DIY: B7 Audi A4 2.0T FWD Coolant Temp Sensor (CTS)
#1
 12-18-2012, 01:55 PM


If you're getting a P2181 code its possible you need to replace your CTS. It seems like these things go bad all the time. Here's a cheap and easy DIY:
DIY for B7 Audi A4 2.0T FWD Coolant Temperature Sensor (CTS)
Here’s what you need:
Part # 06A919501A – Coolant Temp Sensor (GREY 2 pin)
Part # N90316802 – O ring
Part # 032121142 – plastic retaining clip
Flat head screw driver
Flashlight
Mirror
Step 1: Wait until the engine is very cold. You’ll be working behind the engine block near the cat and it gets pretty hot. Remove Engine Cover.
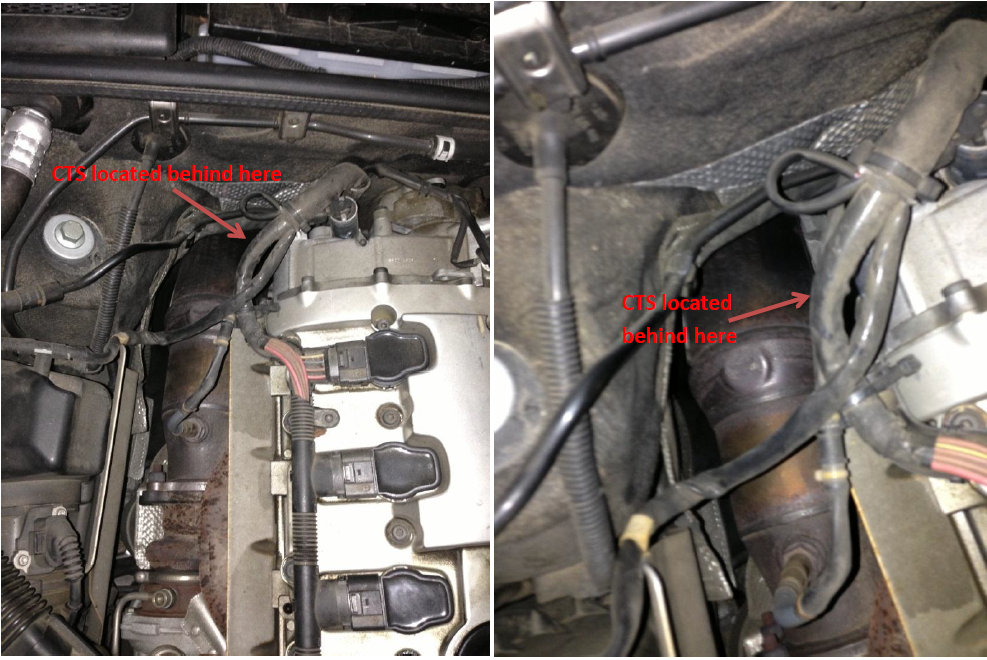
Step 2: Use a flashlight and mirror to get a visual on the CTS.


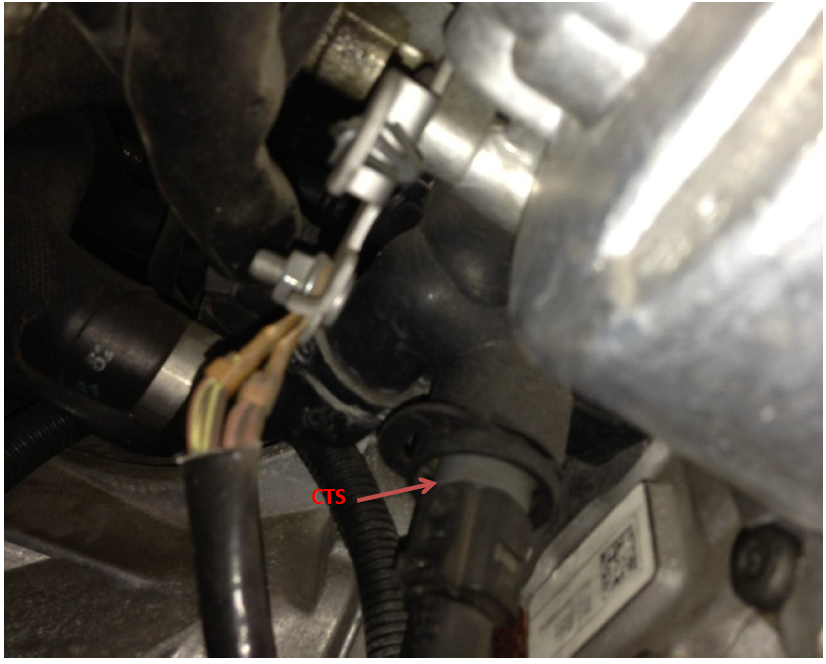
Step 3: Insert a flathead screwdriver into the small opening (indicated by the arrow above) on the electrical connector and gently pry up. Remove electrical connector and move it out of your way.
Step 4: Insert a flathead screwdriver into the small opening (indicated by the arrow above) under the plastic retaining clip and gently pry up. Remove plastic clip and try not to drop it. You may need it as back up later.
Step 5: Gently pull out the old CTS. Some coolant will come out but not too much. Locate and set aside the old O-ring on the top of the sensor. If you can’t see it, it’s up inside the plastic pipe where the CTS sits. Reach in there and pull it out. You may need it as back up later.
Step 6: Place new O-ring on top side of the new CTS and insert electrical connector into new CTS. Firmly push new CTS into the plastic pipe where the coolant came out. You do this pretty much blind so you have to feel around and make sure the new CTS is seated correctly.
Step 7: Place new plastic retaining clip into clip grooves until it clicks into place. This is somewhat difficult and frustrating because you have to keep the CTS seated correctly while orienting the clip to click into place in the grooves. You do all of this blind. It took me about 20 minutes to finally get it. If you drop the new O-ring or new plastic clip in the process, it’s possible it will be tough to find or retrieve from behind the engine block. Obviously you can use the old ones if this happens.
That’s it!
DIY for B7 Audi A4 2.0T FWD Coolant Temperature Sensor (CTS)
Here’s what you need:
Part # 06A919501A – Coolant Temp Sensor (GREY 2 pin)
Part # N90316802 – O ring
Part # 032121142 – plastic retaining clip
Flat head screw driver
Flashlight
Mirror
Step 1: Wait until the engine is very cold. You’ll be working behind the engine block near the cat and it gets pretty hot. Remove Engine Cover.
Step 2: Use a flashlight and mirror to get a visual on the CTS.
Step 3: Insert a flathead screwdriver into the small opening (indicated by the arrow above) on the electrical connector and gently pry up. Remove electrical connector and move it out of your way.
Step 4: Insert a flathead screwdriver into the small opening (indicated by the arrow above) under the plastic retaining clip and gently pry up. Remove plastic clip and try not to drop it. You may need it as back up later.
Step 5: Gently pull out the old CTS. Some coolant will come out but not too much. Locate and set aside the old O-ring on the top of the sensor. If you can’t see it, it’s up inside the plastic pipe where the CTS sits. Reach in there and pull it out. You may need it as back up later.
Step 6: Place new O-ring on top side of the new CTS and insert electrical connector into new CTS. Firmly push new CTS into the plastic pipe where the coolant came out. You do this pretty much blind so you have to feel around and make sure the new CTS is seated correctly.
Step 7: Place new plastic retaining clip into clip grooves until it clicks into place. This is somewhat difficult and frustrating because you have to keep the CTS seated correctly while orienting the clip to click into place in the grooves. You do all of this blind. It took me about 20 minutes to finally get it. If you drop the new O-ring or new plastic clip in the process, it’s possible it will be tough to find or retrieve from behind the engine block. Obviously you can use the old ones if this happens.
That’s it!
#2
03-09-2013, 04:54 PM
Dude, super write up, great pics and accurate! thanks!!!
I assumed my CTS needed replaced based on the P2181 but after changing it out, the same code again has reappeared; therefore i will change out the thermostat.
Have you done this yet and or is there a write up you can show me or provide the link for a DIY?
Thanks again!
Rich
I assumed my CTS needed replaced based on the P2181 but after changing it out, the same code again has reappeared; therefore i will change out the thermostat.
Have you done this yet and or is there a write up you can show me or provide the link for a DIY?
Thanks again!
Rich
#3
03-10-2013, 10:17 AM
Dude, super write up, great pics and accurate! thanks!!!
I assumed my CTS needed replaced based on the P2181 but after changing it out, the same code again has reappeared; therefore i will change out the thermostat.
Have you done this yet and or is there a write up you can show me or provide the link for a DIY?
Thanks again!
Rich
I assumed my CTS needed replaced based on the P2181 but after changing it out, the same code again has reappeared; therefore i will change out the thermostat.
Have you done this yet and or is there a write up you can show me or provide the link for a DIY?
Thanks again!
Rich
Rich: Yes I replaced my thermostat a couple months ago so it fresh on my mind. Happy to answer any questions or help out where I can. It was basically my first (other than the CTS) DIY I've ever done so you can definitely handle it. Not too bad, but takes some patience. Try the link below. Its for a A4 1.8T but its pretty similar.
try this link, lemme know if it doesn't work for some reason:
https://docs.google.com/file/d/0B2dG...it?usp=sharing
Here are some tips:
(1) Get this: Home Page > Search > 06D121111G2KT > ES#2586519 Thermostat Replacement Kit - 06D121111G2KT
(2) One of these makes life way easier:
(3) This came in handy as well. But not totally necessary :
(4) you ABSOLUTELY need one of these
(5) you don't need to remove throttle body (as described in the above link)
(6) you might need a buddy to get the bottom quick connect hose off. We used a rubber mallet/hammer and a screwdriver. One guy held the quick connect hose, other guy tapped the top of the connect with the screwdriver/mallet until it finally popped off. This is probably the only semi-difficult part about the job.
(7) drain your coolant before hand.
(8) a torque wrench is a "nice-to-have" for installing the new thermostat, but not totally required.
(9) need an 8 or 10 mm hex bit to remove the alternator, need a long 17 mm box end wrench to get the serpentine belt off
(10) might need to replace the O-ring on the middle hose. I think its this Home Page > Search > N90316802 > ES#264172 Sealing O-Ring - Priced Each (19.6x3.6mm) - N90316802 but I'm not totally sure.
Hope this helps. Feel free to PM me if you have any other questions.
#4
03-10-2013, 07:44 PM
Holy crap, I don't think i want to do this.
I saw another vid of a dude replacing his thermostat on a 1.8 also but it was a more traditional thermostat than what i just viewed, and it was located near the bottom of the block near the radiator; and it looked rather easy unlike this large thermostat housing.
Rich
I saw another vid of a dude replacing his thermostat on a 1.8 also but it was a more traditional thermostat than what i just viewed, and it was located near the bottom of the block near the radiator; and it looked rather easy unlike this large thermostat housing.
Rich
#6
03-17-2013, 08:35 AM

CTS is a good first part to throw at P2181, but it's more likely a thermostat with that code. I had my temp sensor replaced, but the code came back, so I got a local German specialist shop to do my t-stat for about $350 (well worth it considering the part is about $80 and it would have probably taken me all day to do it). The dealership quoted me $500 and I laughed at them.
#7
12-14-2014, 03:42 PM

Thanks for the great instructions and photos. One thing I want to add is about the O Ring. Once I pulled out the sensor and the coolant started to flow.. I noticed the O Ring was not on the sensor. Before searching all around the engine compartment, I stuck my finger up in where the sensor goes. The O Ring was stuck up in there still. I'd recommend checking to make sure it's not in there, when putting the new sensor back in. I'm assuming with double O Rings, it'll leak, and you probably won't even get to put the retaining clip back in place.
Very easy process. Took me literally 8 minutes.
Very easy process. Took me literally 8 minutes.
#8
01-04-2017, 11:54 AM

If you're getting a P2181 code its possible you need to replace your CTS. It seems like these things go bad all the time. Here's a cheap and easy DIY:
DIY for B7 Audi A4 2.0T FWD Coolant Temperature Sensor (CTS)
Here’s what you need:
Part # 06A919501A – Coolant Temp Sensor (GREY 2 pin)
Part # N90316802 – O ring
Part # 032121142 – plastic retaining clip
Flat head screw driver
Flashlight
Mirror
Step 1: Wait until the engine is very cold. You’ll be working behind the engine block near the cat and it gets pretty hot. Remove Engine Cover.

Step 2: Use a flashlight and mirror to get a visual on the CTS.

Step 3: Insert a flathead screwdriver into the small opening (indicated by the arrow above) on the electrical connector and gently pry up. Remove electrical connector and move it out of your way.
Step 4: Insert a flathead screwdriver into the small opening (indicated by the arrow above) under the plastic retaining clip and gently pry up. Remove plastic clip and try not to drop it. You may need it as back up later.
Step 5: Gently pull out the old CTS. Some coolant will come out but not too much. Locate and set aside the old O-ring on the top of the sensor. If you can’t see it, it’s up inside the plastic pipe where the CTS sits. Reach in there and pull it out. You may need it as back up later.
Step 6: Place new O-ring on top side of the new CTS and insert electrical connector into new CTS. Firmly push new CTS into the plastic pipe where the coolant came out. You do this pretty much blind so you have to feel around and make sure the new CTS is seated correctly.
Step 7: Place new plastic retaining clip into clip grooves until it clicks into place. This is somewhat difficult and frustrating because you have to keep the CTS seated correctly while orienting the clip to click into place in the grooves. You do all of this blind. It took me about 20 minutes to finally get it. If you drop the new O-ring or new plastic clip in the process, it’s possible it will be tough to find or retrieve from behind the engine block. Obviously you can use the old ones if this happens.
That’s it!
DIY for B7 Audi A4 2.0T FWD Coolant Temperature Sensor (CTS)
Here’s what you need:
Part # 06A919501A – Coolant Temp Sensor (GREY 2 pin)
Part # N90316802 – O ring
Part # 032121142 – plastic retaining clip
Flat head screw driver
Flashlight
Mirror
Step 1: Wait until the engine is very cold. You’ll be working behind the engine block near the cat and it gets pretty hot. Remove Engine Cover.
Step 2: Use a flashlight and mirror to get a visual on the CTS.
Step 3: Insert a flathead screwdriver into the small opening (indicated by the arrow above) on the electrical connector and gently pry up. Remove electrical connector and move it out of your way.
Step 4: Insert a flathead screwdriver into the small opening (indicated by the arrow above) under the plastic retaining clip and gently pry up. Remove plastic clip and try not to drop it. You may need it as back up later.
Step 5: Gently pull out the old CTS. Some coolant will come out but not too much. Locate and set aside the old O-ring on the top of the sensor. If you can’t see it, it’s up inside the plastic pipe where the CTS sits. Reach in there and pull it out. You may need it as back up later.
Step 6: Place new O-ring on top side of the new CTS and insert electrical connector into new CTS. Firmly push new CTS into the plastic pipe where the coolant came out. You do this pretty much blind so you have to feel around and make sure the new CTS is seated correctly.
Step 7: Place new plastic retaining clip into clip grooves until it clicks into place. This is somewhat difficult and frustrating because you have to keep the CTS seated correctly while orienting the clip to click into place in the grooves. You do all of this blind. It took me about 20 minutes to finally get it. If you drop the new O-ring or new plastic clip in the process, it’s possible it will be tough to find or retrieve from behind the engine block. Obviously you can use the old ones if this happens.
That’s it!
#9
01-05-2017, 02:38 PM
I wasn't able to access from below but I also did not have a lift and it was my first DIY. Good luck!
#10
01-05-2017, 02:41 PM
Thanks! I wish I had a lift! I'll drive it up onto ramps and see how that goes.