Tech Tips Thursday
#11
 02-12-2015, 05:12 PM


A tip for working with waxes, paint sealants or coatings that are new to you
By Mike Phillips
Tip: Test to small area first
Anytime you're going to use a wax, paint sealant or coating that is a product you've never used before, especially if you're planning on applying it to the entire car... to get a feel for how the product applies and most important, how it wipes off, first test the product to a small area.
This way you'll be familiar with the application and wipe-off characteristics for the specific product before applying to the entire car.
A small area = about a foot squared
The average size square microfiber towel is 16" by 16", which is a little larger than a foot squared. So for your test section, lay a clean microfiber towel out flat, like this,
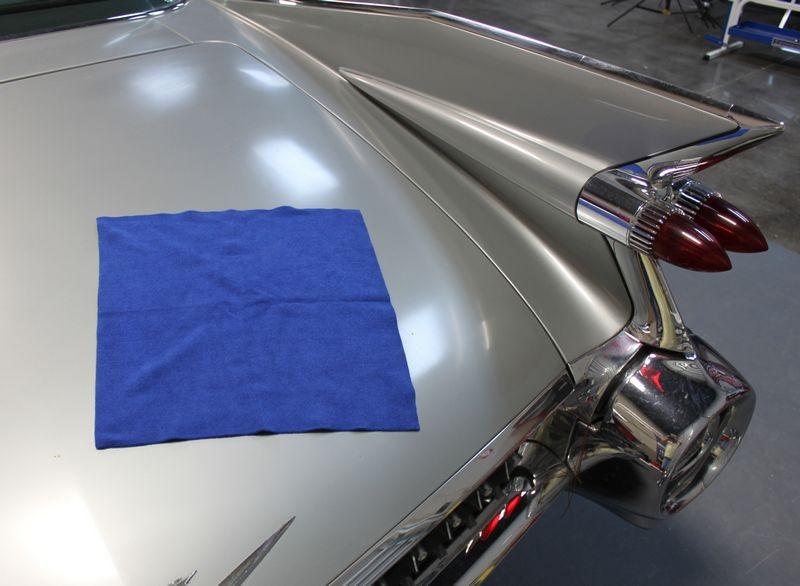
Then use this area as a guide as to how large of an area to apply the product onto in order to get a good feel for both the application and wipe-off characteristics of the new-to-you product.
Follow the manufactures directions
Manufactures know their product formulas best so take a moment to read the directions for application and removal on the label and then follow them as recommended.
Waxes and Paint Sealants that dry
If the directions state that you should allow the product to dry to haze before removal then allow the product to dry before removing it.
The Swipe Test
Here's a handy test to check and see if a wax or paint sealant is dry and ready to remove, The Swipe Test
Wipe-on, wipe-off waxes and paint sealants
Some products are formulated to be removed before they dry, these are called wipe-on, wipe-off waxes. If you're using a wipe-on, wipe-off wax then immediately after applying the wax to the entire car go ahead and remove it.
Products vary and climatic conditions vary
The chemistry between products can be very different; some products wipe off a tick on the difficult side while some products wipe off incredibly easy.
Products perform differently in different environmental conditions; a product that applies and remove easily in a humid area may apply and wipe off with great difficulty in another geographical location that's hot and dry.
The idea behind this tip is for you to become acquainted with a product you've never used before in your specific geographical, environmental and climatic location.
For some people, what this may teach them is the importance of applying a thin coating and if you're new to the world of detailing in general and waxing by hand in specific, you might not know 100% exactly what is meant by a thin coating and you don't want to learn what thin means the hard way.
By Mike Phillips
Tip: Test to small area first
Anytime you're going to use a wax, paint sealant or coating that is a product you've never used before, especially if you're planning on applying it to the entire car... to get a feel for how the product applies and most important, how it wipes off, first test the product to a small area.
This way you'll be familiar with the application and wipe-off characteristics for the specific product before applying to the entire car.
A small area = about a foot squared
The average size square microfiber towel is 16" by 16", which is a little larger than a foot squared. So for your test section, lay a clean microfiber towel out flat, like this,
Then use this area as a guide as to how large of an area to apply the product onto in order to get a good feel for both the application and wipe-off characteristics of the new-to-you product.
Follow the manufactures directions
Manufactures know their product formulas best so take a moment to read the directions for application and removal on the label and then follow them as recommended.
Waxes and Paint Sealants that dry
If the directions state that you should allow the product to dry to haze before removal then allow the product to dry before removing it.
The Swipe Test
Here's a handy test to check and see if a wax or paint sealant is dry and ready to remove, The Swipe Test
Wipe-on, wipe-off waxes and paint sealants
Some products are formulated to be removed before they dry, these are called wipe-on, wipe-off waxes. If you're using a wipe-on, wipe-off wax then immediately after applying the wax to the entire car go ahead and remove it.
Products vary and climatic conditions vary
The chemistry between products can be very different; some products wipe off a tick on the difficult side while some products wipe off incredibly easy.
Products perform differently in different environmental conditions; a product that applies and remove easily in a humid area may apply and wipe off with great difficulty in another geographical location that's hot and dry.
The idea behind this tip is for you to become acquainted with a product you've never used before in your specific geographical, environmental and climatic location.
For some people, what this may teach them is the importance of applying a thin coating and if you're new to the world of detailing in general and waxing by hand in specific, you might not know 100% exactly what is meant by a thin coating and you don't want to learn what thin means the hard way.
#12
02-19-2015, 05:43 PM
Knock out painted roofs first, then tackle the rest of the car...
By Mike Phillips
This topic has come up in the past on this forum and other forums so here's a quick article on a technique that I use when doing multiple-step machine polishing procedures for show car work.
The idea is to knock out the roof from start to finish and then after the roof is completely polished and sealed, then cover it with something soft like a soft flannel bed sheet, and then tackle the rest of the car from the roof line downward.
Here's a couple reasons why to polish out the roof all the way to the wax or sealant step and then work down...
Now follow me on this...
If while you're working on the car you have not "finished section", then you have no way to showcase your work and talent to anyone that happens by, this could be the owner or a potential customer.
If all they can see is a "work in progress", there's nothing to get too excited about...
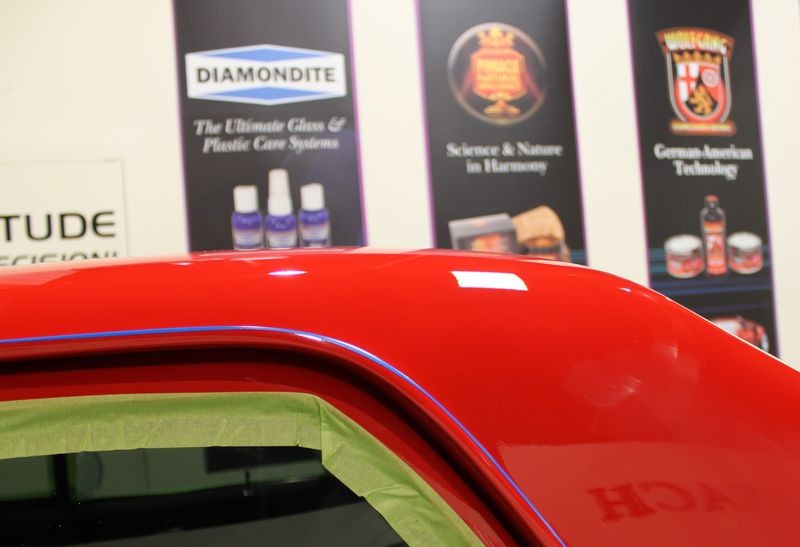
Now if you quickly work the roof all the way to the first application and removal of the wax or paint sealant step, now anytime someone walks by and comments or asks questions about your work you can make a "Presentation".
You talking to owner or potential customer...
In my experience, anyone looking at the finished results can then usually imagine how the rest of the car is going to look and that puts the "Big Picture" together enough for them to appreciate the work you're doing even though the rest of the car maybe taped-off and covered with compound residue...
That can be pretty powerful and even more so if there's any "original" paint or un-polished sections left that you can then show them before-and-after, even more so, you can leverage this if you have a Brinkmann Swirl Finder Light handy...
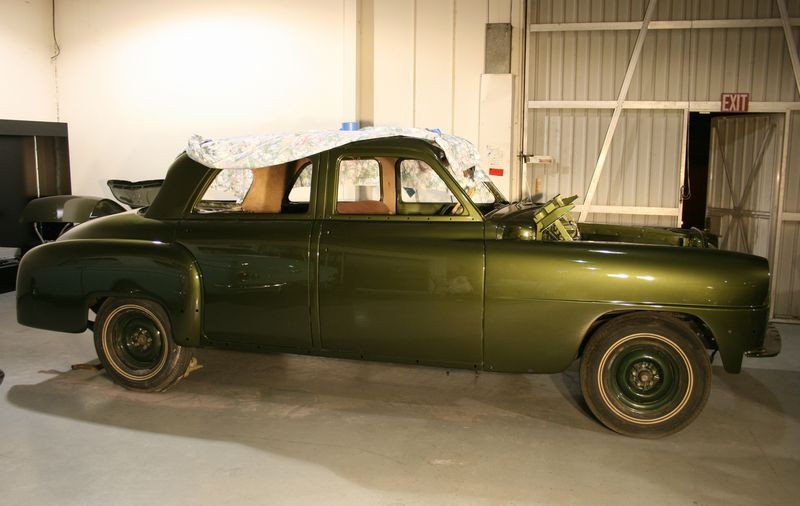
I found this picture of a 1952 DeSoto that Richard Lin and I dampsanded using Porter Cables before dampsanding was a commonly used detailing term.
The flannel bed sheet is covering the roof because at the point in time this picture was taken the paint on the roof had been sanded, compounded, machine polished twice and machine sealed. We didn't want any airborne dust landing and settling on the paint while we continued to work downward.
Of course, it goes without saying that this "style" of doing a multiple-step process to a car is "personal preference" and each person can find a way that works best for them... this is just what tends to work best for me...
By Mike Phillips
1952 DeSoto - Roof has been sanded, cut, polished and waxed and is now protected with a soft flannel sheet
This topic has come up in the past on this forum and other forums so here's a quick article on a technique that I use when doing multiple-step machine polishing procedures for show car work.
The idea is to knock out the roof from start to finish and then after the roof is completely polished and sealed, then cover it with something soft like a soft flannel bed sheet, and then tackle the rest of the car from the roof line downward.
Here's a couple reasons why to polish out the roof all the way to the wax or sealant step and then work down...
1. Reduce the potential
No chance of getting splatter on previously cleaned and polished surfaces below the roof line and then having to wipe the splatter off. This is part of "reducing the potential" for re-instilling scratches that have already been removed. While it's important to be careful and if you are careful then this isn't an issue, it's just my personal preference to know out the roof all the way to wax and not ever have to worry about wiping any kind of residue off a lower panel when moving onto any step after the first step...
2. Marketing
Doing a multiple step process to a car requires a lot of time. From the time you start to the time you've wiped the first coat of wax off could be anywhere from 10 to 12 hours to a couple of days depending upon the project.
Now follow me on this...
If while you're working on the car you have not "finished section", then you have no way to showcase your work and talent to anyone that happens by, this could be the owner or a potential customer.
If all they can see is a "work in progress", there's nothing to get too excited about...
Now if you quickly work the roof all the way to the first application and removal of the wax or paint sealant step, now anytime someone walks by and comments or asks questions about your work you can make a "Presentation".
You talking to owner or potential customer...
"Well I still have the lower portions of the car to finish but come here and check out the paint on the roof, this is how the ENTIRE car is going to look after I wipe off the last coat of wax..."
Then you carefully remove a little piece of painter's tape holding the soft, flannel sheet onto the roof and then pull the sheet back carefully and let whoever is standing there check out a perfectly polished, high gloss finish.In my experience, anyone looking at the finished results can then usually imagine how the rest of the car is going to look and that puts the "Big Picture" together enough for them to appreciate the work you're doing even though the rest of the car maybe taped-off and covered with compound residue...
That can be pretty powerful and even more so if there's any "original" paint or un-polished sections left that you can then show them before-and-after, even more so, you can leverage this if you have a Brinkmann Swirl Finder Light handy...
I found this picture of a 1952 DeSoto that Richard Lin and I dampsanded using Porter Cables before dampsanding was a commonly used detailing term.
The flannel bed sheet is covering the roof because at the point in time this picture was taken the paint on the roof had been sanded, compounded, machine polished twice and machine sealed. We didn't want any airborne dust landing and settling on the paint while we continued to work downward.
Of course, it goes without saying that this "style" of doing a multiple-step process to a car is "personal preference" and each person can find a way that works best for them... this is just what tends to work best for me...
#13
03-05-2015, 05:31 PM
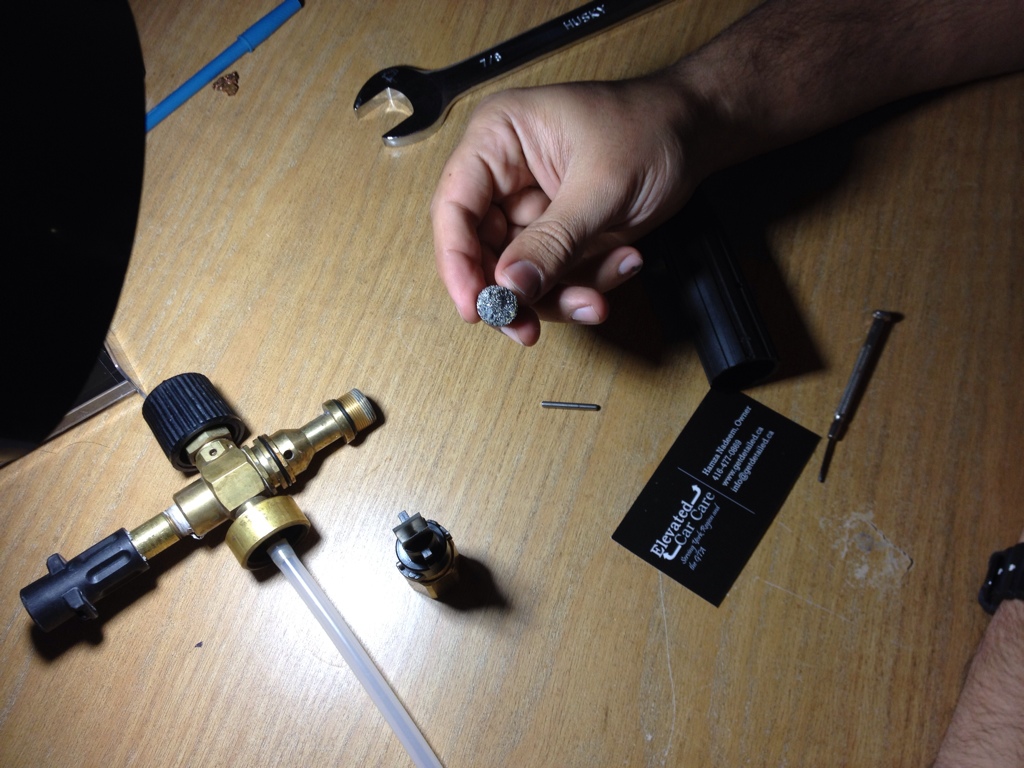
How to clean your foam cannon
By Hamza7
I first thought I owned a Riccardo Foam Cannon but after closer inspection it's just a MTM Hydro.
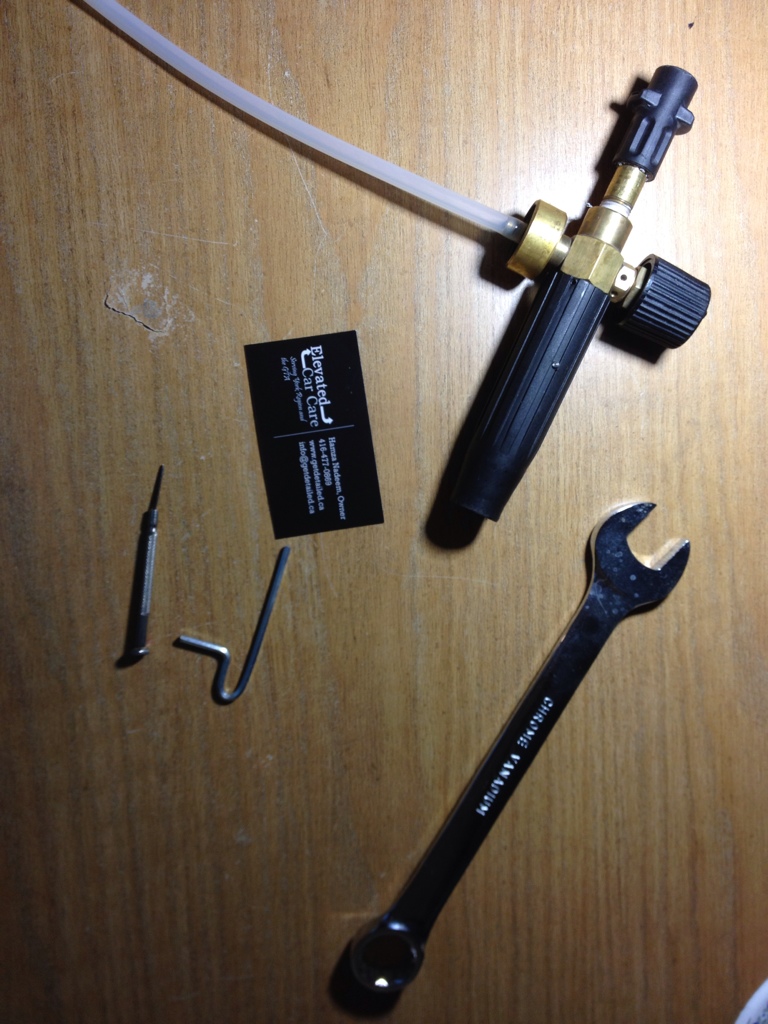
What you'll need for this
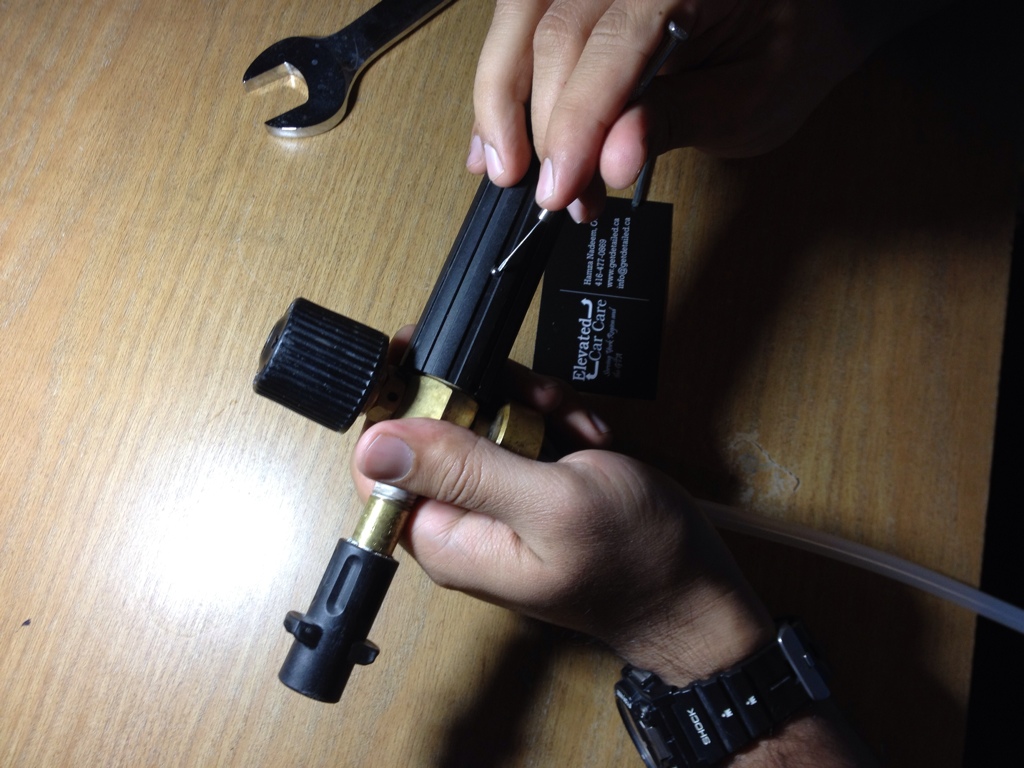
This is the first pin you need to push out with your small diameter tool
Now slowly YANK the black spray adjuster out
Next take your 7/8th inch spanner and grab hold of the the brass thing you see in the picture

After you release the initial tension you should be good to just loosen away by hand
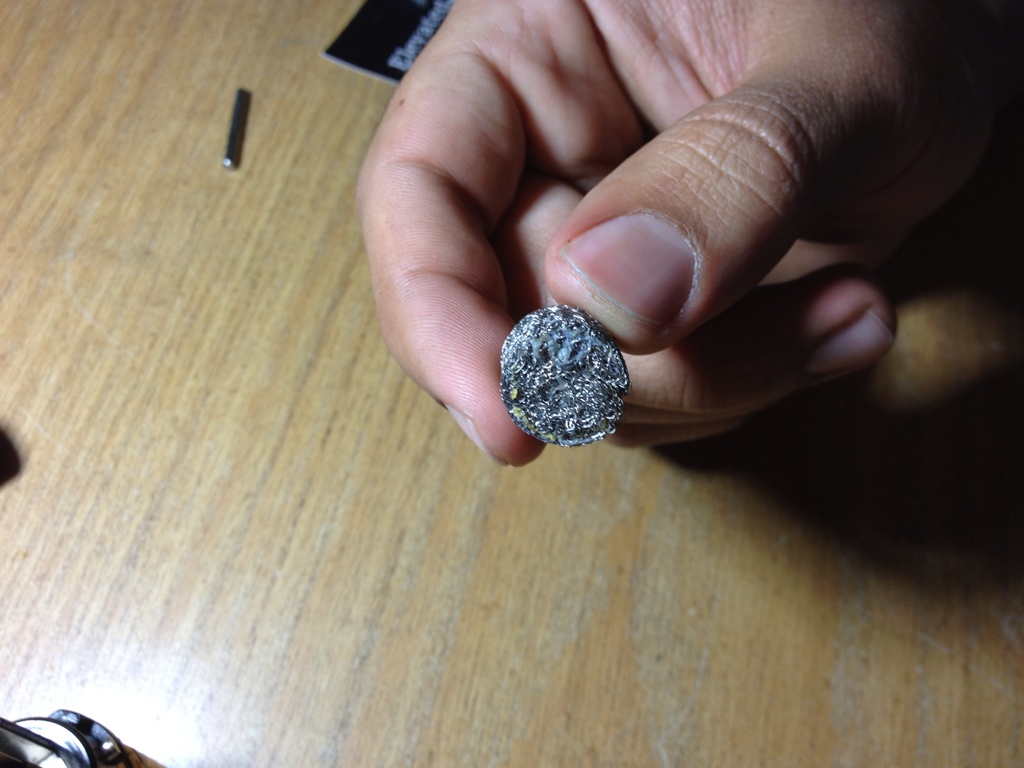
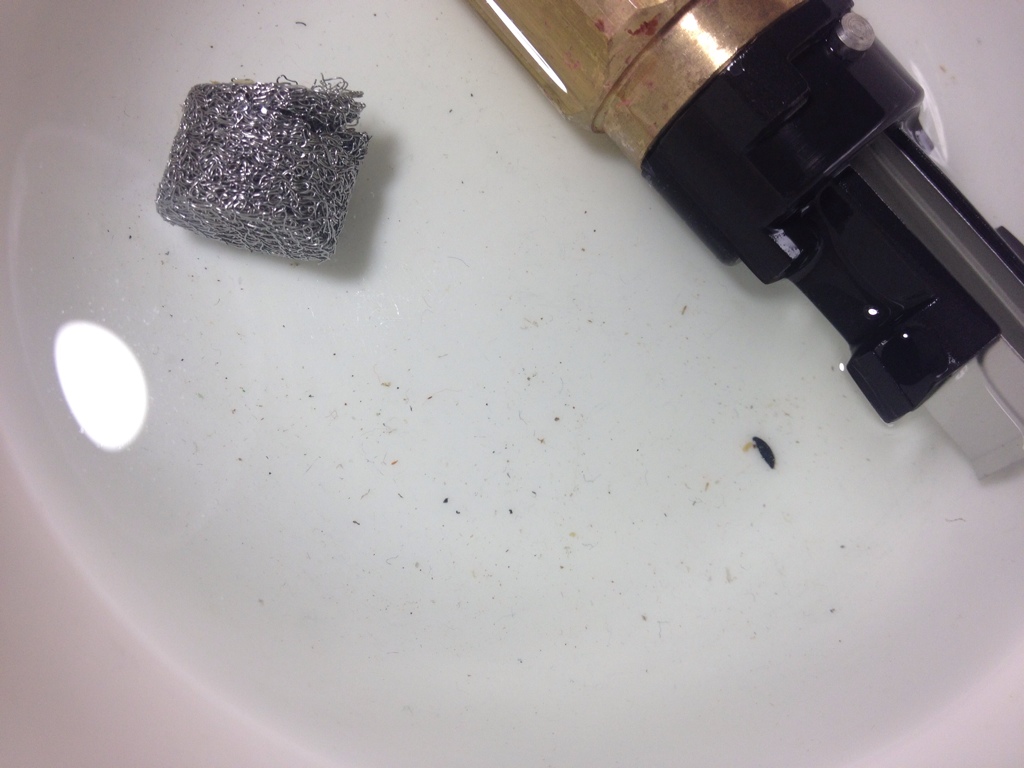
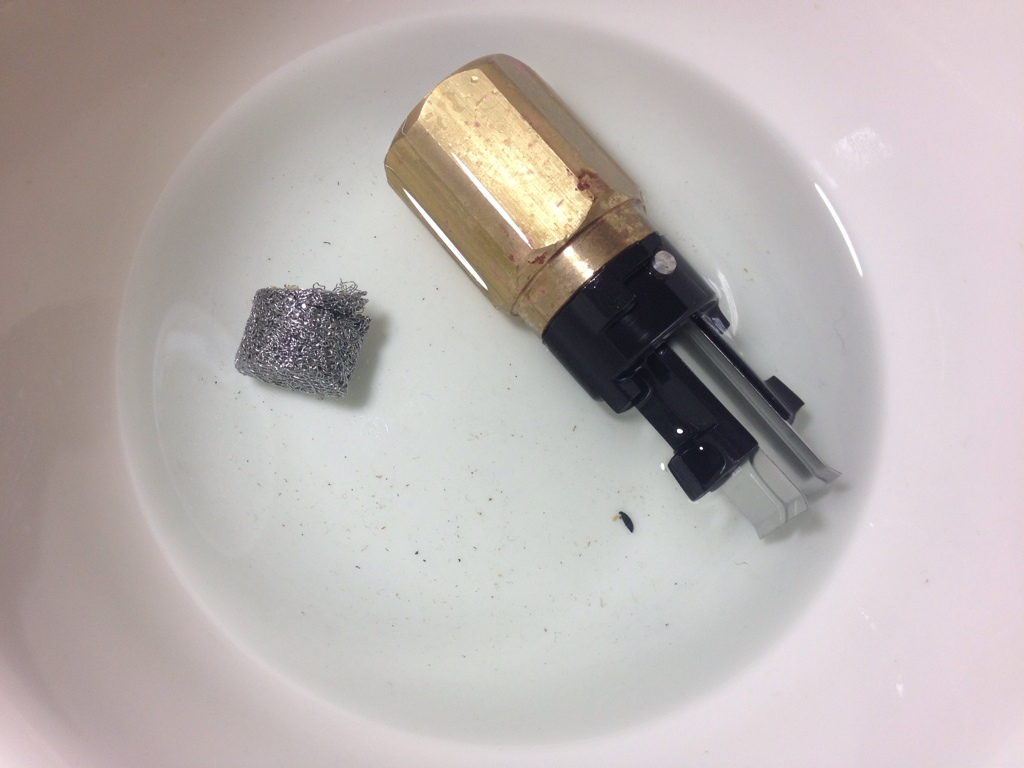
Can you see the little metal filter inside that piece
I use the end of a L key to push it out
Pop, it came out
Can you guys see that filthiness
Next put that piece inside disposable bowl, if you have a plastic one it's way better as I found out that CLR eats away at these things so I
changed it
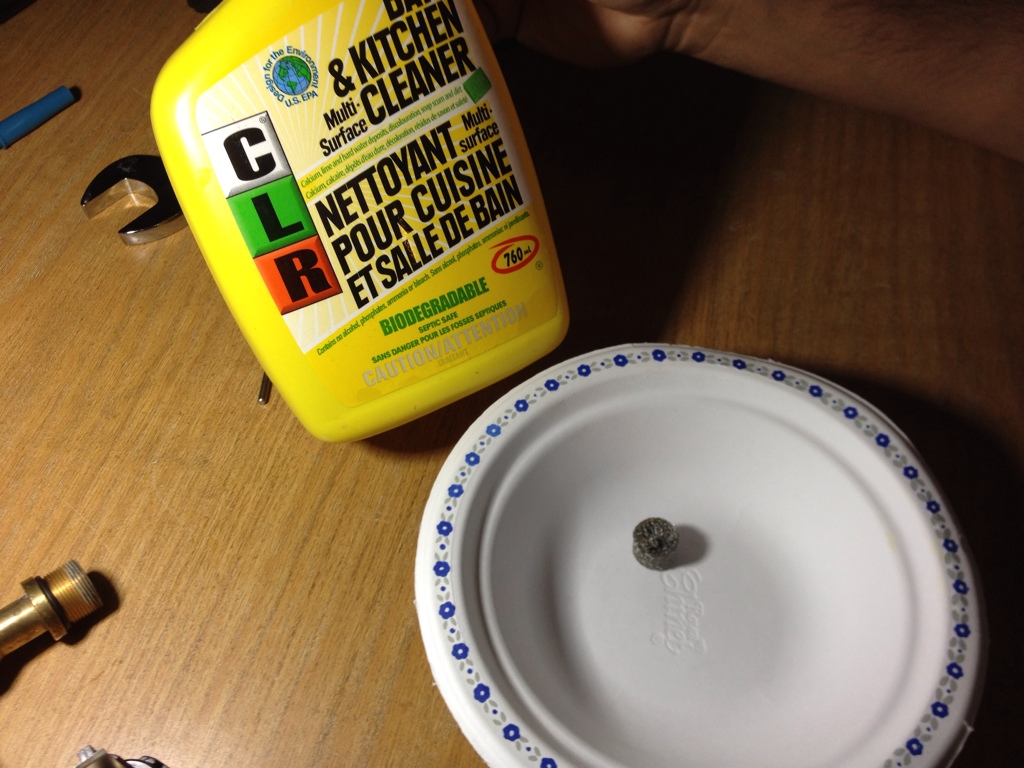
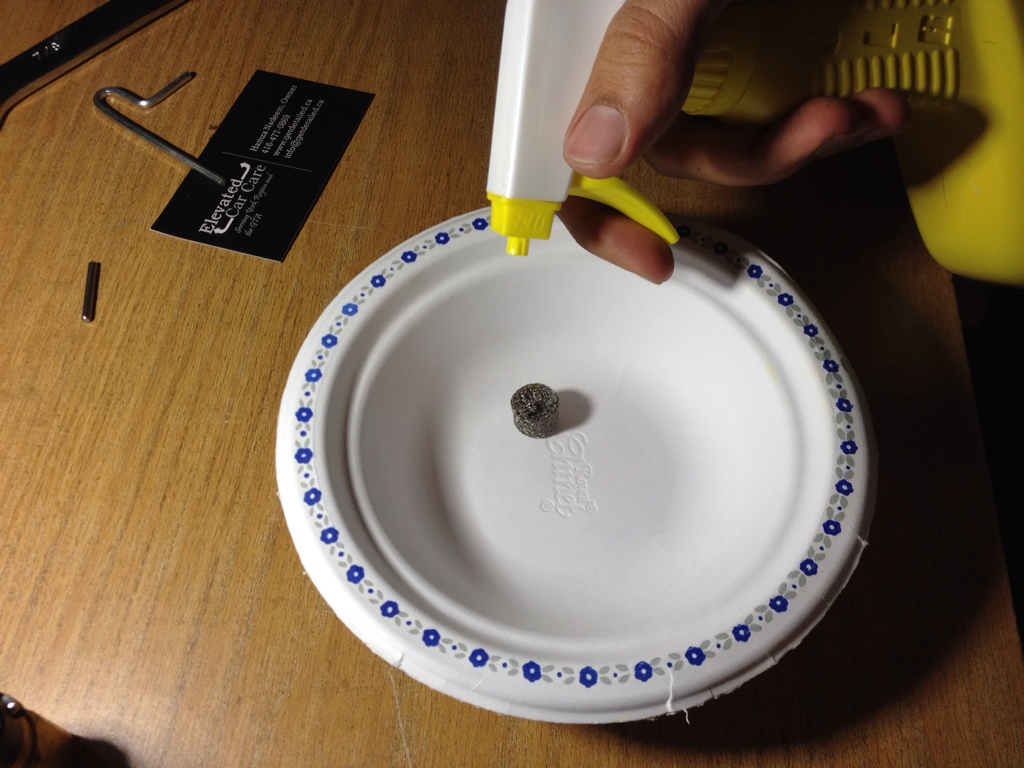
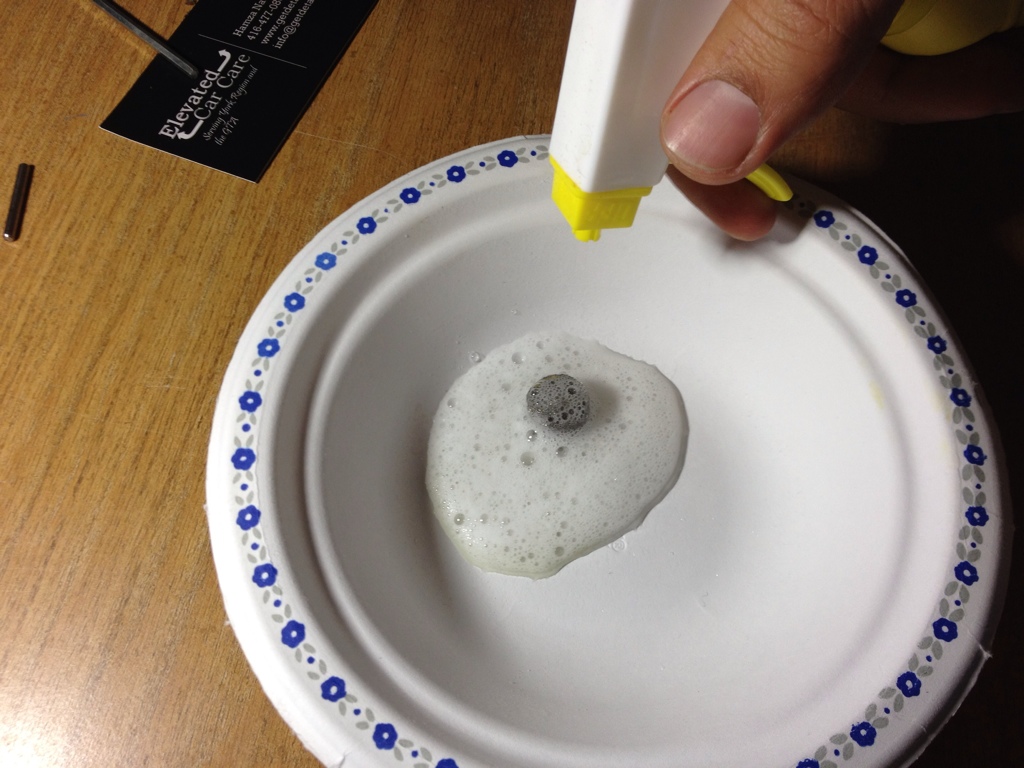
Make sure you coat everything
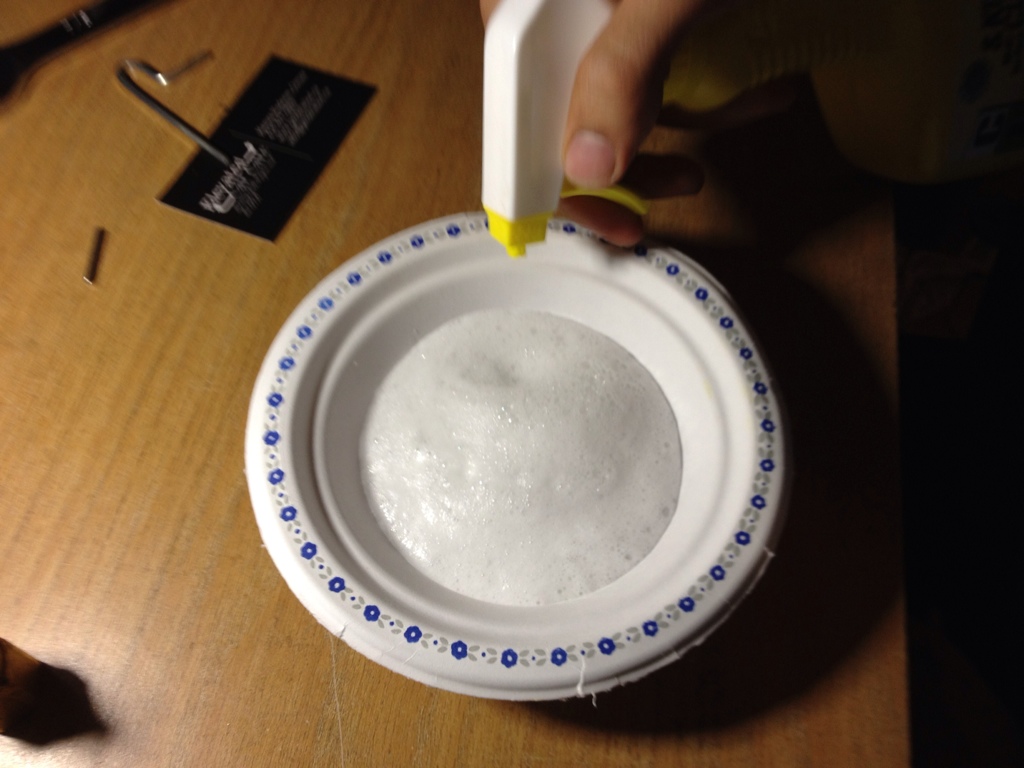
Here I changed the bowl
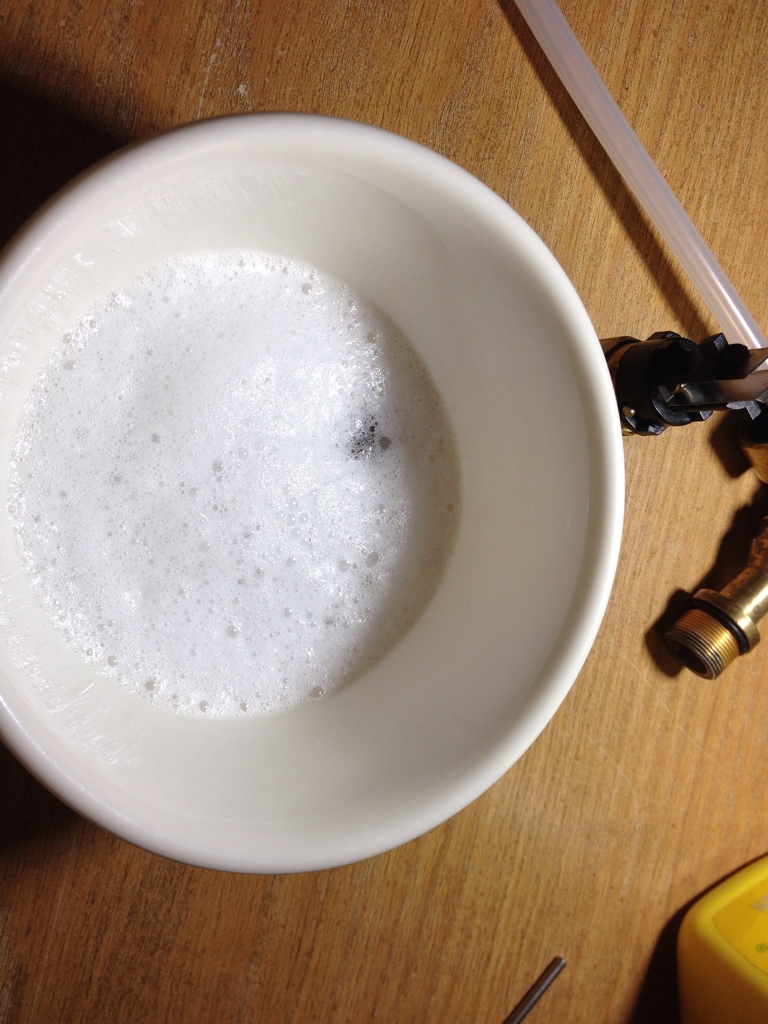
After 12 hours of dewll time
I then ran it under warm water with an old toothbrush to really make sure I got it clean. It's good as new now.
Reassemble in reverse order.
By Hamza7
I first thought I owned a Riccardo Foam Cannon but after closer inspection it's just a MTM Hydro.
What you'll need for this
- Foam Cannon
- A small L key or other small diameter tool
- 7/8th inch spanner or wrench
- Patience
- CLR
- Tooth brush or similar
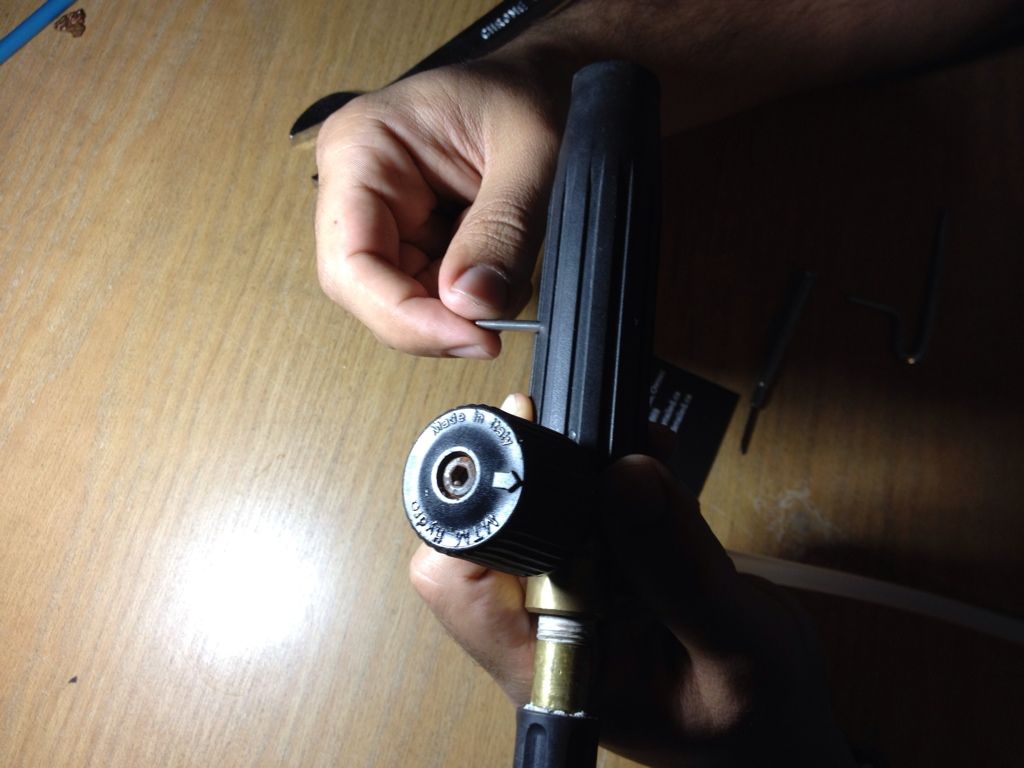
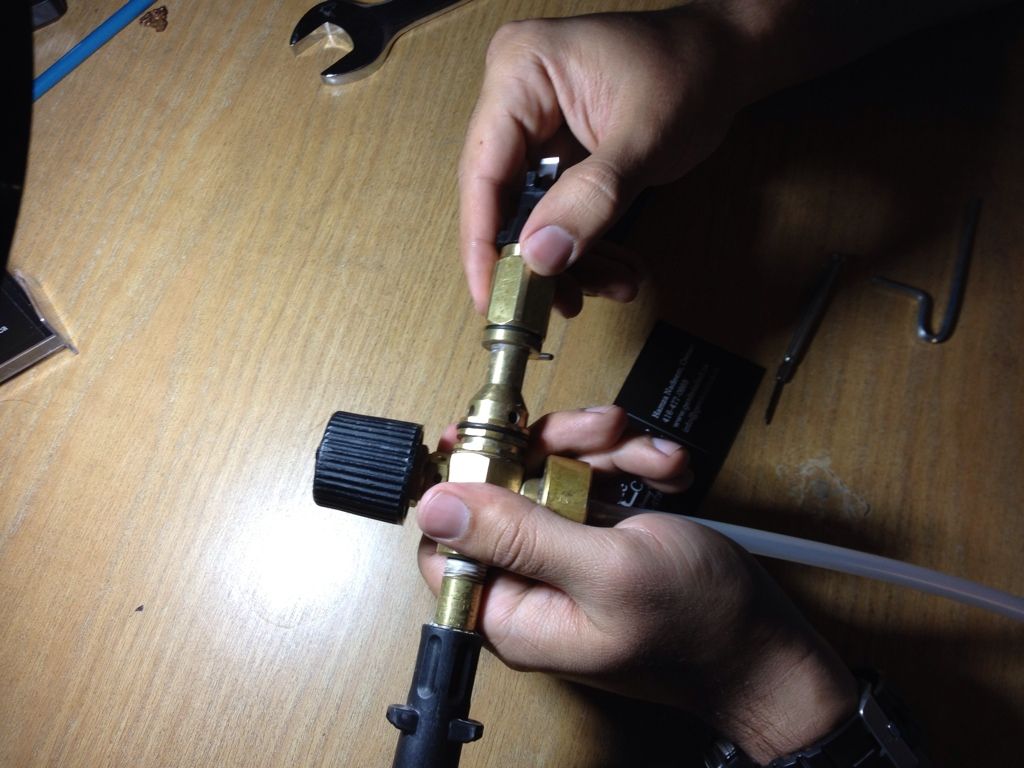
This is the first pin you need to push out with your small diameter tool
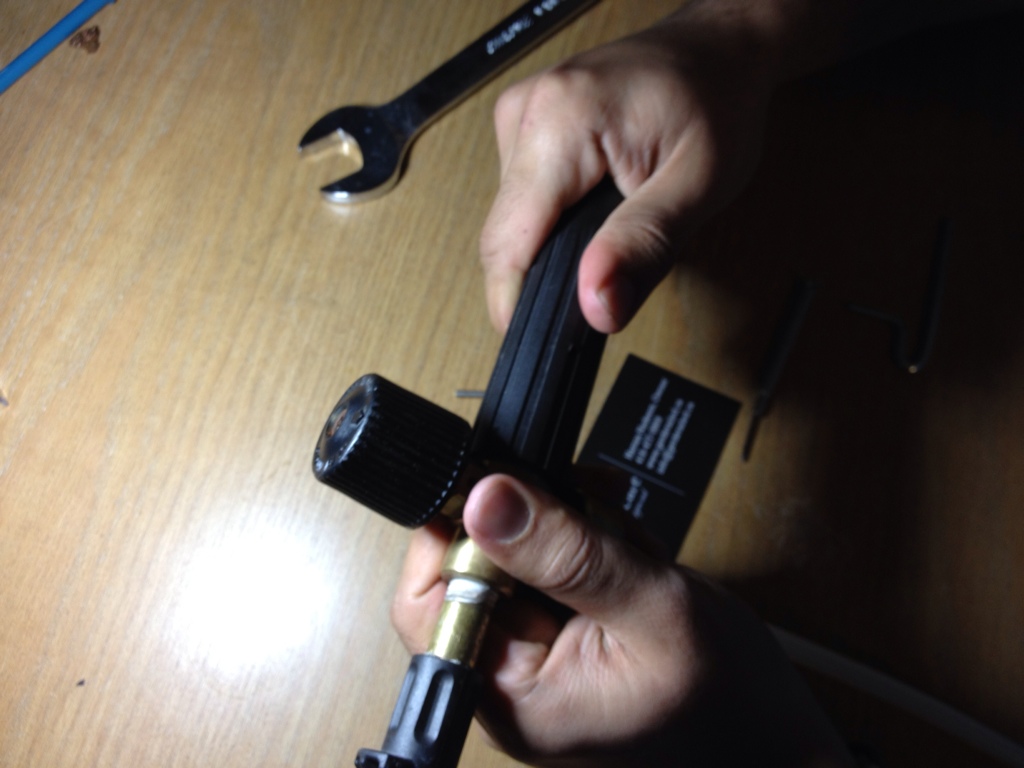
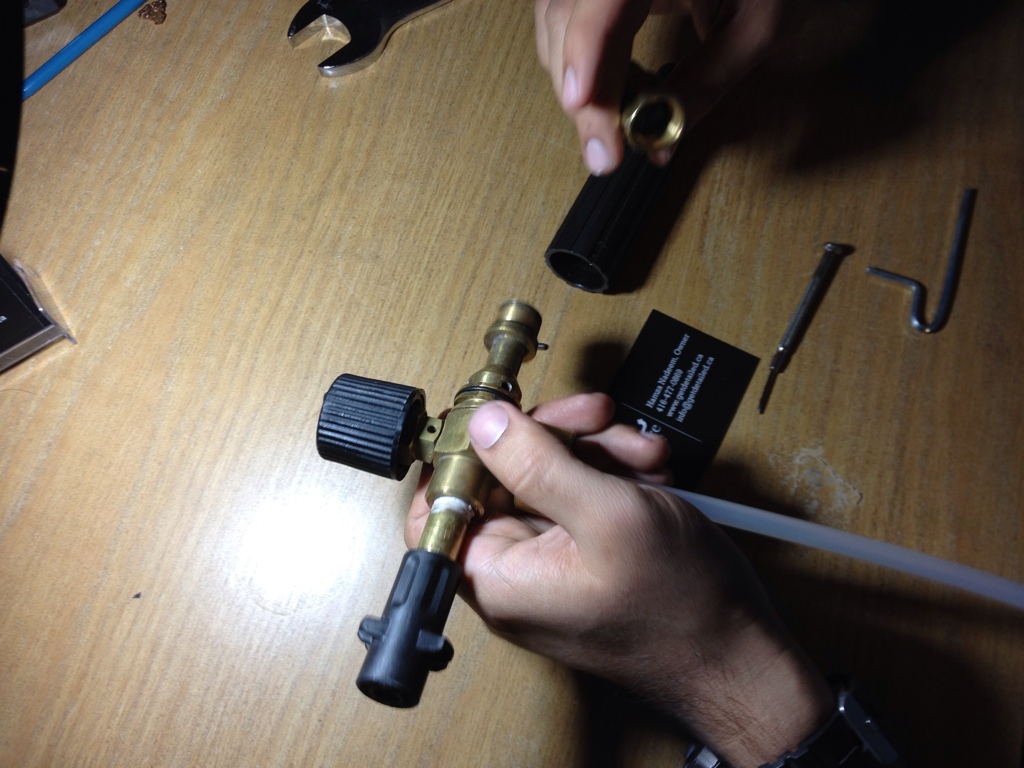
Now slowly YANK the black spray adjuster out
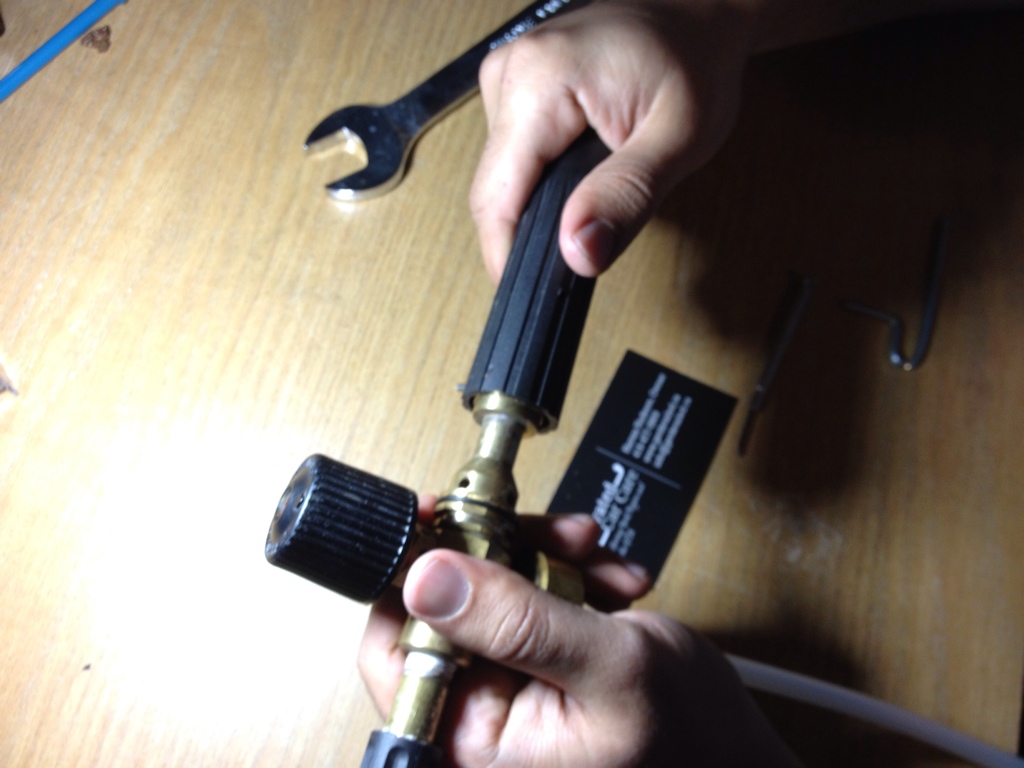
Next take your 7/8th inch spanner and grab hold of the the brass thing you see in the picture
After you release the initial tension you should be good to just loosen away by hand
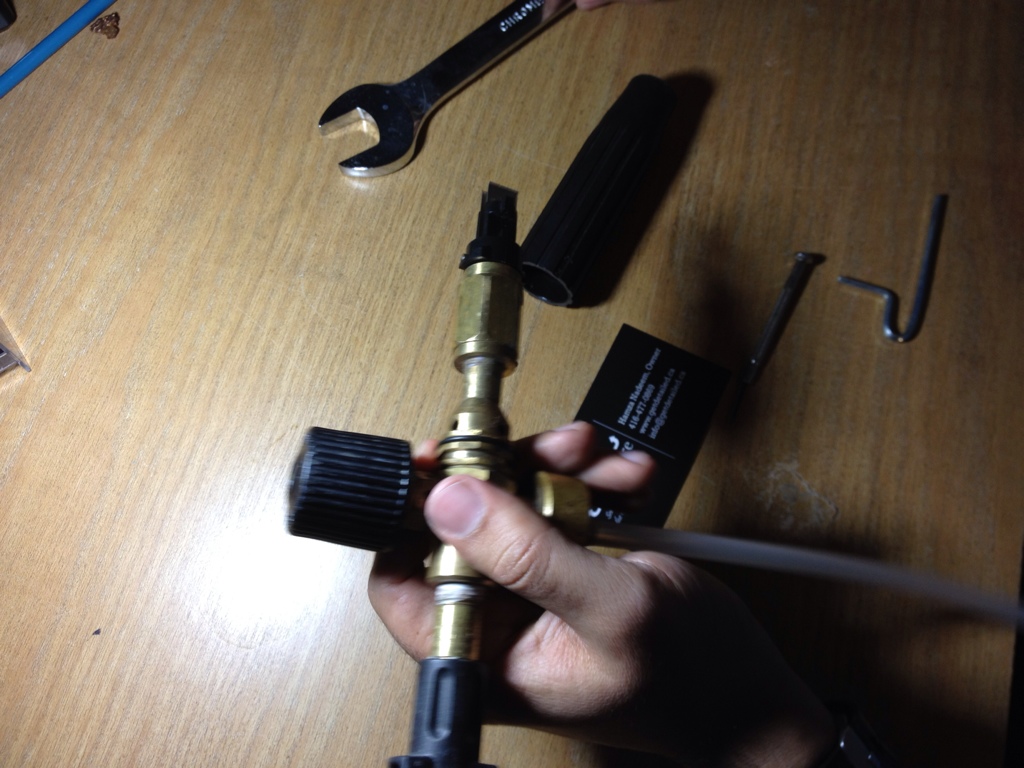
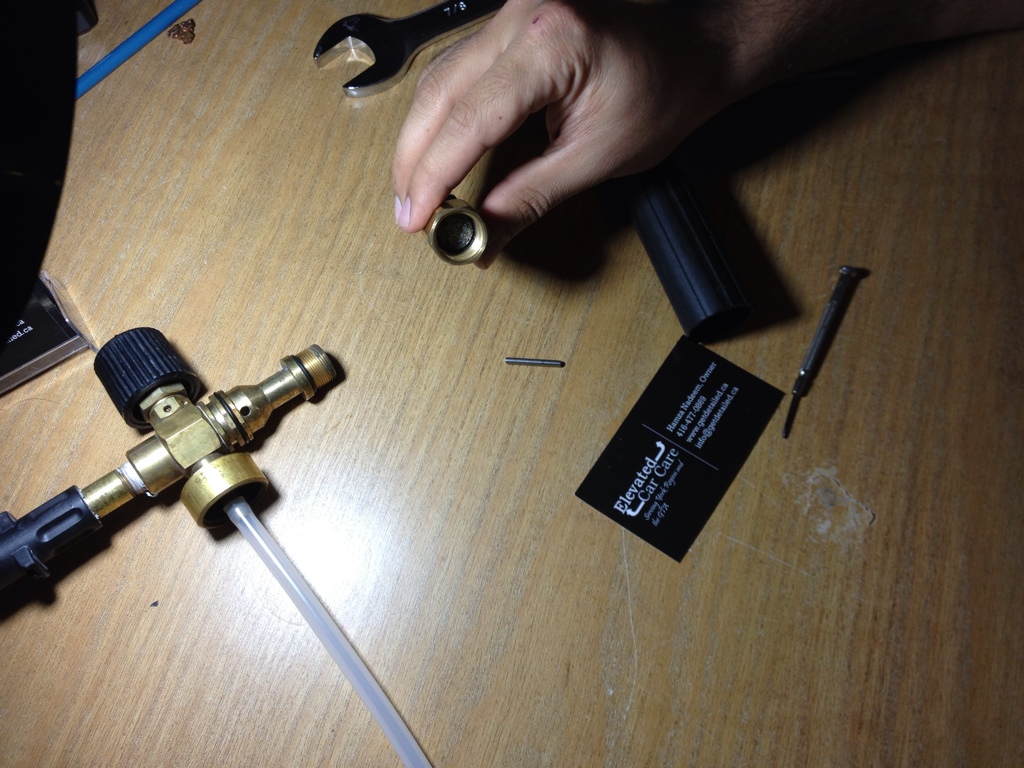
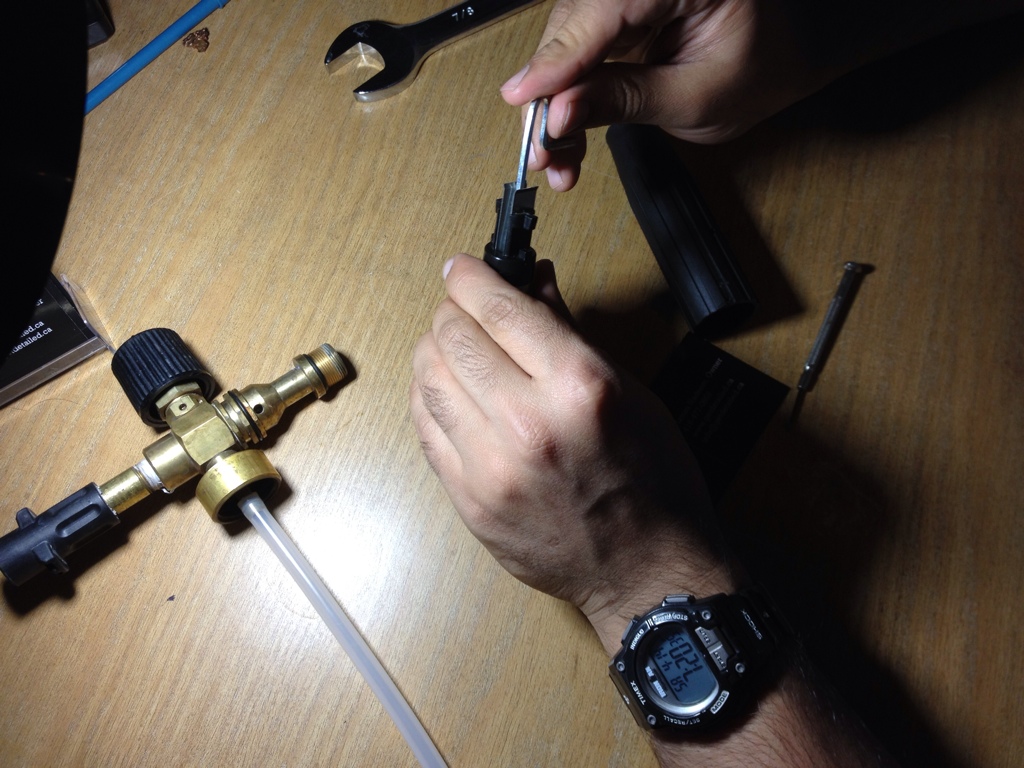
Can you see the little metal filter inside that piece
I use the end of a L key to push it out
Pop, it came out
Can you guys see that filthiness
Next put that piece inside disposable bowl, if you have a plastic one it's way better as I found out that CLR eats away at these things so I
changed it
Make sure you coat everything
Here I changed the bowl
After 12 hours of dewll time
I then ran it under warm water with an old toothbrush to really make sure I got it clean. It's good as new now.
Reassemble in reverse order.
#14
03-12-2015, 02:54 PM
Edging - Buffing the paint around edges
By Mike Phillips
Edging or Edge - Buffing along an edge to knock it out before buffing out the rest of the major portions of the panel. By edging a panel first you don't have to buff near the edges as close when you switch over to a larger pad to buff out the panel.

Edging
I edged the entire car, edging means to go around and remove the sanding marks from all the edges leaving only the major portions of the panels left to compound.
Most people just compound the entire panel from start to finish and that approach works and is used in body shops all the time, but I like to edge all the panels for a couple of reasons.
1) This isn't my car and for that reason I want to be very careful. If it were my car I would edge it, even though it's not my car I treat it like it is my car.
2) Removing the sanding marks around all the edges using a 4" pad is actually very easy to do and gives you GREAT control over the process, especially if you have the Flex 3403 or a lightweight and small rotary buffer to work with. You remove most of the risk for burning and edge or a high point due to the control factor.
Here's the roof edged,


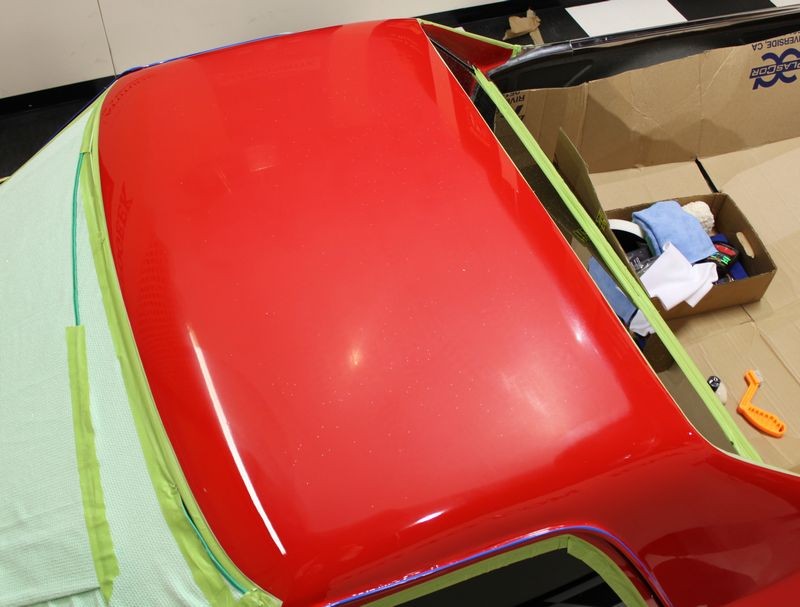

After I finished edging the roof, I was finished edging the entire car. The next step is to remove the sanding marks out of the center portions of the roof, the major portions of the panel. Using #3000 Grit Foam Finishing Discs, means it only takes a just a few minutes to compound out the major flat portions of the roof using the Makita with a W5000 Double Sided Wool Cutting pad with the M105.
The above taken from this thread...
If it has paint... it gets polished...
By Mike Phillips
Edging or Edge - Buffing along an edge to knock it out before buffing out the rest of the major portions of the panel. By edging a panel first you don't have to buff near the edges as close when you switch over to a larger pad to buff out the panel.
Edging
I edged the entire car, edging means to go around and remove the sanding marks from all the edges leaving only the major portions of the panels left to compound.
Most people just compound the entire panel from start to finish and that approach works and is used in body shops all the time, but I like to edge all the panels for a couple of reasons.
1) This isn't my car and for that reason I want to be very careful. If it were my car I would edge it, even though it's not my car I treat it like it is my car.
2) Removing the sanding marks around all the edges using a 4" pad is actually very easy to do and gives you GREAT control over the process, especially if you have the Flex 3403 or a lightweight and small rotary buffer to work with. You remove most of the risk for burning and edge or a high point due to the control factor.
Here's the roof edged,
After I finished edging the roof, I was finished edging the entire car. The next step is to remove the sanding marks out of the center portions of the roof, the major portions of the panel. Using #3000 Grit Foam Finishing Discs, means it only takes a just a few minutes to compound out the major flat portions of the roof using the Makita with a W5000 Double Sided Wool Cutting pad with the M105.
The above taken from this thread...
If it has paint... it gets polished...
#15
03-19-2015, 09:04 AM
How many pads do I need to buff out my car?
By Mike Phillips
Some guys try to buff out entire cars with a single pad per product. That's usually due to inexperience. Thus when they make their initial purchase they don't know to get more pads versus less pads.
Once a person gets into the middle of the correction step and their one or two foam pads are wet with product, (pad saturation), and if they're paying attention they notice it's taking longer to get the same work done than when they first started with a clean, dry pad, then it starts to sink in that more pads are better.
The correction step is the most pad intensive step so get more correction pads, these would be cutting pads.
Polishing goes faster as you're only cleaning up what the correction step left behind and maximizing gloss and clarity.
If you machine apply your waxes and sealants then you really only need one pad for this step.
For a 1965 Mustang or for a 2015 Honda Accord and the paint is trashed, that is filled with swirls, scratches, water spots and oxidation, then here's a good rule of thumb for the optimum number of pads to have on hand assuming you're using a Porter Cable type dual action polisher.
Porter Cable 7424XP
Correction = Orange LC Flat Pad
Polishing = White or Black LC Flat Pad
Sealing = Blue LC Flat Pad
Correction step = 6 pads
1 for the hood
1 for the roof and trunk lid
2 for driver's side
2 for passenger side
Polishing step = 4 pads (You could probably get away with 3 if you use 1 for hood, roof and trunk lid)
1 for the hood
1 for the roof and trunk lid
1 for driver's side
1 for passenger side
Sealing the paint step = 1 waxing pad
Use over entire vehicle
For a Flex 3401
Correction = Orange Hybrid
Polishing = White Hybrid
Sealing = Black Hybrid
From experience, you can push the orange hybrid pads further than most pads plus the Flex 3401 simply doesn't care if the pads are wet with product it's going to rotate them no matter what. Not that using a squishy wet pad is a good thing just saying...
One thing for sure, a fresh, clean, dry orange hybrid pad with a top notch compound cuts fast on the Flex 3401.
Correction step = 6 pads
1 for the hood
1 for the roof and trunk lid
2 for driver's side
2 for passenger side
Polishing step = 4 pads (You could probably get away with 3 if you use 1 for hood, roof and trunk lid)
1 for the hood
1 for the roof and trunk lid
1 for driver's side
1 for passenger side
Sealing the paint step = 1 waxing pad
Use over entire vehicle
For Rupes Bigfoot
Same as pads for a Porter Cable. Basically, more is better and as soon as any pad starts to become wet with product it's going to be faster and more effective to switch to a clean, dry pad.
Big picture...
Being able to switch to a clean dry pad always trumps plowing through with a wet soggy pad. Foam pads become wet or saturated with product the longer you buff, that's just the nature of foam and liquids.
A fresh, clean dry pad works better, whether it's for major correction work or minor polishing work.
A fresh, clean dry pad make you and your time more effective and enables you to do any paint polishing process as fast as possible.
Switching to a fresh clean, dry pad OFTEN means less wear-n-tear on pads in general and you'll get more use or extended life out of each pad overall. Pushing a pad to the point that it's completely saturated with product wears out the foam, the Velcro and the adhesive faster than stopping the use of the pad after a panel or two.
Buffing with wet pads increases the heat retention inside the pad and to the backing plate and heat is never a good thing in any buffing process.
There's only positive aspects to having more pads as compared to having less pads.
Buffing Pads on Autogeek.net
#16
04-02-2015, 02:29 PM
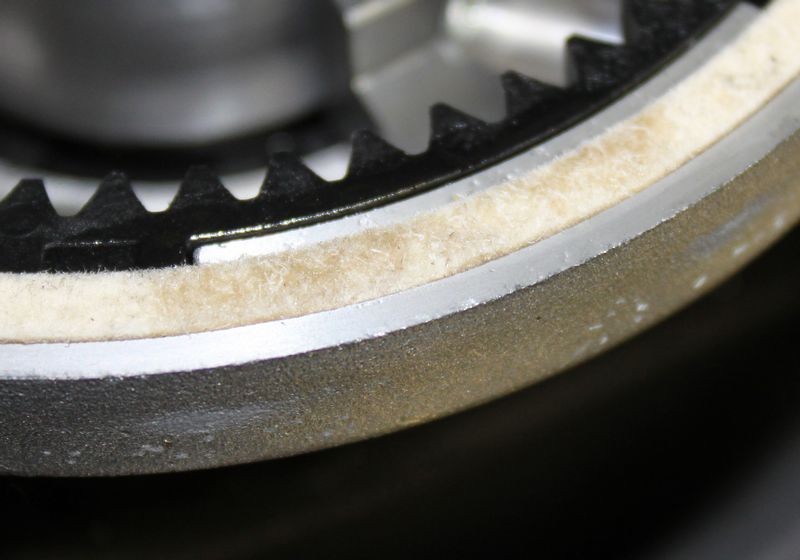
Lubricating the Felt Ring on the Flex 3401
By Mike Phillips
First there is no official recommendation from Flex on this procedure but most owners of the Flex 3401 like to lubricate the Felt Ring to ensure there are no issues between it and the hard plastic backing material that it comes into contact with during operation.
For preventative maintenance reasons, it's okay to lubricate the felt ring after purchase and periodically depending upon how much use your Flex 3401 sees.
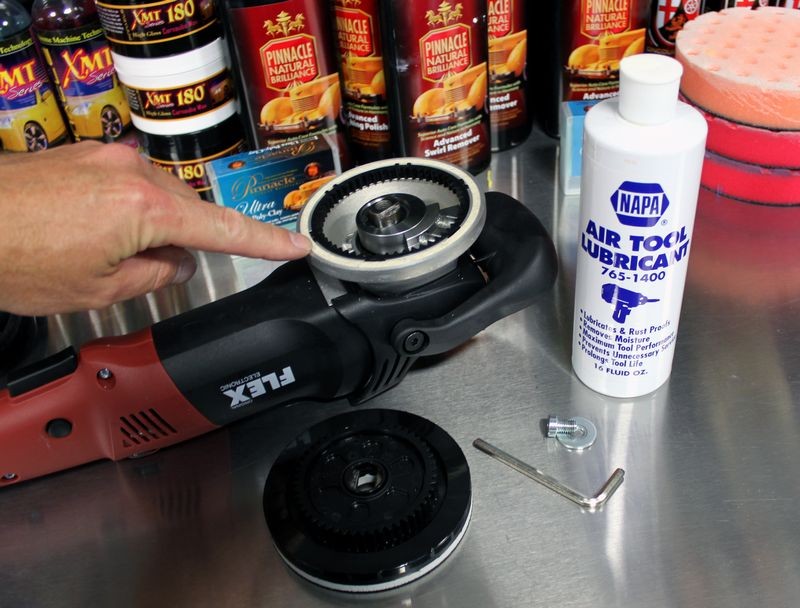
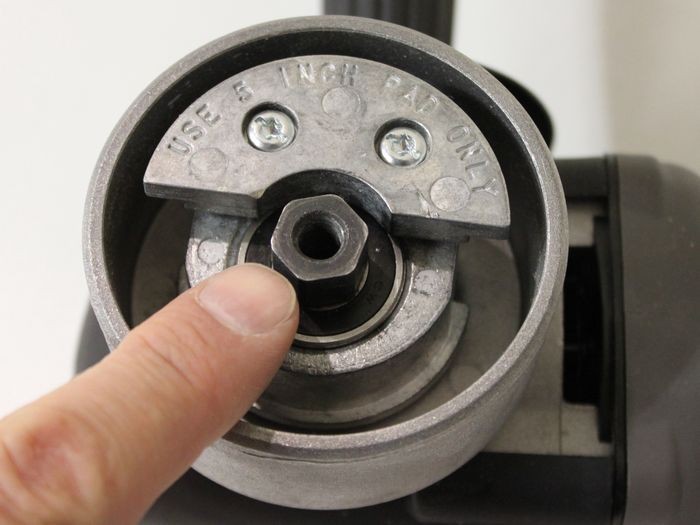
What to use?I went to NAPA and purchased some Air Tool Lubricant, (see picture), but any light machine oil should work including the traditional 3-in-1 Oil.
Here's the felt ring on the Flex 3401
Here I've placed some oil on my finger ...

and then spread it onto the felt ring...

You can see the oil penetrate into the felt to lubricate it and from here it will migrate through the felt...
You could also place some drops around the felt ring and then spread it and work it in using your finger...

This brand new Flex 3401 is ready to go to work for a new project next week...


By Mike Phillips
First there is no official recommendation from Flex on this procedure but most owners of the Flex 3401 like to lubricate the Felt Ring to ensure there are no issues between it and the hard plastic backing material that it comes into contact with during operation.
For preventative maintenance reasons, it's okay to lubricate the felt ring after purchase and periodically depending upon how much use your Flex 3401 sees.
What to use?I went to NAPA and purchased some Air Tool Lubricant, (see picture), but any light machine oil should work including the traditional 3-in-1 Oil.
Here's the felt ring on the Flex 3401
Here I've placed some oil on my finger ...
and then spread it onto the felt ring...
You can see the oil penetrate into the felt to lubricate it and from here it will migrate through the felt...
You could also place some drops around the felt ring and then spread it and work it in using your finger...
This brand new Flex 3401 is ready to go to work for a new project next week...
#17
05-07-2015, 01:44 PM
Factors that can cause a pad to stop rotating on a DA Polisher
By Mike Phillips
Below are a list of factors that can stop pad rotation tools like the Porter Cable, Meguiar's, Griot's and Shurhold DA Polishers. This isn't necessarily a bad thing, just a characteristic that also represents how and why these tools are so safe to use especially for people new to machine polishing.
The factors listed below can stop pad rotation and instead what you'll experience and see is a pad that more or less only vibrates or jiggles against the paint instead of rotates.
Pad rotation isn't important if you're applying a finishing wax or paint sealant to a finish in excellent condition but if you're trying to remove any type of below surface defect like,
Then to be most effective you need the pad on these types of tool to be rotating under firm pressure.
See this article for more information on how the drive mechanism for these tools works....
The Free Floating Spindle Bearing Assembly - The Story Behind The Story...
The Spindle
Watch the below TV show starting at the 10:30 mark and I will show you not only why the PC style tools are so safe but how too much pressure will stop the pad from rotating. (against my hand )
)
By Mike Phillips
Below are a list of factors that can stop pad rotation tools like the Porter Cable, Meguiar's, Griot's and Shurhold DA Polishers. This isn't necessarily a bad thing, just a characteristic that also represents how and why these tools are so safe to use especially for people new to machine polishing.
The factors listed below can stop pad rotation and instead what you'll experience and see is a pad that more or less only vibrates or jiggles against the paint instead of rotates.
Pad rotation isn't important if you're applying a finishing wax or paint sealant to a finish in excellent condition but if you're trying to remove any type of below surface defect like,
- Swirls
- Scratches
- Water Spots
- Oxidation
- Etchings or stains
- Sanding marks
Then to be most effective you need the pad on these types of tool to be rotating under firm pressure.
- Too little pressure - There's a quirky thing about these tools that if you hold the pad just right against the paint as though barely touching it the pad won't rotate like it does under pressure but more or less just flutter and even rotate backwards or counter-clockwise.
- Too much pressure - If you apply too much pressure you can stop the pad from spinning, this is the safety characteristic that Newbies love and experience people forget about after they master the tool and then complain because the pad stops spinning.
- Uneven pressure against pad - If you don't hold the pad flat to the surface, that is you hold the body of the tool in a way that pressure is greater to just an edge or side of the face of the pad you can easily stop the pad from spinning. This is more noticeable with larger pads like 6.5" and 7" pads as the larger the diameter the pad the more leverage the pad has over the spindler/drive mechanism.
- Raised body line - If you're buffing on a raised body line there will be more pressure to smaller area of the face of the pad and this can be enough to stop or slow down the rotation of the pad.
- Convex or Concave shaped body panel - Like a raised body line, if you're working on a convex or concave shaped body panel you can have more pressure to the outer edges of the pad or the inner portion of the pad and this can stop the pad from rotating or slow pad rotation down.
- Too large a pad - When buffing with larger pads the larger diameter of the pad give the pad leverage over the spindle and this can stop pad rotating or slow pad rotation down.
- Wet or saturated pad - When a pad becomes wet or saturated with product the combination of foam and liquid act to absorb and dissipate the energy coming out of the tool and this can stop or slow down the rotation of a pad.
See this article for more information on how the drive mechanism for these tools works....
The Free Floating Spindle Bearing Assembly - The Story Behind The Story...
The Spindle
Watch the below TV show starting at the 10:30 mark and I will show you not only why the PC style tools are so safe but how too much pressure will stop the pad from rotating. (against my hand
)What's in Autogeek's Garage - Episode 3 - Season 2
#18
05-14-2015, 10:40 AM
Modified 10 @ 10 Technique for the Rotary Buffer
By Mike Phillips
At the last Detailing Boot Camp Class I had the opportunity to do a lot of work with Tyler who at age 15 is keenly interested in the craft of detailing cars and the art of polishing paint.
Seriously, this kid is after my job...
Modified 10 @ 10 Technique
IF you look closely, instead of picking up his bead of product at the 10 O'clock mark on his buffing pad Tyler is going to reverse directions and thus pick his bead of product up at the 4 O'Clock position. For this version of the 10 @ 10 Technique you move the polisher left to right and this way you pull the product into the pad instead of splattering it all over the place.
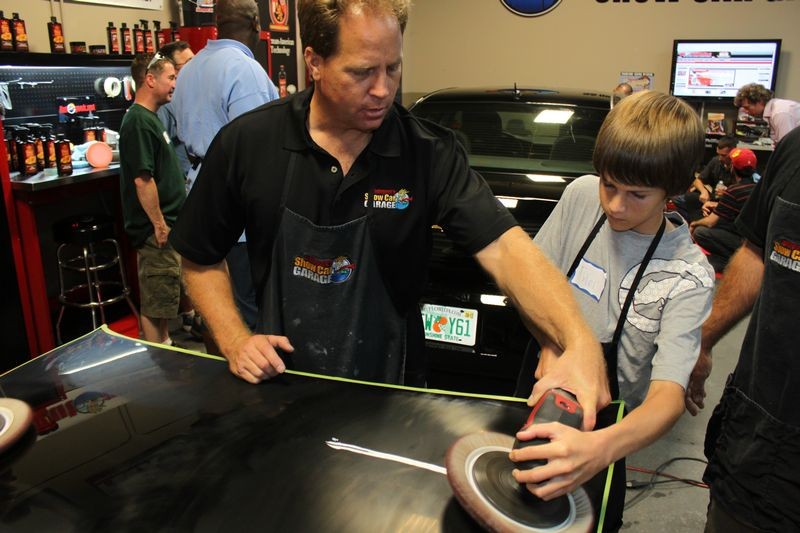
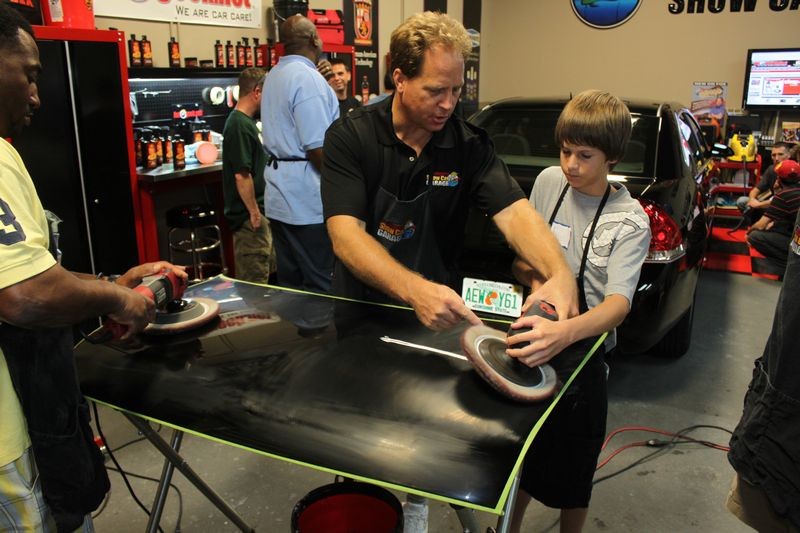
After passing over the bead of product he then quickly lays the pad flat to the paint and starts removing his sanding marks.

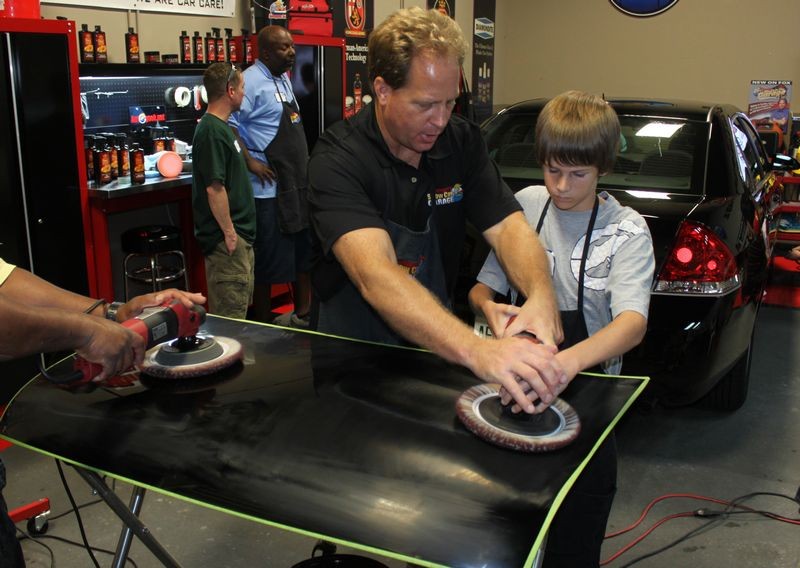
Here's Tyler, learning to hold the pad flat while holding the head of the Flex PE14 Rotary Polisher

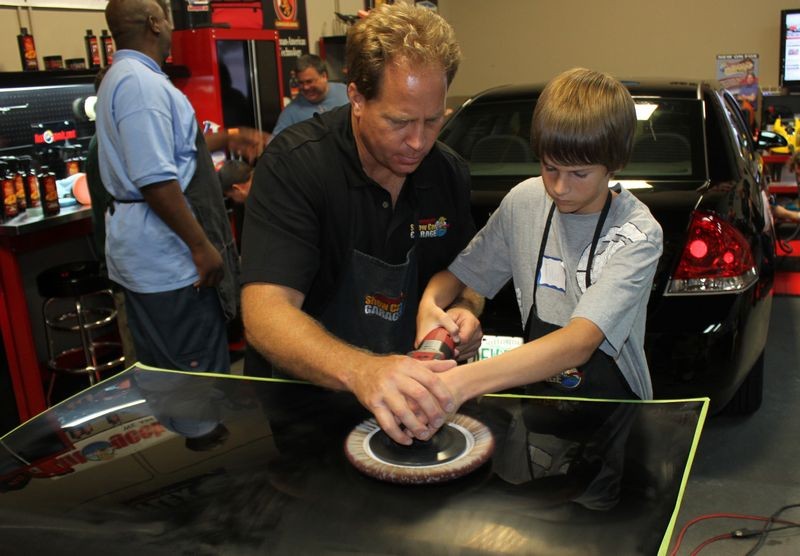
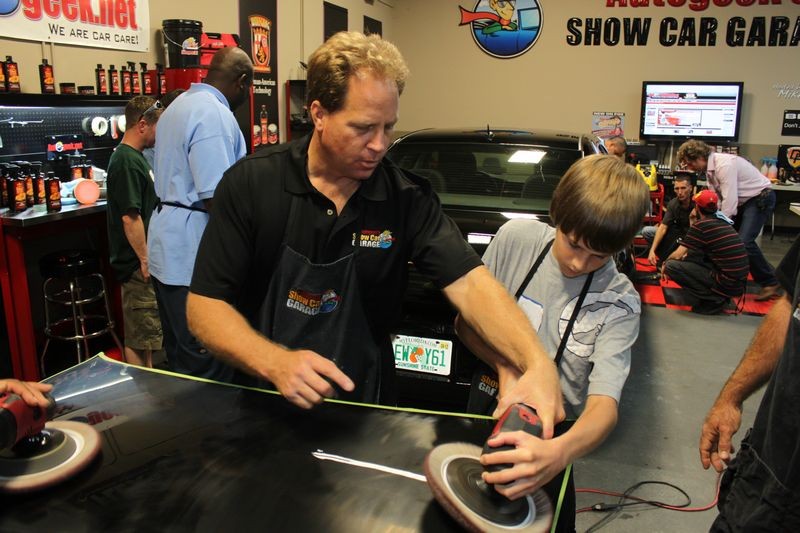
Freestyling....


And here's Tyler moving to the other side to continue removing sanding marks. He makes it look so easy and that's the sign of a future Pro!
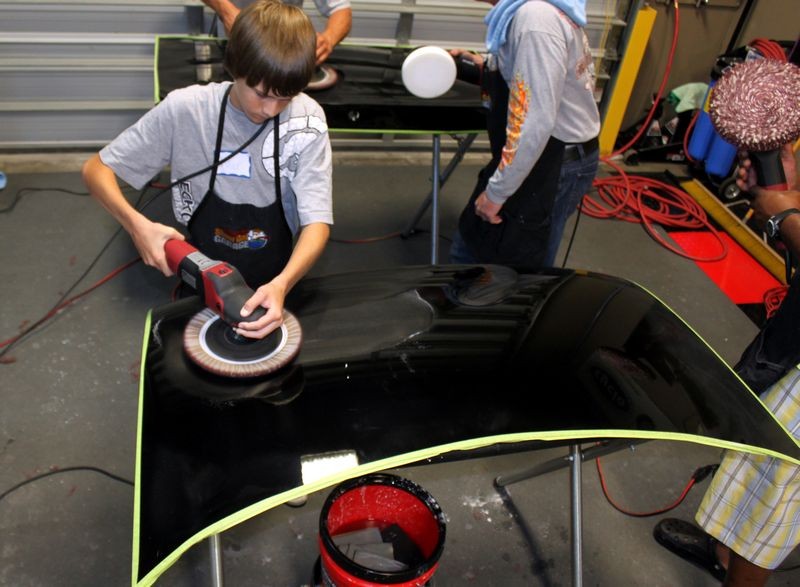
Nice work Tyler...
:xyxthumbs:
By Mike Phillips
At the last Detailing Boot Camp Class I had the opportunity to do a lot of work with Tyler who at age 15 is keenly interested in the craft of detailing cars and the art of polishing paint.
Seriously, this kid is after my job...
Modified 10 @ 10 Technique
IF you look closely, instead of picking up his bead of product at the 10 O'clock mark on his buffing pad Tyler is going to reverse directions and thus pick his bead of product up at the 4 O'Clock position. For this version of the 10 @ 10 Technique you move the polisher left to right and this way you pull the product into the pad instead of splattering it all over the place.
After passing over the bead of product he then quickly lays the pad flat to the paint and starts removing his sanding marks.
Here's Tyler, learning to hold the pad flat while holding the head of the Flex PE14 Rotary Polisher
Freestyling....
And here's Tyler moving to the other side to continue removing sanding marks. He makes it look so easy and that's the sign of a future Pro!
Nice work Tyler...
:xyxthumbs:
#19
06-04-2015, 09:02 AM
The 4 minimum categories of wiping cloths
By Mike Phillips
Wiping cloths
Just as important as any product or tool in your detailing arsenal are your wiping cloths. You can use the best compound, the best polish, the best LSP and of course the best buffing pads and top of the line polishers but if you're using any type of wiping cloth that is in some way, shape or form contaminated then you risk putting swirls and scratches into your car's finish. For this reason it's important to separate your wiping cloths into dedicated categories and have some type of labeling system so that you or others know what a collection of wiping cloths can be used on safely.
The ultimate goal is to have confidence that when you go to remove your LSP of a finish you've toiled over all day long, that the end results will giddy with glee, not because the paint looks fabulous, not loathsome and infuriated because you just instilled scratches back into the paint you've worked on so hard.
More than that, you want friends, family and even employees to be enabled to choose the right cloth in case they're are to perform any kind of detailing task with or without your supervision. For example, you're gone, a bird leaves a bird dropping on the hood of your girlfriend or wife's car and in their attempt to remove the bird dropping you don't want them grabbing the wrong microfiber polishing cloth and remove the bird dropping but create a new Saturday Detailing Project for you in the process.
4 Categories Minimum
Everyone should have at least 4 types of wiping cloths, some of you may have more categories like a dedicated collection of glass wiping cloths, or wiping cloths dedicated towards leather and vinyl dressings. These are the minimum, feel free to separate your wiping cloths as much as you like and places like Target offer plastic roll-around bins with drawers that you can label and store your different groups of wiping cloths. It's important to separate any cloth deemed worthing of wiping a high gloss finish from all the rest.
Good Microfiber Polishing Cloths
You can 'touch' paint with microfiber polishing cloths from this collection. These are the microfiber polishing cloths in your collection that are new or you have washed and dried and you trust them to be safe on a high gloss, polished finish.
Tatty Microfiber Polishing Cloths
These are washed, dried and clean, but their quality has fallen to a level that you have deemed them not worthing of touching a high gloss, polished finish. You don't throw them away because they still have value for wiping spray detailers or cleaner/waxes out places like door jambs, chrome wheels or bumpers, a roll bar, the paint on a boat trailer, or some components in the engine compartment. You might even keep them around for checking the oil or wiping grease off your hands after changing the oil. The point is they are still great at removing residue, just not off a swirl-free, scratch-free, high gloss surface.
Good Cotton Towels
While microfiber is superior at removing polishes, waxes and paint sealants off paint, and especially trace residues off smooth, high gloss finishes, there's still a place for good quality cotton towels. For example, cleaning you pad on the fly. Cotton towels with a large nap work better than microfiber towels. Some people prefer a cotton towel with a large nap to remove compounds because they offer a more aggressive bite but then switch over to microfiber for removing polishes and LSP's. Your good cotton towels should be clean and soft and worthing of working on paint in good condition or better.
Tatty Cotton Towels
Tatty Cotton Towels are cotton towels that are washed and dried but for whatever the reason, their quality is fallen off to far from what's acceptable to touch paint in good condition or better. They still have value however for mundane tasks like wiping excess tired dressing off the face of a tire, applying or wiping cleaners and dressings in the fenderwell area, applying or removing cleaners, dressings or cleaner/waxes in the trunk area or door jambs and engine compartments. They have value because they are absorbent, clean and ready to use and paid for. After some projects you might be better of discarding them versus trying to clean them well enough that they can be used again.

Thread
Thread Starter
Forum
Replies
Last Post
WolfgangCarCare
Detailing
0
02-11-2014 06:55 PM

