Valve Cover Gasket Replacement Audi 30v 2.8L V6 (A4, A6)
#1
 03-05-2013, 10:46 PM


Hi All
Been doing some work on the Audi lately, and also have been noticing some burning smells in the cabin that originated from the engine bay. There has also been some noticeable stuttering, and even when I bought it - it seemed to lack some power.
I had a hunch it was a oil leak. So Sunday morning I started to pull the engine apart to take a look. I started on the passenger side.
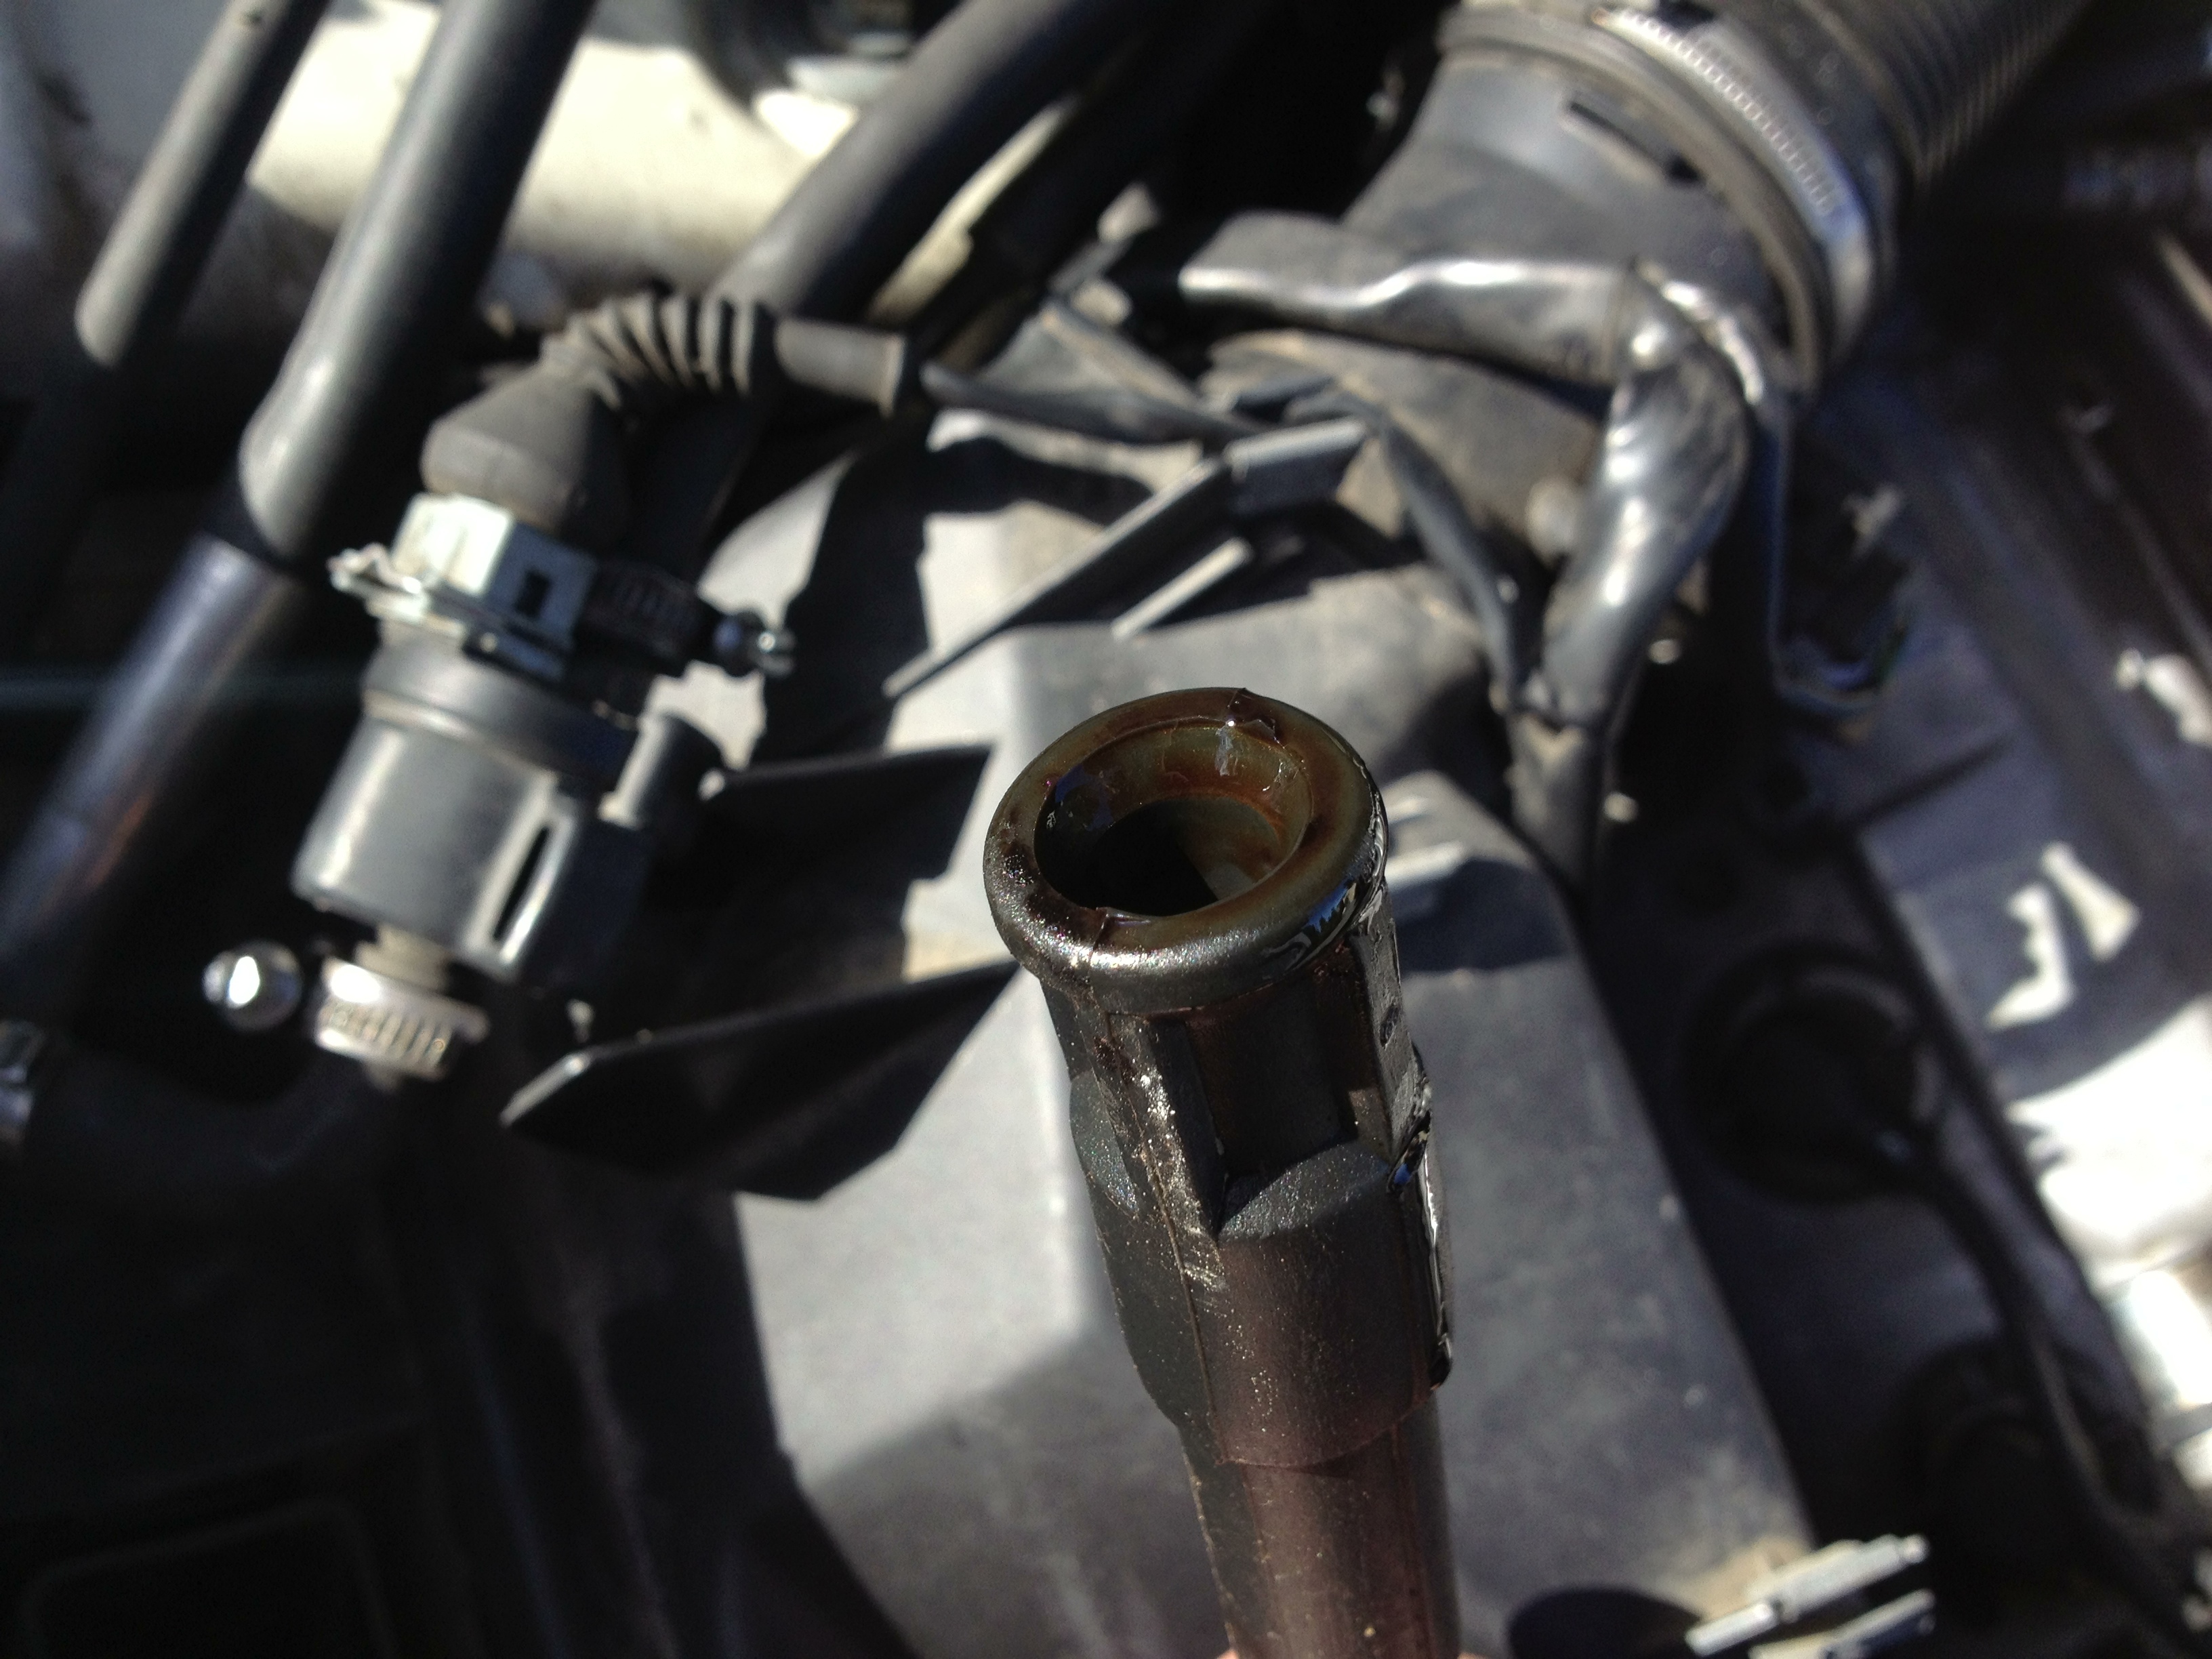
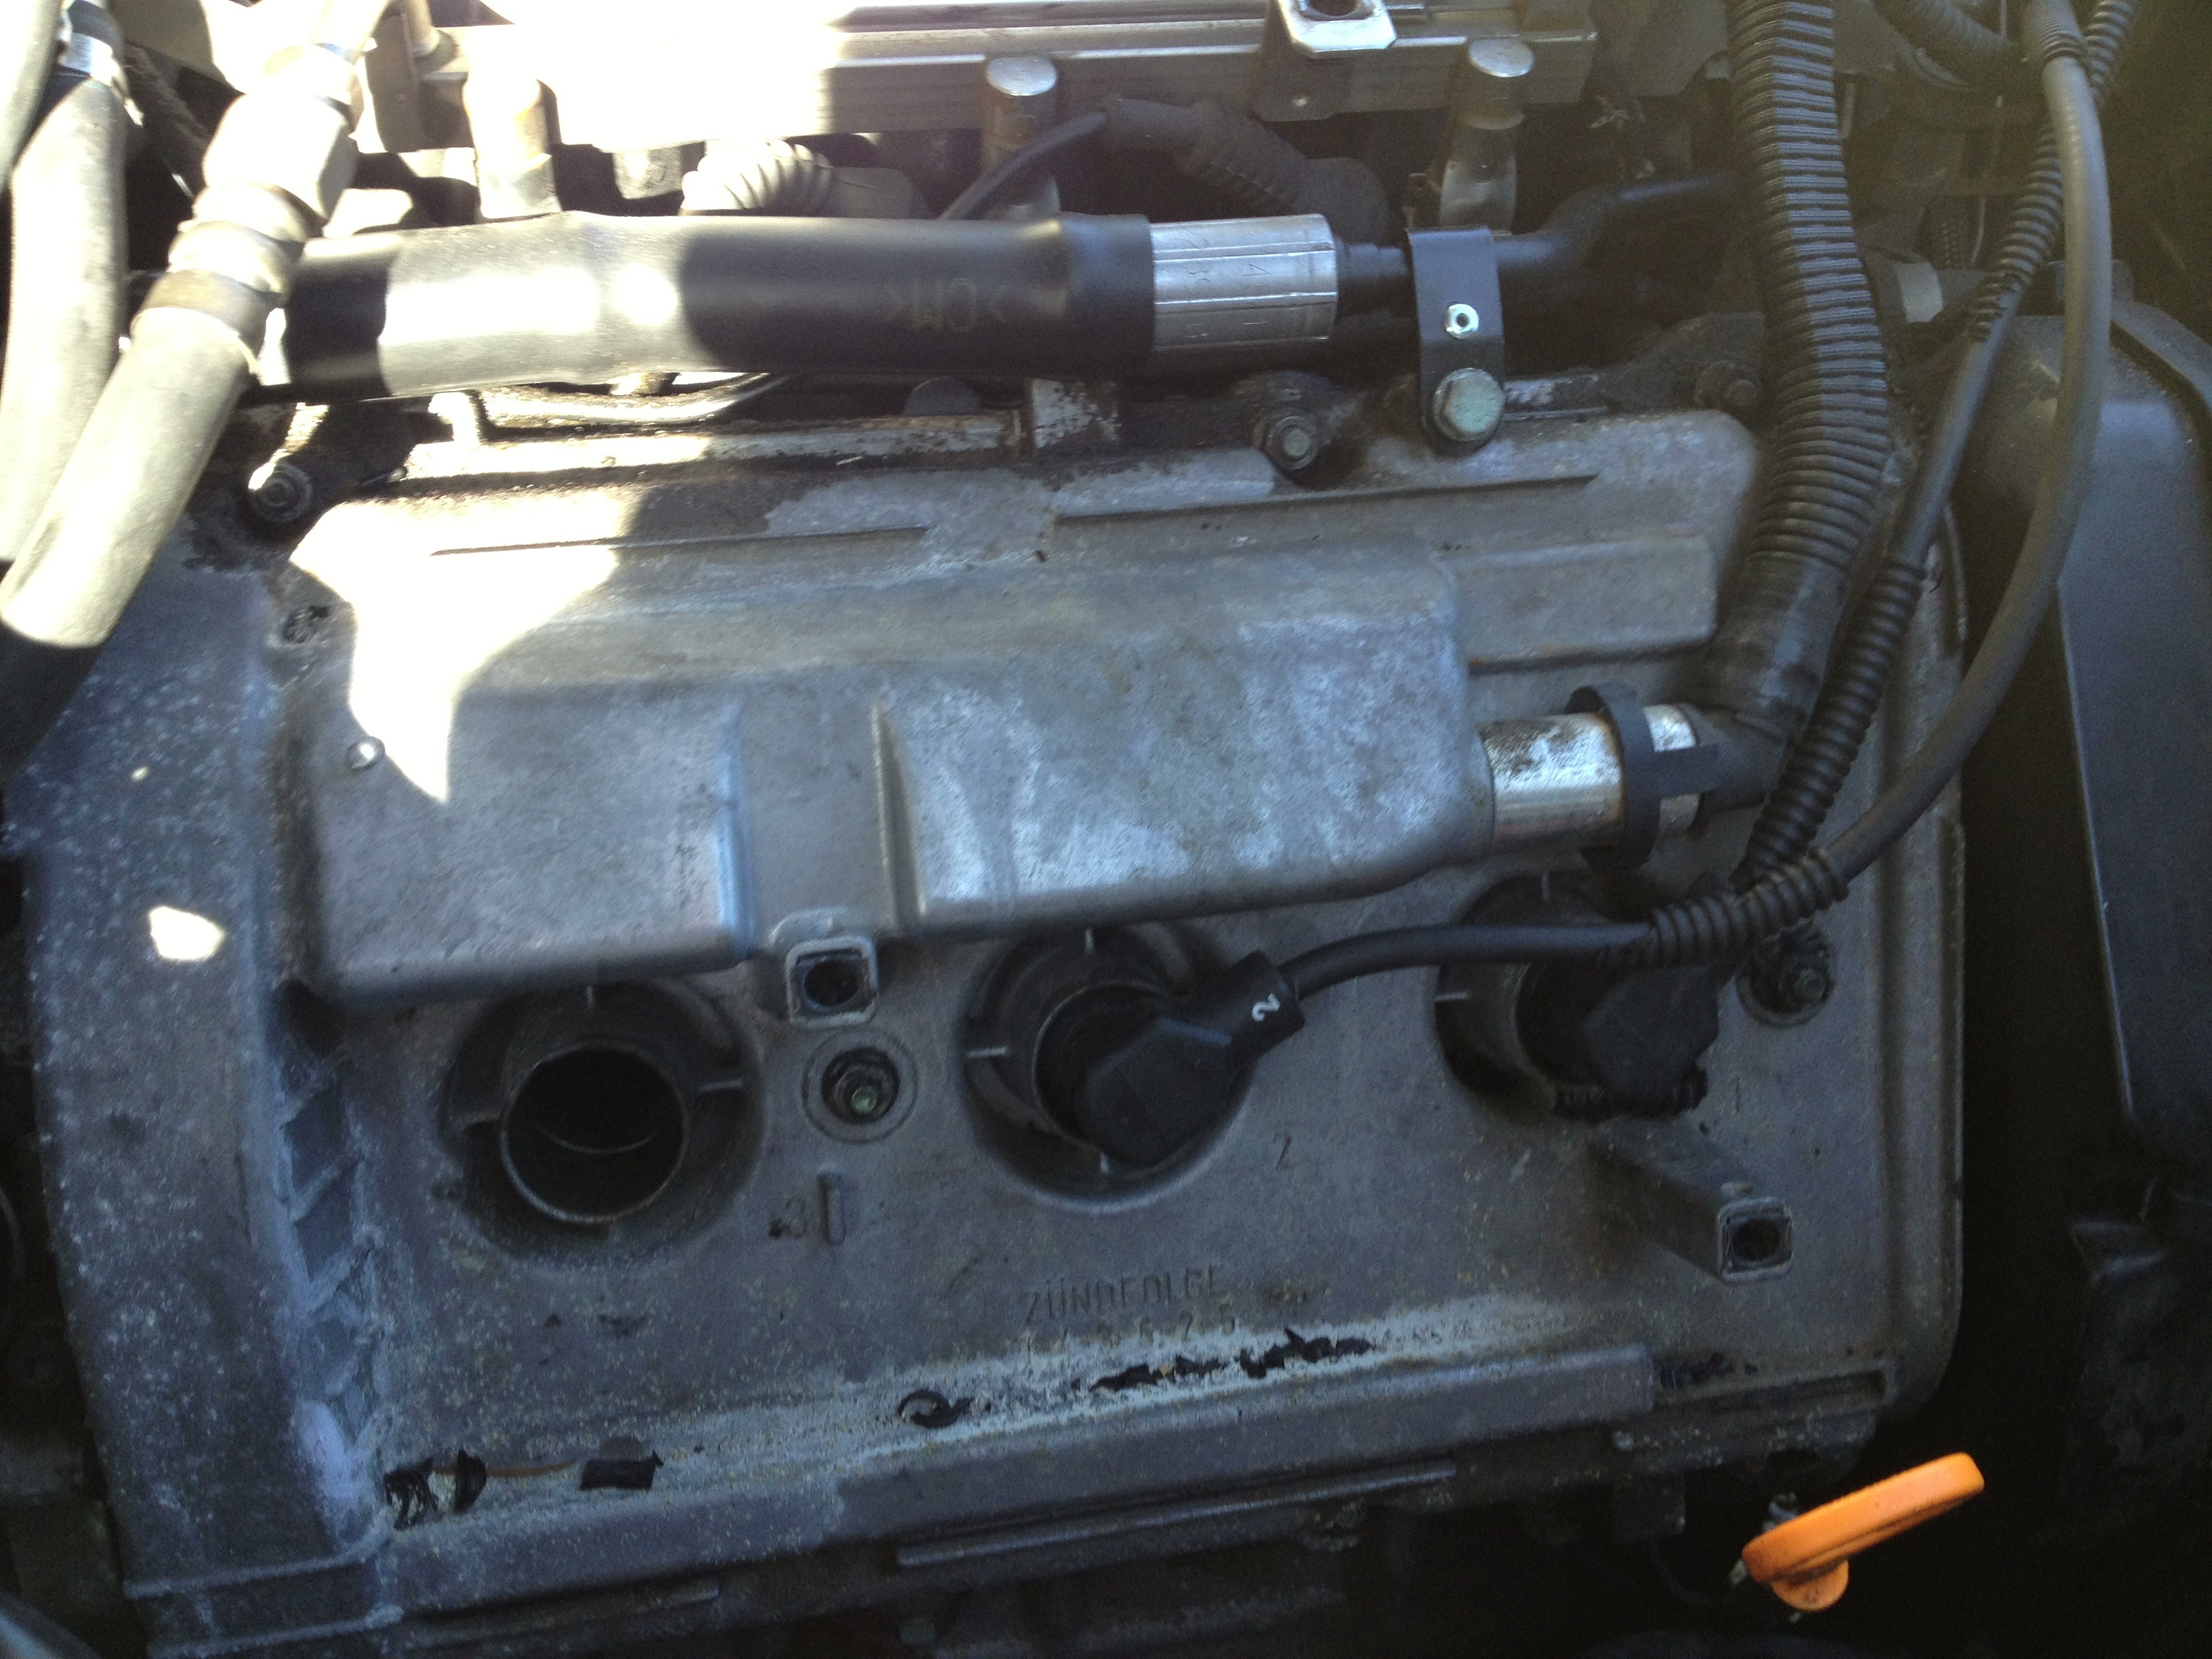
Pulled out the wires and found this. Look familiar?
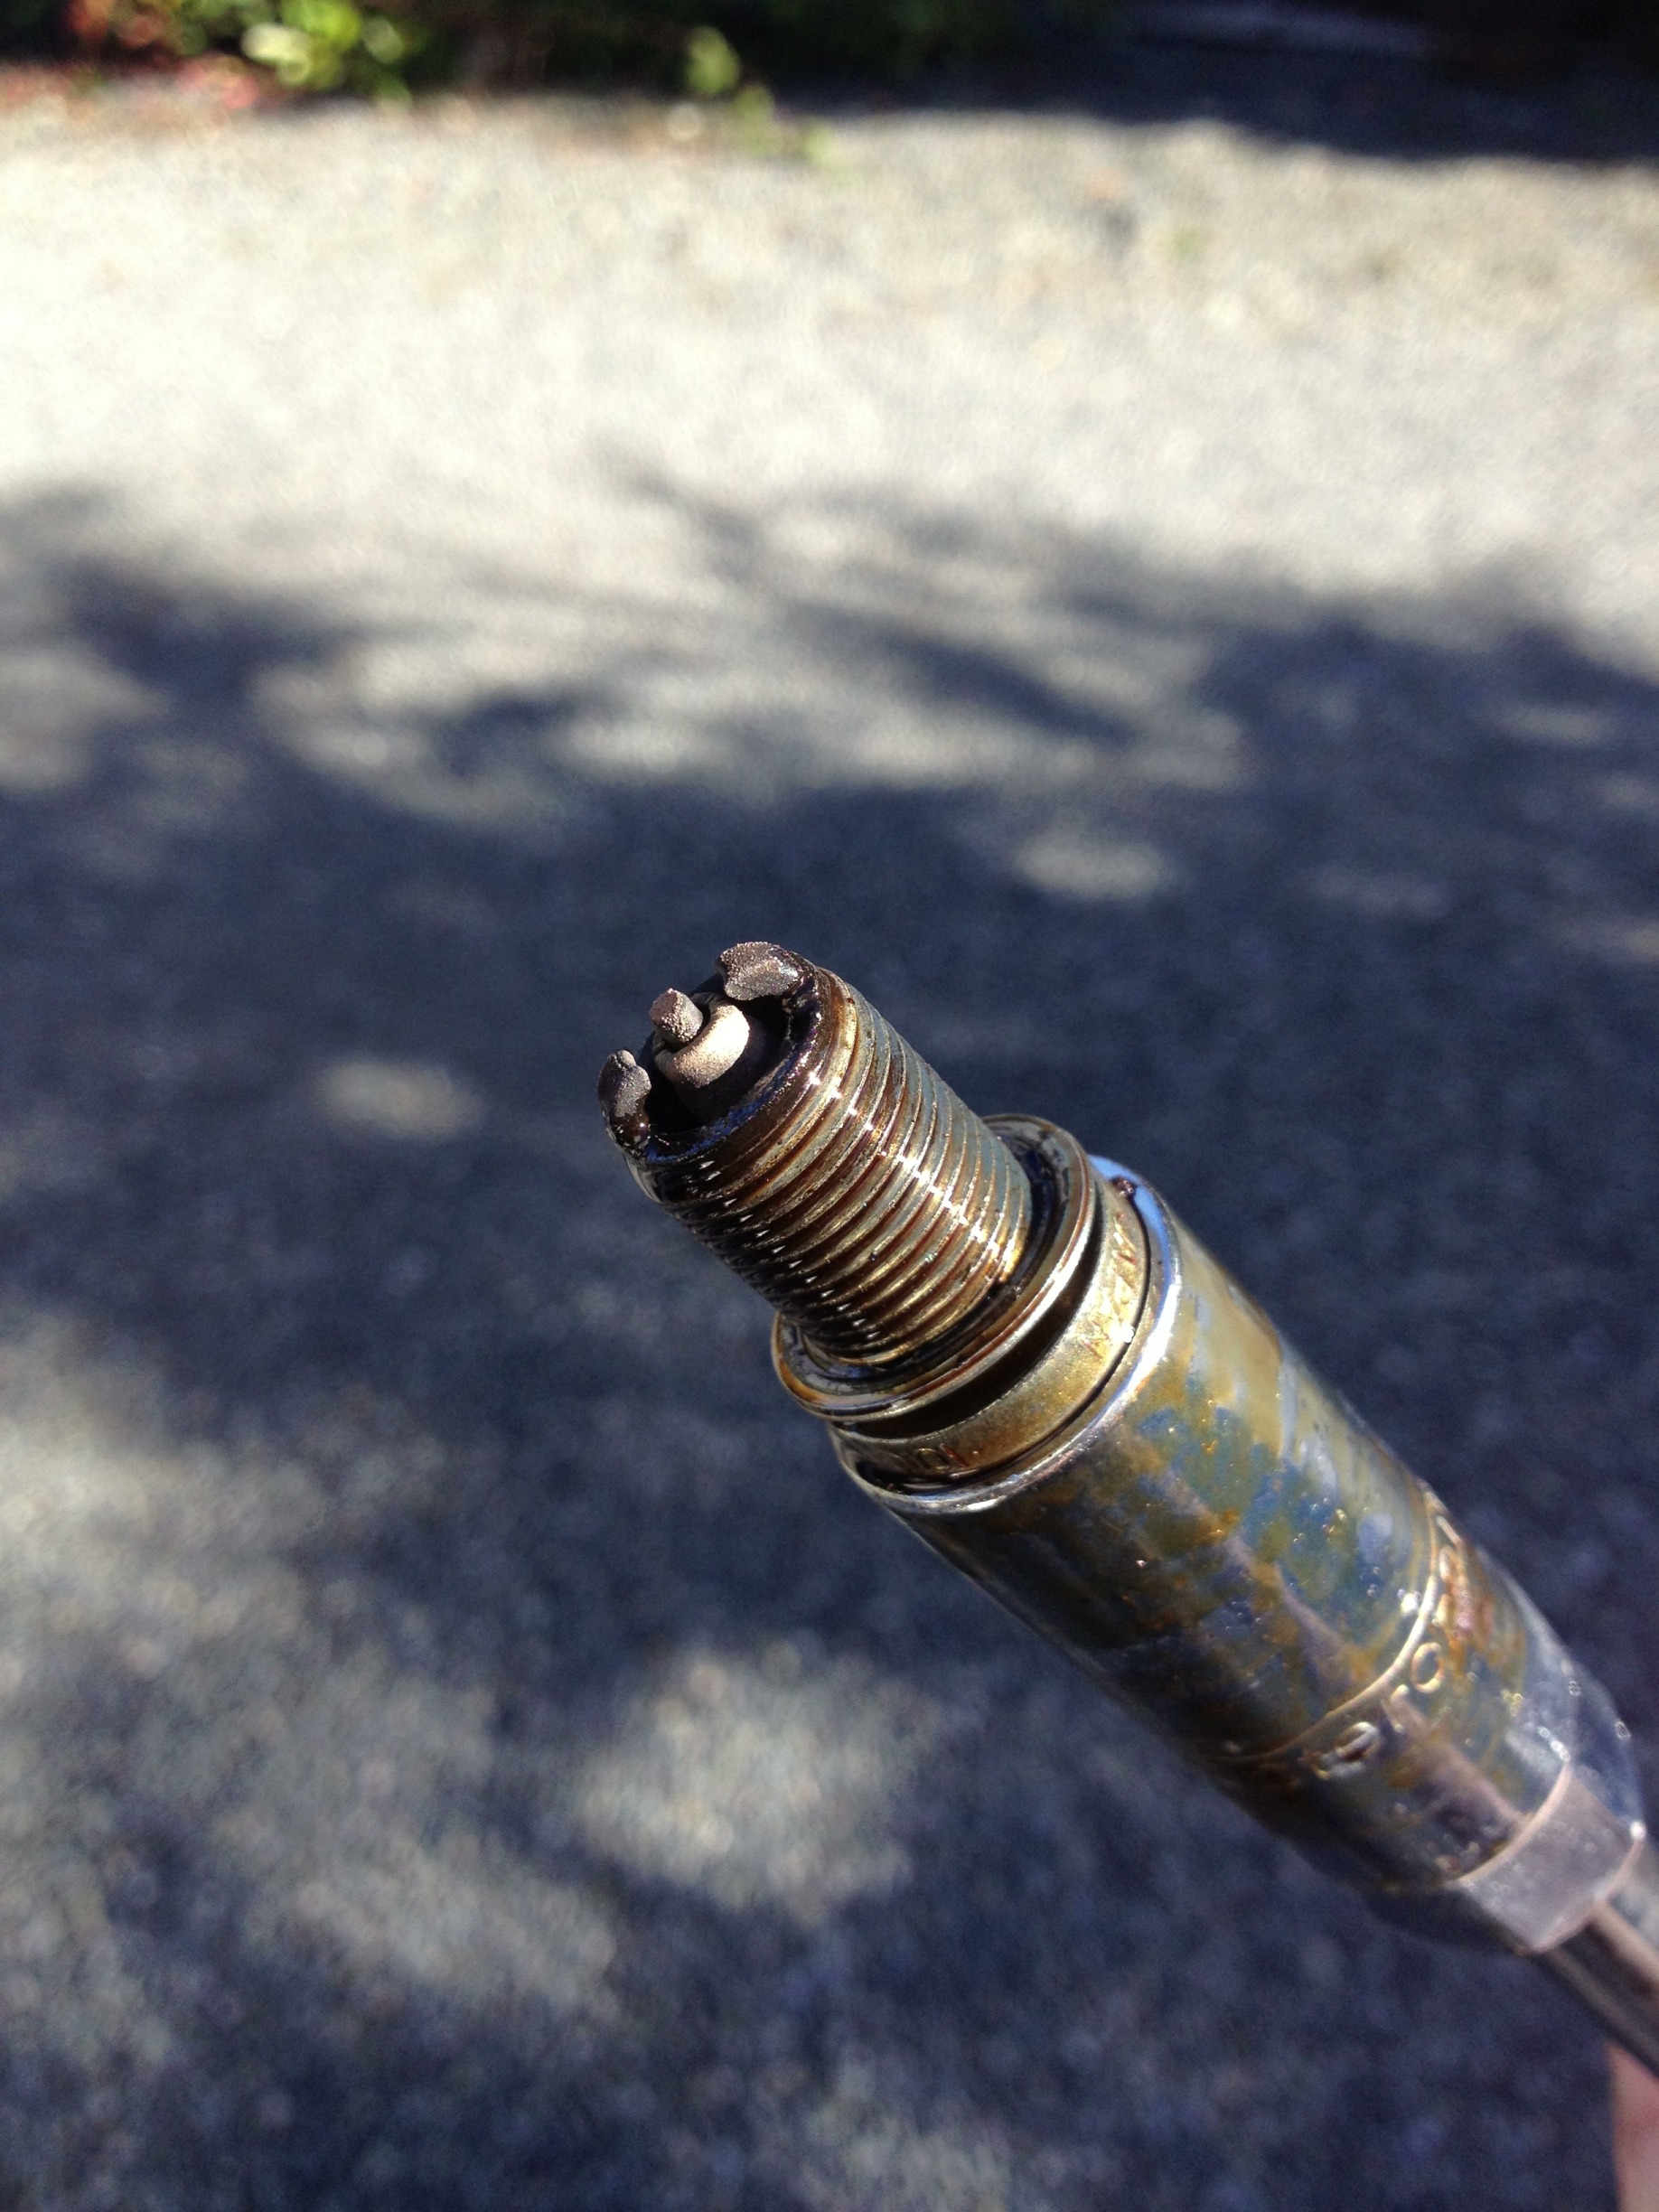
The plugs soon came out and they were swimming in oil
At that point I new I had bad gaskets. I didn't even bother looking on the driver side. I knew it was going to be as bad. I thought to myself, how hard is a gasket job going to be? Dunno, lets go find out.
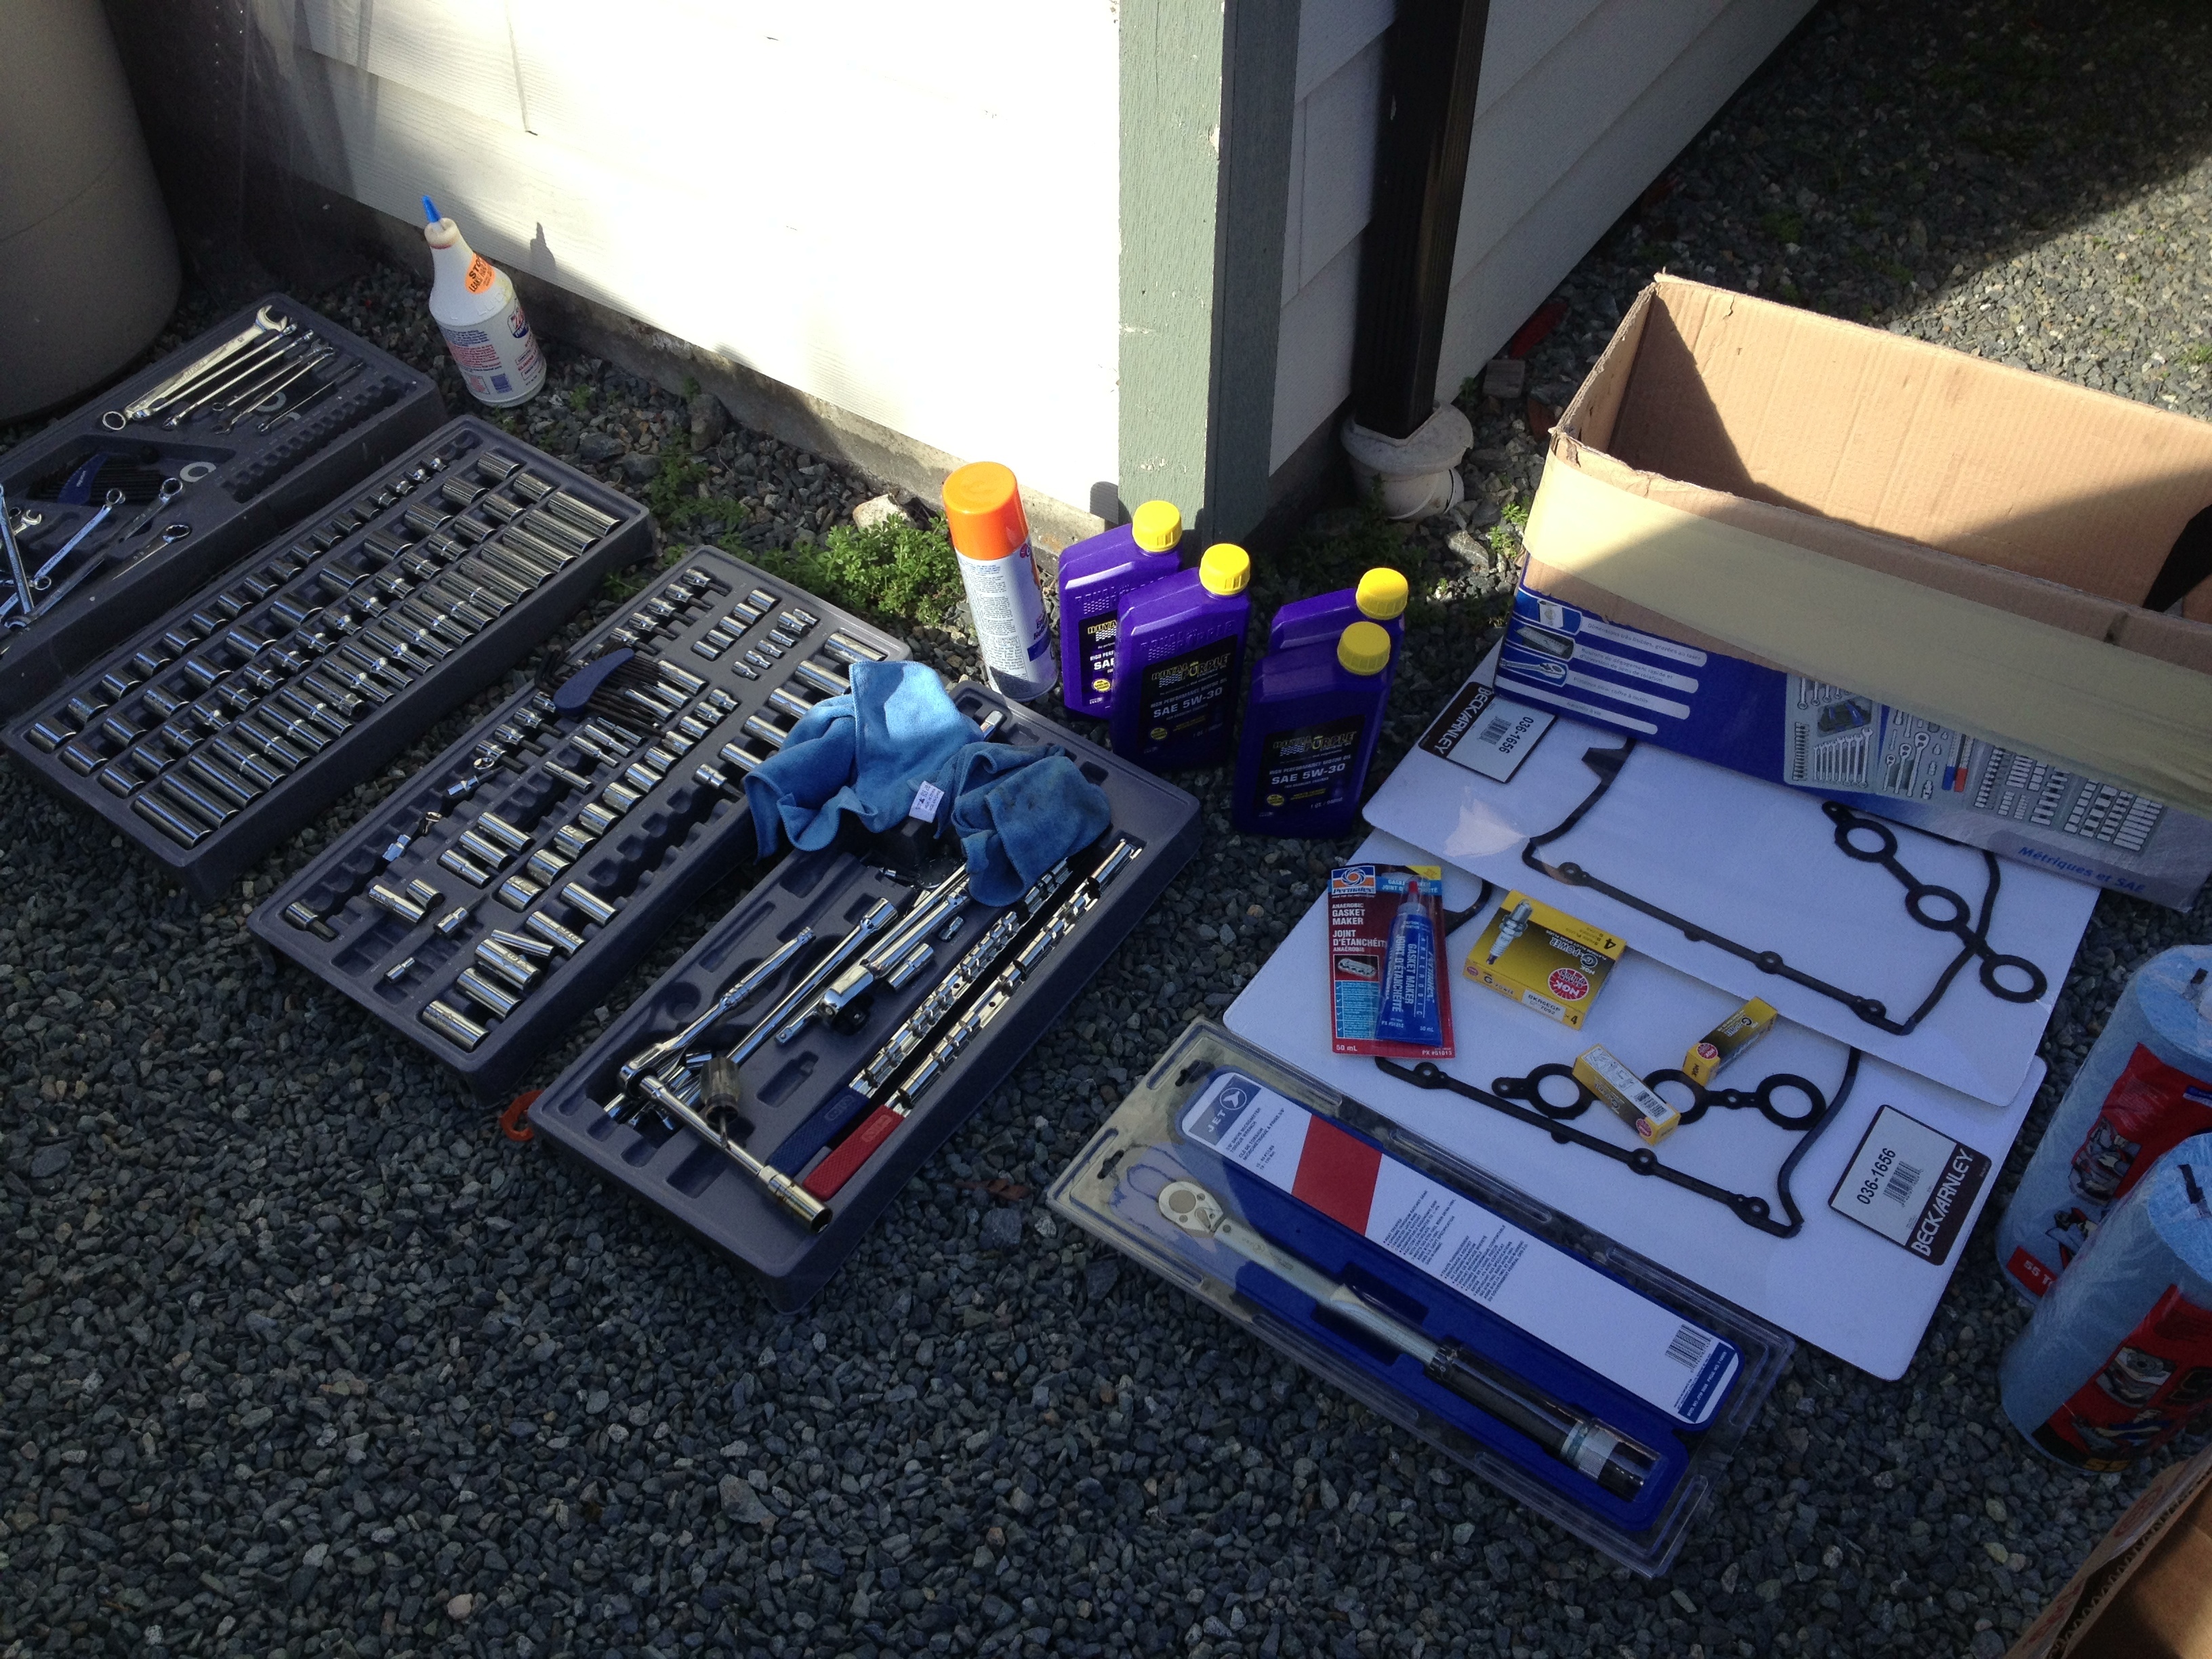
Headed off to Lordco and bought some goodies to make the job work
- 2 Gaskets (had a hunch the other side was failing)
- Torque wrench --> MAKE SURE YOU BUY ONE OF THESE IF YOU DO THIS!!!
- engine cleaner
- paper towels
- spark plugs
- spark wires will come in a couple of weeks ( in case it was another problem)
- 4 quarts of Royal Purple
- RTV Sealant
- You will also need to have a #10 bolt socket for the bolts around the valve cover
- You will also need a socket that can remove spark plugs
- You will also need a spark plug gapping tool
- Flat head screw driver
- Time if you've never done this before for both sides (3.5 Hours)
- a friend to help a little is a good thing too. (I had my buddy around for the last bit to help speed things up)
I have a great tool set my wife bought me a couple years ago to get started.
So here is the spread to help this happen.
Ok so lets get started. (Dislaimer, this is intended as a general guide/how to. Doing extra googling can help. If you are dumb enough to leave your engine on and pull things apart - well.... you shouldn't own a vehicle)
- Make sure car is off
Your bay should look like this. This is where we take things apart to get easy access to the Valve Cover
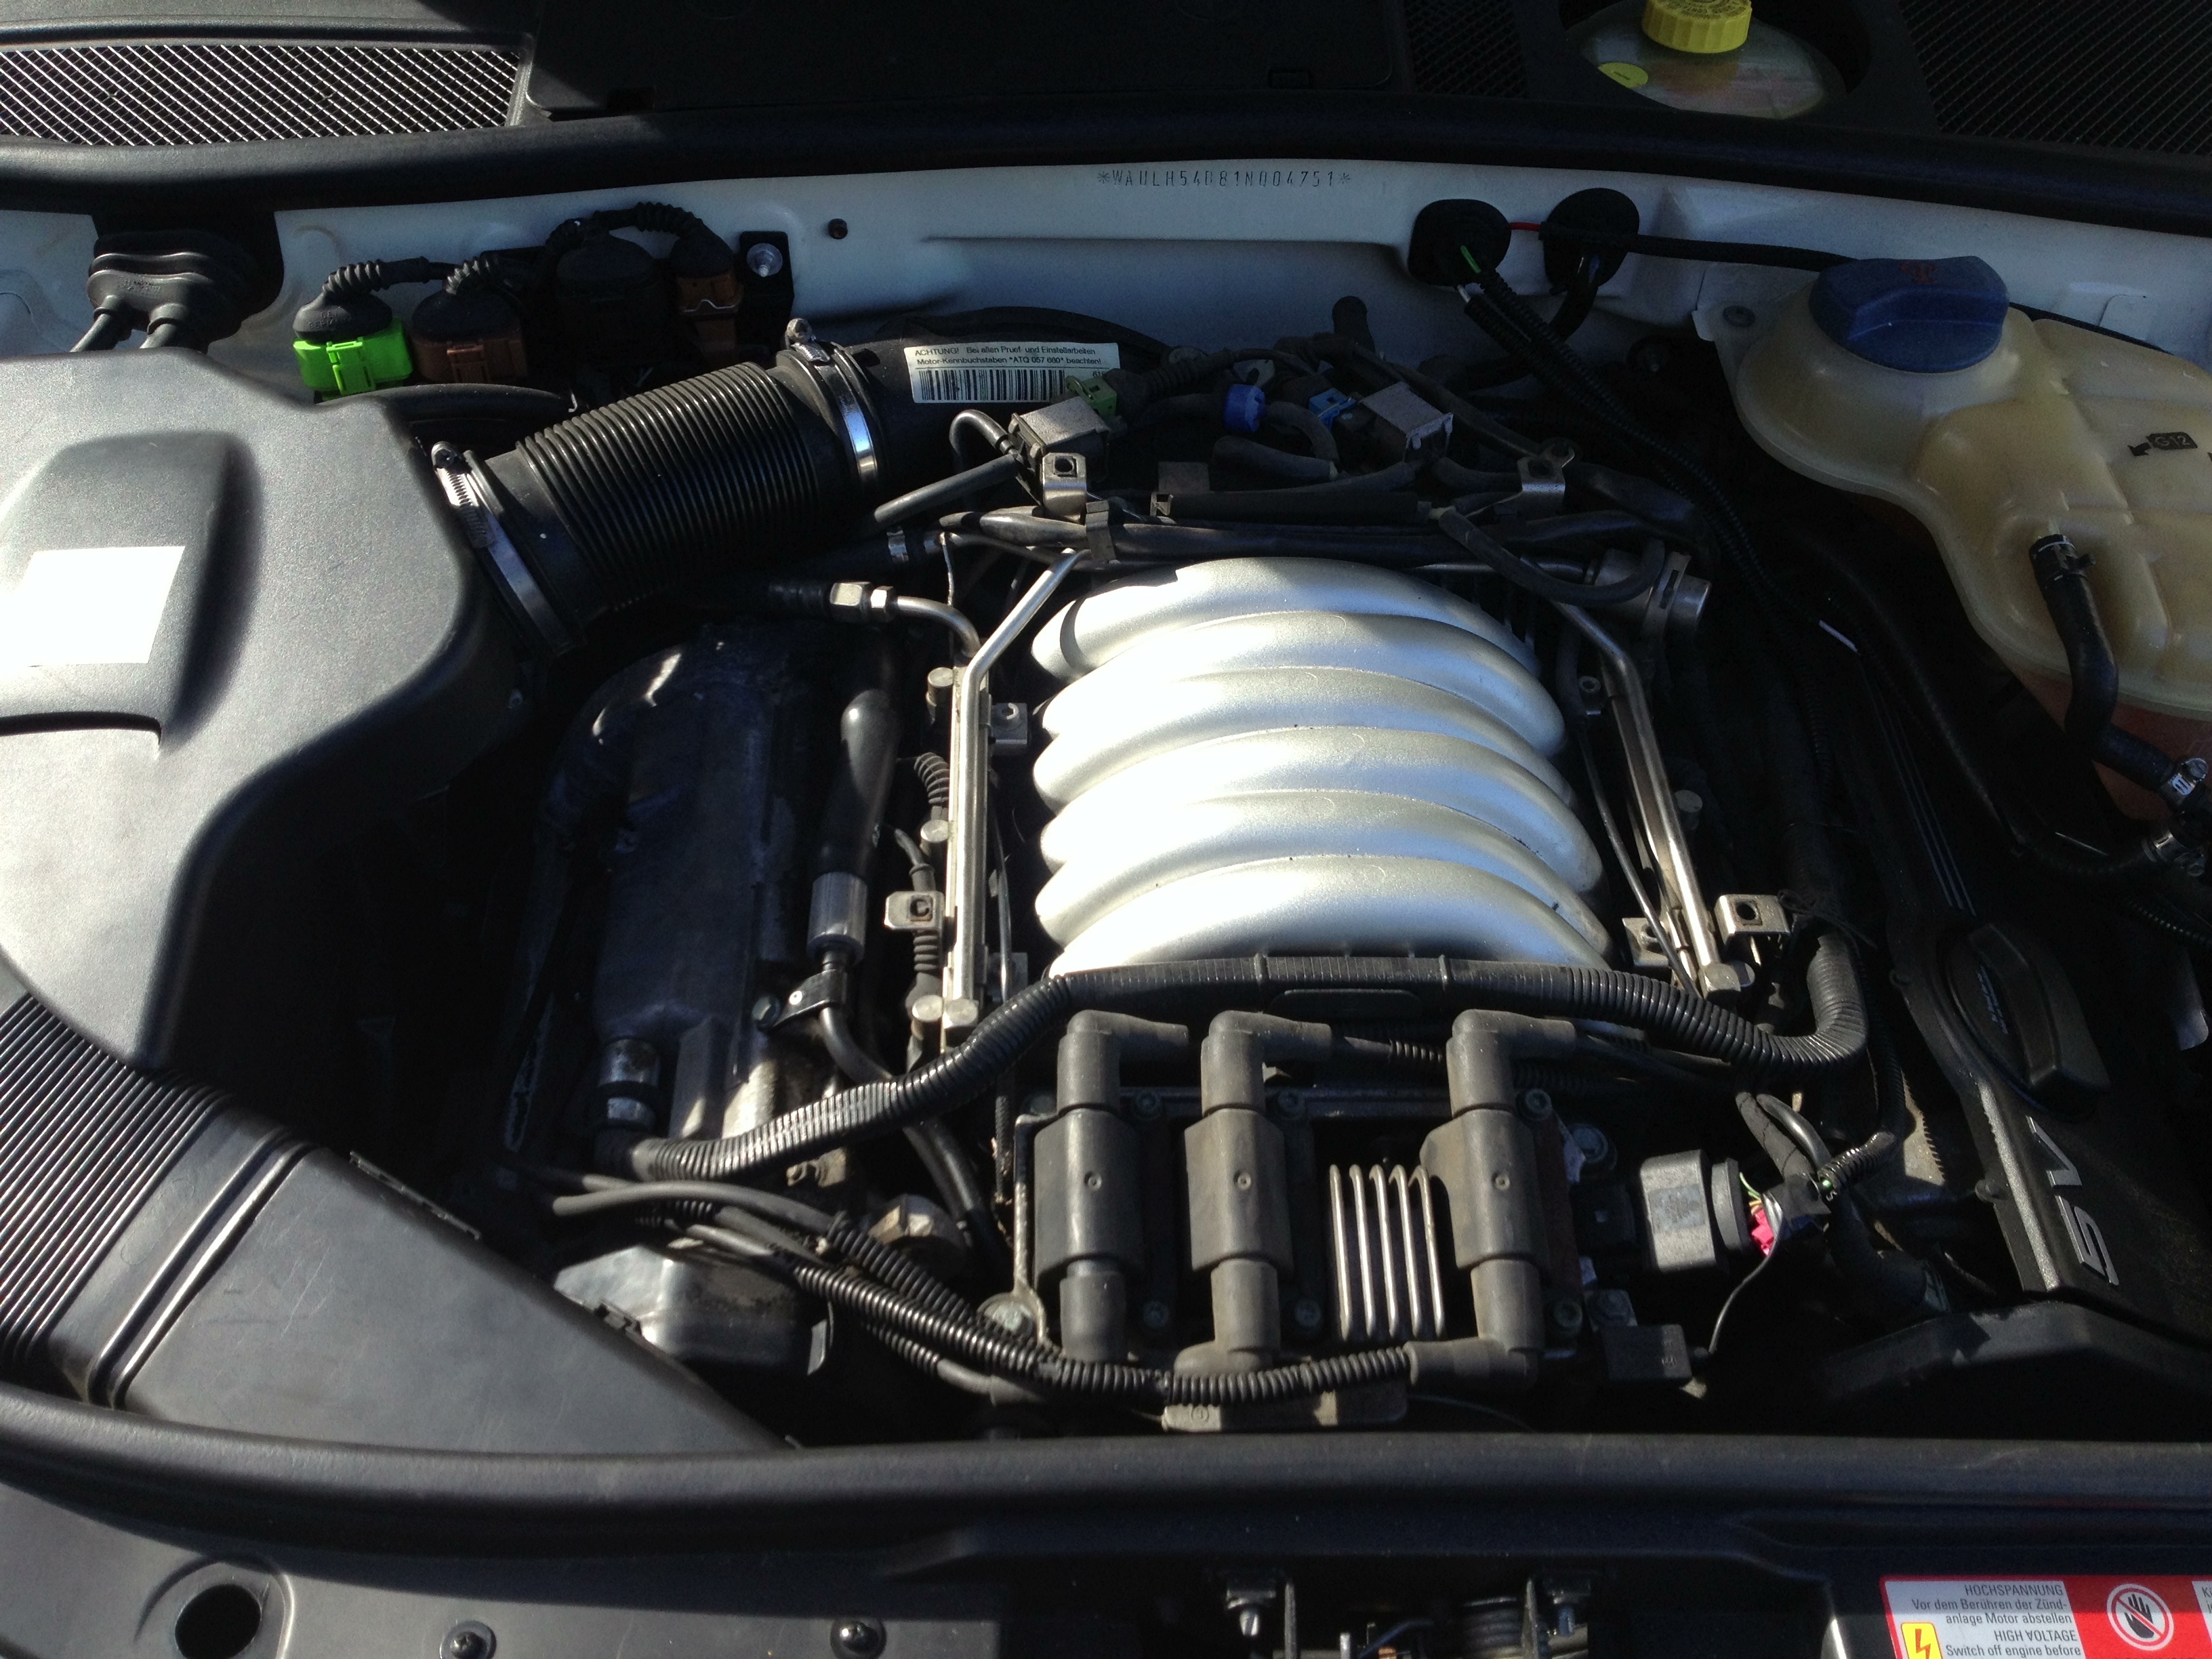
( I am starting on the passenger side right now, but this is the same process for each side)
- Remove all the engine shrouds and put them aside so you don't step on them
- Remove the airbox runners
- Remove the MAF sensor and put it aside (Might be a good time to clean it)
- Remove the air box top
- Unbolt the Airbox bracket and remove
- There is a philips screw at the top right of the coolant on the driver side.
- In order to do the gasket job on the drivers' side, just simply remove the screw, disconnect the sensor below the tank and move it around.
- Get the bare bones look like this below once you've removed things
- At this point, start to take out your wires and plugs.
- You will probably see the oil on the parts as they come out, don't worry we will clean it up later
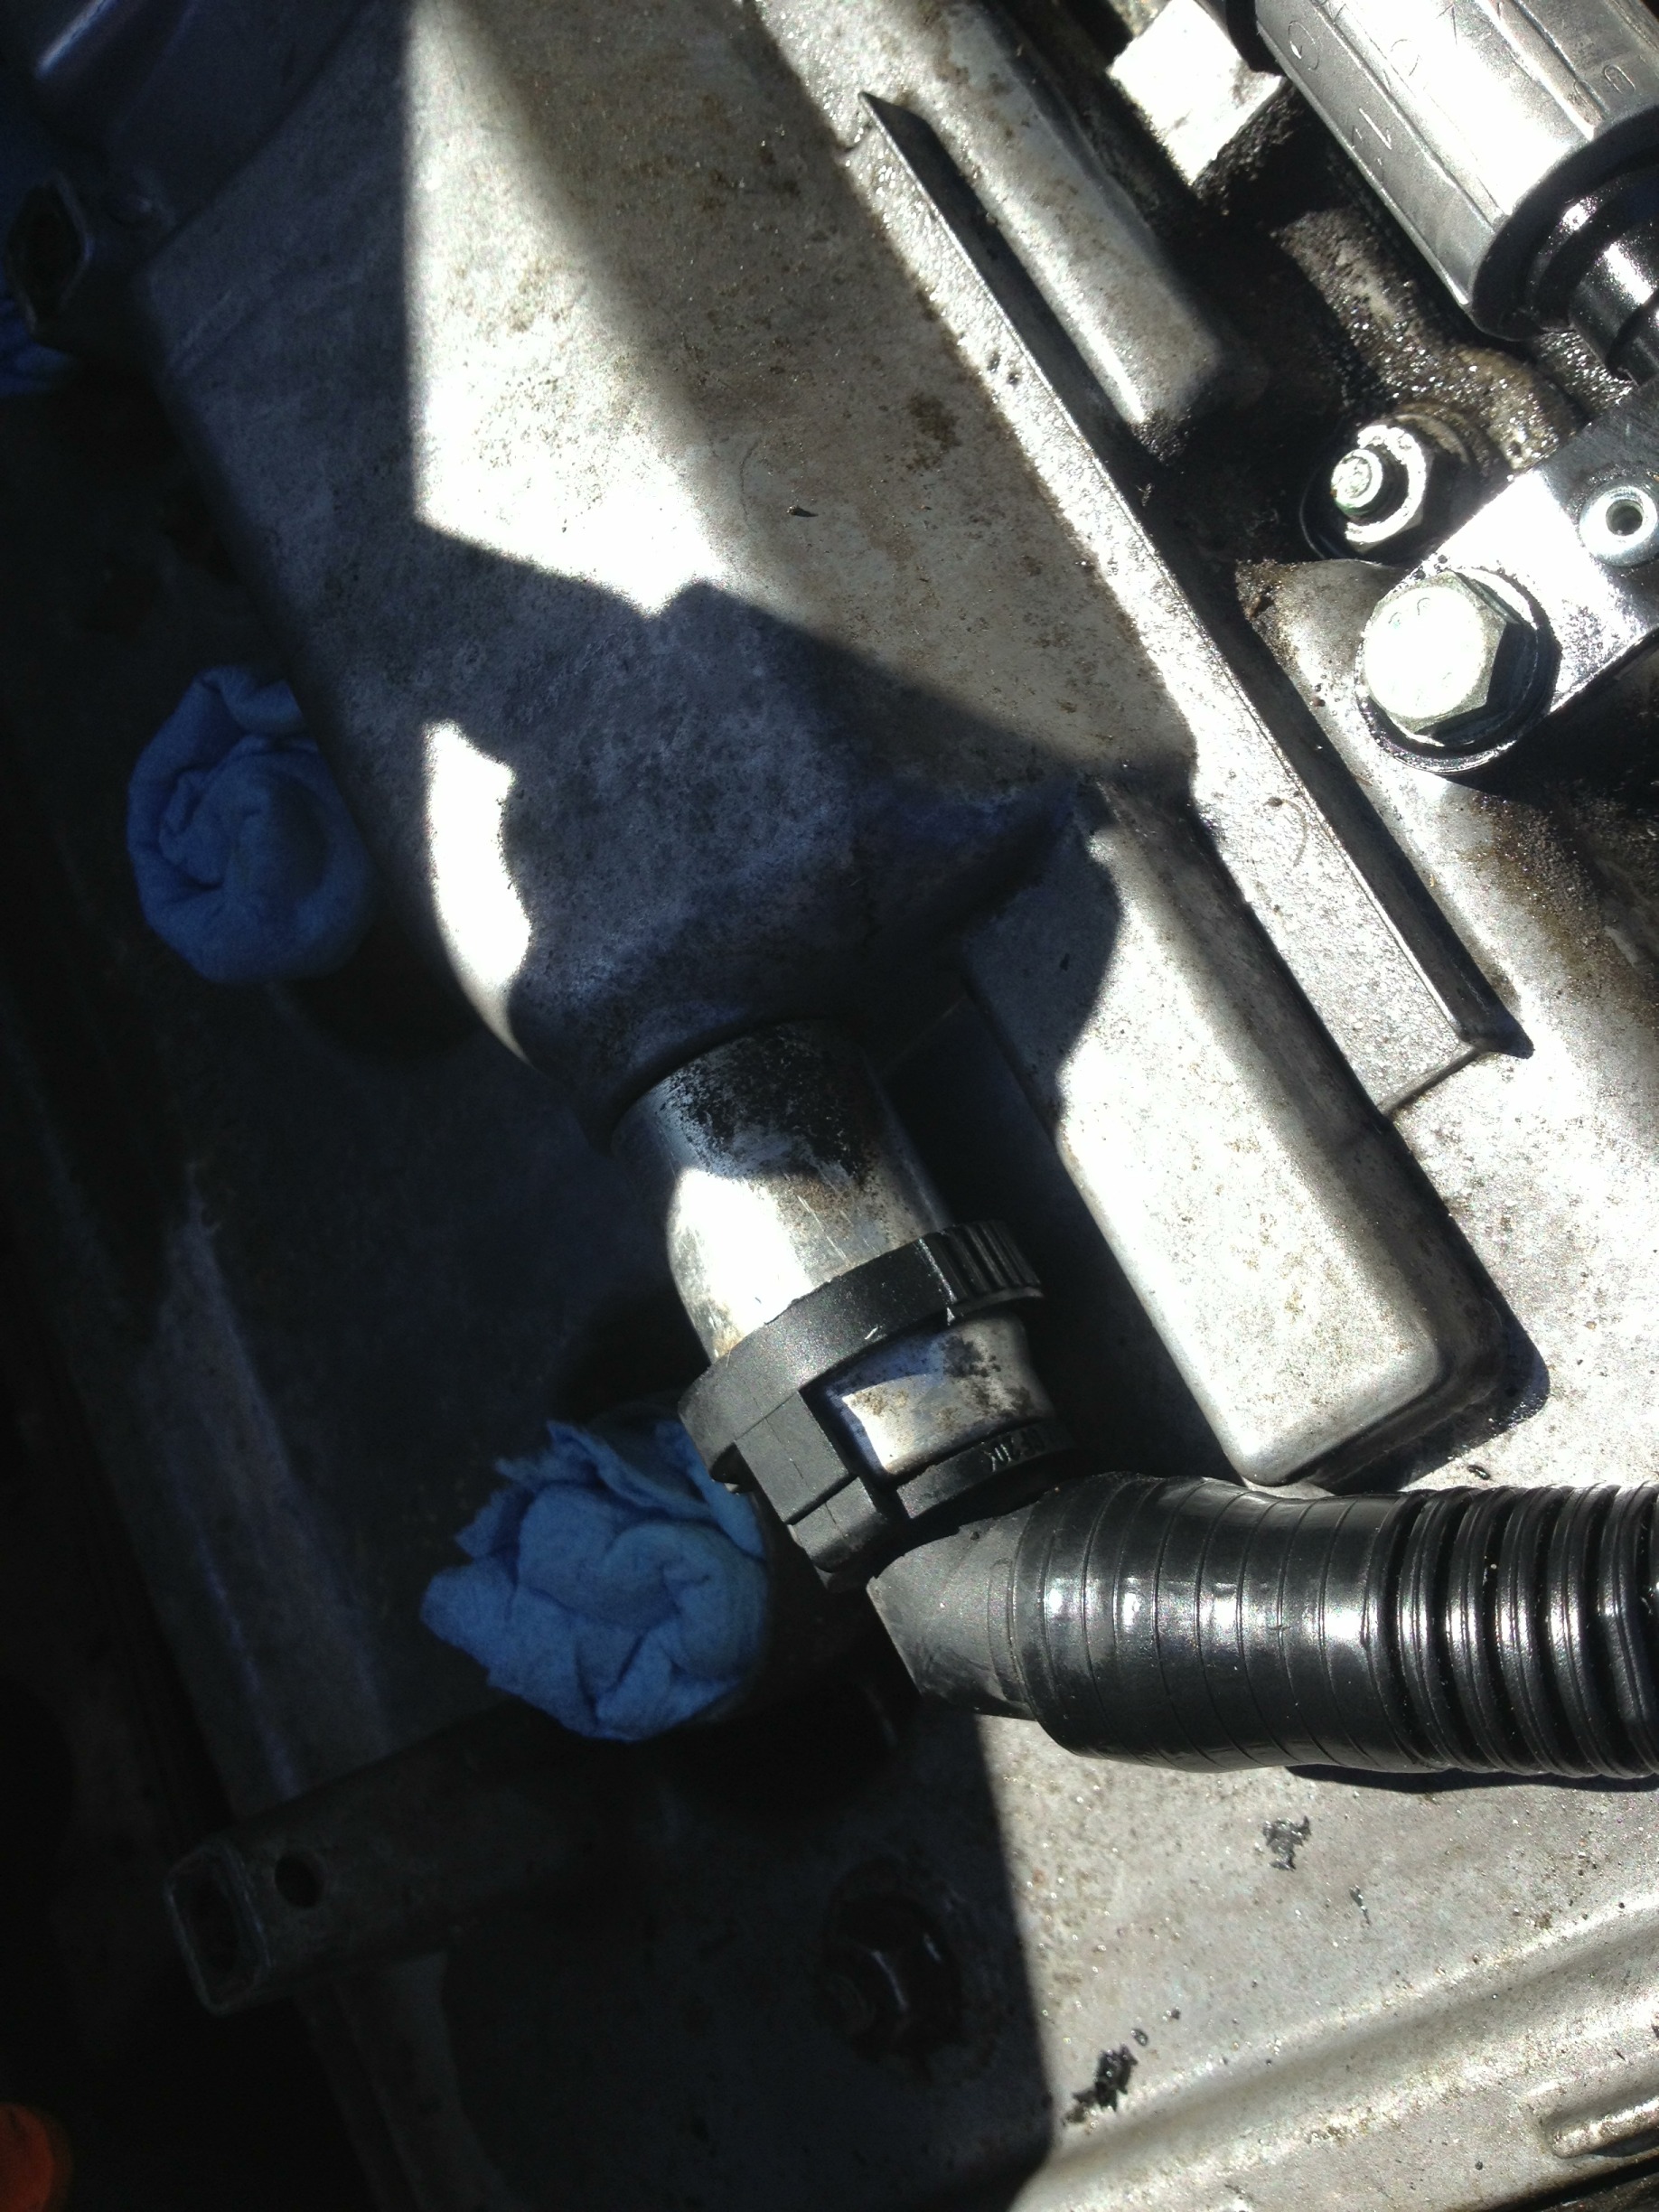
- Pay attention to the high pressure power steering hose at the top of the valve cover. Un bolt the clamp so that you can have the hose give a little wiggle room
- Roll up and stuff some paper towel down the spark holes to keep crap from getting in as you take the cover off
- For both sides of the engine, you will need to remove the oil senders by pinching and polling them off
- Now grab your socket wrench, extender and a #10 to start unbolting
- IIRC there are 8 bolts to take off in no particular order ( re-bolting order down below)
- Once you've got the bolts off, remove the dip stick
- My bolts came off WAY to easy. Bet you some dipstick (HAHA I made a funny) didn't use a torque wrench to put them on.
- My valve cover came off effortlessly. You may have to use the flat head screw driver to GENTLY pry the edges till it gives
- You may have to negotiate for it to come off, it can fight a bit for space with the dip stick holder. Either way it comes off pretty easy
It should now look like this
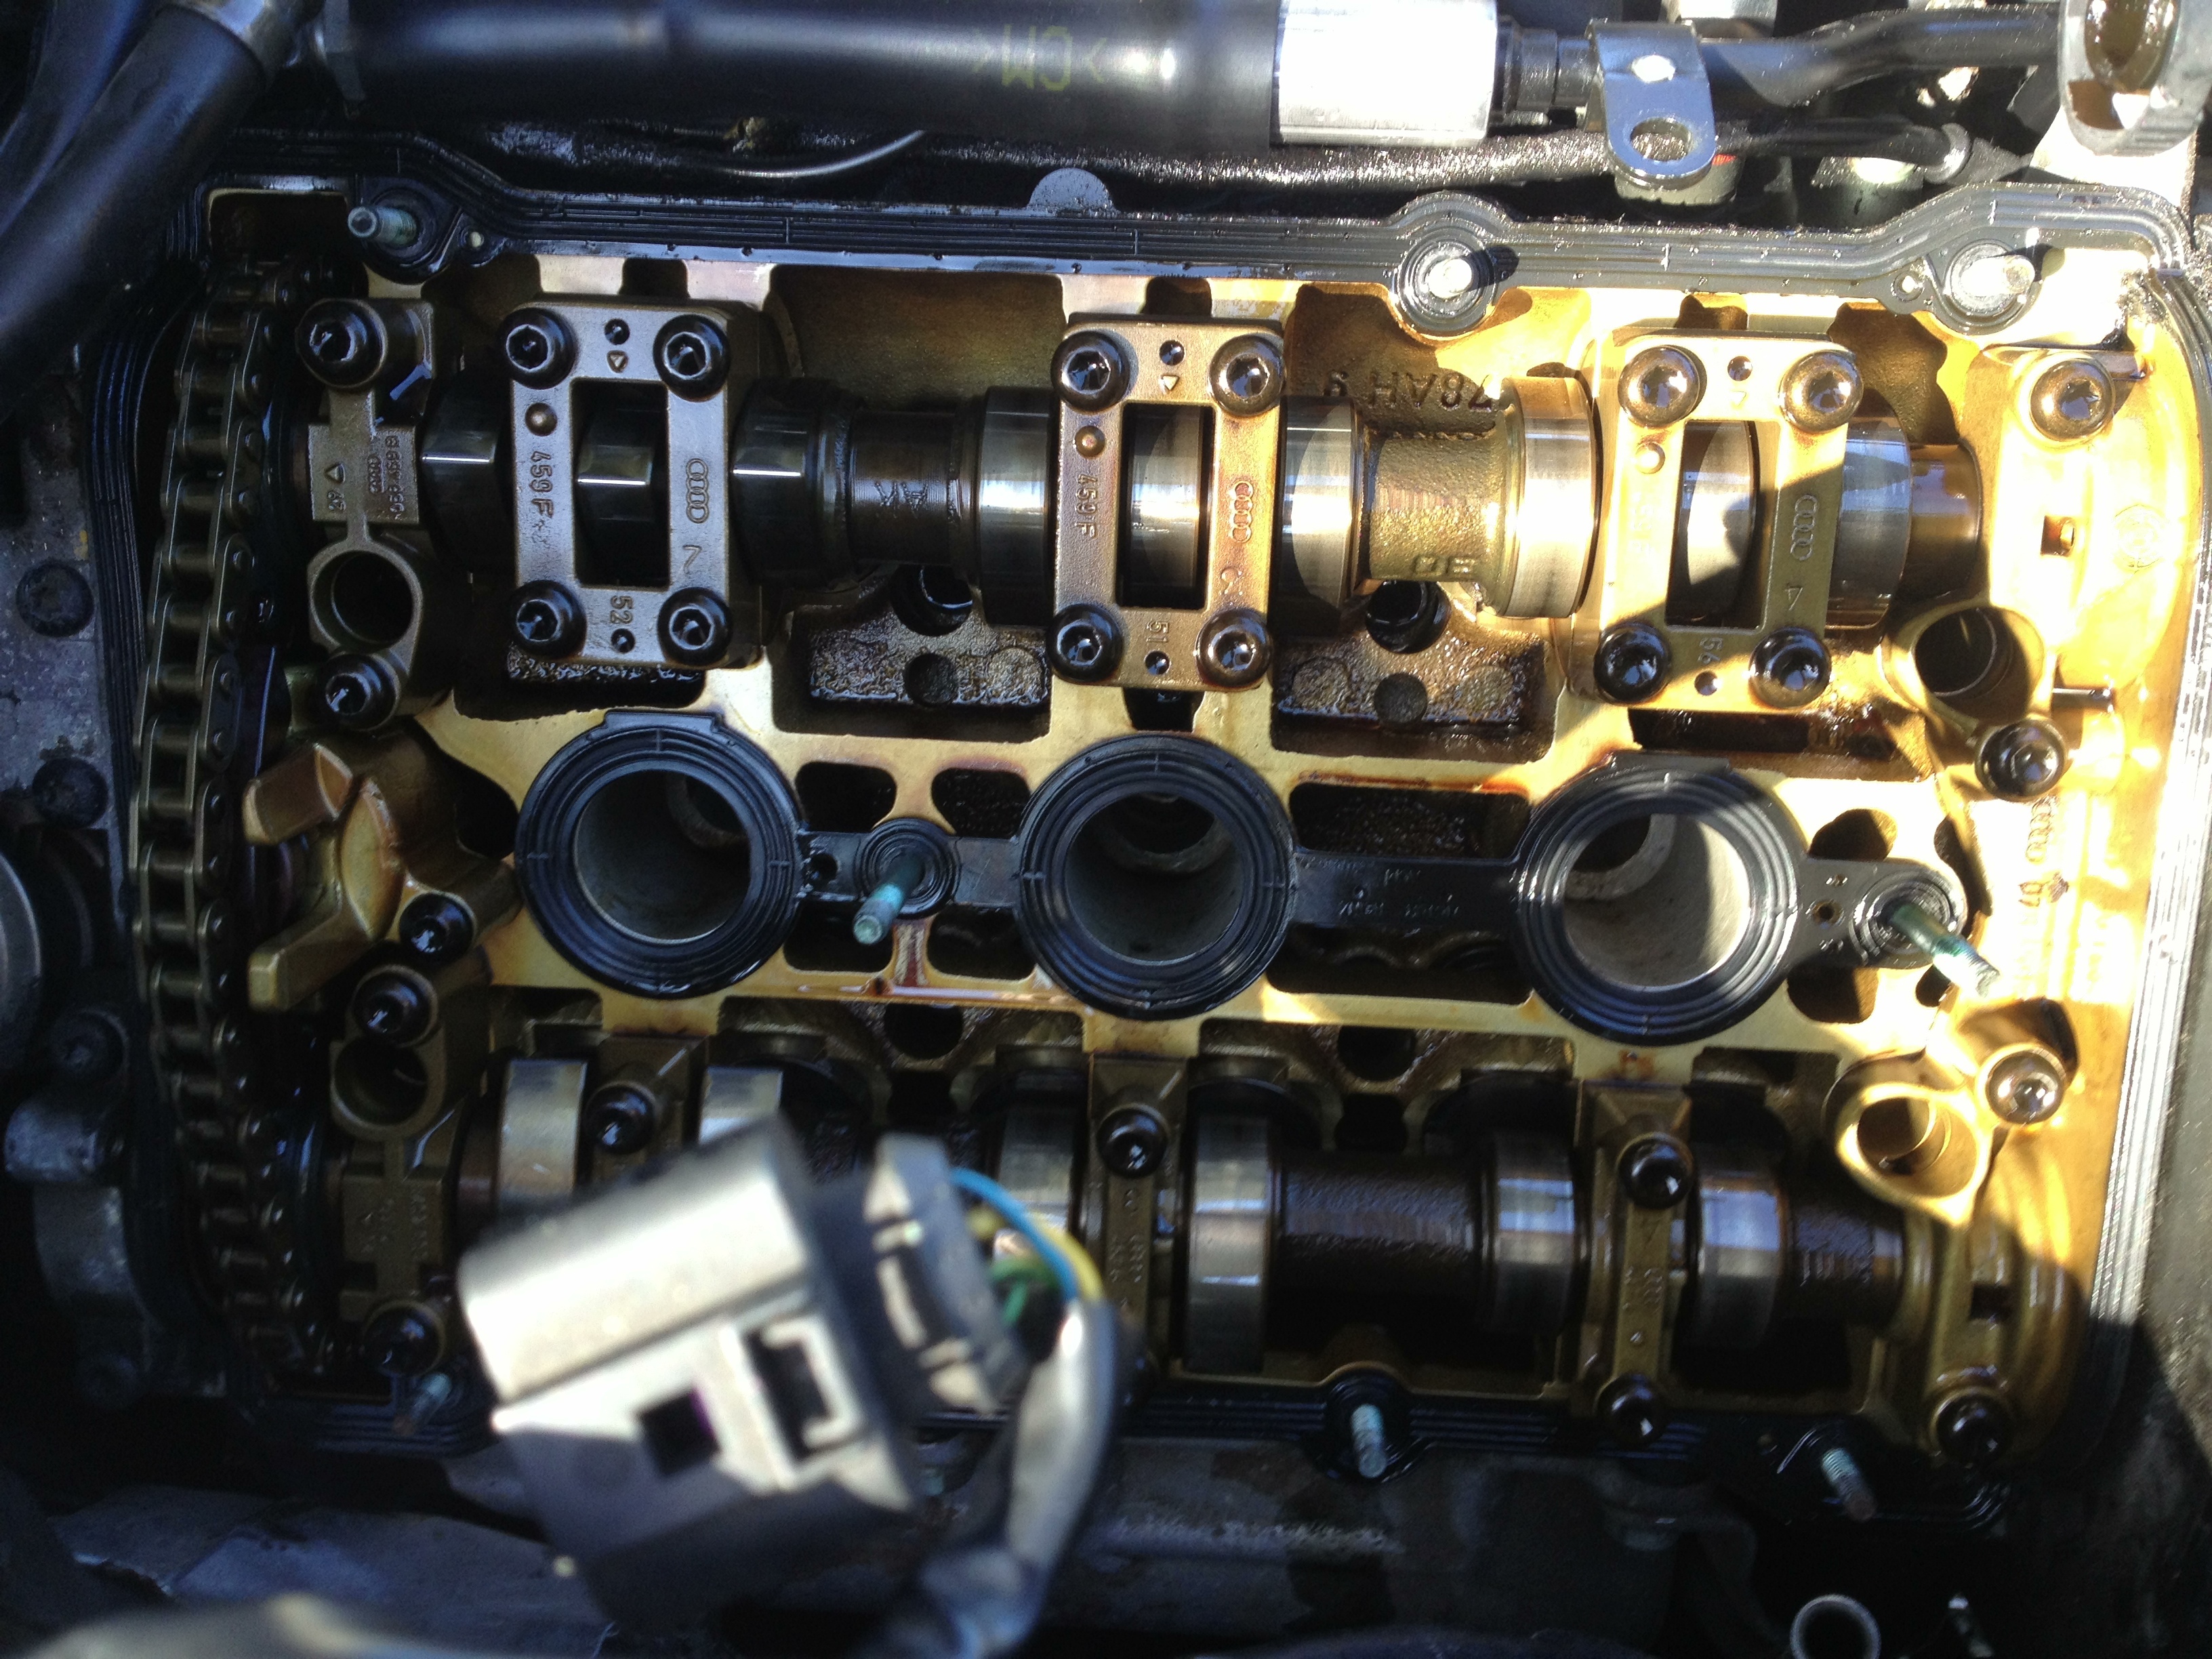
This was the first time I've ever been under the cover of an engine. Didn't seem too scary... think I should try to start it like this? What could go wrong
- Dispite the photo, you will have your paper towel wedged in. START CLEANING UP!!!
- pull off the gaskets
- Mine were crappy and all gross.
- Whip down the area where you pulled the gaskets off.
- Make sure you remove any crud around the edges. Take your time cleaning, you're not in a hurry
- If your spark plug holes are drowning in oil. keep shoving rolled up pointy paper towel down to soak it up. It will eventually cleanup
- Once things are done, get the RTV sealant and the small middle gaskets
- I chose to apply RTV sealant around the rings of the gaskets. You don't have too, but it is an extra quality step
- Once you have the small middle gasket done, drop it on, press down a little and clean up the extra spooge
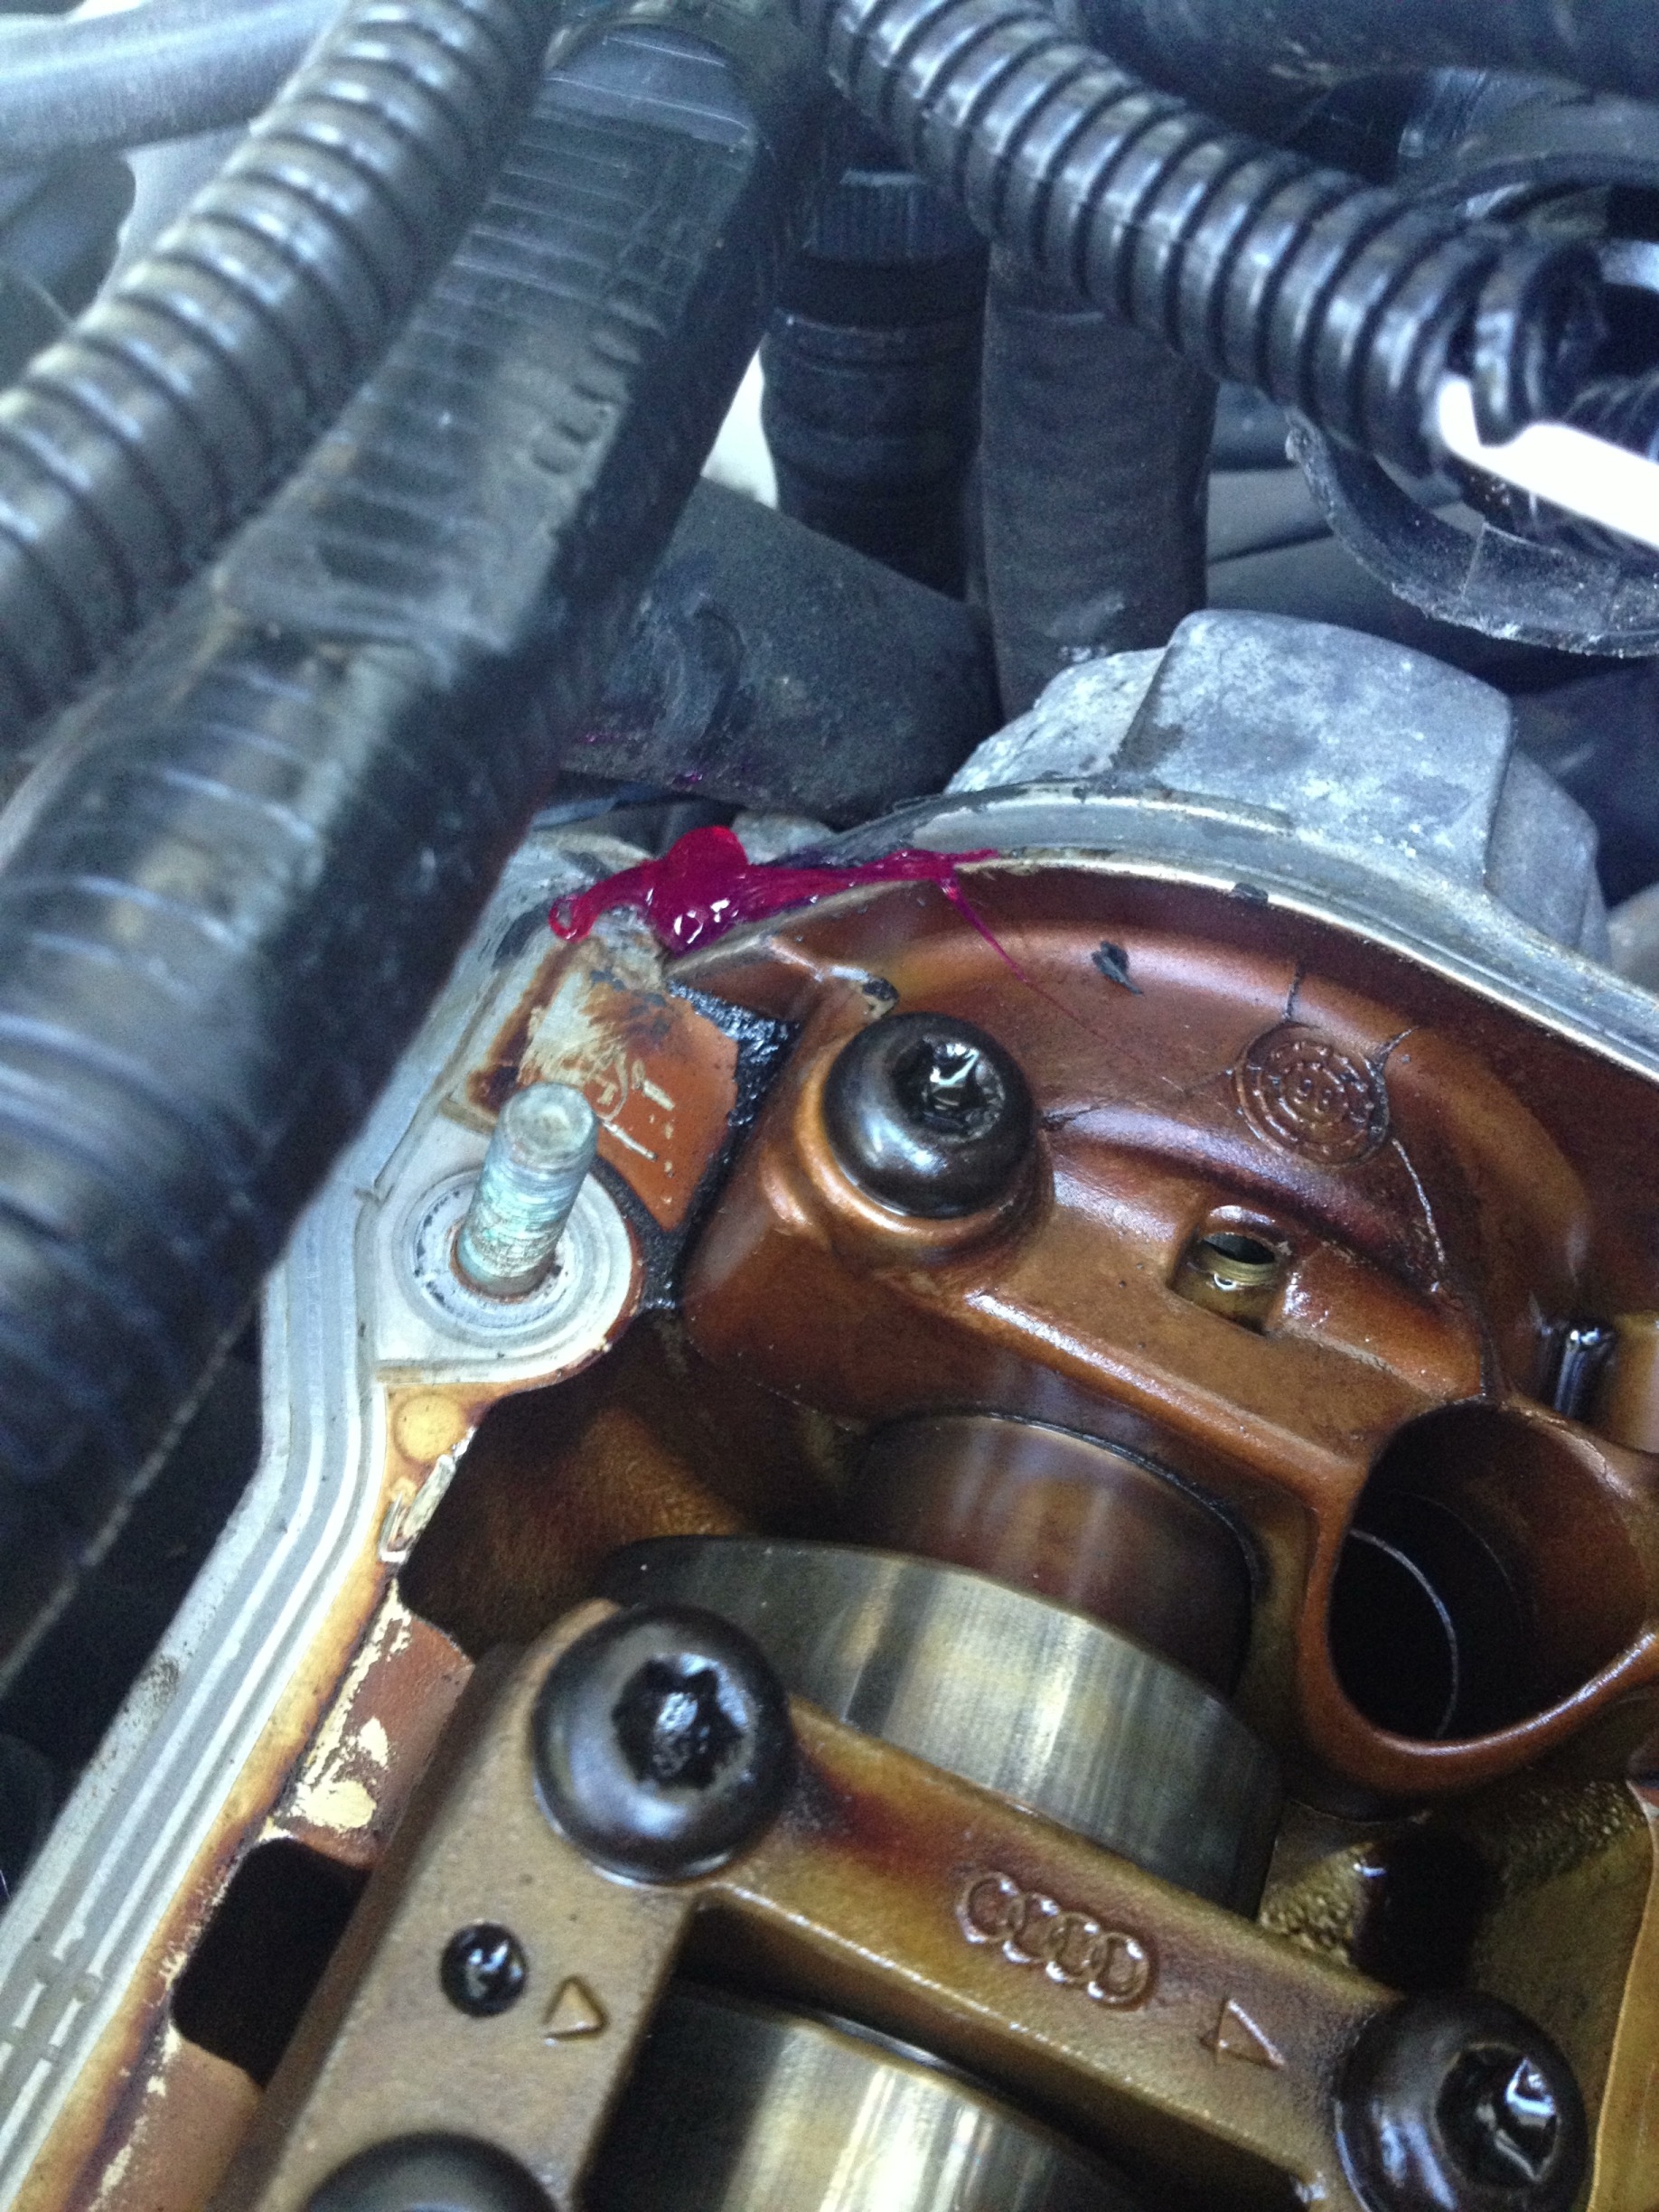
- Now for the big gasket, I, like the picture below, stuck RTV sealant in the corners. You will also see on the gasket, a V shaped portion, make sure you goop up the V so it settles in. You will see why I suggest doing it as it doesn't sit perfectly.
- Ok at this point you've got the RTV done in the corners, the big basket can go on
- Now would be a good time to clean off the cover for any dirt or gunky fluid
- Once you've got a clean cover, place it back on the same way you took it off.
- Now, what order. I googled and had a hard time finding the order
- I chose to do the middle gasket area bolts first. For your Torque Wrench set it to 7Pnds
- I did the two middle first, then Top left, bottom right, bottom left, top right, and same top bottom opposite for the rest
- At this time I could gap the plugs to 0.063 - that is also what the old ones measured
- Reinsert the plugs and don't over tighten(you can use a little anti seizing compound if you want on the thread)
- install or clean up your old wires
- hook up the oil senders
- If you've done both sides, make sure you also hooked back up the sensor for the coolant
- Feel free to add a quart or two of oil
- Now that you've got everything hooked backup like the way it was before you took it apart. START YOUR ENGINES!!
- Mine fired up quickly and no rough idle.
I let things run for 10 minutes and took it for a drive. I've still noticed a burning smell, but there was spillage on to the headers and it will take a little time to burn it off. After a couple of days I noticed the burning smell was A LOT less and almost gone as the spillage is burning off
I've check my wires, no oil. I will pull the plugs out in a week to double check. I might even take the torque wrench and retighten after driving for a bit
So that is my two bits. Feel free to add more.
Been doing some work on the Audi lately, and also have been noticing some burning smells in the cabin that originated from the engine bay. There has also been some noticeable stuttering, and even when I bought it - it seemed to lack some power.
I had a hunch it was a oil leak. So Sunday morning I started to pull the engine apart to take a look. I started on the passenger side.
Pulled out the wires and found this. Look familiar?
The plugs soon came out and they were swimming in oil
At that point I new I had bad gaskets. I didn't even bother looking on the driver side. I knew it was going to be as bad. I thought to myself, how hard is a gasket job going to be? Dunno, lets go find out.
Headed off to Lordco and bought some goodies to make the job work
- 2 Gaskets (had a hunch the other side was failing)
- Torque wrench --> MAKE SURE YOU BUY ONE OF THESE IF YOU DO THIS!!!
- engine cleaner
- paper towels
- spark plugs
- spark wires will come in a couple of weeks ( in case it was another problem)
- 4 quarts of Royal Purple
- RTV Sealant
- You will also need to have a #10 bolt socket for the bolts around the valve cover
- You will also need a socket that can remove spark plugs
- You will also need a spark plug gapping tool
- Flat head screw driver
- Time if you've never done this before for both sides (3.5 Hours)
- a friend to help a little is a good thing too. (I had my buddy around for the last bit to help speed things up)
I have a great tool set my wife bought me a couple years ago to get started.
So here is the spread to help this happen.
Ok so lets get started. (Dislaimer, this is intended as a general guide/how to. Doing extra googling can help. If you are dumb enough to leave your engine on and pull things apart - well.... you shouldn't own a vehicle)
- Make sure car is off
Your bay should look like this. This is where we take things apart to get easy access to the Valve Cover
( I am starting on the passenger side right now, but this is the same process for each side)
- Remove all the engine shrouds and put them aside so you don't step on them
- Remove the airbox runners
- Remove the MAF sensor and put it aside (Might be a good time to clean it)
- Remove the air box top
- Unbolt the Airbox bracket and remove
- There is a philips screw at the top right of the coolant on the driver side.
- In order to do the gasket job on the drivers' side, just simply remove the screw, disconnect the sensor below the tank and move it around.
- Get the bare bones look like this below once you've removed things
- At this point, start to take out your wires and plugs.
- You will probably see the oil on the parts as they come out, don't worry we will clean it up later
- Pay attention to the high pressure power steering hose at the top of the valve cover. Un bolt the clamp so that you can have the hose give a little wiggle room
- Roll up and stuff some paper towel down the spark holes to keep crap from getting in as you take the cover off
- For both sides of the engine, you will need to remove the oil senders by pinching and polling them off
- Now grab your socket wrench, extender and a #10 to start unbolting
- IIRC there are 8 bolts to take off in no particular order ( re-bolting order down below)
- Once you've got the bolts off, remove the dip stick
- My bolts came off WAY to easy. Bet you some dipstick (HAHA I made a funny) didn't use a torque wrench to put them on.
- My valve cover came off effortlessly. You may have to use the flat head screw driver to GENTLY pry the edges till it gives
- You may have to negotiate for it to come off, it can fight a bit for space with the dip stick holder. Either way it comes off pretty easy
It should now look like this
This was the first time I've ever been under the cover of an engine. Didn't seem too scary... think I should try to start it like this? What could go wrong
- Dispite the photo, you will have your paper towel wedged in. START CLEANING UP!!!
- pull off the gaskets
- Mine were crappy and all gross.
- Whip down the area where you pulled the gaskets off.
- Make sure you remove any crud around the edges. Take your time cleaning, you're not in a hurry
- If your spark plug holes are drowning in oil. keep shoving rolled up pointy paper towel down to soak it up. It will eventually cleanup
- Once things are done, get the RTV sealant and the small middle gaskets
- I chose to apply RTV sealant around the rings of the gaskets. You don't have too, but it is an extra quality step
- Once you have the small middle gasket done, drop it on, press down a little and clean up the extra spooge
- Now for the big gasket, I, like the picture below, stuck RTV sealant in the corners. You will also see on the gasket, a V shaped portion, make sure you goop up the V so it settles in. You will see why I suggest doing it as it doesn't sit perfectly.
- Ok at this point you've got the RTV done in the corners, the big basket can go on
- Now would be a good time to clean off the cover for any dirt or gunky fluid
- Once you've got a clean cover, place it back on the same way you took it off.
- Now, what order. I googled and had a hard time finding the order
- I chose to do the middle gasket area bolts first. For your Torque Wrench set it to 7Pnds
- I did the two middle first, then Top left, bottom right, bottom left, top right, and same top bottom opposite for the rest
- At this time I could gap the plugs to 0.063 - that is also what the old ones measured
- Reinsert the plugs and don't over tighten(you can use a little anti seizing compound if you want on the thread)
- install or clean up your old wires
- hook up the oil senders
- If you've done both sides, make sure you also hooked back up the sensor for the coolant
- Feel free to add a quart or two of oil
- Now that you've got everything hooked backup like the way it was before you took it apart. START YOUR ENGINES!!
- Mine fired up quickly and no rough idle.
I let things run for 10 minutes and took it for a drive. I've still noticed a burning smell, but there was spillage on to the headers and it will take a little time to burn it off. After a couple of days I noticed the burning smell was A LOT less and almost gone as the spillage is burning off
I've check my wires, no oil. I will pull the plugs out in a week to double check. I might even take the torque wrench and retighten after driving for a bit
So that is my two bits. Feel free to add more.
#2
03-06-2013, 05:03 PM
Looks like my cams are leaking. Just burning a bit of oil when they expand.
Probably will tackle the job when the weather is nicer. For now just a small leak
Probably will tackle the job when the weather is nicer. For now just a small leak
#3
03-06-2013, 09:26 PM

twopedalwarrior, That should fix the leaky valve cover gasket. Note that it's also common to have oil leaks at the cam chain tensioner seals, although it's a bit late to tell you now. Sounds like you just found out. Changing these seals are a bit more involved. There are writeup about how to do it w/o removing the cams. Here's a site discussing oil leaks if interested. Audi Parts - Vw Parts - Audi Parts Vw Parts Kit Company - Blauparts�
#4
03-06-2013, 10:58 PM
CRuby, thanks for the reply. I've started seeing out helpful Blauparts site is. I'd like to do the cam seals w/o removing the cams.
I will do some reading. I am taking a step back from the Audi for a week. I've put a fair bit of work into her, and given up some weekends. Need recharge for more work.
I've spread some of the work to the Audi dealership here in town and have some quite a bit myself.
This 2001 A6 Avant we paid $3000 for and have only spend 1500 on replacement parts and labour. Almost at the done stage.
Tranny fluid change next week. Cam seals in the near future. Replacing the cracked and weathered fogs this weekend. And installing a new Door Latch sensor.
All in all, enjoying the Audi
#5
08-26-2014, 06:43 AM
DIDNT GET IT, WERE YOU CALLING YOURSELF A DIPSTICK
BEFORE YOU DECIDED TO CHANGE THE DRIVER SIDE GASKETS, DID YOU LOOK TO SEE IF ANY OIL WAS DRIPPING UNDER THAT SIDE? JUST ASKING CAUSE I AM DOING MY DRIVER SIDE, BUT DONT SEE ANY OIL DRIPS ON PASS SIDE,
SO IM NOT DOING THAT SIDE. THINK I NEED TO REPLACE THE CAM SEAL TOO
BEFORE YOU DECIDED TO CHANGE THE DRIVER SIDE GASKETS, DID YOU LOOK TO SEE IF ANY OIL WAS DRIPPING UNDER THAT SIDE? JUST ASKING CAUSE I AM DOING MY DRIVER SIDE, BUT DONT SEE ANY OIL DRIPS ON PASS SIDE,
SO IM NOT DOING THAT SIDE. THINK I NEED TO REPLACE THE CAM SEAL TOO
#6
08-26-2014, 07:08 PM
If one leaks, the other side either is or likely will be soon. Might as well do both and be done with it.
OP - I know this is an older post but it's a very well-written one. I'll move it to the DIY subforum for permanence. Thanks for taking the time to document your work and write it up.
OP - I know this is an older post but it's a very well-written one. I'll move it to the DIY subforum for permanence. Thanks for taking the time to document your work and write it up.

Thread
Thread Starter
Forum
Replies
Last Post
robert.jones
Audi A6
1
12-10-2008 08:01 AM
robert.jones
General Tech
1
12-10-2008 07:56 AM