Fiberglass Kickpanel Tutorial
#1
 02-22-2006, 03:06 PM


Hello friends! As an "Audiophile", I'd like to show you how to get amazing life-like sound in our Audi's. The good news is our cars are very quiet from the factory! This will allow us to drive and be able to appreciate the subtle sonic differences in equipment. The factory door locations are difficult to work with for a number of reasons. 1st, the door panels are mounted to the door with plastic slides. While these are a sexy engineering feat, they're incapable of providing a rigid "baffle" for our speakers. This will make midbass performance suffer. 2nd, the speakers are only 5.25" (or so), and in terms of dynamics, bigger is usually better. 3rd, and most importantly, in order to get a proper "sound stage", path length distances (distance from the source of sound - speaker(s) - to your ears, must be equalized. The most realistic solution in a car to minimize the differences is to move the speakers as far away from us as possible. This will also give us another audiophile sound quality - depth! The kickpanels is the ideal mounting location for midrange/midbass drivers.
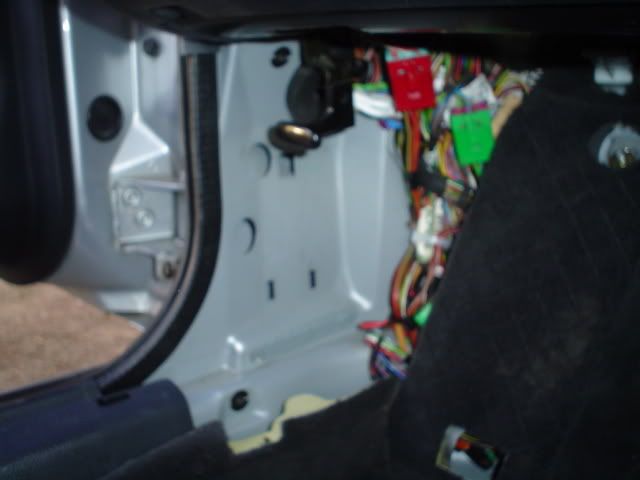
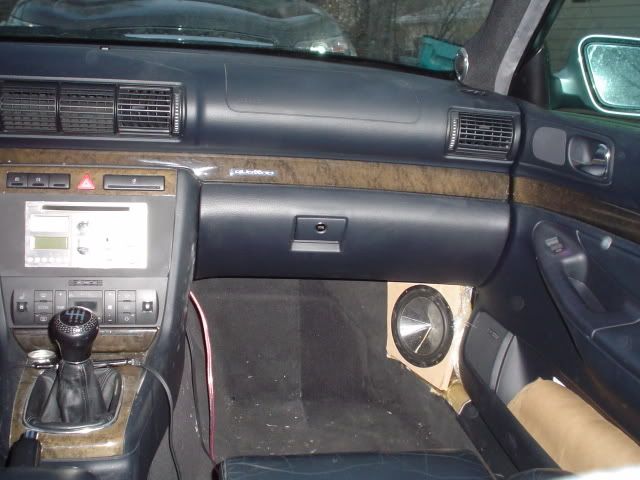
I'm installing a set of 6.5" midbass' in my 2000 Audi S4. I've spent considerable time listening to some "satellite" style home speakers to determine the angle/position/location I wanted to use in this car. A two way with the midbass' in the kickpanels and tweeters on the A-pillars proved to be the best. I've found by keeping the xover slightly higher (~4KHz) will retain width. Having tweeters on the A-pillars will keep the height I wanted. Please see my other tutorial thread on how I mounted the tweeters. Those of you that have VWs or Audis no doubt know of the spaghetti of wires left by the factory in both drivers and passengers kickpanels.
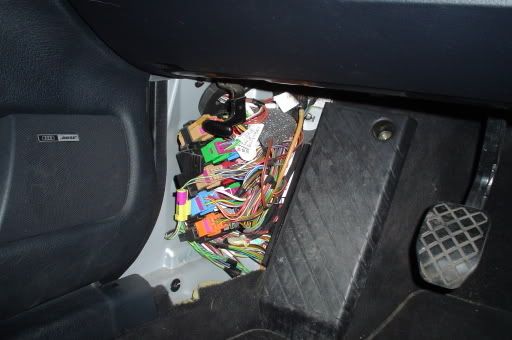
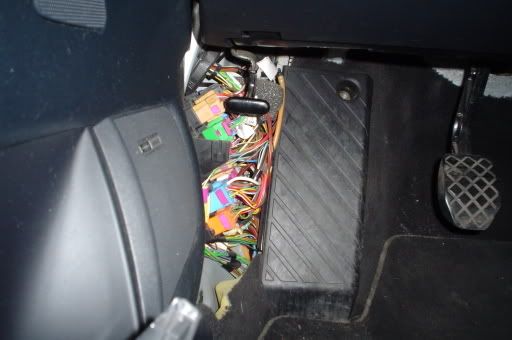
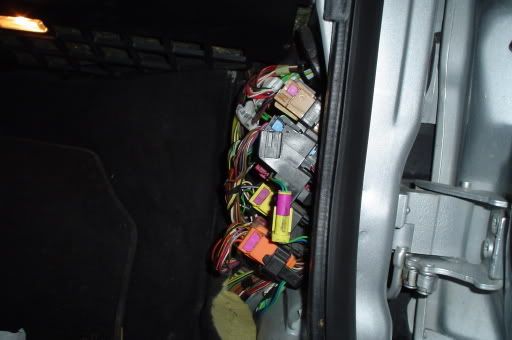
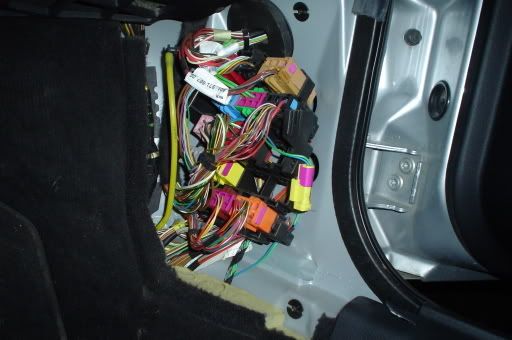
Obviously these wires need to be moved. How much effort and motivation needed to perform this task is somewhat up to you. I was lucky enough to be able to get the wires (and bulky connectors) to reach under the "dead pedal" on the drivers side, and behind the carpet on the passenger side. I could have done the trim to fit with butt connectors, but that's a LOT of work! Not to mention it would limit my ability to return the car to stock condition, and make trouble shooting with the manual almost impossible (many wires are ID'd by the color of connector).
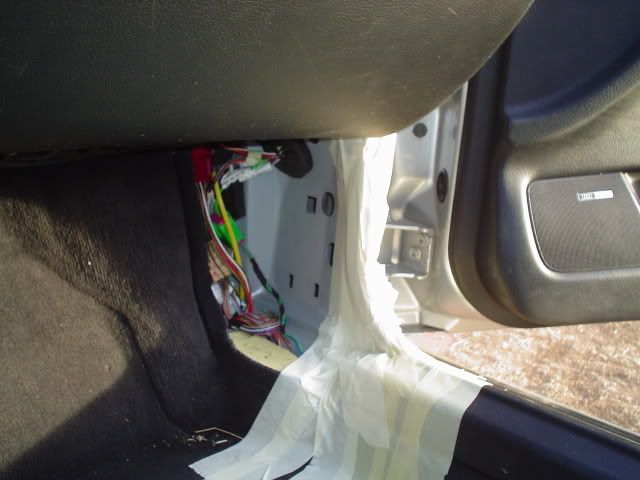
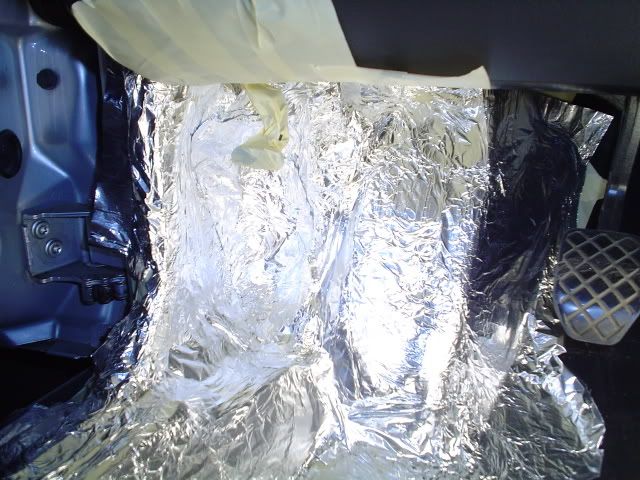
Once you've cleared the area, place masking tape EVERYWHERE!!! This includes going under the dash to protect that panel too. Be sure to tape up ANYTHING that doesn't need resin on it, like the hood release. This will keep the resin from seeping into areas it shouldn't, and off the carpet. I recall Steve Head (Audionuts kickpanel tutorial) suggesting to keep a can of WD-40 at the ready to scrub the resin out of the carpet should you spill some. I've also found it to be able to have similar results on clothes.
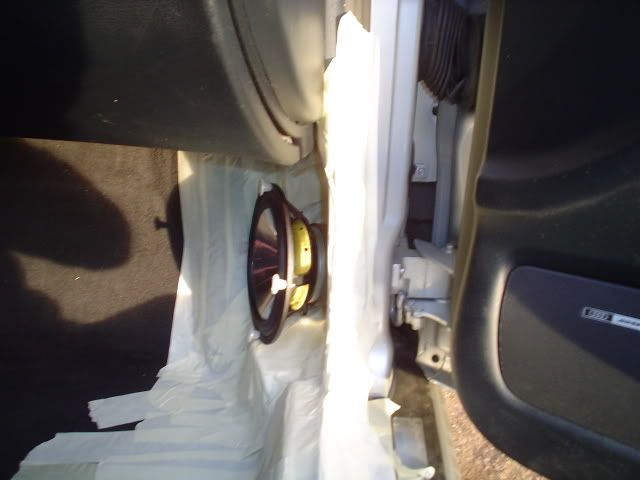
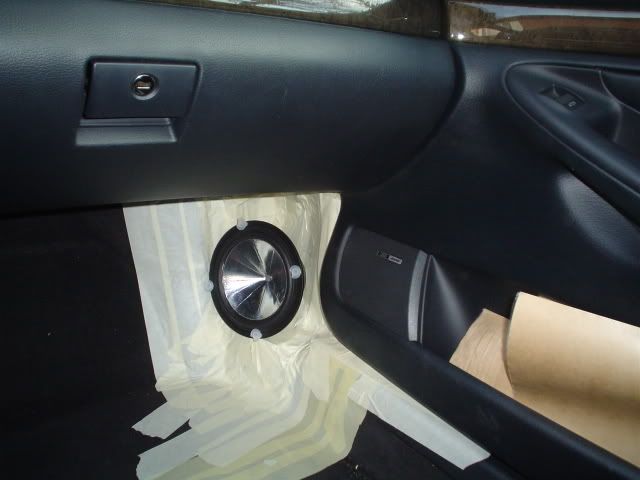
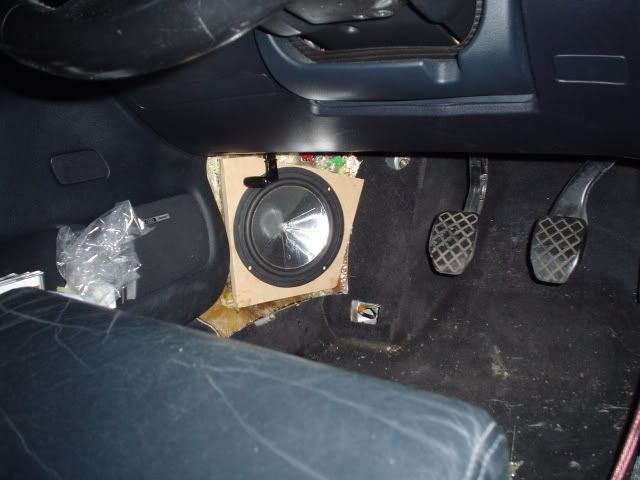
Double check that you've got enough space to mount the drivers. I wanted to get the drivers as wide as I possibly could, and in this install, the magnets for the midbass' will be WIDER than the A-pillars!!!
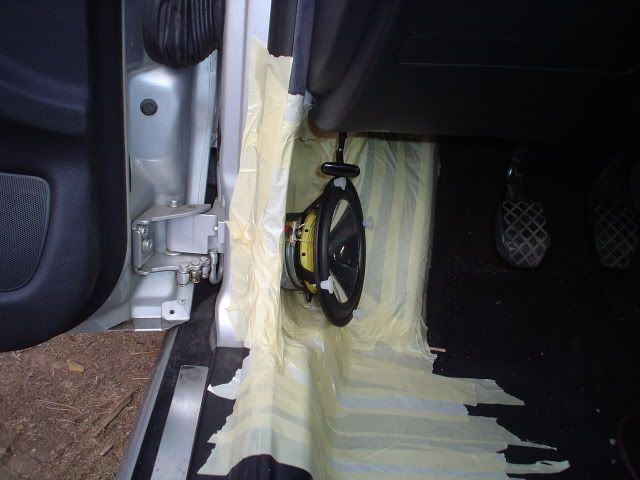
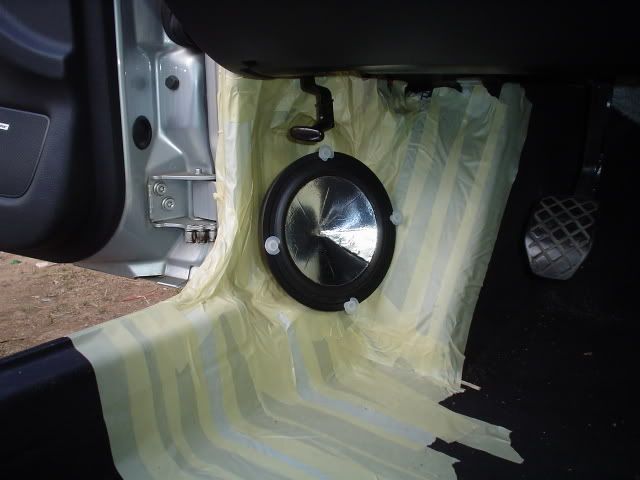
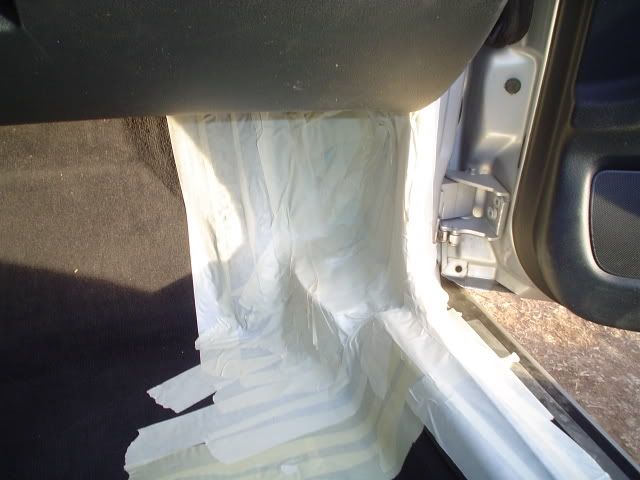
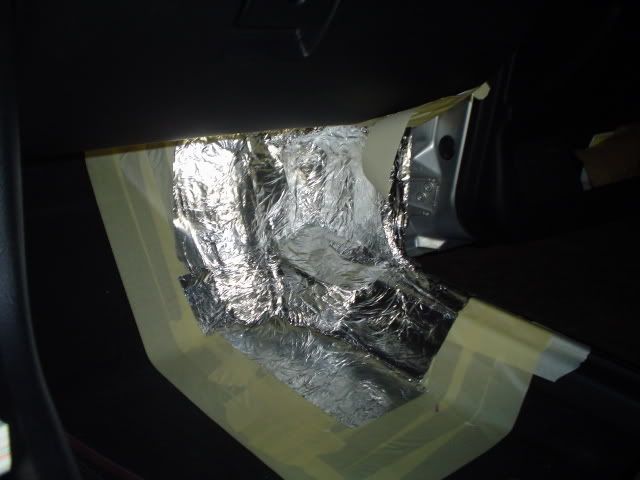
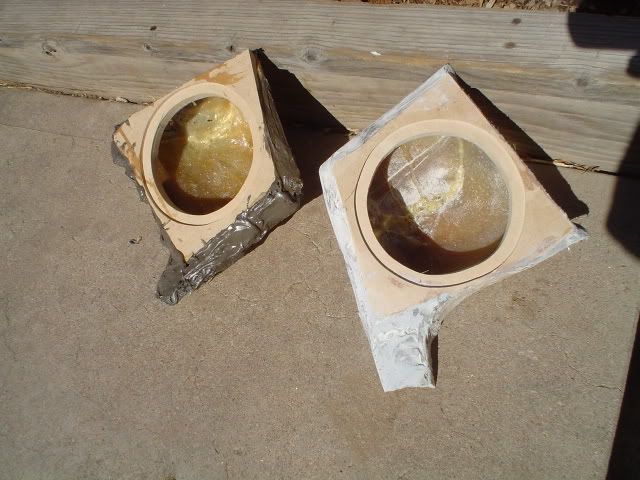
Apply some spray adhesive over the masking tape and then place aluminum foil down. This will make pulling the hardened molds out of the kickpanels easy.
I purchased two 9' square bags of Bondo Fiberglass Mat (Home Depot).
http://www.bondo-online.com/catalog_...sp?itemNbr=112
Cut this into ~10" X ~10" squares (or whatever is easy - it's not important). This will get you a more manageable size to work with. One bag was enough to do the following pictures, but my kickpanels are what I'd call on the small side...so you might need both bags. I will use the other bag of mat to build these up to be thicker later.
**GO CHANGE CLOTHES!***
I purchased a gallon of resin, and used about 1/2 of it. I also used THREE tubes of hardener (and ran out). Of course, when I started this it was 62*F, and when I was done the temperature in Colorado dropped to 32*F. I'm a fan of "more than enough" hardener because too little won't set the resin up and you'll have one hell of a mess. I've yet to find the point where the resin hardens too quickly. As a rule of thumb for mixing, I filled a leftover "beer pong" cup 2/3 full of resin, and dispensed 1/2 of a hardener tube in it, and mixed with the 2" brush. I also invested in a pair of cheap rubber gloves. (Can you tell I hate the mess?)
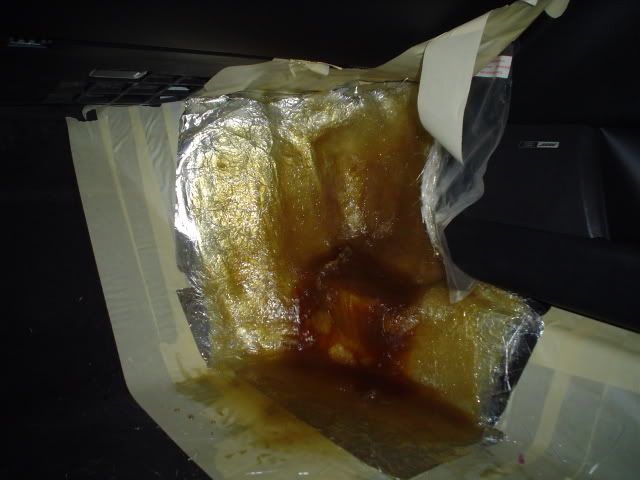
Apply a thin layer of resin over the aluminum foil, and place a section of mat on it. Use a dabbing motion with the brush to apply more resin, and allow it to soak in. Continue this method 'till you've got 3+ layers down. I've found that when going vertical, starting at the lower portion helps, and give it a minute to set up. Go a bit higher on your next pass, etc.
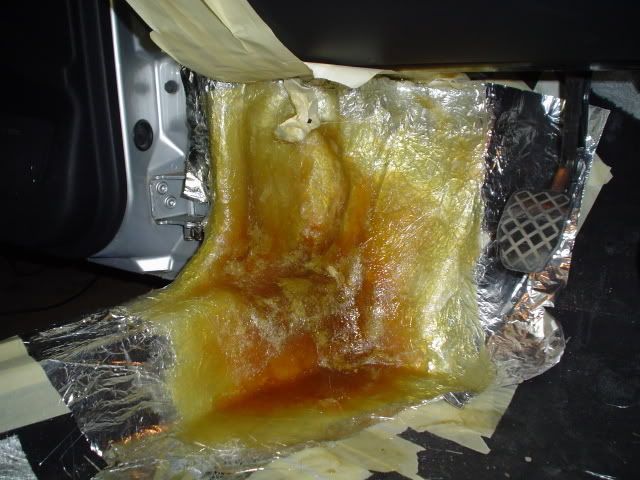
Of course, it started snowing when I was done. I'll have to continue this when the weather's more cooperative. So far, I'm VERY pleased with the results, they're rock hard and will provide a great base for me to work with.
I'll continue this thread later when I show you how to make the baffle (speaker mounting board), attach it to the fiberglass, and make finishing details.
I'm installing a set of 6.5" midbass' in my 2000 Audi S4. I've spent considerable time listening to some "satellite" style home speakers to determine the angle/position/location I wanted to use in this car. A two way with the midbass' in the kickpanels and tweeters on the A-pillars proved to be the best. I've found by keeping the xover slightly higher (~4KHz) will retain width. Having tweeters on the A-pillars will keep the height I wanted. Please see my other tutorial thread on how I mounted the tweeters. Those of you that have VWs or Audis no doubt know of the spaghetti of wires left by the factory in both drivers and passengers kickpanels.
Obviously these wires need to be moved. How much effort and motivation needed to perform this task is somewhat up to you. I was lucky enough to be able to get the wires (and bulky connectors) to reach under the "dead pedal" on the drivers side, and behind the carpet on the passenger side. I could have done the trim to fit with butt connectors, but that's a LOT of work! Not to mention it would limit my ability to return the car to stock condition, and make trouble shooting with the manual almost impossible (many wires are ID'd by the color of connector).
Once you've cleared the area, place masking tape EVERYWHERE!!! This includes going under the dash to protect that panel too. Be sure to tape up ANYTHING that doesn't need resin on it, like the hood release. This will keep the resin from seeping into areas it shouldn't, and off the carpet. I recall Steve Head (Audionuts kickpanel tutorial) suggesting to keep a can of WD-40 at the ready to scrub the resin out of the carpet should you spill some. I've also found it to be able to have similar results on clothes.
Double check that you've got enough space to mount the drivers. I wanted to get the drivers as wide as I possibly could, and in this install, the magnets for the midbass' will be WIDER than the A-pillars!!!
Apply some spray adhesive over the masking tape and then place aluminum foil down. This will make pulling the hardened molds out of the kickpanels easy.
I purchased two 9' square bags of Bondo Fiberglass Mat (Home Depot).
http://www.bondo-online.com/catalog_...sp?itemNbr=112
Cut this into ~10" X ~10" squares (or whatever is easy - it's not important). This will get you a more manageable size to work with. One bag was enough to do the following pictures, but my kickpanels are what I'd call on the small side...so you might need both bags. I will use the other bag of mat to build these up to be thicker later.
**GO CHANGE CLOTHES!***
I purchased a gallon of resin, and used about 1/2 of it. I also used THREE tubes of hardener (and ran out). Of course, when I started this it was 62*F, and when I was done the temperature in Colorado dropped to 32*F. I'm a fan of "more than enough" hardener because too little won't set the resin up and you'll have one hell of a mess. I've yet to find the point where the resin hardens too quickly. As a rule of thumb for mixing, I filled a leftover "beer pong" cup 2/3 full of resin, and dispensed 1/2 of a hardener tube in it, and mixed with the 2" brush. I also invested in a pair of cheap rubber gloves. (Can you tell I hate the mess?)
Apply a thin layer of resin over the aluminum foil, and place a section of mat on it. Use a dabbing motion with the brush to apply more resin, and allow it to soak in. Continue this method 'till you've got 3+ layers down. I've found that when going vertical, starting at the lower portion helps, and give it a minute to set up. Go a bit higher on your next pass, etc.
Of course, it started snowing when I was done. I'll have to continue this when the weather's more cooperative. So far, I'm VERY pleased with the results, they're rock hard and will provide a great base for me to work with.
I'll continue this thread later when I show you how to make the baffle (speaker mounting board), attach it to the fiberglass, and make finishing details.
#2
02-23-2006, 11:48 PM
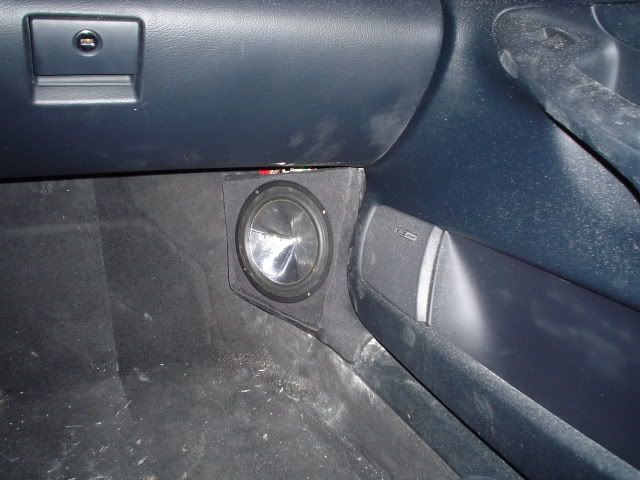
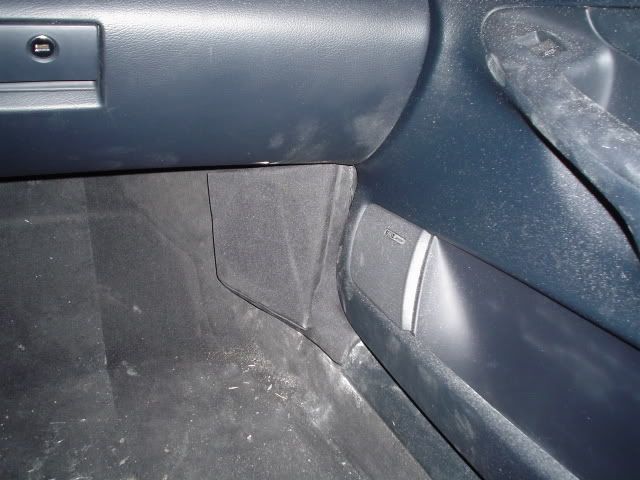
Part 2 - The Baffle and Trim
Today I designed the trim and baffles. There's TONS of ways to do this, so spend some time thinking how you want your kickpanels to look.
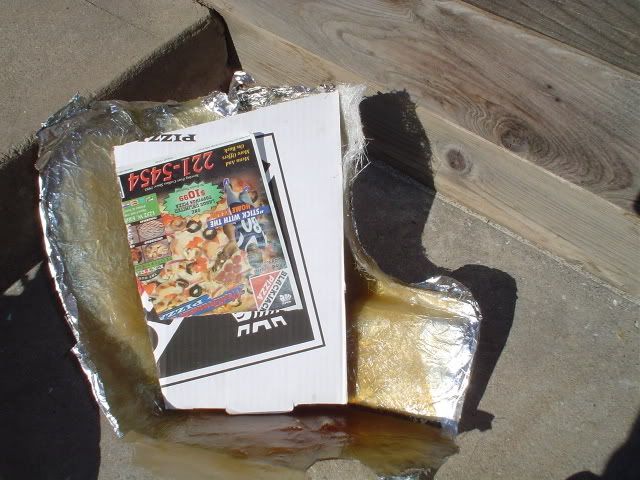
1) Remove the Fiberglass molds from the vehicle.

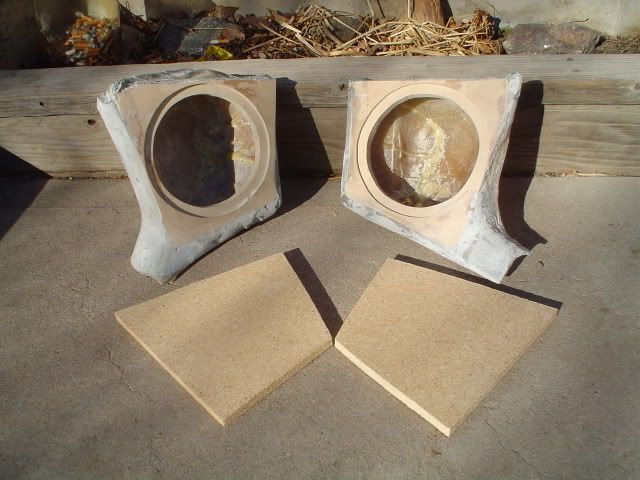
2) Use cardobard (old pizza boxes work great for this) to design the LARGEST the kickpanel will be. This will later be the grille. Trace and cut it out of 3/4" MDF. (These may need to be modified in the future).
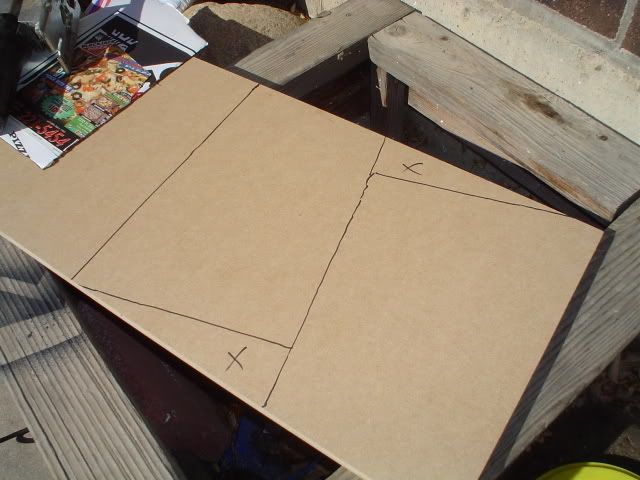
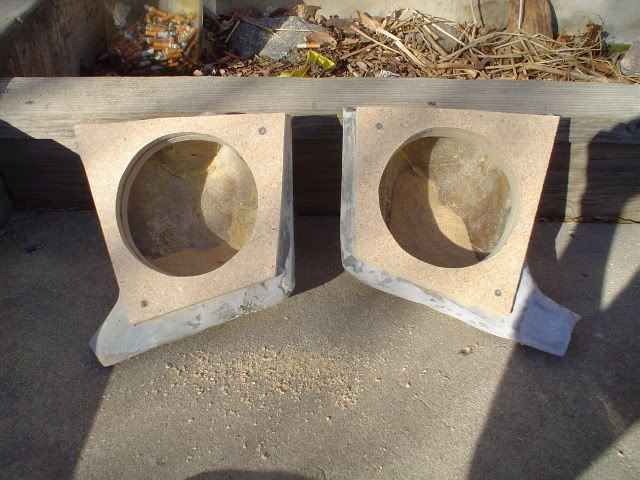
3) Trim the cardboard down to create the baffle. Trace onto 3/4" MDF, and cut. I used a circle cutting jig to create the flush mount, and hole for the driver.
4) Mark on the fiberglass mold where the edges are, and trim to shape.
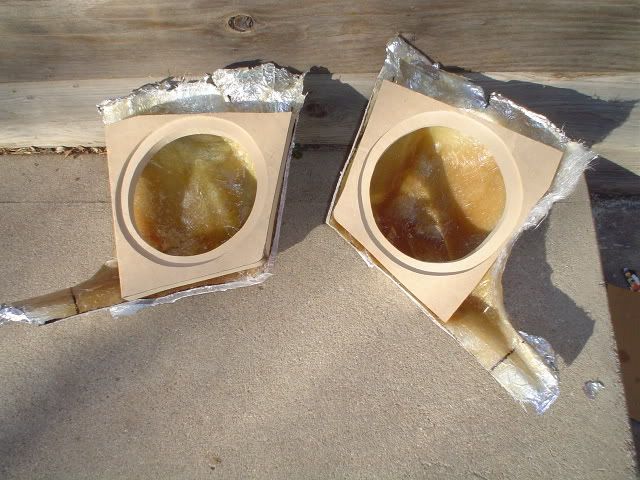
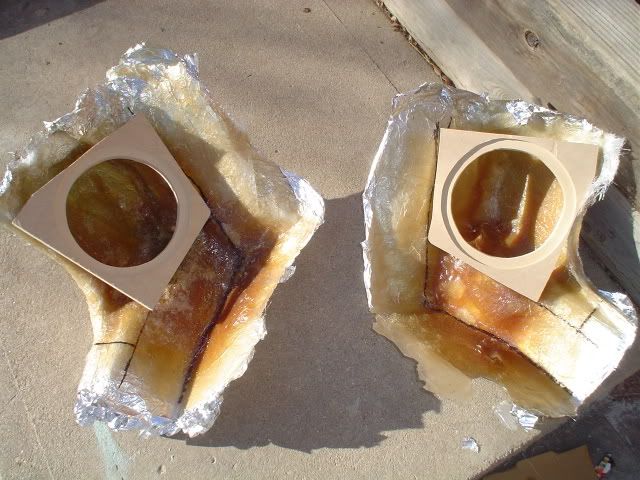
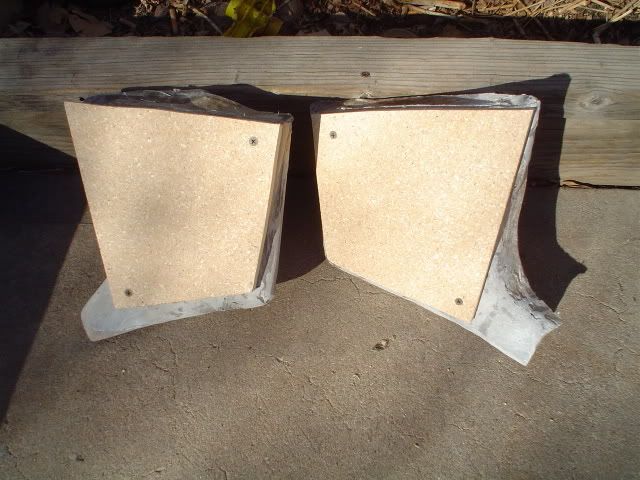
5) Use some glue (Gorilla glue works great) to attach baffles to the fiberglass, and check fittment once dry.
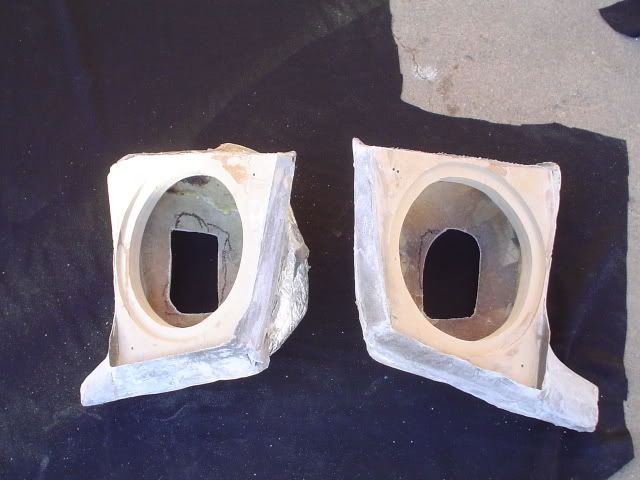
6) Wrap the edges of the baffle to the kickpanel mold using grille cloth, spray adhesive (fiberglass side), and staples (baffle edge - NOT face). Try to keep the resin off of the baffle because we're going to attach the trim (grille) to that, and we'll want a smooth surface. Once the resin is applied to the grille cloth, apply a few layers of fiberglass mat, and coat in resin.
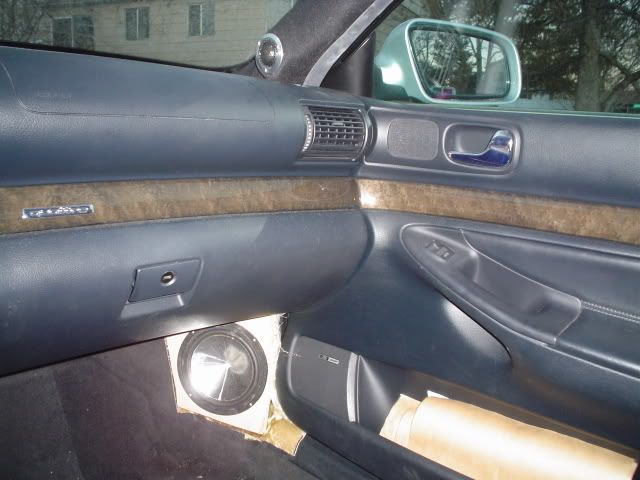
7) Wrap the kickpanel and grille in whatever material you're using. RUN THE WIRE FIRST! Use some screws with HUGE washers through the back of the kickpanel into the car. Wire up and enjoy!
Cheers,
Matt
Today I designed the trim and baffles. There's TONS of ways to do this, so spend some time thinking how you want your kickpanels to look.
1) Remove the Fiberglass molds from the vehicle.
2) Use cardobard (old pizza boxes work great for this) to design the LARGEST the kickpanel will be. This will later be the grille. Trace and cut it out of 3/4" MDF. (These may need to be modified in the future).
3) Trim the cardboard down to create the baffle. Trace onto 3/4" MDF, and cut. I used a circle cutting jig to create the flush mount, and hole for the driver.
4) Mark on the fiberglass mold where the edges are, and trim to shape.
5) Use some glue (Gorilla glue works great) to attach baffles to the fiberglass, and check fittment once dry.
6) Wrap the edges of the baffle to the kickpanel mold using grille cloth, spray adhesive (fiberglass side), and staples (baffle edge - NOT face). Try to keep the resin off of the baffle because we're going to attach the trim (grille) to that, and we'll want a smooth surface. Once the resin is applied to the grille cloth, apply a few layers of fiberglass mat, and coat in resin.
7) Wrap the kickpanel and grille in whatever material you're using. RUN THE WIRE FIRST! Use some screws with HUGE washers through the back of the kickpanel into the car. Wire up and enjoy!
Cheers,
Matt


#6
03-28-2006, 06:44 PM

i def dont think i would attemp that on my own.. LOL big ups to you


#8
03-30-2006, 05:23 AM
Thanks guys!
This past weekend was the Spring Break Nationals in Daytona, FL. Out of 14 cars, mine took 5th! I TIED the 1st place current world champion in Sound Quality, but because the installation wasn't quite finished lost quite a bit of points. Here's some pics:
Sound Quality Judge - Harry Kimura
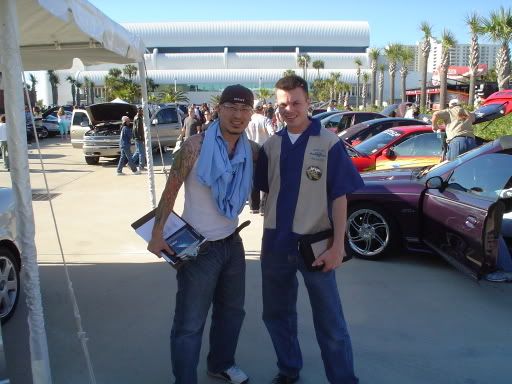
Installation Judge - Ron Buffington
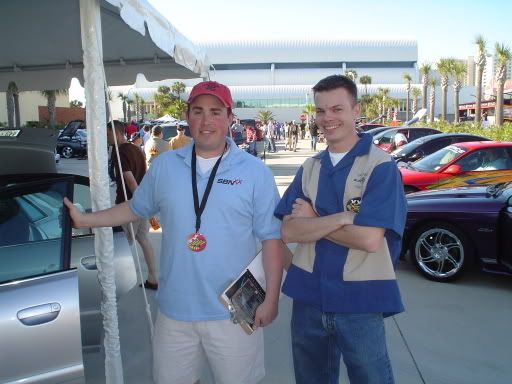
Awards Ceremony - 5th place IASCA Pro Street

Team Zapco (amplifiers)
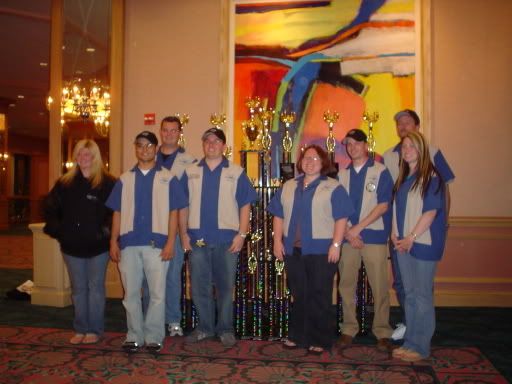
Team Image Dynamics (subs)

This past weekend was the Spring Break Nationals in Daytona, FL. Out of 14 cars, mine took 5th! I TIED the 1st place current world champion in Sound Quality, but because the installation wasn't quite finished lost quite a bit of points. Here's some pics:
Sound Quality Judge - Harry Kimura
Installation Judge - Ron Buffington
Awards Ceremony - 5th place IASCA Pro Street
Team Zapco (amplifiers)
Team Image Dynamics (subs)
#9
05-12-2006, 02:42 PM

that looks extremely clean dude. I'd love to hear how that sounds. I'm sure all that work was a b!tch though, mad props too you
#10
05-13-2006, 10:07 AM
Thanks for the compliments!
Here's a thought...I'll sell these as I'm rebuilding for a different speaker setup. I'll have to check what speakers will fit, and will give suggestions...or sell you a package deal.
Cheers,
Matt
Here's a thought...I'll sell these as I'm rebuilding for a different speaker setup. I'll have to check what speakers will fit, and will give suggestions...or sell you a package deal.
Cheers,
Matt