MetalMan's 1.8T FrankenTurbo (F4H-L, F21) Build Thread
#211
 06-11-2014, 05:55 PM


Whew, sleep has never been so desired as it has been lately. We FINALLY finished tiling our shower last week, and grouted the tile last Friday. This past Monday we sealed the grout. Yesterday we refinished the bathtub with Rustoleum's paint kit (using paint roller and foam brush). That paint has pretty bad fumes but we were prepared (respirators and fans, kept bathroom doors closed)
Last up is caulking the tub on Friday, since we have to wait for the tub's fresh paint to cure. Then Saturday we will be able to shower in our home for the first time ever! It's been a long time coming for sure, and I've spent probably 75% of my free time on it over the last month-and-a-half.
So with my upcoming free time I'll get around to working on the 2001 A4 again and will be doing so in the garage at our new house! Here's a list of my plans:
1) Loosen front wheel lug bolts.
2) Lift entire car high up and lower onto jack stands. Remove front wheels.
3) Remove front bumper and intercooler/piping.
4) Drain coolant, collect it for re-use. Remove coolant tank.
5) Put car in service position by removing front lock carrier.
6) Drain oil and remove oil filter. Replace oil filter.
7) Remove air box and turbo inlet pipe.
8) Remove HFC and downpipe as a single unit, from bottom of car. Also remove downpipe heat shield.
9) Remove old FrankenTurbo F4H-L with coolant and oil lines/fittings.
10) Remove old FrankenTurbo exhaust manifold.
11) Search around for source of current oil leak.
12) Unbolt engine mounts and jack up engine by the oil pan.
13) Mark position of old engine mounts (which are only a few thousand miles old...). Disconnect sway bar/brackets and remove old engine mounts.
14) Install 034 street density engine mounts according to marks, and lower engine onto them. Reinstall sway bar/brackets.
15) Install new FrankenTurbo exhaust manifold with new gasket.
16) Install new FrankenTurbo F21L with installed coolant and oil lines/fittings, and new gaskets. Also use new turbo mounting bolts with holes drilled through heads (for safety wire). Also add oil through oil feed fitting.
17) Reinstall front lock carrier. Reinstall intercooler/piping.
18) Diagnose slipping clutch:
18a) Poke around transmission and clutch slave cylinder, see if things look alright.
18b) If those look okay, proceed with dropping the transmission. Pull battery cable.
18c) If it looks okay in the transmission bell housing (i.e. no oil leak), pull clutch/flywheel and replace with ECS RA4 kit.
18d) If it looks like oil leaked inside the tranny bell housing, pull flywheel and check/replace rear main seal.
18e) Reinstall transmission/mounts/driveshafts.
19) Reinstall downpipe and HFC as a single unit, with new turbo-to-cat gasket and locknuts. Also reinstall downpipe heat shield.
20) Reinstall air box and turbo inlet pipe.
21) Put front wheels back on.
22) Lift up car, remove jackstands, and lower car back onto ground. Torque front wheel bolts.
23) Fill oil.
24) Reinstall coolant tank without cap. Fill coolant, allowing time for air to escape.
25) Crank engine with fuel injectors unplugged for 10-15 seconds, 3 times. (to prime the oil in turbo)
26) Reconnect fuel injectors and start engine. Allow engine to idle up to operating temp to burp coolant and check for fluid leaks. Re-fill coolant as-needed.
27) Drive around with driver-side headlight removed and get turbo really hot. Re-torque turbo mounting bolts.
28) Safety-wire turbo mounting bolts.
29) Perform boost leak test, fix any leaks.
30) Reinstall bumper.
31) Trim front bumper valence to clear FMIC/pipes.
31) Cut stock bumper grills to fit with intercooler/piping.
Last up is caulking the tub on Friday, since we have to wait for the tub's fresh paint to cure. Then Saturday we will be able to shower in our home for the first time ever! It's been a long time coming for sure, and I've spent probably 75% of my free time on it over the last month-and-a-half.
So with my upcoming free time I'll get around to working on the 2001 A4 again
and will be doing so in the garage at our new house! Here's a list of my plans:1) Loosen front wheel lug bolts.
2) Lift entire car high up and lower onto jack stands. Remove front wheels.
3) Remove front bumper and intercooler/piping.
4) Drain coolant, collect it for re-use. Remove coolant tank.
5) Put car in service position by removing front lock carrier.
6) Drain oil and remove oil filter. Replace oil filter.
7) Remove air box and turbo inlet pipe.
8) Remove HFC and downpipe as a single unit, from bottom of car. Also remove downpipe heat shield.
9) Remove old FrankenTurbo F4H-L with coolant and oil lines/fittings.
10) Remove old FrankenTurbo exhaust manifold.
11) Search around for source of current oil leak.
12) Unbolt engine mounts and jack up engine by the oil pan.
13) Mark position of old engine mounts (which are only a few thousand miles old...). Disconnect sway bar/brackets and remove old engine mounts.
14) Install 034 street density engine mounts according to marks, and lower engine onto them. Reinstall sway bar/brackets.
15) Install new FrankenTurbo exhaust manifold with new gasket.
16) Install new FrankenTurbo F21L with installed coolant and oil lines/fittings, and new gaskets. Also use new turbo mounting bolts with holes drilled through heads (for safety wire). Also add oil through oil feed fitting.
17) Reinstall front lock carrier. Reinstall intercooler/piping.
18) Diagnose slipping clutch:
18a) Poke around transmission and clutch slave cylinder, see if things look alright.
18b) If those look okay, proceed with dropping the transmission. Pull battery cable.
18c) If it looks okay in the transmission bell housing (i.e. no oil leak), pull clutch/flywheel and replace with ECS RA4 kit.
18d) If it looks like oil leaked inside the tranny bell housing, pull flywheel and check/replace rear main seal.
18e) Reinstall transmission/mounts/driveshafts.
19) Reinstall downpipe and HFC as a single unit, with new turbo-to-cat gasket and locknuts. Also reinstall downpipe heat shield.
20) Reinstall air box and turbo inlet pipe.
21) Put front wheels back on.
22) Lift up car, remove jackstands, and lower car back onto ground. Torque front wheel bolts.
23) Fill oil.
24) Reinstall coolant tank without cap. Fill coolant, allowing time for air to escape.
25) Crank engine with fuel injectors unplugged for 10-15 seconds, 3 times. (to prime the oil in turbo)
26) Reconnect fuel injectors and start engine. Allow engine to idle up to operating temp to burp coolant and check for fluid leaks. Re-fill coolant as-needed.
27) Drive around with driver-side headlight removed and get turbo really hot. Re-torque turbo mounting bolts.
28) Safety-wire turbo mounting bolts.
29) Perform boost leak test, fix any leaks.
30) Reinstall bumper.
31) Trim front bumper valence to clear FMIC/pipes.
31) Cut stock bumper grills to fit with intercooler/piping.
Last edited by MetalMan; 08-23-2014 at 06:59 PM.
#212
06-20-2014, 11:07 AM
Got the car started yesterday! Let it idle for more than half an hour by the time I finally pulled out of the garage and went on my way. Drove it for about 25mins, with no rattling! Feels good to be driving a car with power compared to my '98.5 which has an all-but-stock engine.
Oh yeah, and the clutch didn't slip one bit that means no dropping transmission, spending money on a replacement clutch, and re-fitting the transmission.
There's definitely been oil buildup on the underside of the engine/subframe, and I didn't conclude a specific source of the oil. I re-tightened the valve cover nuts, since it looked like oil could have leaked from there. We shall see.
Today after work I'll go about running safety wire through the turbo bolts. Tomorrow will see a boost leak test and re-install of the front bumper. Depending on time I may also start on trimming the bumper grilles and lower valence. And also plan to wash the car
Oh yeah, and the clutch didn't slip one bit
that means no dropping transmission, spending money on a replacement clutch, and re-fitting the transmission.There's definitely been oil buildup on the underside of the engine/subframe, and I didn't conclude a specific source of the oil. I re-tightened the valve cover nuts, since it looked like oil could have leaked from there. We shall see.
Today after work I'll go about running safety wire through the turbo bolts. Tomorrow will see a boost leak test and re-install of the front bumper. Depending on time I may also start on trimming the bumper grilles and lower valence. And also plan to wash the car
#213
06-21-2014, 02:13 PM
Yesterday after work I made 3 attempts at safety wiring the turbo bolts. I had never safety-wired before, but I figured it couldn't that difficult.
First attempt:
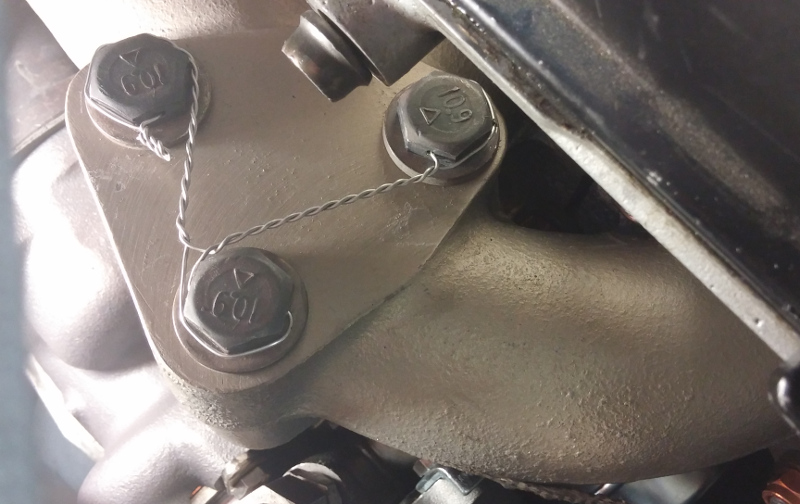
Bit loose around the bolts, definitely wouldn't keep them tight enough.
2nd attempt was a little better, but still not tight enough. It's a challenging area to work in, no doubt. Also the safety wire pliers I bought don't twist counter-clockwise so any counter-clockwise twisting had to be done by hand.
3rd (and final) attempt:
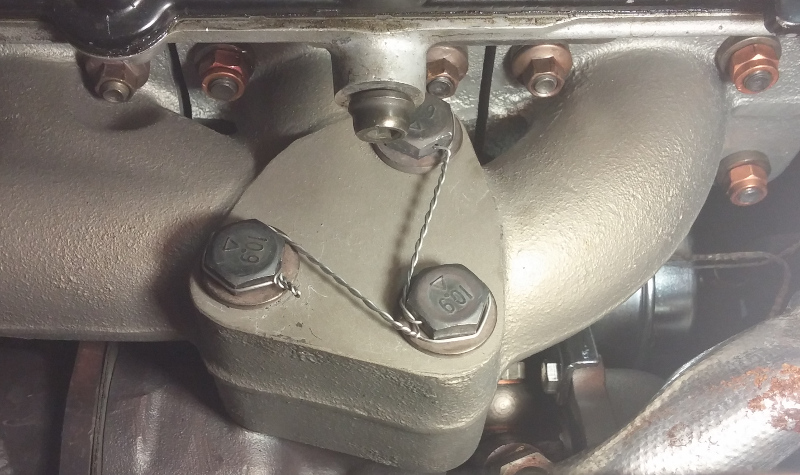
Not too bad, came out pretty tight. Seems tight enough that there won't be any bolts backing out. I know how it can be improved but I had a dinner thing to go to and considered this "good enough".
Here's to a long time with NO MORE FrankenTurbo issues!!
First attempt:
Bit loose around the bolts, definitely wouldn't keep them tight enough.
2nd attempt was a little better, but still not tight enough. It's a challenging area to work in, no doubt. Also the safety wire pliers I bought don't twist counter-clockwise so any counter-clockwise twisting had to be done by hand.
3rd (and final) attempt:
Not too bad, came out pretty tight. Seems tight enough that there won't be any bolts backing out. I know how it can be improved but I had a dinner thing to go to and considered this "good enough".
Here's to a long time with NO MORE FrankenTurbo issues!!
#214
07-14-2014, 11:14 AM
Well, had a bittersweet weekend. Most of it was spent wrenching on my 1998.5 A4, prepping it for a good friend who drove down and picked it up yesterday.
Did a pretty decent amount of work:
-oil change
-replaced ProSport oil pressure sender, for the gauge that's mounted where the analog clock goes (old one wasn't reading properly)
-replaced brake master cylinder
-bled the crap out of the brakes
-washed it for the first time in probably 4+ months (during which time it was sitting outside mostly)
-replaced torn outer CV boot, and also rebuilt the inner CV joint with fresh grease
-attempted to fix the source of a coolant leak from around the turbo
All-in-all I'm glad to be down to one car but that feeling of having a 2nd car (other than my wife's Jeep) was rather comforting. Not to mention that car is comfortable on stock suspension (more-so than my wife's Jeep), got great gas mileage, and proved to be pretty reliable.
#215
08-20-2014, 11:09 AM
Still never ceased to be amazed how time flies...
Haven't really worked on my car in the last month. However, about a month ago finally installed the A6 OEM strut tower brace. I had the A6 STB brackets on the car for probably a month prior, just needed time to fit the A6 aluminum bar.
Turns out the A6 aluminum bar fit pretty well. It took cutting one end down by about 43mm and also re-drilling the two mounting bolt holes (25mm apart from each other).
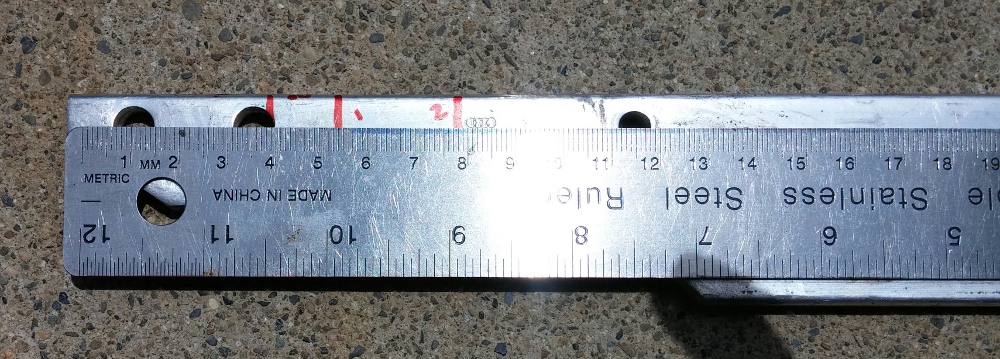
(left-most red line is where to cut the bar, lines 1 & 2 are where the new holes are drilled)
Since installing the STB I've noticed my car creaks a lot! (or maybe it did before and I just hadn't noticed/don't remember). The car is pretty tight though... front STB, AWE DTS, 034 rear sway bar, Eibach coilovers, 034 street density engine mounts, Apikol rear diff mount...
This Friday (day off) am planning to FINALLY install the 4:1 diff mod shims. To do so requires pulling the center diff housing from the back of the tranny, removing the center differential itself, and then disassembly of the differential. This is followed up by reassembly with a couple washers being replaced, and refilling of the transmission fluid. Hopefully the new transmission fluid will also smooth out shifting a little bit
Here's the link to the 4:1 diff mod instructions in case you're curious:
Audi A4 4:1 Center Diff Mod
Also on Friday am planning to modify my stock-like PCV system with a 034 Vortex catch can. Right now it's basically an AEB version of the stock AWM PCV system, so it has the block breather with PCV valve connected to intake manifold, stock Y-piece tying in the valve cover breather port and PRV pipe, and also has the PRV in the turbo inlet pipe.
So I'll 1) ditch the Y-piece; 2) tie the block breather and valve cover breather together with a tee, and connect that tee to the catch can 3) connect the PRV and PCV valves together with a tee, and connect that tee to the catch can.
This should allow for a stock-like functioning PCV system (good) without allowing any gross crap to enter the intake tract (extra good).
In other news the car has an oil leak which has persisted for a while now. I suspect it's coming from either the valve cover gasket (replaced back in October) or exhaust cam seal. Bought a UV dye leak detection kit to pinpoint it but want to make sure I use it only right before an oil change. It's also possible the new-ish PCV valve is allowing positive pressure into the crankcase/valve cover so I'll check it out when I modify the PCV system on Friday.
Haven't really worked on my car in the last month. However, about a month ago finally installed the A6 OEM strut tower brace. I had the A6 STB brackets on the car for probably a month prior, just needed time to fit the A6 aluminum bar.
Turns out the A6 aluminum bar fit pretty well. It took cutting one end down by about 43mm and also re-drilling the two mounting bolt holes (25mm apart from each other).
(left-most red line is where to cut the bar, lines 1 & 2 are where the new holes are drilled)
Since installing the STB I've noticed my car creaks a lot! (or maybe it did before and I just hadn't noticed/don't remember). The car is pretty tight though... front STB, AWE DTS, 034 rear sway bar, Eibach coilovers, 034 street density engine mounts, Apikol rear diff mount...
This Friday (day off) am planning to FINALLY install the 4:1 diff mod shims. To do so requires pulling the center diff housing from the back of the tranny, removing the center differential itself, and then disassembly of the differential. This is followed up by reassembly with a couple washers being replaced, and refilling of the transmission fluid. Hopefully the new transmission fluid will also smooth out shifting a little bit
Here's the link to the 4:1 diff mod instructions in case you're curious:
Audi A4 4:1 Center Diff Mod
Also on Friday am planning to modify my stock-like PCV system with a 034 Vortex catch can. Right now it's basically an AEB version of the stock AWM PCV system, so it has the block breather with PCV valve connected to intake manifold, stock Y-piece tying in the valve cover breather port and PRV pipe, and also has the PRV in the turbo inlet pipe.
So I'll 1) ditch the Y-piece; 2) tie the block breather and valve cover breather together with a tee, and connect that tee to the catch can 3) connect the PRV and PCV valves together with a tee, and connect that tee to the catch can.
This should allow for a stock-like functioning PCV system (good) without allowing any gross crap to enter the intake tract (extra good).
In other news the car has an oil leak which has persisted for a while now. I suspect it's coming from either the valve cover gasket (replaced back in October) or exhaust cam seal. Bought a UV dye leak detection kit to pinpoint it but want to make sure I use it only right before an oil change. It's also possible the new-ish PCV valve is allowing positive pressure into the crankcase/valve cover so I'll check it out when I modify the PCV system on Friday.
Last edited by MetalMan; 08-23-2014 at 07:18 PM.
#216
08-23-2014, 07:40 PM
Well, after much time between yesterday (Friday) and today, success.
Spent a lot more time on everything than I planned!
Yesterday I went ahead and did the catch can install / PCV revamp. I had to ditch the metal pipe which goes from the PRV and ends at the valve cover port, and made it work with a silicone line there instead. It's actually a pretty sweet setup but there are probably 25 hose clamps holding it all together lol.
As for the 4:1 diff mod there were a couple difficulties:
1) Removing the 8 bolts which hold the center differential cover to the transmission bell housing; these use a Torx T45 to remove. The Duralast-brand T45 bit ended up twisting, and almost stripped one of the bolt heads. No good! Didn't get any bolts removed either, they were on tight. I remember reading some people recommended using an impact driver to break the bolts loose... this did the trick! I had a cheap 12V electric impact driver laying laying around with 1/2" drive. Bought a 1/2" to 3/8" drive adapter, added a couple extensions, and a new Husky-brand T45 bit (biked to Home Depot for this), and removed all 8 bolts with ZERO difficulties. Amazing what the right tools will do for you!
2) This was the killer. As I was removing the outer torsen gear sets from the torsen center differential (which I had marked the timing of previously), the worst thing that could have happened, did happen: the center gear stack slipped out, making it so I only knew the correct orientation of a couple of the washers. Both center gears are different, and they only fit one way, same with the rest of the washers. NOOO! Spent probably 3 fricken' hours (ending at almost 2am) trying to get the center gears, washers, and outer gears oriented properly so the whole thing fit together and spun freely.
Had this not occurred I probably only would have needed 1/2 hour to replace the two washers needed for the 4:1 diff mod.
After that things were pretty smooth sailing. Took a little effort to get the center differential to slide back into its case/cover (tight fit), and everything else went back together.
Got my wife to help with refilling the transmission fluid (Motul Gear 300) so I could watch for the dribble out of the fill hole (which is how you know it's completely filled). Should also note the car was up on 4 jack stands and level.
Then I started the car and put it in 1st gear, then 2nd, and let it warm up while spinning the wheels to get the transmission fluid properly dispersed and also so the center diff would be completely covered in fluid.
So conclusion: learned some new things, spent way too much time getting them done, but they're done and I can move on. Knock on wood that the center diff will be okay...
Last edited by MetalMan; 09-02-2014 at 11:19 AM.

#218
09-02-2014, 11:35 AM
Taking corners, it feels great. I think the car inspires more confidence when cornering hard than before, like it wants me to push it even harder! And before this mod I already had the thick 034 rear sway bar and Eibach coilovers.
There is a downside which I was somewhat expecting: due to these shims being a "one-size-fits-all" they don't quite match the tolerances required within my particular center diff (due to wear over the years). So when I take tight turns or do a U-turn there is a bit of rumbling/grumbling from the center diff, since the front end covers more distance than the rear end. It has seemed that over time this has diminished slightly (maybe the washers are wearing in/getting proper lubrication) but it's still there.
There is a downside which I was somewhat expecting: due to these shims being a "one-size-fits-all" they don't quite match the tolerances required within my particular center diff (due to wear over the years). So when I take tight turns or do a U-turn there is a bit of rumbling/grumbling from the center diff, since the front end covers more distance than the rear end. It has seemed that over time this has diminished slightly (maybe the washers are wearing in/getting proper lubrication) but it's still there.
Last edited by MetalMan; 09-10-2014 at 04:05 PM.
#219
09-06-2014, 12:57 PM
Had the downpipe-back exhaust re-done yesterday yet again, another $355 down the drain.
Previously (since October) I had a 22" long x 4" (?) diameter round resonator in the driveshaft tunnel under the driveshaft heat shield, and that was easily the lowest point on my car. Seemed like it would scrape anything, especially some speed bumps and high-angle driveways. Also the (oval) exhaust tip sat about 1-5/8" below the valence cutout which was definitely too low.
So I had a different resonator/muffler put in where the stock resonator normally sits, which is a Magnaflow 4"x9" oval by 14" long (I think), with 2.5" same-side-offset inlet/outlet. Also had the rear muffler/tip raised so the gap between tip and valence cutout now is ~ 5/8". Much better!
Sound has also been reduced a bit, sounds better actually. But in my experience these things will sort of break in over time and become louder. We shall see how much louder it actually becomes.
Also this past Monday (Labor Day) I did a few things:
1) oil change, only about 1,500 miles since my last one
2) coolant drain and minor flush, replaced with new coolant and distilled water
3) oil cooler and its O-ring were replaced
4) valve cover gasket replaced
5) spark plugs replaced (NGK BKR7E, re-gapped to 0.040")
Basically I was getting some brown crap in my coolant. Research suggested the oil cooler was going bad, and allowing the higher-pressure oil to enter into the coolant system, where it collected in the coolant reservoir.
There had been a persistent oil leak, and while I couldn't actually see the source, I guessed/hoped it was the valve cover gasket (perhaps caused by boost entering the valve cover from the URO Parts PCV valve, which I recently replaced with an OEM PCV valve). So far it looks like I'm not getting any new oil drips [knock on wood].
Last edited by MetalMan; 09-10-2014 at 04:07 PM.
#220
09-10-2014, 04:14 PM
This car is really starting to come together!
A week ago I finally got around to doing something about the front fenders and tires rubbing: took one of those rubber/plastic hammers and used the red side, along with a heat gun (on low setting), to tap the inner fender lip inwards/upwards a bit. Saved me like $60 vs. getting the front fenders rolled! And now no more rubbing
Knock-on-wood I still haven't seen a single drop of oil underneath my car for more than a week, since doing the work mentioned in my previous post.
And with no more exhaust scraping also mentioned previously, this car is proving to be a much more delightful experience.
Today I finished installing my custom sealed subwoofer box with JBL 8" sub. The box itself is pretty small, about 10" wide x 5.5" deep x 13" tall, using 1/2" MDF. Internal volume is about 0.28 cu.ft., whereas the subwoofer spec. sheet calls for 0.30 cu.ft. Pretty close and close enough for me. I think it sounds pretty good and finally I can listen to music with frequencies below ~100 Hz
The box sits in the pocket where the original 6-disc CD changer was, and is hidden behind that door/flap thing so you can't even see the subwoofer/box.