
Removing Sunroof and headliner
#1
 06-16-2005, 02:31 PM


Has anyone removed the sunroof or head liner? I have alsomost the inside removed. This is the last part. I think the sunroof must be removed inorder to remove the headliner.
I am removing the interior to Dynamat the vehicle to make it quieter. (The car does have some noise while on the highway). Any assistance would be appreciated. I will take some pictures during the process. I have already Dynamatted the doors, trunk, rear deck and under the rear seat.
If anyone has access to the CDRom service manual that would be great. Please let me know.
Thanks,
Paul
#2
06-18-2005, 12:21 AM
I figured it out. You do not have to remove the sunroof glass. You have to do the following.
1. remove the oh $hit handles
2. remove the close hangers
3. remove the airbag squares in the middle of the side panels
4. remove the c pillers (dont forget pulling the safety clip behind the screw to release the other clip)
5. remove the a pillers (same as above)
6. unbolt the visors
7. pop out the rear light
8. pop out the visor clips (be very carful, these are easy to break)
9. pop out and disconect the sunroof control (open the sunroof completely before doing this)
10. pop out and disconnect the front dome light/map light pod.
11. remove 3 hidden screws
12. pop the trim ring that connects the head liner in the sunroof opening. (do this gently but firmly)
13. gently pull the sides of the headliner down. (suggest a friend to help)
14. unplug and disconnect all the cables that are connected to the roof
15. fold down the rear seat (empty the trunk)
16. motor the back of the front seats all the way back.
17. slide the head liner out through the trunk.
Easy
reverse steps to reinstall
I also removed the sunroof to Dynamat behind it. It wasn't really necessary but made the job much easier.
#3
01-08-2007, 05:02 AM

Thanks psonoda.... I've got the bently & elsa manuals (about the same info/pictures), but when things are 'stuborn' its awesome to have a sanity check from somebody who did it successfully!
I thought I'd add a couple points that were still a bit confusing. With ref's to psonoda's #'s:
8b) the entire clip is plastic & it attatches directly to a square hole in the unibody. The actual clip-ing part is somewhat recessed, so use patience. A s-bent screwdriver helps
10b) the light cluster hinges from the FRONT so pop out the rear first... I stuck my hand in from the front windshield
12b) 2 screws are under the sunroof control module. the is under the light cluster (contrary to what elsa implies)
the manuals say to start removal at the rear. This makes no sense as the headliner holds itself up by curving around a lip above the rear window. Follow psonoda's instructions, when all wires are loose just push the whole assembly to the rear 3/8 inch. required a bit of effort.
#4
01-08-2007, 06:04 PM

Kudos for taking on this project. I went through that last year when I swapped out my interior headliner and pillar trim for OEM RS6 alcantara. It is NOT and easy DIY project, but certainly worthwhile!
FYI - If anyone ever has to remove the sliding panel shadefor the sunroof, it is easiest to remove the glass sunroof panel to get at the screws. Tilting up the glass moonroof and removing the plastic rail covers reveal a coule of bolts that have to be removed.
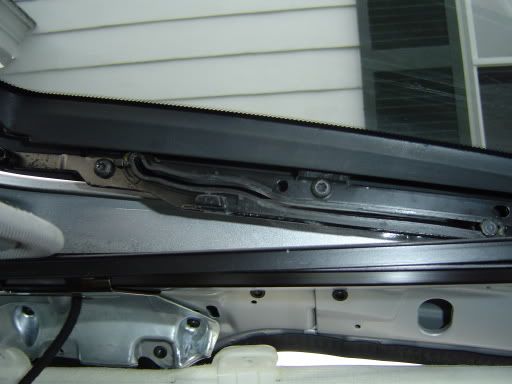
Once those bolts are out, simply lift the glass out. Then looking down from the outside, you can see two tabs on each side with a philips head screw that hold in the shade panel. Remove the screws and voila, itjust comes out!
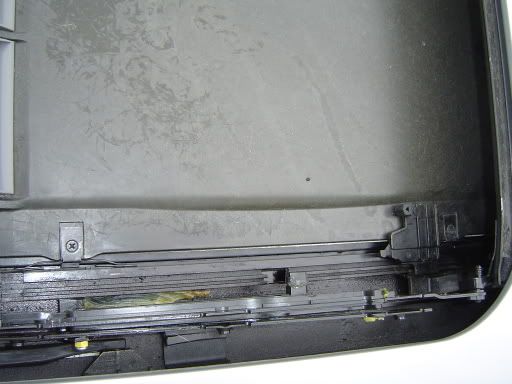
FYI - If anyone ever has to remove the sliding panel shadefor the sunroof, it is easiest to remove the glass sunroof panel to get at the screws. Tilting up the glass moonroof and removing the plastic rail covers reveal a coule of bolts that have to be removed.
Once those bolts are out, simply lift the glass out. Then looking down from the outside, you can see two tabs on each side with a philips head screw that hold in the shade panel. Remove the screws and voila, itjust comes out!
#5
01-09-2007, 03:31 AM

Congrats on the headliners guys. Most definatly the hardest part to remove on the interior of the car. Just to give you an idea of audi's absurd labor times, that pays 2 hours waranty. Thats in and out. I took a peak at your notes and they are excellent. Add some pictures and you have a great diy. Especially for those people with the leaky sunroof drains, because you have to remove the headliner to replace them. And thats the easy part. Then you have to pull the old ones out. They have an expanding foam type insulation that holds them in. It requires great force to pull them out. Then you have to pull the new ones thru.
#6
01-30-2007, 01:12 PM
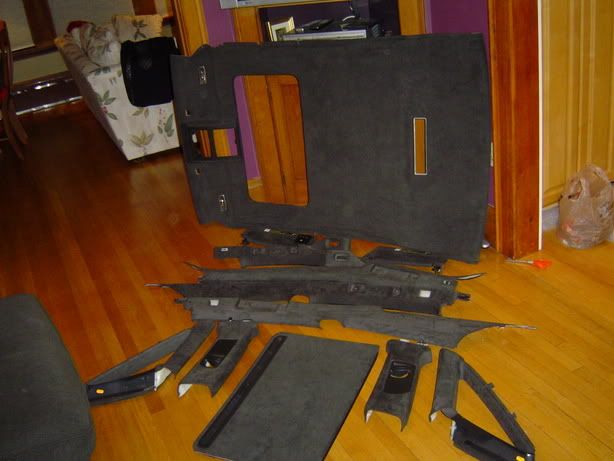
Thanks for all the feed back. Here are some of the pictures from my Dynamat roof install.
Here is the roof with the sunroof removed

Here is me scraping off that useless felt padding

Dynamat with the sunroof reinstalled

Some more Dynamat pictures...
Rear deck

Trunk floor

and trunk lid.

I also build a custom fiberglass enclosure into the side panel. Here are some pics of it. To see the full build-up, check out this link.
http://www.audiogearreviews.com/tech...w-to/index.asp

The finished enclosure barely fits behind the factory side panel.

Yes that is a JL 8W7. It sound awesome. It's also quite deceptive. People think I have a larger subwoofer than an 8"
Let me know what you think.
Here is the roof with the sunroof removed
Here is me scraping off that useless felt padding
Dynamat with the sunroof reinstalled
Some more Dynamat pictures...
Rear deck
Trunk floor
and trunk lid.
I also build a custom fiberglass enclosure into the side panel. Here are some pics of it. To see the full build-up, check out this link.
http://www.audiogearreviews.com/tech...w-to/index.asp
The finished enclosure barely fits behind the factory side panel.
Yes that is a JL 8W7. It sound awesome. It's also quite deceptive. People think I have a larger subwoofer than an 8"
Let me know what you think.
#7
01-30-2007, 03:41 PM

Its beautiful! Those pictures inspire my question....the dynamat reduces sound, I know that, but like you I have a subwoofer in my trunk. My question is, does the dynamat reduce the sound of sub?
#8
01-30-2007, 03:57 PM

for future reference.
1-
Moulded headliner
t
Removing moulded headliner
–
Remove upper A-pillar trim
–
On left side, unfasten wiring harness to moulded headliner between A-pillar and dash panel.
–
Remove upper B-pillar trim
–
Remove upper C/D-pillar trim
–
Unplug connector if automatic anti-glare interior mirror fitted.
–
Remove sun visors -2-.
–
Remove holders -3- for sun visors.
–
Prise out trim frame -6- if vehicle fitted with sun roof.
–
Removing cover for moulded headliner opening and reading light (without “PASSENGER AIRBAG OFF” lamp)
–
Removing cover for moulded headliner opening and reading light (with “PASSENGER AIRBAG OFF” lamp)
–
Sun roof: Unscrew bolts -5- (3x).
–
No sun roof: Unscrew bolts -5- (2x).
–
Move gear lever/selector lever to front position.
–
Move backrest of front passenger's seat to rearmost position.
–
Move backrest of driver's seat to rearmost position.
–
Second mechanic is required to support moulded headliner.
–
Disengage moulded headliner at rear.
–
Removal of cable at moulded headliner involves getting out of vehicle and in doing so carefully lowering moulded headliner onto seats.
–
Separate wiring harness from moulded headliner
–
Take out moulded headliner through rear door.
t
Installing
–
Carefully slide in moulded headliner through rear door.
–
Attach wiring harness to moulded headliner
Note![/align]
Keep to sequence when fitting, as otherwise roof trim can no longer be centred.
–
Engage moulded headliner at rear.
–
Clip in holders for sun visors.
–
Clip in sun roof trim frame -6-.
–
Perform remaining installation operations in reverse order of removal.
2-
Sun visor
q
Unclip sun visor -2- from holder -3-, unclip trim cap -8- and unscrew bolt -7-.
3-
Holder for sun visor
q
Press holder for sun visor firmly to one side and pull it out.
4-
Centre sun visor
q
Removing
5-
Bolt
q
Tightening torque 2.5 Nm
6-
Sun roof trim frame
q
Prise out at marks -11-.
7-
Bolt
8-
Trim cap
9-
Trim cap
10-
Moulded headliner opening frame
11-
Prising-out marks
Removing and installing cover panel for moulded headliner opening and interior light (without “PASSENGER AIRBAG OFF” lamp)
–
Prise out cover panel for moulded headliner opening -1- at locations marked -4-.
–
Prise out cover panel for interior light -3- at locations marked -5-.
Removing and installing cover panel for moulded headliner opening and interior light (with “PASSENGER AIRBAG OFF” lamp)
–
Prise out cover panel for moulded headliner opening -1- at locations marked -6-.
–
Prise out cover panel for interior light -3- at locations marked -4-.
–
Unplug connector for “PASSENGER AIRBAG 0FF” lamp -5-.
2-
Moulded headliner opening frame
Removing centre sun visor
t
Moulded headliner removed
–
Cut out moulded headliner opening frame -1- at bolt -2- (line -4-).
–
Unscrew bolt -2-.
–
Carefully open metal holder -3- and take out centre sun visor.
Cable routing on back of moulded headliner
1-
Back of moulded headliner
Moulded headliner removed (set down on seats)
q
Unplug connector -4-.
q
Unplug connectors -5-.
q
Unplug connector -6-.
q
Unfasten adhesive tape -8-.
q
Unclip cable ducts -3-.
q
Guide wiring harness -2- through cable guide -7-.
q
On installation, fix cables for sun visors in position with adhesive tape -8-.
2-
Wiring harness
3-
Cable duct (6x)
4-
Connector for rear interior light
5-
Connectors for sun visor illumination
6-
Connector for interior lighting
7-
Cable guide
8-
Adhesive tape for fixing cables in position
[IMG]local://upfiles/12092/C4D63E08053046228F4C701D1A99052A.jpg[/IMG]
[IMG]local://upfiles/12092/26F4CADC93CB4BB2B591A2681884B4DA.jpg[/IMG]
[IMG]local://upfiles/12092/5B2F506782B740E9A09C9AF0BBEB5863.jpg[/IMG]
1-
Moulded headliner
t
Removing moulded headliner
–
Remove upper A-pillar trim
–
On left side, unfasten wiring harness to moulded headliner between A-pillar and dash panel.
–
Remove upper B-pillar trim
–
Remove upper C/D-pillar trim
–
Unplug connector if automatic anti-glare interior mirror fitted.
–
Remove sun visors -2-.
–
Remove holders -3- for sun visors.
–
Prise out trim frame -6- if vehicle fitted with sun roof.
–
Removing cover for moulded headliner opening and reading light (without “PASSENGER AIRBAG OFF” lamp)
–
Removing cover for moulded headliner opening and reading light (with “PASSENGER AIRBAG OFF” lamp)
–
Sun roof: Unscrew bolts -5- (3x).
–
No sun roof: Unscrew bolts -5- (2x).
–
Move gear lever/selector lever to front position.
–
Move backrest of front passenger's seat to rearmost position.
–
Move backrest of driver's seat to rearmost position.
–
Second mechanic is required to support moulded headliner.
–
Disengage moulded headliner at rear.
–
Removal of cable at moulded headliner involves getting out of vehicle and in doing so carefully lowering moulded headliner onto seats.
–
Separate wiring harness from moulded headliner
–
Take out moulded headliner through rear door.
t
Installing
–
Carefully slide in moulded headliner through rear door.
–
Attach wiring harness to moulded headliner
Note![/align]
Keep to sequence when fitting, as otherwise roof trim can no longer be centred.
–
Engage moulded headliner at rear.
–
Clip in holders for sun visors.
–
Clip in sun roof trim frame -6-.
–
Perform remaining installation operations in reverse order of removal.
2-
Sun visor
q
Unclip sun visor -2- from holder -3-, unclip trim cap -8- and unscrew bolt -7-.
3-
Holder for sun visor
q
Press holder for sun visor firmly to one side and pull it out.
4-
Centre sun visor
q
Removing
5-
Bolt
q
Tightening torque 2.5 Nm
6-
Sun roof trim frame
q
Prise out at marks -11-.
7-
Bolt
8-
Trim cap
9-
Trim cap
10-
Moulded headliner opening frame
11-
Prising-out marks
Removing and installing cover panel for moulded headliner opening and interior light (without “PASSENGER AIRBAG OFF” lamp)
–
Prise out cover panel for moulded headliner opening -1- at locations marked -4-.
–
Prise out cover panel for interior light -3- at locations marked -5-.
Removing and installing cover panel for moulded headliner opening and interior light (with “PASSENGER AIRBAG OFF” lamp)
–
Prise out cover panel for moulded headliner opening -1- at locations marked -6-.
–
Prise out cover panel for interior light -3- at locations marked -4-.
–
Unplug connector for “PASSENGER AIRBAG 0FF” lamp -5-.
2-
Moulded headliner opening frame
Removing centre sun visor
t
Moulded headliner removed
–
Cut out moulded headliner opening frame -1- at bolt -2- (line -4-).
–
Unscrew bolt -2-.
–
Carefully open metal holder -3- and take out centre sun visor.
Cable routing on back of moulded headliner
1-
Back of moulded headliner
Moulded headliner removed (set down on seats)
q
Unplug connector -4-.
q
Unplug connectors -5-.
q
Unplug connector -6-.
q
Unfasten adhesive tape -8-.
q
Unclip cable ducts -3-.
q
Guide wiring harness -2- through cable guide -7-.
q
On installation, fix cables for sun visors in position with adhesive tape -8-.
2-
Wiring harness
3-
Cable duct (6x)
4-
Connector for rear interior light
5-
Connectors for sun visor illumination
6-
Connector for interior lighting
7-
Cable guide
8-
Adhesive tape for fixing cables in position
[IMG]local://upfiles/12092/C4D63E08053046228F4C701D1A99052A.jpg[/IMG]
[IMG]local://upfiles/12092/26F4CADC93CB4BB2B591A2681884B4DA.jpg[/IMG]
[IMG]local://upfiles/12092/5B2F506782B740E9A09C9AF0BBEB5863.jpg[/IMG]
#10
01-30-2007, 10:47 PM
Good question. Done properly, Dynamat will increase the actual bass output and lower road noise. Lower road noise means you do not have to turn your stereo up as loud. I can still generate about 129 dB with a SPL micraphone in the drivers seat. The is with the rear seat NOT folded down. Not to bad for an 8" woofer. [8D]
You can technically lower bass output inside your vehicle if you Dynamat too much between the trunk and the passenger compartment. Really you would only notice this if you are trying to compete in an SPL (Loudness) contest. The bass gained by Dynamatting the trunk would far outweigh any loss of bass by covering the rear deck and seat area with too much Dynamat.
Interestingly, with the seats down in my car, the bass is louder but does not blend well with the front speakers. Rear seat up, it blends and sounds much better.