B5 2.8L Oil Cooler Swap with Cooling system/heater core flush
#1
 02-12-2014, 12:52 AM


Hello! I've been using this site and others for awhile now in order to avoid the mechanic shop as much as possible. The information posted by people here has made owning my a4 a reality. I can't even think of the thousands i've saved using tutorials here, so I thought it was about time I contributed something myself.
I have a 1996 A4 Quattro with about 150000 miles, and ive been working to secure the various oil leaks that have sprung up over time. The latest comes from the Oil cooler o-ring. I have also noticed excessive build up of some dark reddish material inside of my coolant reservoir, which I believe is oil escaping into the coolant via oil cooler. I will be replacing the following:
- Oil cooler
- Oil cooler O-Ring
- Coolant reservoir/expansion tank
- Oil filter
- Oil, 5 quarts 5w-30 full synthetic (not necessary but you're right there so why not)
- Coolant (G12)
I will also be flushing the heater core and the coolant system in order to remove all of the old coolant and fix a lack of heat I am experiencing inside of the vehicle.
If you can change your own oil and have a screwdriver set and a few sockets, you can do this too. The procedure was relatively easy, just time consuming and messy. I wouldn't recommend this to anyone afraid of getting wet.
Here I go!
The first thing I did was drive the car on ramps to get enough clearance to fit myself under. I then removed the oil filler cap and the coolant reservoir cap to allow draining when necessary. Next to be removed is the belly pan, take note of the lovely piles of grime courtesy of the busted oil cooler o-ring
Next step is to remove the old oil filter. Let as much oil drip out of the cooler as possible before proceeding.
If you are changing the oil as well, now is a good time to drain it via the drain plug.
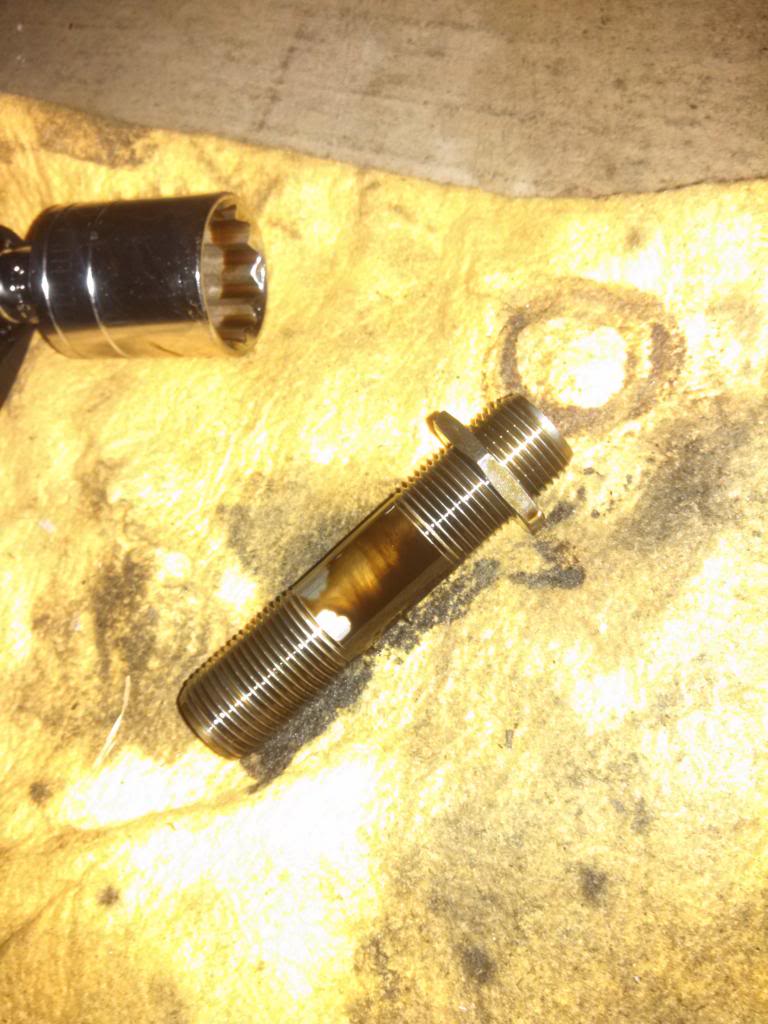
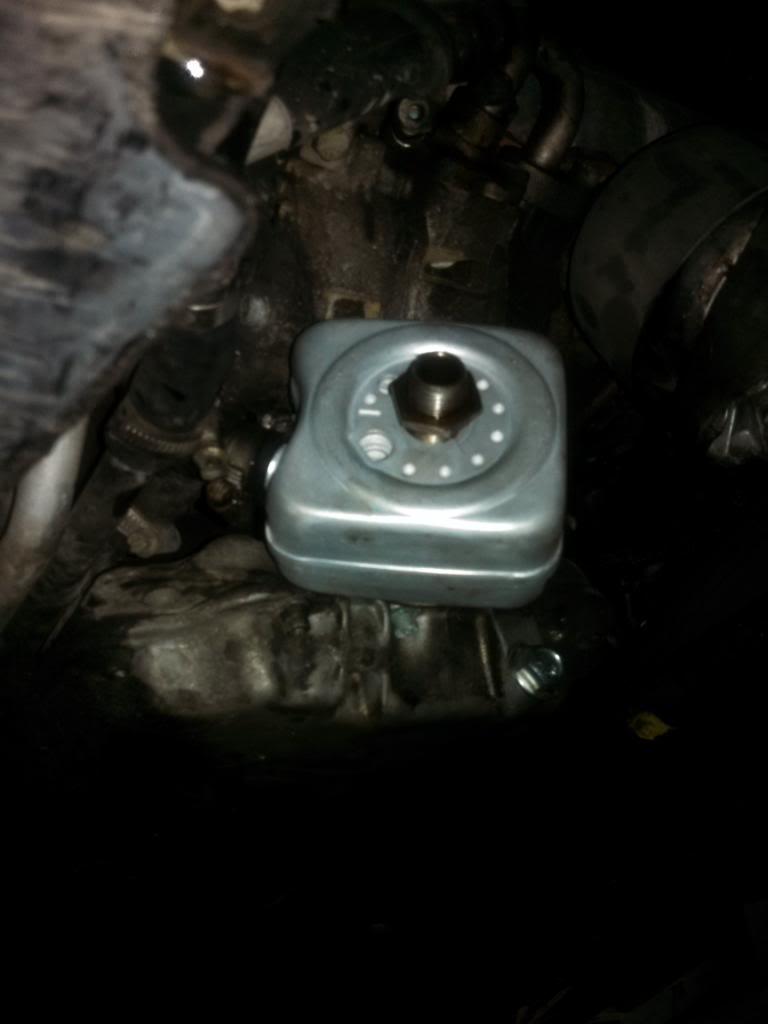
The brass nut in the photo is actually part of a longer threaded rod that goes through the cooler and holds the unit in place. In this vehicle and I believe most B5s, it is a 27 mm nut. This is how it should look when it comes out:
With the rod/nut combo removed, you should proceed by draining the coolant from the radiator. On the 2.8L, there is a red philips screw hiding behind the grill on the very bottom corner of the drivers side bumper. It looks like this: (im not the best photographer, sorry)

The screw can be loosened without removing the grill, just be very cautious not to gum it up in the process, it is soft plastic. Once you have it sufficiently loose, your coolant will begin draining. Catch it with a bucket.
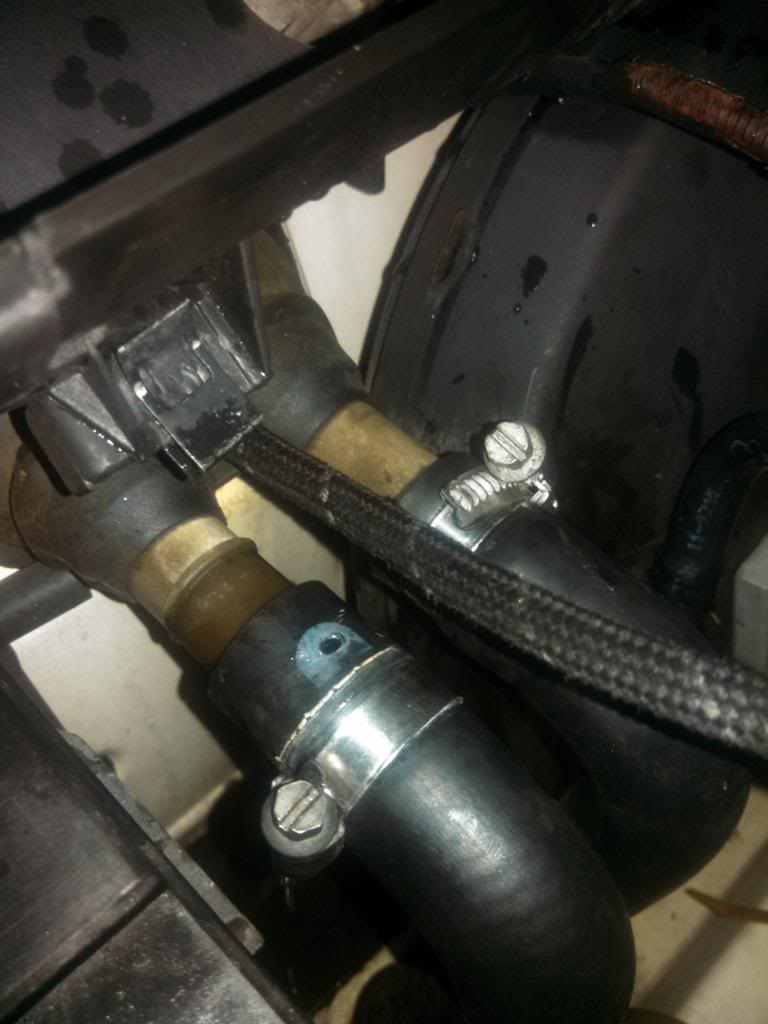
Once the coolant has been drained, loosen the two clamps holding the coolant hoses onto the oil cooler. You can see both of them here:
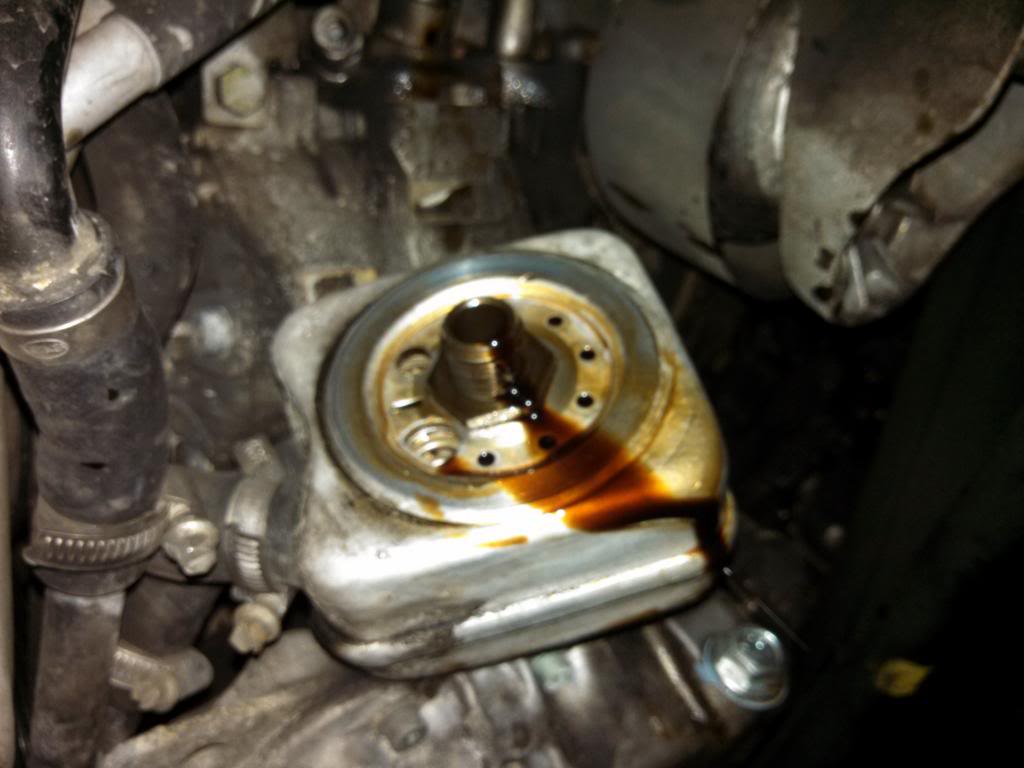
Remove the hoses slowly and carefully, coolant may still be in the lines and might squirt out if it is under pressure. Have a bucket ready. Here is what my old cooler looks like: (ew)
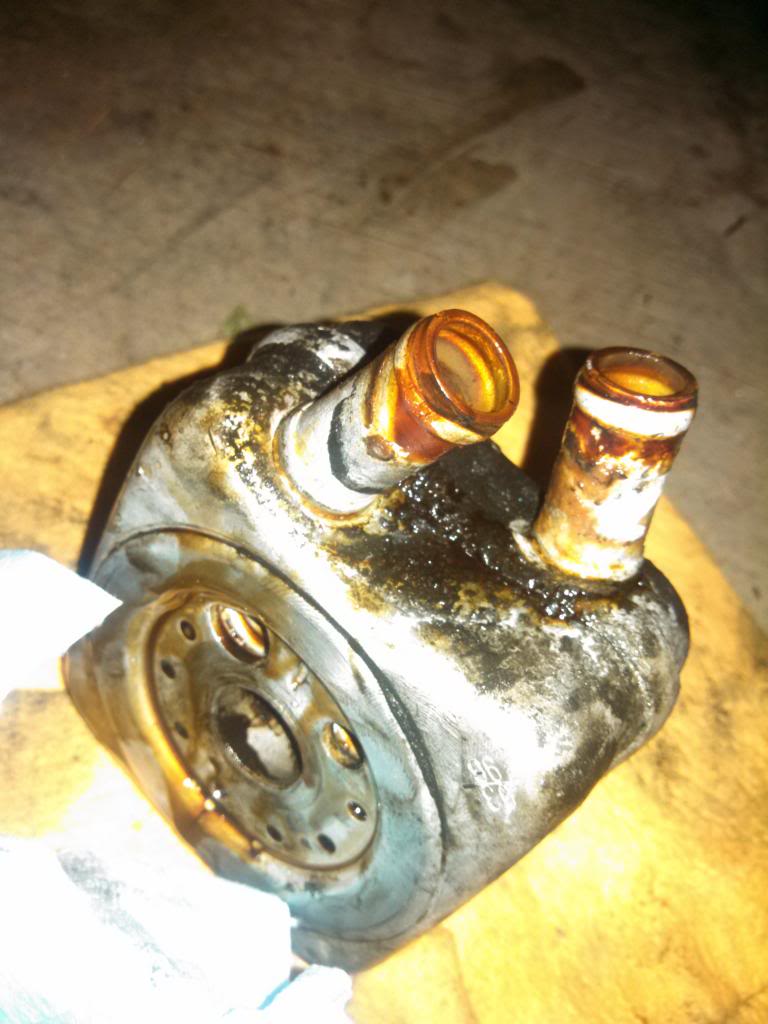
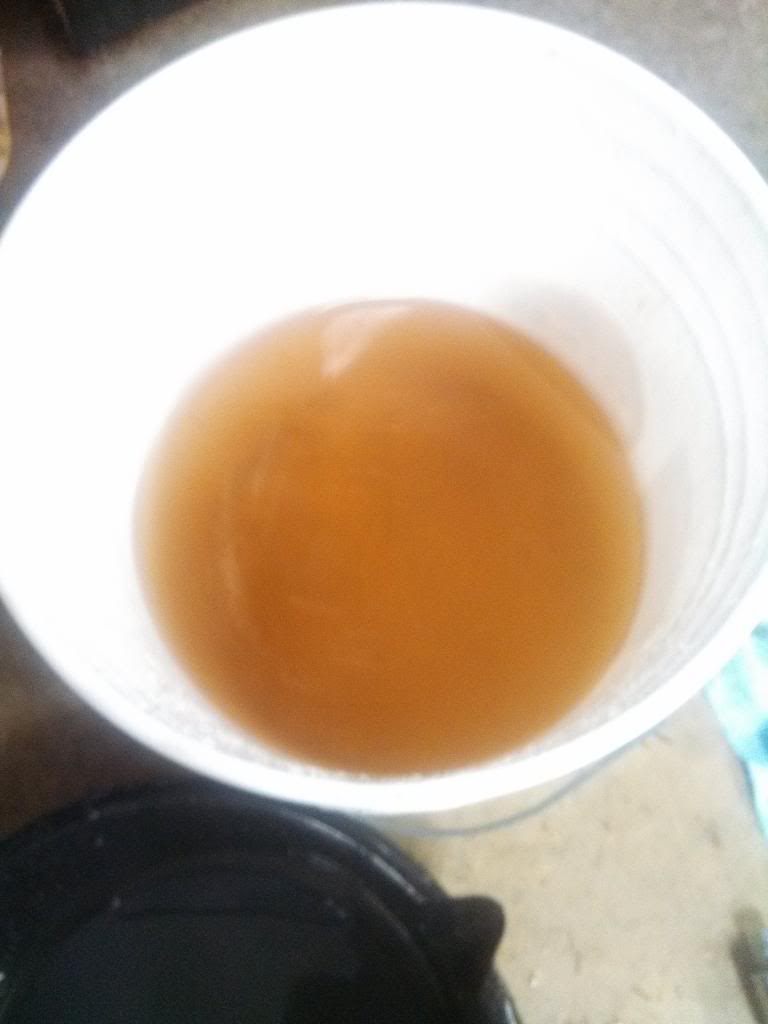
The red stuff you see is what leads me to believe oil is leaking into the coolant, the reservoir is filled up with the same junk. Time for a new one.
The old coolant is actually a yellowish/urine/beer color:
Old vs New:
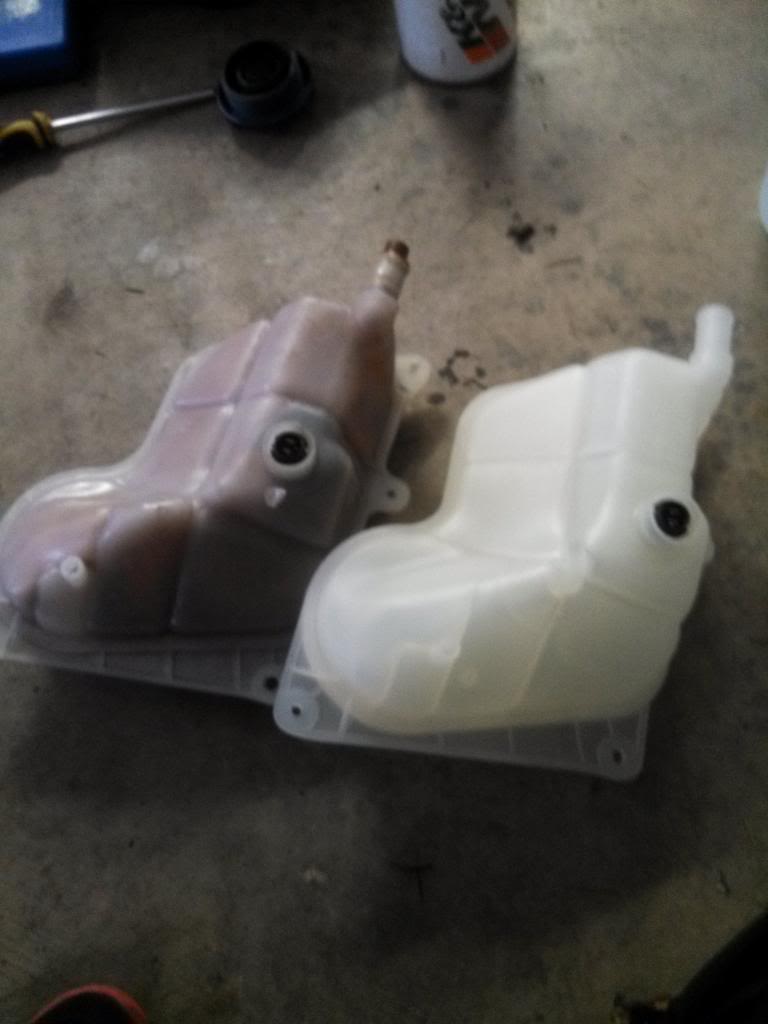
The reservoir is very easy to remove, assuming it is empty. With the cap removed, loosen the 2 hose clamps holding the hoses onto the unit. Remove the hoses. There are 3 phillips head screws holding the reservoir into place. Remove these, and lift the unit up carefully. The coolant level sensor is plugged in to the bottom of the unit. Simply pull it out, no clamps or pins holding it in. Install new unit following the reverse steps.
New Reservoir installed:
Just the sight of that makes me happy. I would recommend flushing the cooling system as much as possible at this point. You can do so by pouring distilled water into the reservoir and letting it drain via the radiator. A couple gallons should do the trick. This is the poor mans radiator flush.
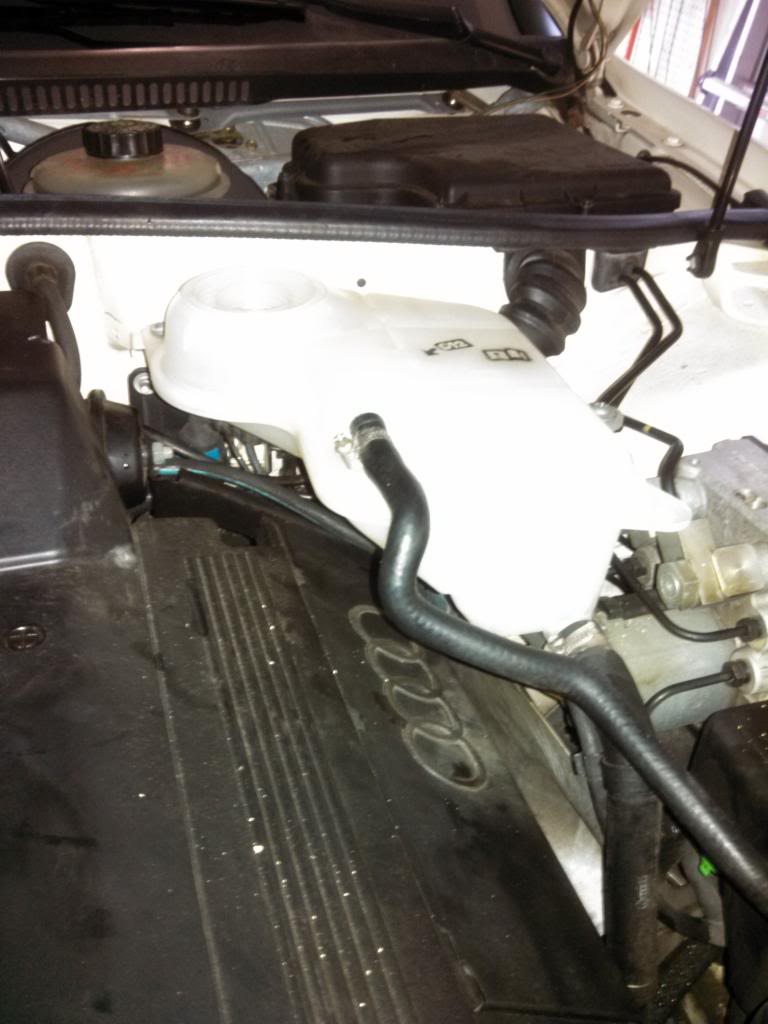
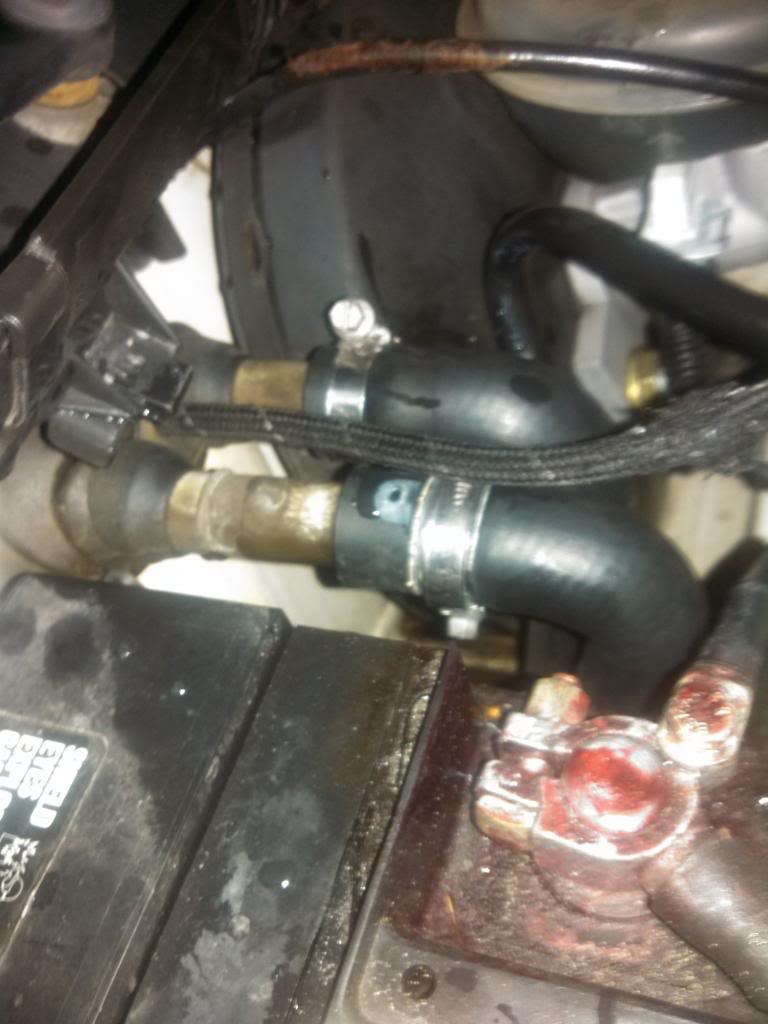
Next is to flush the heater core. I lost heat awhile ago and I can hear bubbles moving through the core when I start the car. The core is connected to the cooling system via these two large hoses:
For the flush, I pulled both hoses off, and took a garden hose nozzle (set to "jet" mode, in case you're wondering), and alternated spraying inside of each of the tubes leading into the heater core until clear water with good flow came out. This is also known as the "poor mans heater core flush". I guess tap water isn't the best to get inside the system, so use caution with this method.
With the core flushed, reattach the drivers side hose and secure it in place with the clamp. The passenger side hose should be pulled up just barely over the flange, as pictured below: Apparently some cars will have a very delicate bleeder screw on on the passenger side hose, I must not have gotten the "prestige package" a4, because I have in its place a small hole.
Now we get to the best part, installing the new cooler!!
Installation is reverse of removal, just make sure your O-ring is attached using the little tabs on the sealing end of the cooler. Insert the rod/nut combo and hand tighten to hold the cooler in place. Torque the 27mm nut to 18 foot pounds.
Install a new filter. Autozone and other places might try to sell you a smaller filter, but make sure to get a big one. It might cost more, but the engine needs it. Why? Because Audi, thats why.
BOOM

Next, refill the oil, and secure the filler cap. Check the dipstick to ensure enough is in the engine. You can start the engine once the oil is added to flush out any remaining coolant still in the system. Keep an eye on the temp gauge. With the old coolant flushed, tighten up the red radiator drain screw to its original position.
For the replacement coolant, i purchased a much more attractive purple G12 concentrate. With concentrate, you mix in a bucket 1 part coolant, 1 part distilled water. I used the whole jug, which I believe was about 5 liters. I have some extra now just in case. Start the engine and begin filling the reservoir with your new coolant. Bubbles will rise into the reservoir as the system fills with the new coolant. Keep an eye on the level and add coolant as necessary.
Be sure to observe the passenger side heater core hose as you add coolant.
It will begin to bleed as the coolant heats up. Little bubbles will begin foaming from the hole (or bleeder screw, if you're that fancy). You can open the throttle under the vacuum hoses to clear out air bubbles faster. (Or step on the gas if you like sitting.)
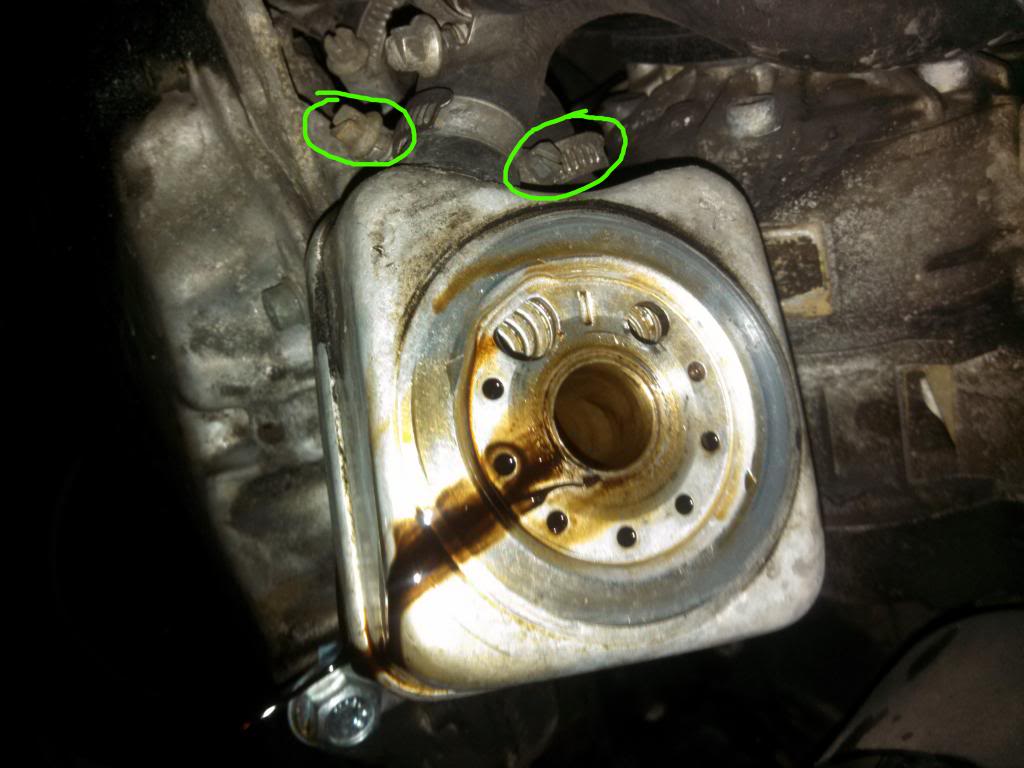
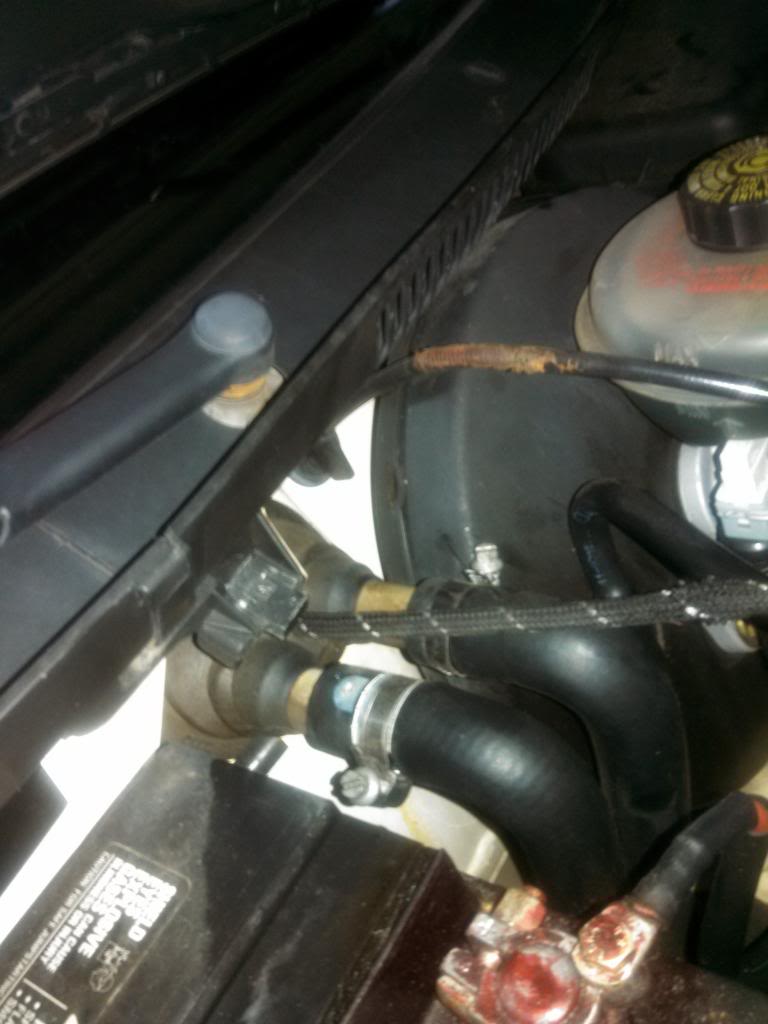
There is another bleeder screw that is much harder to get to. It is a 5 mm allen, and it is located under the EGR on the drivers side of the car. In the picture, the green highlights the bleeder screw. However, it is blocked from easy access by a black metal bracket (red) that holds the EGR temperature sensor and a few others.
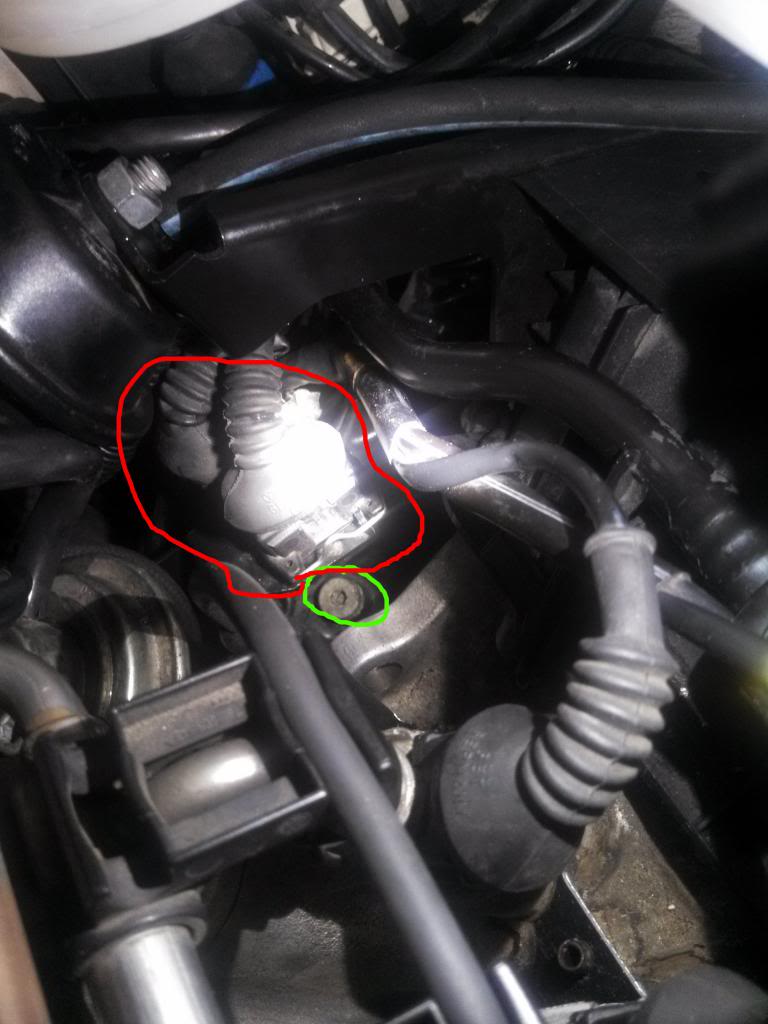
The bracket can be loosened and moved slightly. It is held in place with a single 13 mm nut located underneath the EGR. It may be too difficult to reach without some serious disassembly, however. If you cannot reach this bleeder screw, continue to bleed from the passenger side heater core tube as much as possible. It may take a few quick drives around the street to fully bleed the system.
Once the system is bled, you are done! Reattach and firmly secure the passenger side heater core hose, and leave the engine running for a bit. Watch for leaks.
A bad oil cooler can often be misdiagnosed as failing head gaskets, due to the oil and coolant mixing. A hard lesson I learned (car wouldn't start, spent over 1,000 on a starter and other stuff, turned out to be a 12$ cam position sensor ) is to always start with the cheap fixes first. The parts for this job can all be found on ebay and are relatively inexpensive.
I am not a professional mechanic and if anything is horribly wrong with this post, please notify me so I can learn and stuff. Hope this helps!
Happy Audiing!
I have a 1996 A4 Quattro with about 150000 miles, and ive been working to secure the various oil leaks that have sprung up over time. The latest comes from the Oil cooler o-ring. I have also noticed excessive build up of some dark reddish material inside of my coolant reservoir, which I believe is oil escaping into the coolant via oil cooler. I will be replacing the following:
- Oil cooler
- Oil cooler O-Ring
- Coolant reservoir/expansion tank
- Oil filter
- Oil, 5 quarts 5w-30 full synthetic (not necessary but you're right there so why not)
- Coolant (G12)
I will also be flushing the heater core and the coolant system in order to remove all of the old coolant and fix a lack of heat I am experiencing inside of the vehicle.
If you can change your own oil and have a screwdriver set and a few sockets, you can do this too. The procedure was relatively easy, just time consuming and messy. I wouldn't recommend this to anyone afraid of getting wet.
Here I go!
The first thing I did was drive the car on ramps to get enough clearance to fit myself under. I then removed the oil filler cap and the coolant reservoir cap to allow draining when necessary. Next to be removed is the belly pan, take note of the lovely piles of grime courtesy of the busted oil cooler o-ring
Next step is to remove the old oil filter. Let as much oil drip out of the cooler as possible before proceeding.
If you are changing the oil as well, now is a good time to drain it via the drain plug.
The brass nut in the photo is actually part of a longer threaded rod that goes through the cooler and holds the unit in place. In this vehicle and I believe most B5s, it is a 27 mm nut. This is how it should look when it comes out:
With the rod/nut combo removed, you should proceed by draining the coolant from the radiator. On the 2.8L, there is a red philips screw hiding behind the grill on the very bottom corner of the drivers side bumper. It looks like this: (im not the best photographer, sorry)
The screw can be loosened without removing the grill, just be very cautious not to gum it up in the process, it is soft plastic. Once you have it sufficiently loose, your coolant will begin draining. Catch it with a bucket.
Once the coolant has been drained, loosen the two clamps holding the coolant hoses onto the oil cooler. You can see both of them here:
Remove the hoses slowly and carefully, coolant may still be in the lines and might squirt out if it is under pressure. Have a bucket ready. Here is what my old cooler looks like: (ew)
The red stuff you see is what leads me to believe oil is leaking into the coolant, the reservoir is filled up with the same junk. Time for a new one.
The old coolant is actually a yellowish/urine/beer color:
Old vs New:
The reservoir is very easy to remove, assuming it is empty. With the cap removed, loosen the 2 hose clamps holding the hoses onto the unit. Remove the hoses. There are 3 phillips head screws holding the reservoir into place. Remove these, and lift the unit up carefully. The coolant level sensor is plugged in to the bottom of the unit. Simply pull it out, no clamps or pins holding it in. Install new unit following the reverse steps.
New Reservoir installed:
Just the sight of that makes me happy. I would recommend flushing the cooling system as much as possible at this point. You can do so by pouring distilled water into the reservoir and letting it drain via the radiator. A couple gallons should do the trick. This is the poor mans radiator flush.
Next is to flush the heater core. I lost heat awhile ago and I can hear bubbles moving through the core when I start the car. The core is connected to the cooling system via these two large hoses:
For the flush, I pulled both hoses off, and took a garden hose nozzle (set to "jet" mode, in case you're wondering), and alternated spraying inside of each of the tubes leading into the heater core until clear water with good flow came out. This is also known as the "poor mans heater core flush". I guess tap water isn't the best to get inside the system, so use caution with this method.
With the core flushed, reattach the drivers side hose and secure it in place with the clamp. The passenger side hose should be pulled up just barely over the flange, as pictured below: Apparently some cars will have a very delicate bleeder screw on on the passenger side hose, I must not have gotten the "prestige package" a4, because I have in its place a small hole.
Now we get to the best part, installing the new cooler!!
Installation is reverse of removal, just make sure your O-ring is attached using the little tabs on the sealing end of the cooler. Insert the rod/nut combo and hand tighten to hold the cooler in place. Torque the 27mm nut to 18 foot pounds.
Install a new filter. Autozone and other places might try to sell you a smaller filter, but make sure to get a big one. It might cost more, but the engine needs it. Why? Because Audi, thats why.
BOOM
Next, refill the oil, and secure the filler cap. Check the dipstick to ensure enough is in the engine. You can start the engine once the oil is added to flush out any remaining coolant still in the system. Keep an eye on the temp gauge. With the old coolant flushed, tighten up the red radiator drain screw to its original position.
For the replacement coolant, i purchased a much more attractive purple G12 concentrate. With concentrate, you mix in a bucket 1 part coolant, 1 part distilled water. I used the whole jug, which I believe was about 5 liters. I have some extra now just in case. Start the engine and begin filling the reservoir with your new coolant. Bubbles will rise into the reservoir as the system fills with the new coolant. Keep an eye on the level and add coolant as necessary.
Be sure to observe the passenger side heater core hose as you add coolant.
It will begin to bleed as the coolant heats up. Little bubbles will begin foaming from the hole (or bleeder screw, if you're that fancy). You can open the throttle under the vacuum hoses to clear out air bubbles faster. (Or step on the gas if you like sitting.)
There is another bleeder screw that is much harder to get to. It is a 5 mm allen, and it is located under the EGR on the drivers side of the car. In the picture, the green highlights the bleeder screw. However, it is blocked from easy access by a black metal bracket (red) that holds the EGR temperature sensor and a few others.
The bracket can be loosened and moved slightly. It is held in place with a single 13 mm nut located underneath the EGR. It may be too difficult to reach without some serious disassembly, however. If you cannot reach this bleeder screw, continue to bleed from the passenger side heater core tube as much as possible. It may take a few quick drives around the street to fully bleed the system.
Once the system is bled, you are done! Reattach and firmly secure the passenger side heater core hose, and leave the engine running for a bit. Watch for leaks.
A bad oil cooler can often be misdiagnosed as failing head gaskets, due to the oil and coolant mixing. A hard lesson I learned (car wouldn't start, spent over 1,000 on a starter and other stuff, turned out to be a 12$ cam position sensor
) is to always start with the cheap fixes first. The parts for this job can all be found on ebay and are relatively inexpensive. I am not a professional mechanic and if anything is horribly wrong with this post, please notify me so I can learn and stuff. Hope this helps!
Happy Audiing!
#2
02-12-2014, 09:55 AM
I bought a B5 Passat that had been mis-diagnosed that way. All I had to do was what you just did. I took lots and lots of flushing, and I used two gallons of pure Simple Green to get the oil out of it, then gallons and gallons of water to flush out all the Simple Green and oil left over.
#3
02-12-2014, 11:05 AM
sounds very tedious...just curious did you use distilled water to flush everything out at the end? Ive heard of some people just taking a garden hose to it...
Last edited by Dustinxiii; 02-12-2014 at 11:22 AM.
#4
02-12-2014, 03:54 PM
It was.
I always use tap water, and use a hose on my isolate the heater core, oil cooler and radiator and flush them with a hose. Lots of debate about that topic. Some say don't use distilled, others say...oh I don't know. I've never had a problem with tap water.
I always use tap water, and use a hose on my isolate the heater core, oil cooler and radiator and flush them with a hose. Lots of debate about that topic. Some say don't use distilled, others say...oh I don't know. I've never had a problem with tap water.
#5
02-13-2014, 12:57 AM
Good to know because my heater core is effectively garden hosed haha. Since it is flushed, I do have some heat back, but it is still pretty weak. The inside of the car definitely gets warmer, but it doesnt make me sweat or anything.
Would I be correct in assuming that the core itself is bad? Or does it need a flush with like some simple green or something more thorough? I basically just washed it out with water, there is probably a good amount of oily red build up in there now that i think about it...
Would I be correct in assuming that the core itself is bad? Or does it need a flush with like some simple green or something more thorough? I basically just washed it out with water, there is probably a good amount of oily red build up in there now that i think about it...
#6
02-13-2014, 07:36 AM
I hate to say it, but if there is still oilly residue in the heater core, then its in the rest of the system. So if you spend a weekend swapping out the heater core, it will get coated with the same stuff. Maybe this summer you need to trynto grt it all out of the system.
#7
02-13-2014, 12:08 PM
good idea. I think i might do it as part of a timing belt/water pump job. Im at about 148,000 miles right now, and the plan is to change the t belt/serpentine, all pulleys and tensioners, water pump and thermostat as soon as it hits 150.
#8
02-16-2014, 06:16 PM

Thanks for the write-up. I will be doing this in the next few days and everything else I saw didn't have a torque value for the nut that holds the oil cooler on. I assume it's probably the same for the 30V V6. Luckily I caught mine before my reservoir turns brown like yours.
#9
02-16-2014, 06:38 PM
Oh yeah it's a huge mess my entire cooling system is coated in oil it's good to get this done at regular intervals.
As for the procedure, it should be the same for any 2.8L, the only difference may be the location of bleeder valves.
As for the procedure, it should be the same for any 2.8L, the only difference may be the location of bleeder valves.
Last edited by Dustinxiii; 02-16-2014 at 06:41 PM.
#10
11-18-2019, 09:08 PM

Flushed my heater core with a mix of CLR water and anti-freeze. 20 min and then flushed with water until it flowered clear. May not be "like new" but I have heat! 

Thread
Thread Starter
Forum
Replies
Last Post