DIY - power steering rack replacement
#1
 02-19-2011, 11:26 PM

OK, this job can be a pain and the first time doing it is an eye-opener, so I thought I'd take advantage of the one we changed today and took pics to create this DIY. As always, do it at your own risk - if you break your own car, don't blame me. It's not a difficult job technically, but it's an aggravating one. For a job that requires all of a dozen bolts to be removed, it's surprisingly frustrating. If you take it on, you'll see what I mean. NOTE - this was done on a 1998 A4 quattro tip 30v. There's one main difference between this car and the 1.8T cars - the 1.8T has four rack mount bolts, whereas the V6 only has three.
Hopefully you're reading this a few days in advance of tackling the job - it's a great idea to spray penetrating fluid on the tie rod ends for a few days before starting. Sometimes they'll come off the rack easily enough, and sometimes they're your worst enemy. Hit them at least with Liquid Wrench, but if you have it, use Deep Creep or Kroil. Those are better and every bit helps. While you're doing this in advance of doing the job, inspect the ball joints in your suspension and decide whether you might need new TREs, new control arms, or if you're OK to reuse them all at this point.
First step - break the lug bolts free, and jackstand the front of the car securely, ebrake engaged, car in park (auto) or in gear (manual). Chock the rear wheels. Leave a jack under the car as a backup. Don't play around when it comes to your safety. You may want this job done and over with, but getting killed by having your car fall on you isn't the way to achieve this. With the car up and secure, straighten the steering wheel and lock the column. You'll probably have to unlock it later and turn the wheel to disengage the column from the rack, but keep it locked and straight as much as you can and if/when you do turn the wheel, pay attention to the direction you turn it, so you can return it to center in the opposite direction. Do it right and you're fine. Do it wrong and you may find the steering wheel upside down when driving straight. There is also a warning that I came across against excessive turning of the wheel with the shaft disengaged, in that there's a possibility of damaging the airbag system. If your stereo requires a security code to reactivate, locate it since you'll be removing the battery.
OK, with the car up and wheels removed, steering centered, and the TREs freshly juiced, the first step is to disengage the TREs from the spindle. You'll see that they attach with a vertical bolt through the top (13mm) as well as a pinch bolt (16mm nut). These are rarely anywhere near as bad as the pinch bolts that pin the upper CAs to the spindle. Loosen the top 13mm bolt and back it most of the way out but don't remove it. Break the pinch nut free, use a small prybar to pry open the pinch section, and then gently tap the top bolt to drive the TRE ball joint shaft out of the pinch collar on the spindle. In this pic you can see the 13mm bolt still threaded into the TRE shaft, and you can see the hole in the spindle where the pinch bolt was inserted:

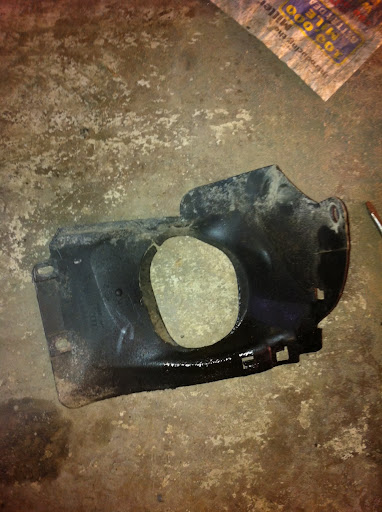
Now, on the driver side there's a shield that surrounds the TRE where it comes out from the center of the car. There's a nut (10mm) on a stud that secures it at the upper right corner (as you look into the wheel well) next to the wire for the ABS sensor. That has to come off. On the left (forward) end of the shield, very inconveniently behind the spring, are two push pins that secure that end. Pop them out (I used a long flathead screwdriver, coming up from below). Once they're free, you can remove the shield. This is the shield (note the holes in it for the securing hardware):
Now, move to the interior of the car, in the driver's footwell. Remove the knee bolster (the panel above your shins when you're sitting in the driver's seat). It's easy to take out and is held by a few 8mm screws. You'll need 1/4" drive tools for this - ratchet, socket, and 6" extension. Use a small, thin flathead screwdriver to pop the covers off the two main mount bolts, remove them, remove the one screw under the fuse panel cover (look along the bottom of the fusebox opening), and the remaining 1-2 screws along the bottom edge of the panel. Pull the panel outward and ease it down - don't just drop it since the footwell light and the OBD2 port are both attached - unclip them and get the knee bolster out of the way. This is what you'll see:

Now that the panel is off, you have to remove the pinch bolt and nut that clamp the steering column onto the rack. Look way back at the firewall for a T55 Torx socketed bolt head, like this:

There's a nut at the opposite end of that bolt - remove the nut, and then wiggle the bolt until you can pull it free - it's an eccentric-shaft bolt and holds the shaft onto the rack. Turn it until you can pop it out, and the column will separate from the rack. You may need to unlock the column and turn the wheel some for a better angle (as mentioned at the top). Recenter the wheel when finished and lock the column again. Then look at the opening in the firewall where the rack pokes in - around the edge of that opening you'll see the rubber lip of a shaft boot that protrudes into the rack well and protects this part of the rack. Pry and pop it loose and pull it into the car so it's out of the way. You won't get the rack out without doing so.
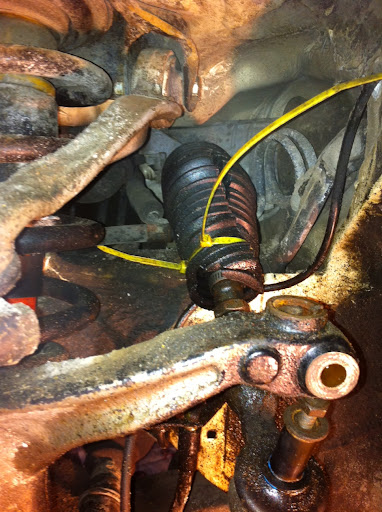
Next up is the second-most blood, beer-swilling, and frustration-inducing part of the job - unbolting the lines from the rack (the only part more of a pain is putting them back onto the new rack). Look in the opening in the wheelwell and you'll see a double coil of metal line. You can see it just to the right of the TRE boot in this pic:
That's one of the power steering lines attached to the rack. The other one is behind it. One is a 19mm banjo bolt, and the other is a 22mm. You'll need open-ended wrenches for these. It's a test of patience and hand strength. They're not hard to break free but you can only get about 1/16th of a turn on them at a time, so it's turn, flip the wrench, turn some more, flip it back, and repeat for quite awhile. You'll hate your life but you WILL get it. Be careful not to lose either of the washers on each bolt (one on either side of the banjo line fitting) - the new rack won't come with them so they'll need to be reused or replaced.
Once the two lines are off, you need to remove the rack mounting bolts. On a 30v V6 there are three - on a 1.8T there are four (since this was done on a 98 30v, I only have three for reference - on a 1.8T the fourth I believe is accessed from underneath, in the rack well). For a quick reference, look at the new rack you have waiting to install. You'll see the bolt mounting holes. There is a hole on either side of the lobe that locks onto the steering column, and a third one at the other end. Look in the battery well area between the firewalls. Down underneath the battery is one bolt (hint - remove the battery). It goes through this hole on the rack:

The second one is in front of the brake booster (in the pic below, it's in the center, the small rust-colored one).

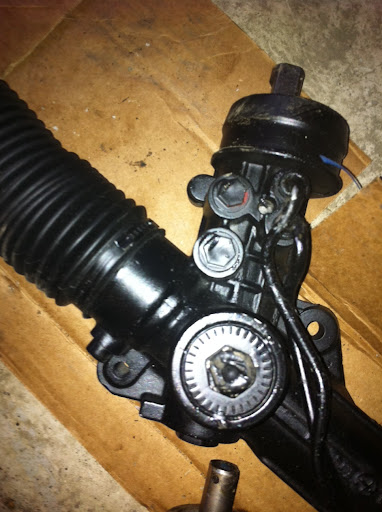
The third one pretty much sucks. In this pic, you can see both of the holes for these two bolts, on each side of the rack where the shaft input attaches:

If you climb under the dash and shine a flashlight through the hole in the firewall where the column connects to the rack, to the right of it (toward the center of the car) you'll see the head of the third bolt. You'll need a socket (I don't recall the size, but it's the same as for the other two), a swivel, a ratchet, and at least two feet of extensions. From under the car, look up just behind the driver's side axle, way up, and you'll just see it. That's the one you have to remove. It helps to have an assistant looking through the firewall hole and guiding you onto the bolt head (your buddy won't be able to reach through and help though - the gap on that side between the edge of the hole and the shaft is less than 1/2"). Remove that bolt, and the rack will be fully detached from the car. Now, you have to figure out which way to twist and turn the rack so that the steering damper bolted to it, as well as the external rack hard lines, don't snag on the two power steering banjo lines you disconnected. It takes prying, swearing, twisting, etc, but you'll get it out. On this particular car we had to undo one of the external rack hard lines because it was damaged during its install and bent out of shape.
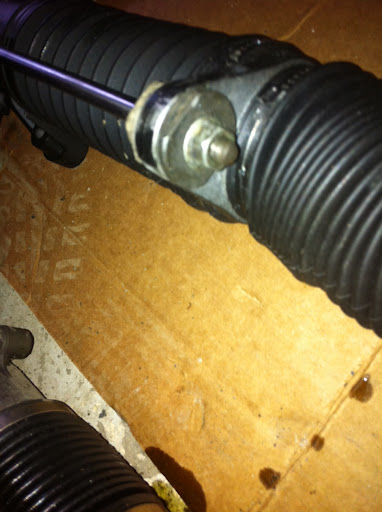
OK, at this point the rack is out of the car and on the ground. If you have new TREs that are going to be installed on the new rack, you need to measure how far the existing TREs on the old rack are turned onto the rack, and set up the new parts the same way. This will maintain the toe settings of the alignment as well as possible (but you'll still need to get an alignment to be sure it's all properly done). If, like us in this job, you are reusing the TREs with the new rack, you need to remove them. This is the point at which, if you did not pretreat them with penetrating fluid for a few days, you may start to wish you had this done at a shop. The TREs can seize onto the rack incredibly solidly. Thankfully we were lucky and these came off without too much trouble. Where the TREs separate from the rack are two hex "nuts". One is 18mm and one is 19mm. This is the joint you're looking for:

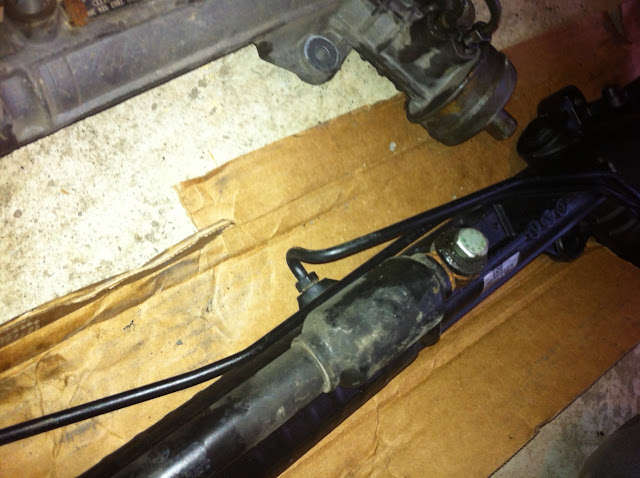
The rust-colored part is the TRE and the glossier black section is the new rack (these are installed on the rack at this point and it was easier to show the two parts with the contrast of an old weathered TRE and a newly-painted rack).
Use open-ended wrenches and have your buddy stand on the rack to keep it from moving, and break the TREs free. Remove them and install them on the new rack. You'll see that on the TREs, the portion that has been exposed to the elements will be dirty and show corrosion, and the part that was threaded into the rack will be clean. Install them until the clean section is no longer visible and then tighten. You should put anti-seize on the threads before installing them.
Once the TREs are on, swap the power steering damper (shock piston assembly) onto the new rack. There are only two bolts that hold it on. Here's one end:
Here's the other:
The ports for the banjo lines will be plugged with plastic plugs that you'll have to remove. These are the plugs (they look like black hex bolts in the picture, one above the other):
We waited until the new rack was reinstalled before removing them (the idea being that it was sensible to not let the fluid leak out, since this rack came with some fluid inside). However, you should verify that it's actually CHF11S Audi-specific mineral oil fluid (the green stuff). This one had red conventional PS fluid in it, so it needed to come out. What we did, once the rack was bolted into the car, was to connect the steering shaft to the rack, then remove the plugs, and turn the wheel from lock to lock, holding it at each end of its travel, to pump the fluid out. That way the red fluid would be out and we could fill the system from the reservoir using the right fluid. We did this with the TREs disconnected from the spindles.
Anyhow, at this point you are exactly at the midpoint of the procedure and from here out the install of the new rack is the reverse of the removal. Connecting the lines absolutely sucks, and there's no real way to advise on how to do it other than to reach in and find a way. Easiest way we've found overall for install is to first mount the rack with the mounting bolts, then reinstall the shaft boot at the firewall. Reconnect the steering shaft (and pump out the red fluid from the rack if you have that). Reassemble the underside of the dash. Connect the power steering lines to the rack (do it tightly - under pressure a banjo bolt will leak unless it's very firmly tightened). Reinstall the rack shield. Reconnect the TREs to the spindles. Reinstall the battery. Put the wheels back on, put the car on the ground, torque the wheels, and then fill and burp the PS system. This is done by taking off the power steering reservoir cap, and with the engine running, turning the wheel lock to lock 10-15 times in each direction. Top off the fluid, cap the reservoir, go for a drive, come back, and remove the cap. Check the level, top it off if needed, and you're done.
It's a long DIY to read, I know, and it can sound intimidating, but the truth is it takes only a fraction of the tech know-how that a job like a timing belt takes. It's basically persistence more than anything. It's annoying as hell and you'll want a friend to help, but it's definitely doable, especially in light of how expensive this job is at a dealership. When you're done, test drive the car, make sure it's not leaking, and enjoy a well-earned beer.
Addendum regarding the 1.8T, provided by member dmount76 after completing this job on his car:
"There are a few differences in the bolts and accessing them than listed in the write up. The 22mm bolt is accessible with a socket and long extensions. Be sure to use a 6 point socket as the bolt tried to strip when I put a 12 point on it. There are 3 bolts that hold the rack on. One is easily accessable from below (right next to the banjo bolts that hold the lines on) and the other two are accessed from the top, under the hood. One under the battery and the other on the drivers side. They take a 12 point 10 mm socket. To get the rack out just twist and slide it out the hole where that cover was on the drivers side. It really helps if you push the drivers side wheel in like the car is turning left."
Hopefully you're reading this a few days in advance of tackling the job - it's a great idea to spray penetrating fluid on the tie rod ends for a few days before starting. Sometimes they'll come off the rack easily enough, and sometimes they're your worst enemy. Hit them at least with Liquid Wrench, but if you have it, use Deep Creep or Kroil. Those are better and every bit helps. While you're doing this in advance of doing the job, inspect the ball joints in your suspension and decide whether you might need new TREs, new control arms, or if you're OK to reuse them all at this point.
First step - break the lug bolts free, and jackstand the front of the car securely, ebrake engaged, car in park (auto) or in gear (manual). Chock the rear wheels. Leave a jack under the car as a backup. Don't play around when it comes to your safety. You may want this job done and over with, but getting killed by having your car fall on you isn't the way to achieve this. With the car up and secure, straighten the steering wheel and lock the column. You'll probably have to unlock it later and turn the wheel to disengage the column from the rack, but keep it locked and straight as much as you can and if/when you do turn the wheel, pay attention to the direction you turn it, so you can return it to center in the opposite direction. Do it right and you're fine. Do it wrong and you may find the steering wheel upside down when driving straight. There is also a warning that I came across against excessive turning of the wheel with the shaft disengaged, in that there's a possibility of damaging the airbag system. If your stereo requires a security code to reactivate, locate it since you'll be removing the battery.
OK, with the car up and wheels removed, steering centered, and the TREs freshly juiced, the first step is to disengage the TREs from the spindle. You'll see that they attach with a vertical bolt through the top (13mm) as well as a pinch bolt (16mm nut). These are rarely anywhere near as bad as the pinch bolts that pin the upper CAs to the spindle. Loosen the top 13mm bolt and back it most of the way out but don't remove it. Break the pinch nut free, use a small prybar to pry open the pinch section, and then gently tap the top bolt to drive the TRE ball joint shaft out of the pinch collar on the spindle. In this pic you can see the 13mm bolt still threaded into the TRE shaft, and you can see the hole in the spindle where the pinch bolt was inserted:
Now, on the driver side there's a shield that surrounds the TRE where it comes out from the center of the car. There's a nut (10mm) on a stud that secures it at the upper right corner (as you look into the wheel well) next to the wire for the ABS sensor. That has to come off. On the left (forward) end of the shield, very inconveniently behind the spring, are two push pins that secure that end. Pop them out (I used a long flathead screwdriver, coming up from below). Once they're free, you can remove the shield. This is the shield (note the holes in it for the securing hardware):
Now, move to the interior of the car, in the driver's footwell. Remove the knee bolster (the panel above your shins when you're sitting in the driver's seat). It's easy to take out and is held by a few 8mm screws. You'll need 1/4" drive tools for this - ratchet, socket, and 6" extension. Use a small, thin flathead screwdriver to pop the covers off the two main mount bolts, remove them, remove the one screw under the fuse panel cover (look along the bottom of the fusebox opening), and the remaining 1-2 screws along the bottom edge of the panel. Pull the panel outward and ease it down - don't just drop it since the footwell light and the OBD2 port are both attached - unclip them and get the knee bolster out of the way. This is what you'll see:
Now that the panel is off, you have to remove the pinch bolt and nut that clamp the steering column onto the rack. Look way back at the firewall for a T55 Torx socketed bolt head, like this:
There's a nut at the opposite end of that bolt - remove the nut, and then wiggle the bolt until you can pull it free - it's an eccentric-shaft bolt and holds the shaft onto the rack. Turn it until you can pop it out, and the column will separate from the rack. You may need to unlock the column and turn the wheel some for a better angle (as mentioned at the top). Recenter the wheel when finished and lock the column again. Then look at the opening in the firewall where the rack pokes in - around the edge of that opening you'll see the rubber lip of a shaft boot that protrudes into the rack well and protects this part of the rack. Pry and pop it loose and pull it into the car so it's out of the way. You won't get the rack out without doing so.
Next up is the second-most blood, beer-swilling, and frustration-inducing part of the job - unbolting the lines from the rack (the only part more of a pain is putting them back onto the new rack). Look in the opening in the wheelwell and you'll see a double coil of metal line. You can see it just to the right of the TRE boot in this pic:
That's one of the power steering lines attached to the rack. The other one is behind it. One is a 19mm banjo bolt, and the other is a 22mm. You'll need open-ended wrenches for these. It's a test of patience and hand strength. They're not hard to break free but you can only get about 1/16th of a turn on them at a time, so it's turn, flip the wrench, turn some more, flip it back, and repeat for quite awhile. You'll hate your life but you WILL get it. Be careful not to lose either of the washers on each bolt (one on either side of the banjo line fitting) - the new rack won't come with them so they'll need to be reused or replaced.
Once the two lines are off, you need to remove the rack mounting bolts. On a 30v V6 there are three - on a 1.8T there are four (since this was done on a 98 30v, I only have three for reference - on a 1.8T the fourth I believe is accessed from underneath, in the rack well). For a quick reference, look at the new rack you have waiting to install. You'll see the bolt mounting holes. There is a hole on either side of the lobe that locks onto the steering column, and a third one at the other end. Look in the battery well area between the firewalls. Down underneath the battery is one bolt (hint - remove the battery). It goes through this hole on the rack:
The second one is in front of the brake booster (in the pic below, it's in the center, the small rust-colored one).
The third one pretty much sucks. In this pic, you can see both of the holes for these two bolts, on each side of the rack where the shaft input attaches:
If you climb under the dash and shine a flashlight through the hole in the firewall where the column connects to the rack, to the right of it (toward the center of the car) you'll see the head of the third bolt. You'll need a socket (I don't recall the size, but it's the same as for the other two), a swivel, a ratchet, and at least two feet of extensions. From under the car, look up just behind the driver's side axle, way up, and you'll just see it. That's the one you have to remove. It helps to have an assistant looking through the firewall hole and guiding you onto the bolt head (your buddy won't be able to reach through and help though - the gap on that side between the edge of the hole and the shaft is less than 1/2"). Remove that bolt, and the rack will be fully detached from the car. Now, you have to figure out which way to twist and turn the rack so that the steering damper bolted to it, as well as the external rack hard lines, don't snag on the two power steering banjo lines you disconnected. It takes prying, swearing, twisting, etc, but you'll get it out. On this particular car we had to undo one of the external rack hard lines because it was damaged during its install and bent out of shape.
OK, at this point the rack is out of the car and on the ground. If you have new TREs that are going to be installed on the new rack, you need to measure how far the existing TREs on the old rack are turned onto the rack, and set up the new parts the same way. This will maintain the toe settings of the alignment as well as possible (but you'll still need to get an alignment to be sure it's all properly done). If, like us in this job, you are reusing the TREs with the new rack, you need to remove them. This is the point at which, if you did not pretreat them with penetrating fluid for a few days, you may start to wish you had this done at a shop. The TREs can seize onto the rack incredibly solidly. Thankfully we were lucky and these came off without too much trouble. Where the TREs separate from the rack are two hex "nuts". One is 18mm and one is 19mm. This is the joint you're looking for:
The rust-colored part is the TRE and the glossier black section is the new rack (these are installed on the rack at this point and it was easier to show the two parts with the contrast of an old weathered TRE and a newly-painted rack).
Use open-ended wrenches and have your buddy stand on the rack to keep it from moving, and break the TREs free. Remove them and install them on the new rack. You'll see that on the TREs, the portion that has been exposed to the elements will be dirty and show corrosion, and the part that was threaded into the rack will be clean. Install them until the clean section is no longer visible and then tighten. You should put anti-seize on the threads before installing them.
Once the TREs are on, swap the power steering damper (shock piston assembly) onto the new rack. There are only two bolts that hold it on. Here's one end:
Here's the other:
The ports for the banjo lines will be plugged with plastic plugs that you'll have to remove. These are the plugs (they look like black hex bolts in the picture, one above the other):
We waited until the new rack was reinstalled before removing them (the idea being that it was sensible to not let the fluid leak out, since this rack came with some fluid inside). However, you should verify that it's actually CHF11S Audi-specific mineral oil fluid (the green stuff). This one had red conventional PS fluid in it, so it needed to come out. What we did, once the rack was bolted into the car, was to connect the steering shaft to the rack, then remove the plugs, and turn the wheel from lock to lock, holding it at each end of its travel, to pump the fluid out. That way the red fluid would be out and we could fill the system from the reservoir using the right fluid. We did this with the TREs disconnected from the spindles.
Anyhow, at this point you are exactly at the midpoint of the procedure and from here out the install of the new rack is the reverse of the removal. Connecting the lines absolutely sucks, and there's no real way to advise on how to do it other than to reach in and find a way. Easiest way we've found overall for install is to first mount the rack with the mounting bolts, then reinstall the shaft boot at the firewall. Reconnect the steering shaft (and pump out the red fluid from the rack if you have that). Reassemble the underside of the dash. Connect the power steering lines to the rack (do it tightly - under pressure a banjo bolt will leak unless it's very firmly tightened). Reinstall the rack shield. Reconnect the TREs to the spindles. Reinstall the battery. Put the wheels back on, put the car on the ground, torque the wheels, and then fill and burp the PS system. This is done by taking off the power steering reservoir cap, and with the engine running, turning the wheel lock to lock 10-15 times in each direction. Top off the fluid, cap the reservoir, go for a drive, come back, and remove the cap. Check the level, top it off if needed, and you're done.
It's a long DIY to read, I know, and it can sound intimidating, but the truth is it takes only a fraction of the tech know-how that a job like a timing belt takes. It's basically persistence more than anything. It's annoying as hell and you'll want a friend to help, but it's definitely doable, especially in light of how expensive this job is at a dealership. When you're done, test drive the car, make sure it's not leaking, and enjoy a well-earned beer.
Addendum regarding the 1.8T, provided by member dmount76 after completing this job on his car:
"There are a few differences in the bolts and accessing them than listed in the write up. The 22mm bolt is accessible with a socket and long extensions. Be sure to use a 6 point socket as the bolt tried to strip when I put a 12 point on it. There are 3 bolts that hold the rack on. One is easily accessable from below (right next to the banjo bolts that hold the lines on) and the other two are accessed from the top, under the hood. One under the battery and the other on the drivers side. They take a 12 point 10 mm socket. To get the rack out just twist and slide it out the hole where that cover was on the drivers side. It really helps if you push the drivers side wheel in like the car is turning left."
Last edited by BaseDrifter; 08-23-2015 at 03:03 PM.
#2
02-19-2011, 11:37 PM
I'll move this to the DIY section in a few days - I want to leave it here at first so that you guys know it's available, and to solicit any feedback that you think may make it more helpful.

#5
02-20-2011, 10:47 PM
Just curious as to about how long this took? I've got a quickly worsening leak in my rack and am trying to see if its going to be worth the headache to do myself or to just bend over at a shop..
#6
02-20-2011, 11:09 PM
The first time we did one, it was Hiwords, Devildub, Keith, and myself. It took us probably 8-9 working hours. Yesterday it took more like 4 1/2 or so. You will need a helper. With the info I put up, and barring any issues like seized bolts or TREs, I'd think probably 6-7 hours to do it. You'll have to feel your way through some of it but should be just fine - there's really nothing more to it than what I posted. That first time we ran into issues a couple times and had nothing to guide us so we had to figure it out. You can do it though - with the tools I listed and a basic toolset of sockets, etc, you'll be fine.

Thread
Thread Starter
Forum
Replies
Last Post
kobe24
Audi A6
0
05-01-2009 12:17 PM
16, 99, a4, audi, audiforumscom, find, lock, lug, millimeter, power, rack, replacement, steering, upside, vwaudiformcouk, wheel