
Audi UR Quattro Rally Build

Thread Starter
|
1st Gear
Joined: Apr 2011
Posts: 366
From: Birmingham, MI
We're really close to finishing the dry build phase and we’re starting to run out of things to do. The list of essentials is down to 3-4 and the "nice but not essential" is tempting us. Let's how disciplined we can be over the next few weeks.
We bought an original composite boot/trunk lid from a later Quattro, for obvious reasons, but it had one broken mounting stud. We were hoping three out of four would be enough but with that huge oil cooler, we thought we should at least attempt to fix it. It was easier than expected but with one minor oops. See if you can spot it.


We also modified the rear skid plate bar to make it look more authentic. We added what might be a reinforcing bar along its trailing edge:


Next, we added some mounting tabs on the strut bar for our igniters:


We always felt these cars lacked fender liners, even though the works cars didn't seem to have them. We started to make some but soon discovered that they would probably restrict suspension travel so settled instead on blocking off the area behind the headlights and horns with abs sheet as a compromise.


We also added these straps to the hood and trunk to make it easier to lift them. They aren't period works correct so we intended removing them once the build is finished but they are proving so useful we may keep them. What do you think?

We may have reached the end of the dry-build phase now! We'll let you know if that's true in the next update. Click, like and subscribe.
We bought an original composite boot/trunk lid from a later Quattro, for obvious reasons, but it had one broken mounting stud. We were hoping three out of four would be enough but with that huge oil cooler, we thought we should at least attempt to fix it. It was easier than expected but with one minor oops. See if you can spot it.
We also modified the rear skid plate bar to make it look more authentic. We added what might be a reinforcing bar along its trailing edge:
Next, we added some mounting tabs on the strut bar for our igniters:
We always felt these cars lacked fender liners, even though the works cars didn't seem to have them. We started to make some but soon discovered that they would probably restrict suspension travel so settled instead on blocking off the area behind the headlights and horns with abs sheet as a compromise.
We also added these straps to the hood and trunk to make it easier to lift them. They aren't period works correct so we intended removing them once the build is finished but they are proving so useful we may keep them. What do you think?
We may have reached the end of the dry-build phase now! We'll let you know if that's true in the next update. Click, like and subscribe.
Thread Starter
|
1st Gear
Joined: Apr 2011
Posts: 366
From: Birmingham, MI
THE FINAL PUSH.......
......to get the shell into the trailer and delivered to our paint guys was a lot more work than we thought but last week we did it. It feels like a huge milestone for the project as next time we see it, the car will be in pristine fresh white paint and we can start bolting shiny things to it. When we left you it was the most car it's been in over 20 years. At the end of this update, it will be the least. That's progress! Here's what we had to do to get it to this stage:
First, we took all the bodywork off the front and then started taking everything out of the engine bay in as many large subassemblies as possible. We dropped the engine and transmission as one but we had to take off some ancillaries.

Most of the engine harness came out as one, thanks to bulkhead connectors.

With the engine out, that gave us access to the brakes master cylinders and lines as well as the fuel system plus the steering rack.

Next, we removed all four strut assemblies and both subframes. Of course, we left the rear diff attached. This also allowed the exhaust to be removed.


Then we directed our attention to the cabin. Dash was first then the heater, seats, wiring harness, pedals footrests etc.


Of course, we organized everything very professionally............ as a diorama on the floor!


At some point we remembered that we hadn't mocked up the rear skid plate and fuel pump cover. Our next thought was "DOH! we have to put the rear subframe and diff back in."


With the shell basically stripped we set about filling unwanted holes and removing unwanted brackets. There were a lot more than we anticipated. We also tidied up some previous welds and finish welded some things we'd previously tack-welded. Fortunately, while taking parts off we remembered to mark the holes for either rivnuts, welded nuts or through holes. Again, there were way more than we imagined.


With the shell as naked as it has ever been and our engineering brains engaged, we took the opportunity to weigh it. Wouldn't you? It turned out to weigh 374lb in the front and 573lb in the rear which is 40% front and 60% rear. Coincidentally this is the same as our assembled 911 rally car and the exact opposite of a fully assembled Quattro! Isn't engineering fun?
We knew we'd have to move the shell around the workshop and paint shop and also transport it in the trailer so devised two different systems to do so. Rather than build a cart to move it around we thought we'd see if we could attach some wheels to our pin stands and make them mobile. Sounds crazy but we figured if we could just add a brace to stop them rotating it might be very stable. We were pleasantly surprised by the result. You wouldn't want to push it down the street like this but it is quite happy to trundle around the workshop.


So, what about getting it into the trailer and securely dragging it the three hours each way to the paint shop? Clearly it had to be lower than the pin stands on dollies. We came up with simply bolting wheels to the subframe mounts. After all, that's kind of what they are for, right.


......to get the shell into the trailer and delivered to our paint guys was a lot more work than we thought but last week we did it. It feels like a huge milestone for the project as next time we see it, the car will be in pristine fresh white paint and we can start bolting shiny things to it. When we left you it was the most car it's been in over 20 years. At the end of this update, it will be the least. That's progress! Here's what we had to do to get it to this stage:
First, we took all the bodywork off the front and then started taking everything out of the engine bay in as many large subassemblies as possible. We dropped the engine and transmission as one but we had to take off some ancillaries.
Most of the engine harness came out as one, thanks to bulkhead connectors.
With the engine out, that gave us access to the brakes master cylinders and lines as well as the fuel system plus the steering rack.
Next, we removed all four strut assemblies and both subframes. Of course, we left the rear diff attached. This also allowed the exhaust to be removed.
Then we directed our attention to the cabin. Dash was first then the heater, seats, wiring harness, pedals footrests etc.
Of course, we organized everything very professionally............ as a diorama on the floor!
At some point we remembered that we hadn't mocked up the rear skid plate and fuel pump cover. Our next thought was "DOH! we have to put the rear subframe and diff back in."
With the shell basically stripped we set about filling unwanted holes and removing unwanted brackets. There were a lot more than we anticipated. We also tidied up some previous welds and finish welded some things we'd previously tack-welded. Fortunately, while taking parts off we remembered to mark the holes for either rivnuts, welded nuts or through holes. Again, there were way more than we imagined.
With the shell as naked as it has ever been and our engineering brains engaged, we took the opportunity to weigh it. Wouldn't you? It turned out to weigh 374lb in the front and 573lb in the rear which is 40% front and 60% rear. Coincidentally this is the same as our assembled 911 rally car and the exact opposite of a fully assembled Quattro! Isn't engineering fun?
We knew we'd have to move the shell around the workshop and paint shop and also transport it in the trailer so devised two different systems to do so. Rather than build a cart to move it around we thought we'd see if we could attach some wheels to our pin stands and make them mobile. Sounds crazy but we figured if we could just add a brace to stop them rotating it might be very stable. We were pleasantly surprised by the result. You wouldn't want to push it down the street like this but it is quite happy to trundle around the workshop.
So, what about getting it into the trailer and securely dragging it the three hours each way to the paint shop? Clearly it had to be lower than the pin stands on dollies. We came up with simply bolting wheels to the subframe mounts. After all, that's kind of what they are for, right.
Thread Starter
|
1st Gear
Joined: Apr 2011
Posts: 366
From: Birmingham, MI
Finally, the day came to trundle it into the trailer. load the van with other parts and drag it to our friends at Courtade Body Shop (www.courtadebodyshop.com) for the transformation.


Thread Starter
|
1st Gear
Joined: Apr 2011
Posts: 366
From: Birmingham, MI
The shell is all white and back home ready for assembly!
The guys at Courtade Body Shop in Grand Rapids Michigan did an amazing job and even came in under estimate. Can't thank them enough. Here are some pictures and videos of the process.


Now let the assembly begin. Can you guess what's getting bolted on first?

The guys at Courtade Body Shop in Grand Rapids Michigan did an amazing job and even came in under estimate. Can't thank them enough. Here are some pictures and videos of the process.
Now let the assembly begin. Can you guess what's getting bolted on first?
Last edited by team illuminata; Dec 16, 2025 at 09:37 AM.
Thread Starter
|
1st Gear
Joined: Apr 2011
Posts: 366
From: Birmingham, MI
As we enter the final phase of this project let's review how we got here. We started this build about 10 years ago but now we have the shell painted we think we can see light at the end of the tunnel. Six big Hella lights! We're building this car utilizing the resources of friends and suppliers as much as possible so it's a real collaborative effort hence the name "Quattro Squad".

The donor car was supposed to be the parts car for our 85 Quattro but the shell was too nice to scrap, the interior had been stripped and a rudimentary cage had been installed. It was going to be the previous owner's track toy but never got finished. Before we dragged it home, it had been sat in a barn for about 12 years, only 5 miles from our building. So, we wondered what to do with it as it was too good to part out yet also too far gone to be a candidate for restoration. Some bright spark said "build a rally car out of it" as we already had a 911 rally car. That idea was immediately dismissed, but the seed had been planted and it soon germinated. We easily convinced ourselves that we could quickly slap it together and, as a bonus, use any aftermarket parts we wanted, unlike the 85 Quattro we also own, that is so nice we can only use genuine original parts for it. How hard could it be?


Well, as you're reading this write up you probably know how these things go. The first sign of trouble was when we convinced ourselves that, even though we never planned to go rallying in this car ourselves it would be a shame to build a car that could never be rallied at all so, naturally, we stripped the car bare and took it up to Thompson Racing Fabrication for a full ARA legal cage. We considered a FIA schedule K historic cage but the costs were a little daunting to say the least. At some point it was obvious it had to have a Group B carbon-Kevlar wide body kit too, rather than simply adding Group 4-wheel arch eye-brow extenders, so that was purchased and delivered with the car.


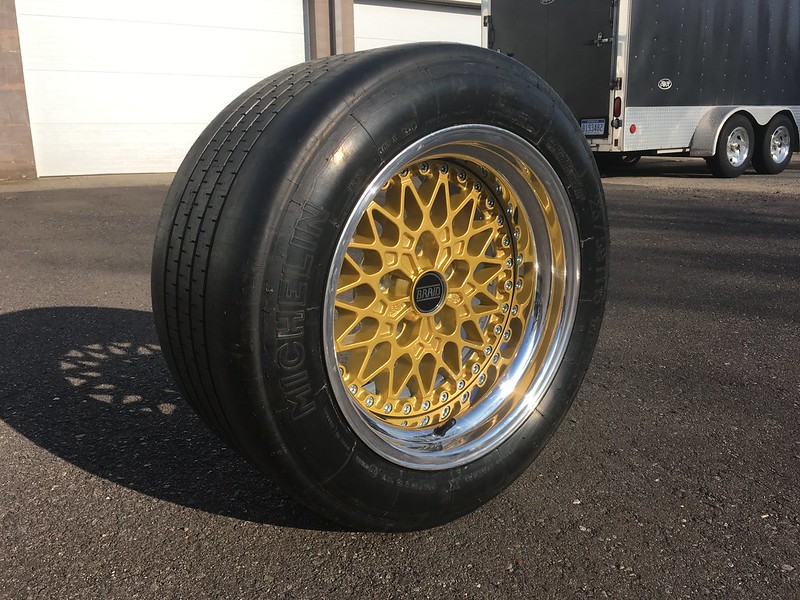
Back to the present and the assembly phase of our baby. The guys at Courtade Body Shop did a fantastic job of painting the shell and various other parts. They even did it on schedule and under budget. It was a little tricky getting it back into its build room (why don't casters roll in the direction you push them?) but it's on its pin stands now and ready for shiny parts to be installed. In keeping with our other cars, we are going to do our version of the Rothmans liveried Quattros that ran as A2 variants even though our body kit is of an A1 and has an S1 hood curtesy of the previous owner; Specifically, we're replicating the one we have a 1:18 diecast model of. It will also have a more modern 20 valve AAN Engine from EFI Express rather than the 10 valve that should be in there. We do have the proper wheels and tires from BRAID and Michelin, a group B replica dash, replica radiator, intercooler and oil cooler made from Vibrant parts, fire extinguisher mounts and tow hooks from Rennline, wiring harness from Racingtech, carbon Kevlar seats from Corbeau, six massive Hella 2000 lights, a custom stainless-steel exhaust from our friend Scott Banes and many other shiny parts to bolt on.


So, follow along as we slap it together and subscribe to our Instagram, Facebook and YouTube channels. Then you'll know if we actually finish the bloody thing!
Instagram: https://www.instagram.com/quattro.squad/
Facebook: https://www.facebook.com/QuattroSquad/
YouTube: https://www.youtube.com/@quattrosquad7034
The donor car was supposed to be the parts car for our 85 Quattro but the shell was too nice to scrap, the interior had been stripped and a rudimentary cage had been installed. It was going to be the previous owner's track toy but never got finished. Before we dragged it home, it had been sat in a barn for about 12 years, only 5 miles from our building. So, we wondered what to do with it as it was too good to part out yet also too far gone to be a candidate for restoration. Some bright spark said "build a rally car out of it" as we already had a 911 rally car. That idea was immediately dismissed, but the seed had been planted and it soon germinated. We easily convinced ourselves that we could quickly slap it together and, as a bonus, use any aftermarket parts we wanted, unlike the 85 Quattro we also own, that is so nice we can only use genuine original parts for it. How hard could it be?
Well, as you're reading this write up you probably know how these things go. The first sign of trouble was when we convinced ourselves that, even though we never planned to go rallying in this car ourselves it would be a shame to build a car that could never be rallied at all so, naturally, we stripped the car bare and took it up to Thompson Racing Fabrication for a full ARA legal cage. We considered a FIA schedule K historic cage but the costs were a little daunting to say the least. At some point it was obvious it had to have a Group B carbon-Kevlar wide body kit too, rather than simply adding Group 4-wheel arch eye-brow extenders, so that was purchased and delivered with the car.
Back to the present and the assembly phase of our baby. The guys at Courtade Body Shop did a fantastic job of painting the shell and various other parts. They even did it on schedule and under budget. It was a little tricky getting it back into its build room (why don't casters roll in the direction you push them?) but it's on its pin stands now and ready for shiny parts to be installed. In keeping with our other cars, we are going to do our version of the Rothmans liveried Quattros that ran as A2 variants even though our body kit is of an A1 and has an S1 hood curtesy of the previous owner; Specifically, we're replicating the one we have a 1:18 diecast model of. It will also have a more modern 20 valve AAN Engine from EFI Express rather than the 10 valve that should be in there. We do have the proper wheels and tires from BRAID and Michelin, a group B replica dash, replica radiator, intercooler and oil cooler made from Vibrant parts, fire extinguisher mounts and tow hooks from Rennline, wiring harness from Racingtech, carbon Kevlar seats from Corbeau, six massive Hella 2000 lights, a custom stainless-steel exhaust from our friend Scott Banes and many other shiny parts to bolt on.
So, follow along as we slap it together and subscribe to our Instagram, Facebook and YouTube channels. Then you'll know if we actually finish the bloody thing!
Instagram: https://www.instagram.com/quattro.squad/
Facebook: https://www.facebook.com/QuattroSquad/
YouTube: https://www.youtube.com/@quattrosquad7034
Thread Starter
|
1st Gear
Joined: Apr 2011
Posts: 366
From: Birmingham, MI
Welcome back to another update of our quattro rally build. The beginning of assembly.
Job #1 was to get the shiny shell into it's build space and on its pin stands. That proved a little harder than expected especially as we had to be careful not to damage the new paint and being careful around this thing was something that we hadn't really had to be so cognoscente of till now. But with a little thought and quite a bit of back and forth we managed it.


So Now we were chomping at the bit to start throwing parts at the bare shell but thought we should first devise some sort of plan. At the very least we realized that we probably shouldn't install parts that will be in the way of other parts later. Then we thought we should prioritize installing parts that would allow the car to roll around on its wheels as right now it's immobile. Also, We also realized there are more parts than we thought that still need refurbishing, buying or even making. Another idea was to add weight to the rear of the car before installing the engine in case it became a bit tippy. So I guess now we had a plan.
As we'll be in and out of the trunk a lot, we thought it might be a good idea to install the trunk seal and buffers first as this would give the trunk lid a soft landing at least. and some protection for our delicate body parts. Bet you didn't expect this to be the first part to go on the car did you?


Then we realized that the doors, being quite light, were very easy to fling open so, in order to stop them over extending and damaging the fenders, we realized we should install the door checks next. No, we didn't see this one coming. We also threw in the door seals to help protect the paint on the edges as well as us.


Next was the steering rack because a) it was shiny, b) it was ready, and c) it was on the "get it rolling on its wheels" list. Check out all those holes in the bulkhead!

And this one we hadn't anticipated ether: We ordered and installed gold heat reflecting tape from the tail pipe and along the transmission tunnel all the way to the engine bay. You see, we realized that we needed to install the rear subframe in order to get the car rolling and that would make installing the heat shielding a bit tricky, at least in the rear.

As we were still feeling very protective of our new charge we next applied cavity wax to every nook and cranny we could find then stuck sheets of green saran-wrap like material on the vulnerable surfaces of the shell to protect the paint.


If you enjoyed reading this follow along so you don't miss the next exciting update. Who knows what we'll install next?
Also, check out our YouTube Channel. https://youtube.com/@quattrosquad703...4ekUbfsds1h2If
and follow us on social media:
INSTAGRAM https://www.instagram.com/quattro.squad/
FACEBOOK https://www.facebook.com/QuattroSquad
Job #1 was to get the shiny shell into it's build space and on its pin stands. That proved a little harder than expected especially as we had to be careful not to damage the new paint and being careful around this thing was something that we hadn't really had to be so cognoscente of till now. But with a little thought and quite a bit of back and forth we managed it.
So Now we were chomping at the bit to start throwing parts at the bare shell but thought we should first devise some sort of plan. At the very least we realized that we probably shouldn't install parts that will be in the way of other parts later. Then we thought we should prioritize installing parts that would allow the car to roll around on its wheels as right now it's immobile. Also, We also realized there are more parts than we thought that still need refurbishing, buying or even making. Another idea was to add weight to the rear of the car before installing the engine in case it became a bit tippy. So I guess now we had a plan.
As we'll be in and out of the trunk a lot, we thought it might be a good idea to install the trunk seal and buffers first as this would give the trunk lid a soft landing at least. and some protection for our delicate body parts. Bet you didn't expect this to be the first part to go on the car did you?
Then we realized that the doors, being quite light, were very easy to fling open so, in order to stop them over extending and damaging the fenders, we realized we should install the door checks next. No, we didn't see this one coming. We also threw in the door seals to help protect the paint on the edges as well as us.
Next was the steering rack because a) it was shiny, b) it was ready, and c) it was on the "get it rolling on its wheels" list. Check out all those holes in the bulkhead!
And this one we hadn't anticipated ether: We ordered and installed gold heat reflecting tape from the tail pipe and along the transmission tunnel all the way to the engine bay. You see, we realized that we needed to install the rear subframe in order to get the car rolling and that would make installing the heat shielding a bit tricky, at least in the rear.
As we were still feeling very protective of our new charge we next applied cavity wax to every nook and cranny we could find then stuck sheets of green saran-wrap like material on the vulnerable surfaces of the shell to protect the paint.
If you enjoyed reading this follow along so you don't miss the next exciting update. Who knows what we'll install next?
Also, check out our YouTube Channel. https://youtube.com/@quattrosquad703...4ekUbfsds1h2If
and follow us on social media:
INSTAGRAM https://www.instagram.com/quattro.squad/
FACEBOOK https://www.facebook.com/QuattroSquad

Thread
Thread Starter
Forum
Replies
Last Post
A4QUATTRO727
Archive - Exterior/Body
28
Dec 22, 2014 09:02 PM
A4QUATTRO727
Archive - Engine/Performance Parts
10
Jul 31, 2012 04:21 PM