
Fiberglass sub box, pics inside


Thread Starter
|
1st Gear
Joined: May 2005
Posts: 414
From:
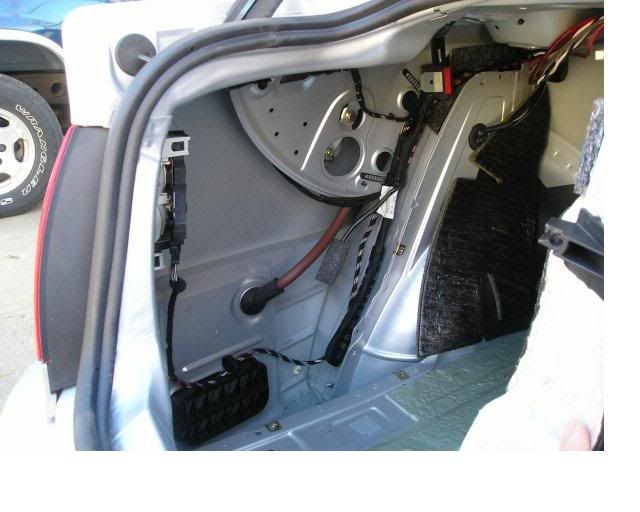
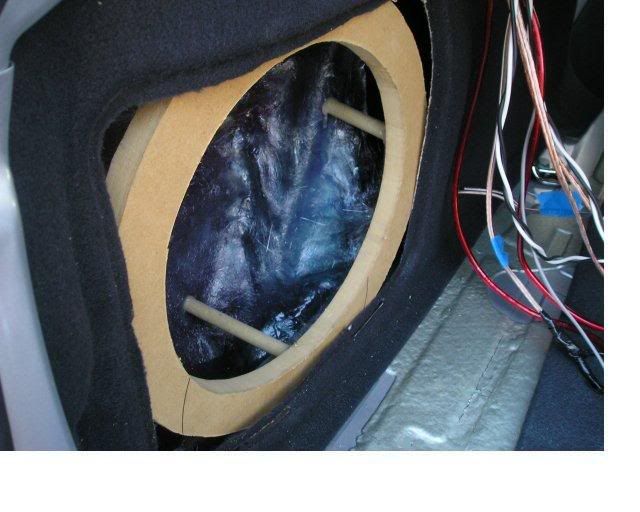
Well, I had originally planned to build a sub box in the right corner of my trunk, where the cubie hole is. However, after buying the sub I realized that the magnet was too wide to fit in the space and still have room for 3/4" mdf to go around it. I started looking in to other options and kept falling back to the large void where the tool box and cd changer are located. I already had removed my cd changer because I have the Blitzsafe adaptor for my iPod so I decided to give it a shot. Originally, I was still going to build it out of mdf but quickly realized not only how difficult it would be but also there would be no way to get a cubic foot of volume. So I decided I'd try fiberglassing. I've worked with Carbon-Kevlar but never fiberglass and never such an akward shape but I decided to try it anyway.
Step 1: I removed the cd changer and tool kit bracketry
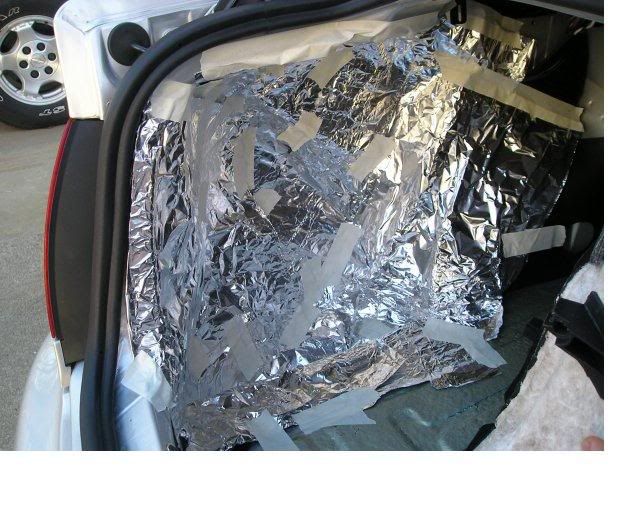
Step 2: I lined the space with tin foil and masking tape
Step 3: I applied the first layer of fiber glass. I used 3Ms spray on adhesive to stick the fiberglass to the tin foil and then I applied the resin. If you'll notice, for my first layer i used fiberglass cloth but for every layer after that I used fiberglass matte. I heard the matte was better if you were going to adhede the fiberglass to wood. It was about 50 degrees outside and the resin still wasn't dry the next day. I used a heat gun (sparingly) and it dried fine.
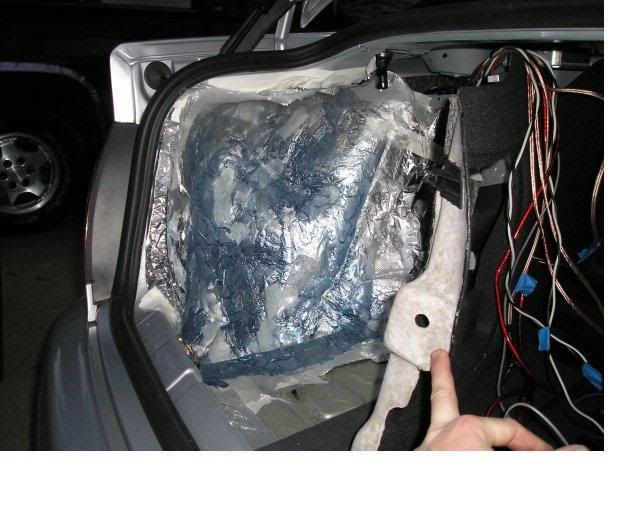
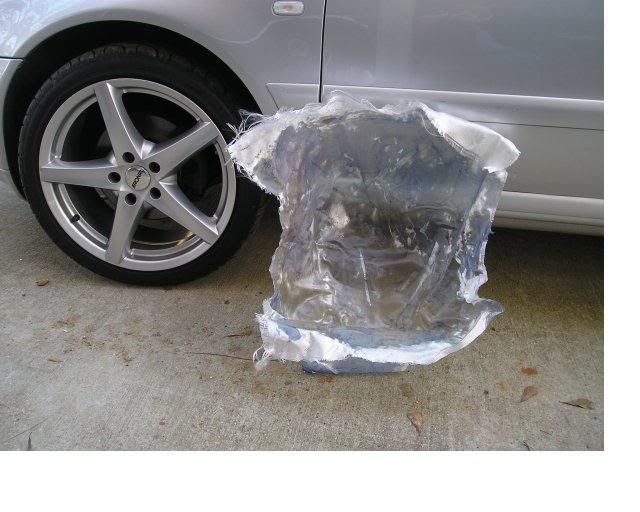
Step 4: I then pulled the shell out and added additional layers to the inside of the shell.
Step 5: I put the shell back in and then put the inside trunk liner back over the shell. I cut out a sub mounting ring out of 3/4" mdf and munted it to the shell using dowel rods.
Step 6: I added more dowel rods for support and then checked for clearance with the sub.
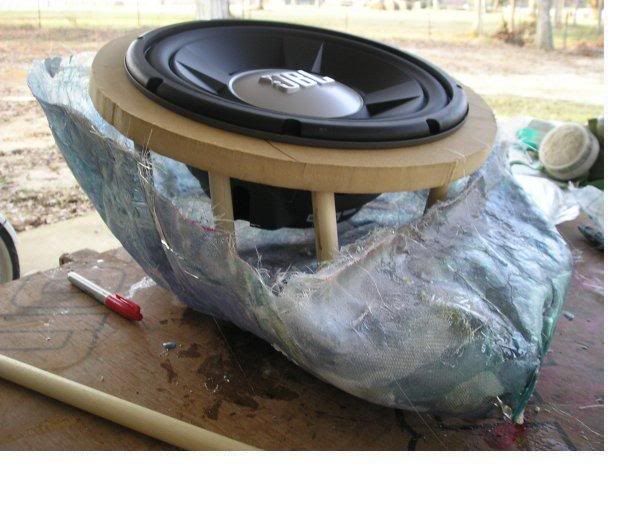
Step 7: I filled in the rest of the frame with fiberglass and voila! It was complete. After installing it in the trunk I added carpet to the front of the box.
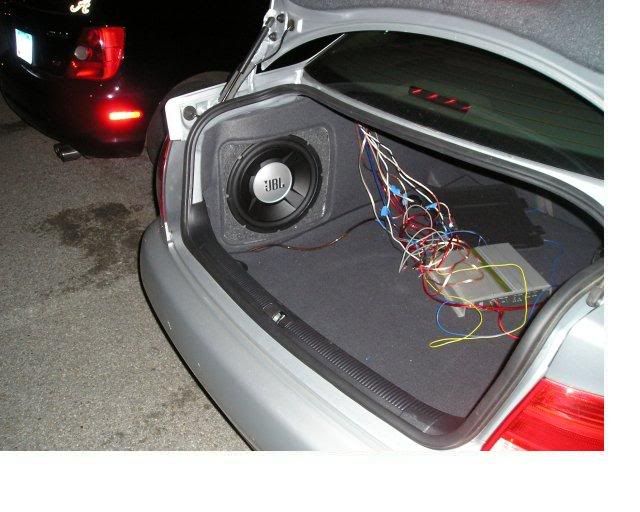
Laugh if you want but I covered the box in duct tape to prevent any air leaks the box may have had. Surprisingly, I didn't have to mount the box to anything, it fits in the spot very snug. The existing cover will fit over the sub but I have to do some minor modifications. The sub sounds much better than I expected. The bass is very tight and crisp with no noticeable distoration at any volume. The sub also sounds exactly the same with the cover on or off. Disregard all of the wiring you see all of that will be hidden and my amps will be mounted underneath my rear deck. Overall the project was not bad, a little time consuming but well worth it. Thanks to RippleChip on AudiZine for his previous write up.
Step 1: I removed the cd changer and tool kit bracketry
Step 2: I lined the space with tin foil and masking tape
Step 3: I applied the first layer of fiber glass. I used 3Ms spray on adhesive to stick the fiberglass to the tin foil and then I applied the resin. If you'll notice, for my first layer i used fiberglass cloth but for every layer after that I used fiberglass matte. I heard the matte was better if you were going to adhede the fiberglass to wood. It was about 50 degrees outside and the resin still wasn't dry the next day. I used a heat gun (sparingly) and it dried fine.
Step 4: I then pulled the shell out and added additional layers to the inside of the shell.
Step 5: I put the shell back in and then put the inside trunk liner back over the shell. I cut out a sub mounting ring out of 3/4" mdf and munted it to the shell using dowel rods.
Step 6: I added more dowel rods for support and then checked for clearance with the sub.
Step 7: I filled in the rest of the frame with fiberglass and voila! It was complete. After installing it in the trunk I added carpet to the front of the box.
Laugh if you want but I covered the box in duct tape to prevent any air leaks the box may have had. Surprisingly, I didn't have to mount the box to anything, it fits in the spot very snug. The existing cover will fit over the sub but I have to do some minor modifications. The sub sounds much better than I expected. The bass is very tight and crisp with no noticeable distoration at any volume. The sub also sounds exactly the same with the cover on or off. Disregard all of the wiring you see all of that will be hidden and my amps will be mounted underneath my rear deck. Overall the project was not bad, a little time consuming but well worth it. Thanks to RippleChip on AudiZine for his previous write up.


Thread Starter
|
1st Gear
Joined: May 2005
Posts: 414
From:
Yea, you can get a cubic foot. I actually think I have closer to .9, but it's hard to measure such an akward shape. There were a few crevesess I left out that I could have molded the box into but I didn't. This was my main concern when I made the box. I was afradi I was going to get finished and then be dissapointed with the output. The sub is rated for 300 watts rms and I've got 250 going to it and 'm very pleased with it's performance. I'd love to see how a 1000 watt sub with decent excursion performed in the box.


1st Gear
Joined: Oct 2005
Posts: 54
Duct tape? i will forget you said that, good quality from what i see and hear. I give you props for attempting it. I use figerglass at work all the time and still havent attempted it. But you may have changed my mind.
Looks nice. Good work
Looks nice. Good work