
Audi 3.0 Lifter (Cam Follower) replacement
#1
 01-11-2012, 12:18 PM


I decided to post a second thread because I have figured out what my problem is. I have worn lifters (cam followers) on the passenger side. One is so bad that it has a hole in it. The cam doesn't seem to be worn bad though.
Money is a little tight at the moment so I want to just replace the bad lifters for now. I have the bentley manual and can follow it to take off the timing belt and everything but im not sure how to remove the cam and replace the lifters. I also ordered the timing tool kit for the 3.0. If anyone can help me with this I would greatly appreciate it. I really like pictures or videos if anyone has ever done this before.
I would like to thank Jackmup for helping me so far on diagnosing and working on my car.
#2
01-14-2012, 09:20 PM
Where did you get the TB from?
what did you order so far?
I didn't take too many pics when I did it I was effin busy as hell in that engine bay. I'm sorry I did mean to.
You need to start with the TB removal but just the removal
http://forums.audiworld.com/showthre...lt+service+DIY
The pictures have been deleted for some reason but I have them printed out.
I'll get them to you.
Next Important
The instructions tell you that the tb can be done without the crank locking pin in place. This is true, but you must be so careful as to not move the crank or you will break the valves on the other head. So mark the crank position. BTW do not replace the crankshaft seal unless it is leaking.
You need to remove the cams.. but before you start this you need to mark the cam positions with a good yellow paint marker from the art store the kind that has a ball inside. You must mark the position before you remove the cam position tool from that side. Mark the cams to the guide frame or the head not the pulleys they move.
You need to remove the cam adjuster on the front
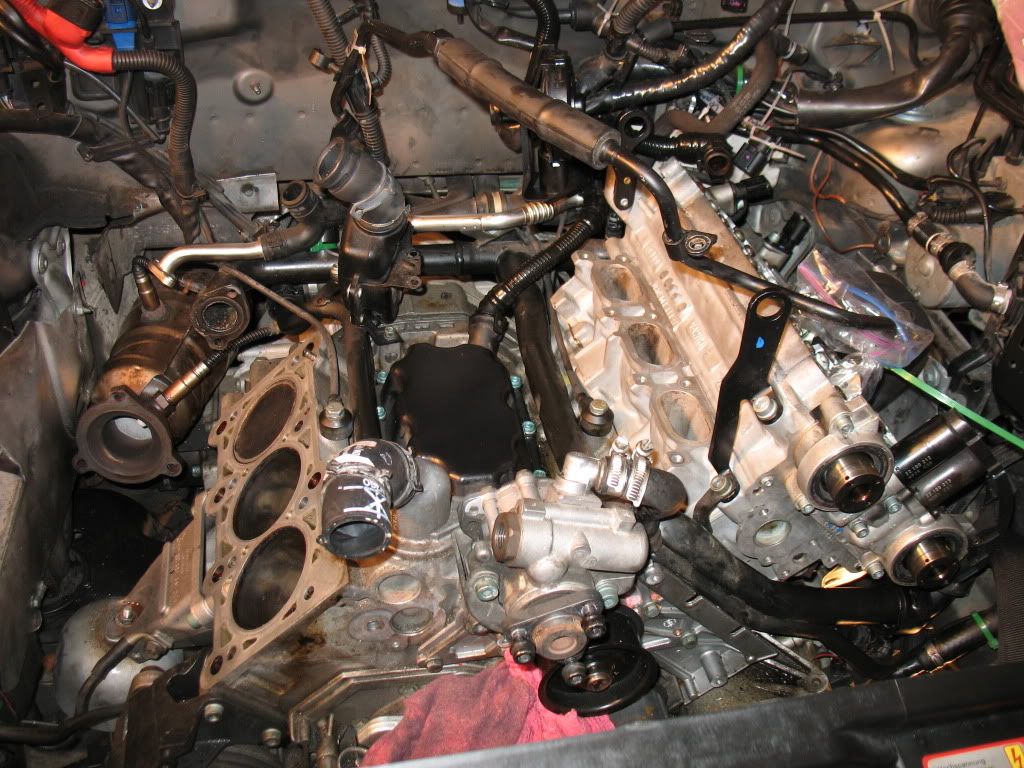
Notice the head on the right both cams a protruding through the adjuster that has the black things on top. You will need a gasket for this and the rear sensor cover. also inside the adjuster on the ends of the cams are whether rings, they are very brittle be very careful or they will break. I broke one on re-assembly.
06C-103-121-E rear sensor cover gasket
06C103121E (06C 103 121 E) Gasket From camshaft position sensor housing to cylinder head. (2 Per Car) manufactured by ELRING KLINGER for $3.31 at KO Performance
06C-103-121-J front camshaft adjuster gasket
06C103121j (06C 103 121 J) Timing Case Gasket Case to camshafts. (2 Per Car) manufactured by GENUINE VW/AUDI for $23.63 at KO Performance
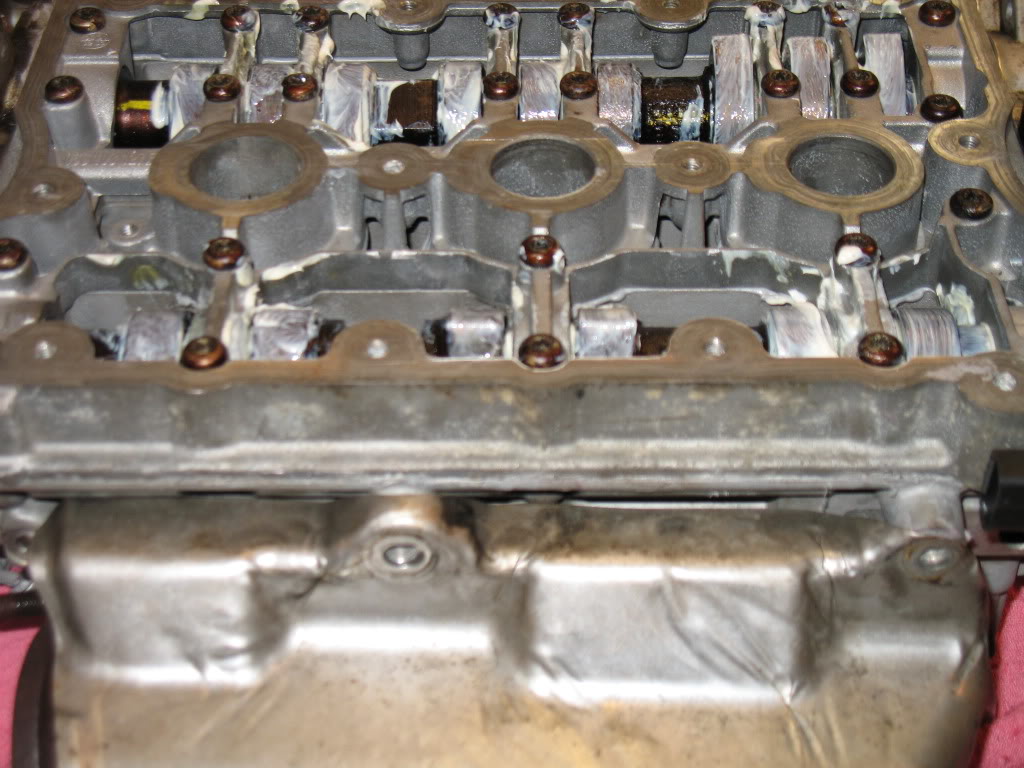
You will notice with your valve cover off that the cam journal carriage is held in place by torx screws, Youll need a torx set and an allen set
also an allen set with the balled tops so you can swivel.
when you take the cam guide frame off I'm not sure if you need to remove the cam timing tool or not. You'll have to finger that one out. It would be nice if you can have it on the cams on re assembly because the pressure from the valve springs will force the cam into the wrong position.
My heads were on the bench when I put the cam position tool back on.
It will be tougher on you at that point but so much easier in other ways.
also check primemotorgroup.com for these. Make sure you don't loose one of these screws down a port. plug ports with rags and keep a magnet on your screws during removal installation. Engine must be COLD
start from the out sides ends 4 nearest cam adjuster the 4 nearest the cam sensor then the next 4 by the cam adjuster and next 4 by the sensor and around like a swirly. Installation will be the opposite but this info is in the bentley so look it up. tighten them in stages final torque is (10NM)
When you install the cams back into the head no. 3 cylinder will have all the lobes up evenly. look that up in your bentley too.
now when you go to re install the cam adjuster valves
some whether rings have locking ends some don't. (if you don't understand what I'm talking about then yours aren't the locking type)
they will slip in easy if they aren't going easy do not force it something is wrong. be patient, be careful. they are a special order.
they hung up on the gasket on me so a little Permatex Indian head might be in order to hold that gasket in place while you work.
The white paste is assembly lube get that at the auto store
the parts will loose their slime coat so apply this to the cam and lifters
Intake cam followers (lifters) w0133-1626959
Exhaust cam followers lifters w0133-1631362
02 2002 Audi A6 Quattro Cam Follower - Engine Mechanical - INA, Exhaust, Intake - PartsGeek
so you will need
1 cam adjuster gasket 06C-103-121-J
1 cam sensor gasket 06C-103-121-E
1 cam adjuster seals W0133-1737311
? intake lifters what evers bad w0133-1626959
? exhaust lifters what ever is bad w0133-1631362
1 valve cover gasket
1 Timing belt
1 Timing belt tensioner
1 timing belt roller
1 water pump
1 Thermostat
1 Thermostat housing o-ring
4 Liters of Audi/vw pink coolant
4 plastic caps for the front timing pulley covers-or they will leak 02 2002 Audi A6 Quattro Camshaft Seal Kit - Engine Mechanical - OES Genuine - PartsGeek
vacuum line cause it will crack on you, I like the oem line here's a link 02 2002 Audi A6 Quattro Cam Follower - Engine Mechanical - INA, Exhaust, Intake - PartsGeek
buy tools cheap at Harbor freight
Torque wrench - a good one! borrow or buy a craftsman or sk FT LBS and Inch LBS/NM two wrenches one is large one is small. they can't be crap
torx set
allen set long and short
allen set with round heads
metric sockets, wrenches etc...
c-clamp valve timing set
the cam pulley adjustment that tool goes on a ratchet
some sort of pin to shove into the timing belt tensioner
crank locking pin but its a pita to install
little telescoping magnet
coffee cans for parts.
Check your PM I'll contact you to send the TB instructions
That's all for me for now this took a while.
get your parts and tools together.
what did you order so far?
I didn't take too many pics when I did it I was effin busy as hell in that engine bay. I'm sorry I did mean to.
You need to start with the TB removal but just the removal
http://forums.audiworld.com/showthre...lt+service+DIY
The pictures have been deleted for some reason but I have them printed out.
I'll get them to you.
Next Important
The instructions tell you that the tb can be done without the crank locking pin in place. This is true, but you must be so careful as to not move the crank or you will break the valves on the other head. So mark the crank position. BTW do not replace the crankshaft seal unless it is leaking.
You need to remove the cams.. but before you start this you need to mark the cam positions with a good yellow paint marker from the art store the kind that has a ball inside. You must mark the position before you remove the cam position tool from that side. Mark the cams to the guide frame or the head not the pulleys they move.
You need to remove the cam adjuster on the front
Notice the head on the right both cams a protruding through the adjuster that has the black things on top. You will need a gasket for this and the rear sensor cover. also inside the adjuster on the ends of the cams are whether rings, they are very brittle be very careful or they will break. I broke one on re-assembly.
06C-103-121-E rear sensor cover gasket
06C103121E (06C 103 121 E) Gasket From camshaft position sensor housing to cylinder head. (2 Per Car) manufactured by ELRING KLINGER for $3.31 at KO Performance
06C-103-121-J front camshaft adjuster gasket
06C103121j (06C 103 121 J) Timing Case Gasket Case to camshafts. (2 Per Car) manufactured by GENUINE VW/AUDI for $23.63 at KO Performance
You will notice with your valve cover off that the cam journal carriage is held in place by torx screws, Youll need a torx set and an allen set
also an allen set with the balled tops so you can swivel.
when you take the cam guide frame off I'm not sure if you need to remove the cam timing tool or not. You'll have to finger that one out. It would be nice if you can have it on the cams on re assembly because the pressure from the valve springs will force the cam into the wrong position.
My heads were on the bench when I put the cam position tool back on.
It will be tougher on you at that point but so much easier in other ways.
also check primemotorgroup.com for these. Make sure you don't loose one of these screws down a port. plug ports with rags and keep a magnet on your screws during removal installation. Engine must be COLD
start from the out sides ends 4 nearest cam adjuster the 4 nearest the cam sensor then the next 4 by the cam adjuster and next 4 by the sensor and around like a swirly. Installation will be the opposite but this info is in the bentley so look it up. tighten them in stages final torque is (10NM)
When you install the cams back into the head no. 3 cylinder will have all the lobes up evenly. look that up in your bentley too.
now when you go to re install the cam adjuster valves
some whether rings have locking ends some don't. (if you don't understand what I'm talking about then yours aren't the locking type)
they will slip in easy if they aren't going easy do not force it something is wrong. be patient, be careful. they are a special order.
they hung up on the gasket on me so a little Permatex Indian head might be in order to hold that gasket in place while you work.
The white paste is assembly lube get that at the auto store
the parts will loose their slime coat so apply this to the cam and lifters
Intake cam followers (lifters) w0133-1626959
Exhaust cam followers lifters w0133-1631362
02 2002 Audi A6 Quattro Cam Follower - Engine Mechanical - INA, Exhaust, Intake - PartsGeek
so you will need
1 cam adjuster gasket 06C-103-121-J
1 cam sensor gasket 06C-103-121-E
1 cam adjuster seals W0133-1737311
? intake lifters what evers bad w0133-1626959
? exhaust lifters what ever is bad w0133-1631362
1 valve cover gasket
1 Timing belt
1 Timing belt tensioner
1 timing belt roller
1 water pump
1 Thermostat
1 Thermostat housing o-ring
4 Liters of Audi/vw pink coolant
4 plastic caps for the front timing pulley covers-or they will leak 02 2002 Audi A6 Quattro Camshaft Seal Kit - Engine Mechanical - OES Genuine - PartsGeek
vacuum line cause it will crack on you, I like the oem line here's a link 02 2002 Audi A6 Quattro Cam Follower - Engine Mechanical - INA, Exhaust, Intake - PartsGeek
buy tools cheap at Harbor freight
Torque wrench - a good one! borrow or buy a craftsman or sk FT LBS and Inch LBS/NM two wrenches one is large one is small. they can't be crap
torx set
allen set long and short
allen set with round heads
metric sockets, wrenches etc...
c-clamp valve timing set
the cam pulley adjustment that tool goes on a ratchet
some sort of pin to shove into the timing belt tensioner
crank locking pin but its a pita to install
little telescoping magnet
coffee cans for parts.
Check your PM I'll contact you to send the TB instructions
That's all for me for now this took a while.
get your parts and tools together.
Last edited by Jackmup; 01-14-2012 at 09:22 PM.
#3
01-14-2012, 10:59 PM
I pm'd you back before I read this. I only purchased the c clamp type timing tool kit. It contained the crank lock pin, c clamps, locking pins, and the cam pulley adjustment tool. I am working on taking the car apart in the evenings. I travel a lot but have never been to New York but when I do we will take you out to dinner or something for all of your help. I will update with more pics when I get everything apart and decide what to replace.
#4
01-17-2012, 04:30 PM
I have been trying to find where to put the crank lock pin but am having a little trouble. I think I found it but not sure. Is it black and takes a 6 mm allen socket? If it is then I am having a heck of a time getting the plug out. I can just barely reach it with three extensions but cant get the socket in far enough to turn it. I have found many pictures of the 2.7 and 2.8 but not the 3.0.
#5
01-17-2012, 06:35 PM

i have the same issue, now my question is will i have to change the Tb as well? i got mine changed about 3k ago along with the thermostat, water pump and some other things.
#6
01-17-2012, 09:25 PM
I have found a way to get a small ratchet to this plug but i cant get it out. I'm not sure what bit this plug takes but a 6mm allen or a torx bit seems to kinda fit it but are not tight. I made a video but I still can't clearly see what bit i need. Help please!!!
Audi 3.0 AVK crank lock pin? - YouTube
Audi 3.0 AVK crank lock pin? - YouTube
#7
01-18-2012, 10:20 PM
That's it
it takes whats is called a poly drive
snap-on, mac, matco, ebay
some retarded thing in between a torx and an allen
Audi took a lesson from Ford on that one
You can do the job without the crank locked, I did
just don't turn the crank, and mark the position with a yellow marker anyway
pickup a new copper crush ring for your oil plug next time your at the store
Last edited by Jackmup; 01-18-2012 at 10:22 PM.
#8
01-19-2012, 09:36 PM
what was the total amount $ spent if you don't mind me asking i want to see if i should just do it myself or take it in!
#9
01-20-2012, 08:06 AM
Total amount for what?
I rebuilt my heads, No valves or seats needed
But I pulled my heads off the block so I needed gaskets,head bolts etc. $2000 just heads
My problem was valve seals though not lifters.
jjhackn is going to replace the lifters with head on and do a tb service so with tools he should be about 1500. largest single cost will be the timing tool set.
His problem is bad lifters.
This is a very advanced project, you need to be able to understand what you might see in the engine as your working on it. i.e. scoring, filings, flakes, oil color, discoloration this tells a story. This is not a parts replacement project.
#10
01-22-2012, 03:01 PM
Ok, I have the timing belt off. Now I believe I need to remove the cam adjuster and cam sensor. My question is how do I remove the sprockets on the front of the cams in order to get to the bolt holding it to the cam guide or do I even have to remove it? Also I have taken out the 2 bolts on top of the rear cam sensor but do I need to completely remove it before the cam guide?