
DIY: BlauSport Struts
#1
 09-16-2009, 01:00 AM

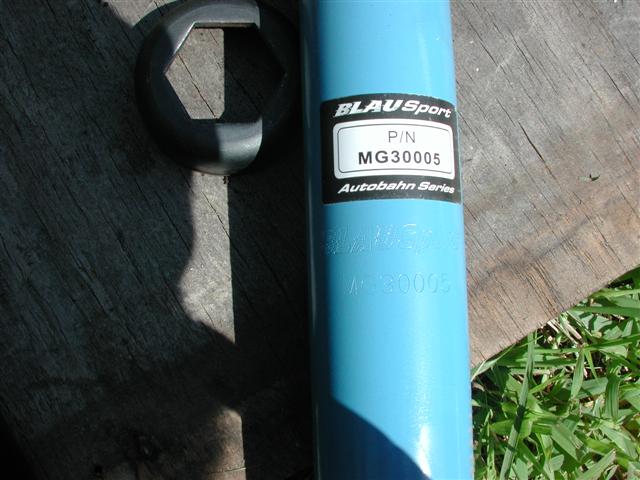
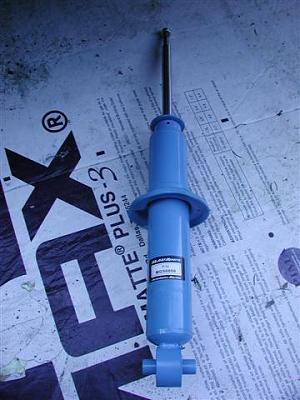
Ok, as most of ya know, I really needed to change my struts. I got really tired of bouncing like a hooptie with hydraulics going down the road so went looking for a good, cost effective kit. I didnt want to lower the car with springs nor did I need the sportier (stiff) type ride Koni's and Bilsteins give, so I started looking at the Boges, KYBs, and other 'touring' type struts. What I found was that buying the part individually costs alot - ~$390 at the cheapest for KYB GR2's w/all needed hardware to ~$500 for the 'upgraded' Boges w/hardware, so.. I started looking for kits to save a few bucks. What I found and ended up getting was a kit from Blauparts called the BlauSport Autobahn Series: http://www.blauparts.com/proddetail.asp?prod=MGR1009-B for the shipped price of only $299.00. Looking around, it was deemed the most likely these were re-painted KYB's. After thinking for a bit, I decided that this was ok as I was looking at them anyways.
I called Blauparts at 3:45pm on a Wednesday and talked to a very nice rep who took my info, and answered my questions. The answers I got were that while they woudn't say just who made the struts they were not just 're-painted' and a label slapped on and in fact were made for Blauparts to thier specs specifically for the application, ie. different valving for a more sportier ride at the higher ride height and heavier weight of our Audi's. Kinda typical answer, really... So anyways, I was done by 3:55pm with the promise that the kit would arrive in 2 days. Ok, good enough. However, the next day (Thursday), and very much to my surprise, FedEx knocked on my door at 11:02am with the kit in hand! Talk about fast shipping! Even though were both in the Mid-West, never have I had an order ship with 30 mins and arrive with 24. Gotta give the props for that.
This kit comes with all the normal hardware you need to change with the struts including new bolts and nuts. Obviously each kit is different depanding on which model and year of car you have. In my case, the kit included the following:
All in nice, Blue, BlauSport boxes. Ok, so far so good. I started to look at the instructions that came with the kit and found some very crappy generic ones in 4 different languages. Oh well, they didnt say there would be any. However, looking through these, I found a reference to KYB and Gas-A-Just. Hmm, it seems KYB made these as surmised. Ok. Looking at the struts themselves, however, did reveal that these are not simply 're-painted' as there is a 'BlauSport' and part number engraved into each one, and only the single, Blue, paint layer. Again, all ok.

Ok, so on to the install...
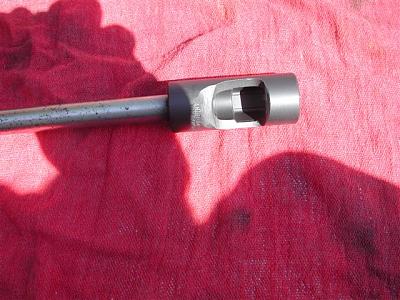
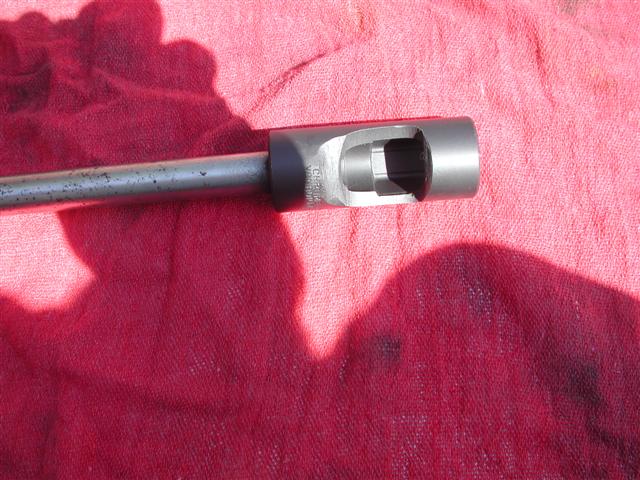
As I didnt have the special Audi tool for removing the strut nut, I went to my local Smith's Farm Store and found both a 22mm Deep Impact Socket and 7mm Long Arm Allen. Using my bench grinder, I proceeded to make my own:
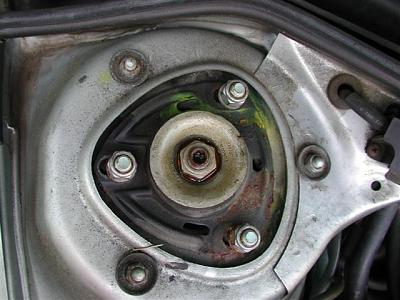
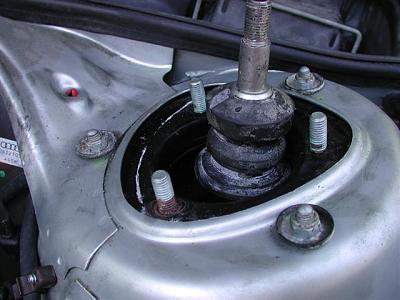
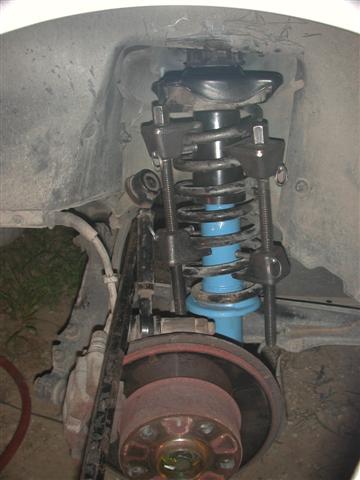
Heading to the car, I first looked at what I was dealing with. It wasn't good:

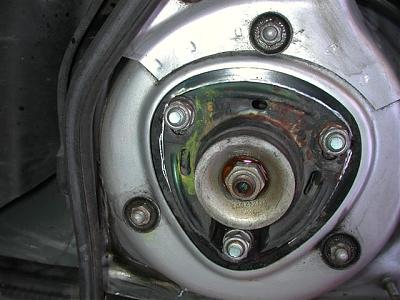
First thing I did was hit the nuts with PB Blaster, wipe off the crud, and mark the Upper Mounts so I could get the Camber back to close:
(continued)
I called Blauparts at 3:45pm on a Wednesday and talked to a very nice rep who took my info, and answered my questions. The answers I got were that while they woudn't say just who made the struts they were not just 're-painted' and a label slapped on and in fact were made for Blauparts to thier specs specifically for the application, ie. different valving for a more sportier ride at the higher ride height and heavier weight of our Audi's. Kinda typical answer, really... So anyways, I was done by 3:55pm with the promise that the kit would arrive in 2 days. Ok, good enough. However, the next day (Thursday), and very much to my surprise, FedEx knocked on my door at 11:02am with the kit in hand! Talk about fast shipping! Even though were both in the Mid-West, never have I had an order ship with 30 mins and arrive with 24. Gotta give the props for that.
This kit comes with all the normal hardware you need to change with the struts including new bolts and nuts. Obviously each kit is different depanding on which model and year of car you have. In my case, the kit included the following:
All in nice, Blue, BlauSport boxes. Ok, so far so good. I started to look at the instructions that came with the kit and found some very crappy generic ones in 4 different languages. Oh well, they didnt say there would be any. However, looking through these, I found a reference to KYB and Gas-A-Just. Hmm, it seems KYB made these as surmised. Ok. Looking at the struts themselves, however, did reveal that these are not simply 're-painted' as there is a 'BlauSport' and part number engraved into each one, and only the single, Blue, paint layer. Again, all ok.
Ok, so on to the install...
As I didnt have the special Audi tool for removing the strut nut, I went to my local Smith's Farm Store and found both a 22mm Deep Impact Socket and 7mm Long Arm Allen. Using my bench grinder, I proceeded to make my own:
Heading to the car, I first looked at what I was dealing with. It wasn't good:

First thing I did was hit the nuts with PB Blaster, wipe off the crud, and mark the Upper Mounts so I could get the Camber back to close:

(continued)
#2
09-16-2009, 01:39 AM
Next, using the homemade socket tool and allen, I removed the Upper Strut Nut:
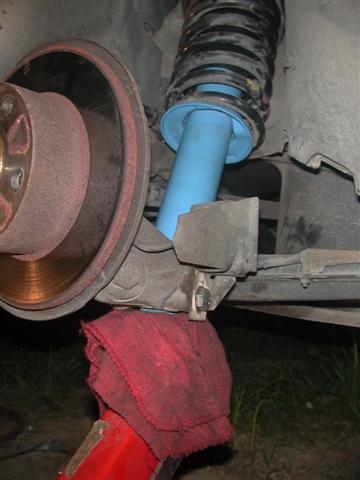
Once removed, I jacked the car up enough to allow me to use a pipe wrench on the Threaded Cap. Notice the strut actually decompressed under its own weight. Very bad strut :
:

NOTE: you will need a 18" wrench as the cap is large. Also, I suggest using a ratchet strap going from the strut to an anchor point somewhere in the engine bay. Why? When you remove the Strut Insert the top of the tire will push outwards. Moving the wheel only aggravates this, and trying to remove the Threaded Cap WILL move the tire. Once moved, you will have to use brute force to get it back into position. Not fun at all. believe me. Bentley says to 'use a block of wood between the steering arm and spring' but I dont see how this would work as it all moves as one. Sorry, I dont have a pic as I didnt think of it till after.
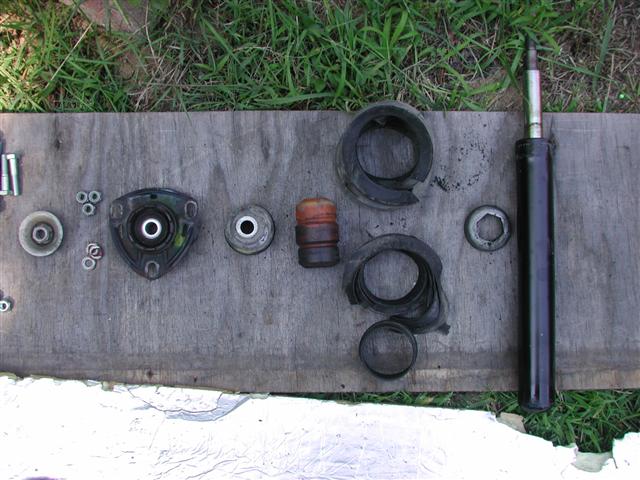
Next, I removed the Upper Strut Mount, then put the Upper Strut Washer back on with the Strut Nut and used that to hold onto while giving the strut a sharp pull straight up. It came out after 3 good pulls. This was what I had taken out, in order of disassembly.:

Shove the Dust Boot through the top and attach to the little lip on the Bearing Plate (you'll see it). I found it easiest to get one side started from below and then reach through the top with one hand to stretch it around the lip while holding it on from below with the other (no pics, hands were full). Once on, I used a large Zip-Tie (used to hold Flex-Duct in HVAC) to secure the Dust Boot to the Bearing Plate better.
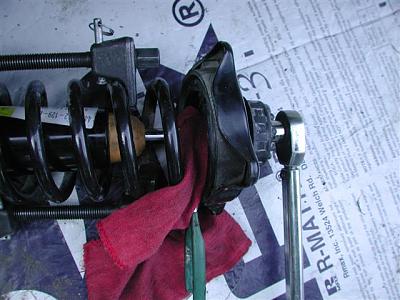
Insert the new strut. KYB says to use no oil on their website, but I put a little wheel bearing grease on the bottom to prevent it rusting to the Strut. Install the Threaded Cap through the top and tighten with the Pipe Wrench. Its suppose to be @ 177ftlbs, but I just tighten it good then gave it 5 quick raps with a 3lb hammer. Then I used another, smaller, Zip-Tie to secure the bottom of the Boot to the strut. It is loose here, but with the Zip-Tie will not slip up over the threaded cap.:
Lower the car making sure the Strut Rod is guided through the hole and install the Bump Stop just till the 'step':
(continued)

Once removed, I jacked the car up enough to allow me to use a pipe wrench on the Threaded Cap. Notice the strut actually decompressed under its own weight. Very bad strut
: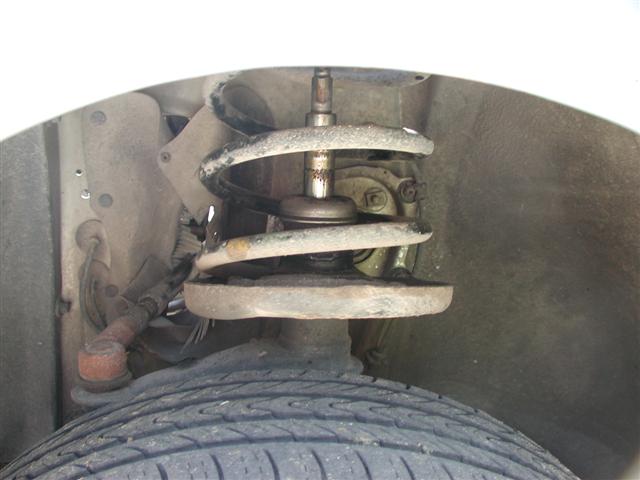
NOTE: you will need a 18" wrench as the cap is large. Also, I suggest using a ratchet strap going from the strut to an anchor point somewhere in the engine bay. Why? When you remove the Strut Insert the top of the tire will push outwards. Moving the wheel only aggravates this, and trying to remove the Threaded Cap WILL move the tire. Once moved, you will have to use brute force to get it back into position. Not fun at all. believe me. Bentley says to 'use a block of wood between the steering arm and spring' but I dont see how this would work as it all moves as one. Sorry, I dont have a pic as I didnt think of it till after.
Next, I removed the Upper Strut Mount, then put the Upper Strut Washer back on with the Strut Nut and used that to hold onto while giving the strut a sharp pull straight up. It came out after 3 good pulls. This was what I had taken out, in order of disassembly.:
Shove the Dust Boot through the top and attach to the little lip on the Bearing Plate (you'll see it). I found it easiest to get one side started from below and then reach through the top with one hand to stretch it around the lip while holding it on from below with the other (no pics, hands were full). Once on, I used a large Zip-Tie (used to hold Flex-Duct in HVAC) to secure the Dust Boot to the Bearing Plate better.
Insert the new strut. KYB says to use no oil on their website, but I put a little wheel bearing grease on the bottom to prevent it rusting to the Strut. Install the Threaded Cap through the top and tighten with the Pipe Wrench. Its suppose to be @ 177ftlbs, but I just tighten it good then gave it 5 quick raps with a 3lb hammer. Then I used another, smaller, Zip-Tie to secure the bottom of the Boot to the strut. It is loose here, but with the Zip-Tie will not slip up over the threaded cap.:
Lower the car making sure the Strut Rod is guided through the hole and install the Bump Stop just till the 'step':

(continued)
#3
09-16-2009, 02:00 AM
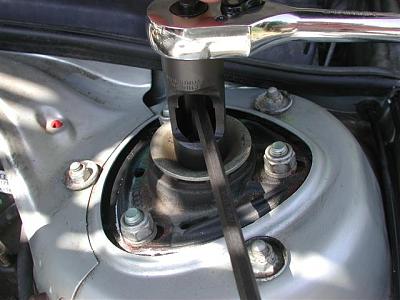
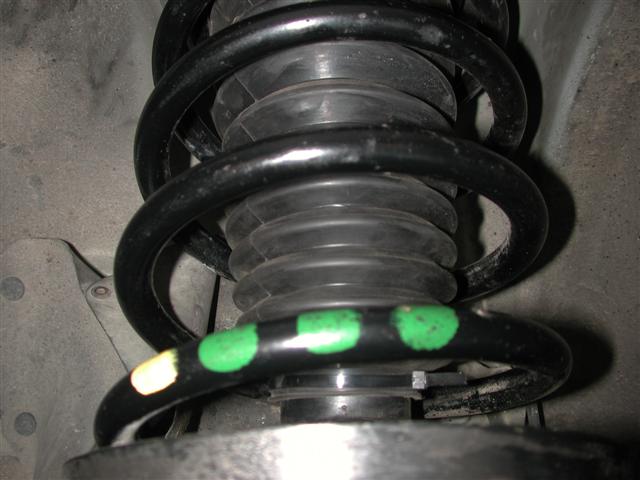
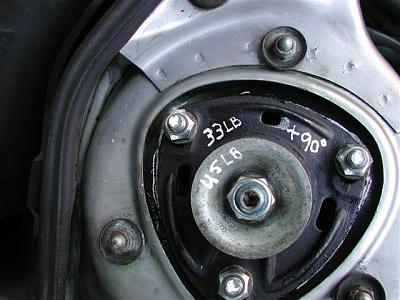
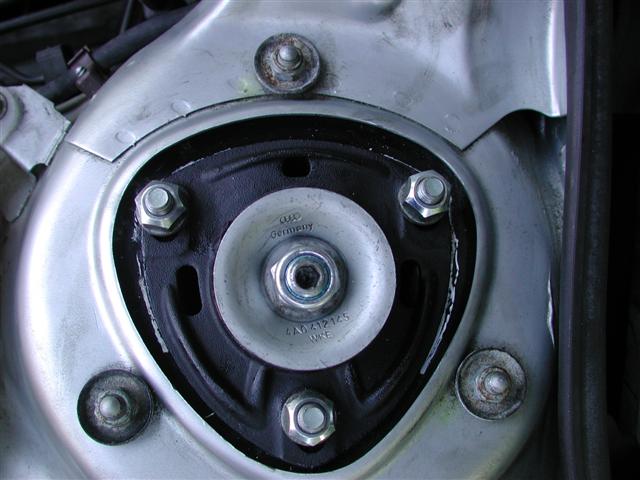
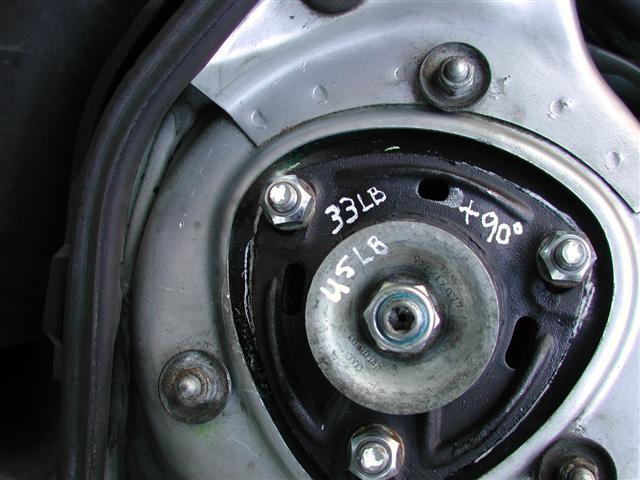
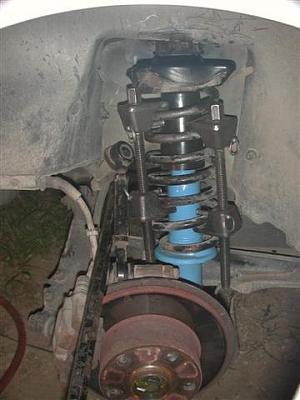
Installed the Bump Cover then the Upper Mount. Aligned the Mount with the studs while pushing down to decompress the strut. This takes alittle 'oompf', but try to make it smooth. Once on, I secured with three new Bearing Mount Nuts from the kit (17mm) and tighten lightly. Installed the Strut Rod Washer and, using a new Strut Rod Nut from the kit and the homemade tool, tighten to 45ftlbs. Then I moved the Bearing Mount to the lines I marked before and tighten down the Mount Nuts to 33ftlbs +90 degrees:

I like to mark frequently loosened nuts and bolts with their torque specs for those techs who never look them up:
Some of you might have noticed I didnt change the actual Strut bearings. Well, to do that you pretty much need to remove the whole assembly. On these cars, the Strut and Wheel Hub are one piece so to remove you'd need to remove more than I wanted to at the time. Besides, mine were actually really good looking with no visible wear. If you feel the need to, feel free.. the appropriate nuts and bolts to reinstall are included in the kit.
Thats it for now. Tomorrow, the rears!!
#6
09-16-2009, 12:25 PM
Ok, rears..
These are actually alittle harder to do due to the space restraints, but can go even faster than the fronts if you pay attention to what you are doing.
First I rented a set of Strut Spring Compressors from Advanced Auto. These are $49.99 with that being returned went you return the tool. So its actually free and you have NO excuse to not use them or buy a cheap crap set that can kill you.
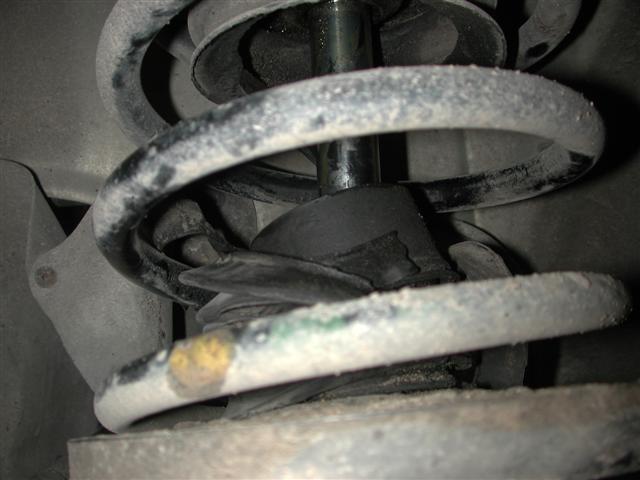
I removed the tire and jacked the car up to get a look. Here's what I found. Notice the Dust Boot and Bump Stop are separated with the Stop looking rather raggy:

I have found that when doing these types of struts, its easier to use the Strut Compressors to relieve the tension on the bottom bolt and to prevent the Strut from 'springing' down and out, potentially hurting you or causing damage. Its tight, but can be done. NOTE: watch the CV Boot while working! It is real close and if you damage it, your screwed.:

Using a set of extensions, I unscrewed the three Upper Strut Mount nuts, then the Lower Strut Mount bolt. If you've got the tension right on the compressors, it should slip right out. If not, use a drift or punch to tap it out. Then just lower the whole assembly:

Set it on something flat and solid and disassemble. Since these are not being reused, I used a pair of pliers on the Strut Rod and an impact on the nut. Here's the parts in order on disassembly. Notice, again, the compressed Strut - another very bad strut:

Heres the replacement with integrated spring seat:
(continue)
These are actually alittle harder to do due to the space restraints, but can go even faster than the fronts if you pay attention to what you are doing.
First I rented a set of Strut Spring Compressors from Advanced Auto. These are $49.99 with that being returned went you return the tool. So its actually free and you have NO excuse to not use them or buy a cheap crap set that can kill you.
I removed the tire and jacked the car up to get a look. Here's what I found. Notice the Dust Boot and Bump Stop are separated with the Stop looking rather raggy:

I have found that when doing these types of struts, its easier to use the Strut Compressors to relieve the tension on the bottom bolt and to prevent the Strut from 'springing' down and out, potentially hurting you or causing damage. Its tight, but can be done. NOTE: watch the CV Boot while working! It is real close and if you damage it, your screwed.:
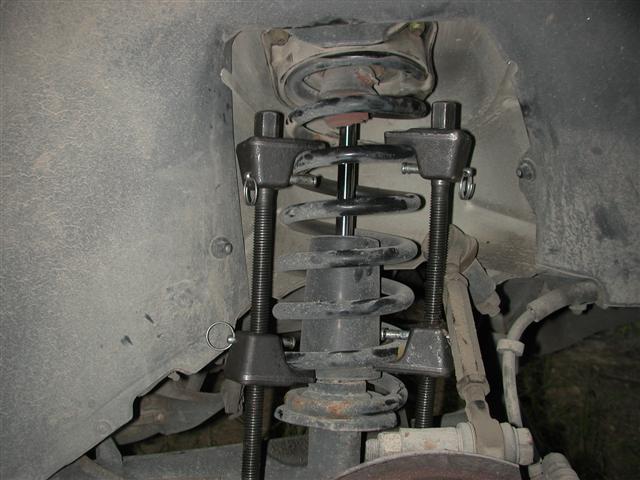
Using a set of extensions, I unscrewed the three Upper Strut Mount nuts, then the Lower Strut Mount bolt. If you've got the tension right on the compressors, it should slip right out. If not, use a drift or punch to tap it out. Then just lower the whole assembly:
Set it on something flat and solid and disassemble. Since these are not being reused, I used a pair of pliers on the Strut Rod and an impact on the nut. Here's the parts in order on disassembly. Notice, again, the compressed Strut - another very bad strut:
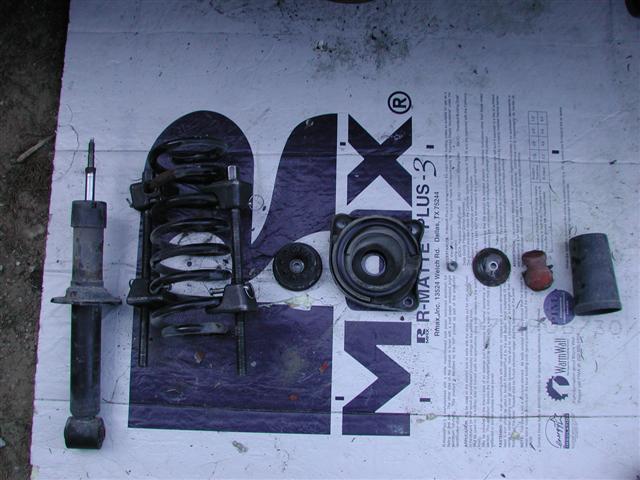
Heres the replacement with integrated spring seat:

(continue)
#7
09-16-2009, 01:19 PM
Reassembly...
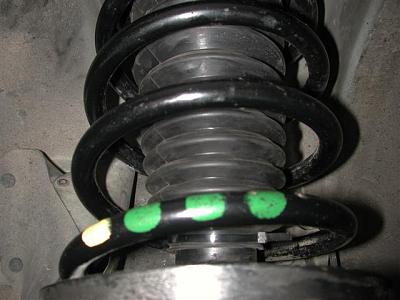
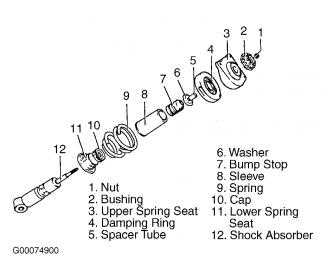
Placed Bump Stop w/ Boot over the Strut Rod, then the Upper Bearing Washer, Coil, Upper Isolator and Upper Mount Plate, the Bearing Spacer, Upper Bushing and Rod Nut:
To tighten, you can either use the special Audi tool, or do what is usually done - using pliers and a rag. I used a pair of pliers and a doubled up rag to hold the Strut Rod while tighten the Rod Nut. If you go this route, remember to only hold the very top of the rod. If you nick the rod where it inters the Strut, you will quickly ruin the seal and thus the Strut. The correct spec is 22ftlbs. NOTE: My pic shows a torque wrench, but I actually used an impact set to a low setting. With a moderate pressure being applied to the pliers, the rod will spin in the rag when tight enough and not strip the Rod or Nut. It takes alittle experience to do correctly:
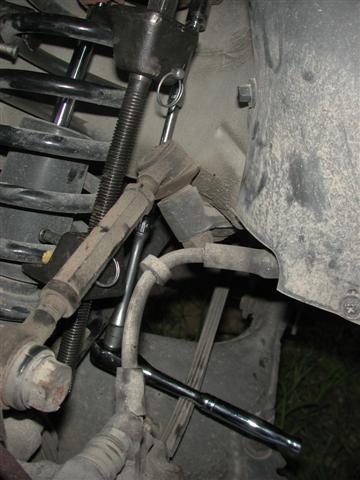
Insert assembly into car. Remember, I still have the compressors on and Strut is compressed. However, the Strut is now alittle longer due to the new rubber on top, and the compressors are already strained. I first tried to install the top first on the Upper Mounting Bolts then bring the Lower Strut Mount up with a jack to align it with the mount. No joy. There was no way that thing was lining up without 2 or 3 pairs of hands and a crowbar or two. So much for Bently again...
So, I installed the Lower Mounting Bolt first, then used a crowbar across the Upper Control Arm to extend to suspension and lower the Strut just enough to fit:
Removed the spring compressors guiding the Upper Mount onto the studs and making sure the coil is aligned with the perch stops. Next, I used a jack to compress the Strut until ALL the weight was on the suspension and tightened the Lower Strut Bolt to 66ftlbs, and the Upper Strut Mount nuts to 18ftlbs. These are all new and included in the kit. Remember that ANY suspension part MUST be tightened with the car at ride height (under normal load) or binding will occur:

-------
Placed Bump Stop w/ Boot over the Strut Rod, then the Upper Bearing Washer, Coil, Upper Isolator and Upper Mount Plate, the Bearing Spacer, Upper Bushing and Rod Nut:
To tighten, you can either use the special Audi tool, or do what is usually done - using pliers and a rag
. I used a pair of pliers and a doubled up rag to hold the Strut Rod while tighten the Rod Nut. If you go this route, remember to only hold the very top of the rod. If you nick the rod where it inters the Strut, you will quickly ruin the seal and thus the Strut. The correct spec is 22ftlbs. NOTE: My pic shows a torque wrench, but I actually used an impact set to a low setting. With a moderate pressure being applied to the pliers, the rod will spin in the rag when tight enough and not strip the Rod or Nut. It takes alittle experience to do correctly: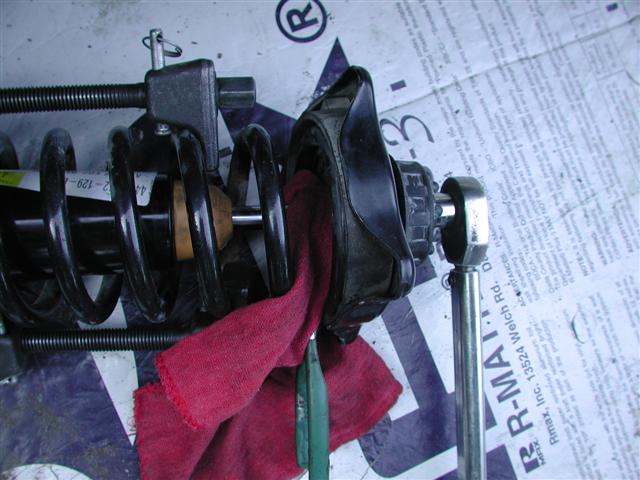
Insert assembly into car. Remember, I still have the compressors on and Strut is compressed. However, the Strut is now alittle longer due to the new rubber on top, and the compressors are already strained. I first tried to install the top first on the Upper Mounting Bolts then bring the Lower Strut Mount up with a jack to align it with the mount. No joy. There was no way that thing was lining up without 2 or 3 pairs of hands and a crowbar or two. So much for Bently again...
So, I installed the Lower Mounting Bolt first, then used a crowbar across the Upper Control Arm to extend to suspension and lower the Strut just enough to fit:

Removed the spring compressors guiding the Upper Mount onto the studs and making sure the coil is aligned with the perch stops. Next, I used a jack to compress the Strut until ALL the weight was on the suspension and tightened the Lower Strut Bolt to 66ftlbs, and the Upper Strut Mount nuts to 18ftlbs. These are all new and included in the kit. Remember that ANY suspension part MUST be tightened with the car at ride height (under normal load) or binding will occur:
-------
#8
09-16-2009, 01:48 PM
Thats about it for the install. Now the review:
These things really surprised me. I mean, I know that mine were completely shot, but these things really changed the car over what I was expecting based on past experience. Taking it out onto some of our roughest roads (I live in the country), the first thing I noticed was absolutely NO suspension noise. No clunks. This was good as it means nothing was loose, and the rest of the suspension was good. The next thing I noticed was no bounce. Absolutely none. Blauparts claim these are valved more to the 'Sport' side of the spectrum, and I believe them. These are NOT your normal KYBs and are much better than the equivalent Monroe that actually cost more. The car took the bumps with some jolts, but stayed flat on the road. You could fell the road and what the car was doing. There were what I felt some excessive vibrations transmitted into the cabin, but with no bounce and with full control with no skidding back and forth. The tires were glued to the road. And believe me when I say this road is rough. Next I took a couple hard turns, not really expecting much w/o a rear sway bar, but even that was improved significantly. Body roll was reduced to a very acceptable level for a cruiser and much safer than previously. I also checked front dive under hard breaking and found that too to be very acceptable.
I went out of town over the holiday weekend to Wisconsin, going through Chicago - the real test of a suspension. 3-4 hours on a road trip would help separate the men from the posers. On the way up, I started to feel that these just might be a little too stiff for my taste, and my wife agreed. I have a bad back with Rods and Cages, so really like more of the 'touring' type ride over the 'sport', and I could start feeling the 'sport' when going over some of the pothole ridden Chicago roads. However, at the end of the trip, I noticed that the pain and stiffness was not as bad as I was use to. For the next 10 days or so we were there, the car was driven every day and either I got use to the new feel, or the Struts where wearing in, but I could swear the ride was getting slightly less stiff and the handling was improving. On the way home, going back through Chicago, I found the ride quality, road feel, and suspension performance very acceptable, even enjoyable. I hit some fairly rough Chicago roads with no objections and threw the car around in traffic with aplomb. On smooth, newer roads the car rode is as if on glass. On the rougher portions, the suspension sucked up the bumps while keeping the tires glued for complete control and transmitted only enough to the cabin to inspire confidence. There was no 'rough ride' complaints from anyone this time. When I got home and out of the car, my back felt about as good as could be expected, and better than it has when taking that trip in any car before, other than my '96 Aerostar Cargo (sorry guys, that thing rides nice! Not 'sporty' though).
These things might be made by KYB and be on the cheap side compared to other 'non-Monroe' struts, but they just might be the ticket for those of us on a budget but still want an upgrade on the OEM ride without going full on 'sport'.
Now for the long term test drive...
These things really surprised me. I mean, I know that mine were completely shot, but these things really changed the car over what I was expecting based on past experience. Taking it out onto some of our roughest roads (I live in the country), the first thing I noticed was absolutely NO suspension noise. No clunks. This was good as it means nothing was loose, and the rest of the suspension was good. The next thing I noticed was no bounce. Absolutely none. Blauparts claim these are valved more to the 'Sport' side of the spectrum, and I believe them. These are NOT your normal KYBs and are much better than the equivalent Monroe that actually cost more. The car took the bumps with some jolts, but stayed flat on the road. You could fell the road and what the car was doing. There were what I felt some excessive vibrations transmitted into the cabin, but with no bounce and with full control with no skidding back and forth. The tires were glued to the road. And believe me when I say this road is rough. Next I took a couple hard turns, not really expecting much w/o a rear sway bar, but even that was improved significantly. Body roll was reduced to a very acceptable level for a cruiser and much safer than previously. I also checked front dive under hard breaking and found that too to be very acceptable.
I went out of town over the holiday weekend to Wisconsin, going through Chicago - the real test of a suspension
. 3-4 hours on a road trip would help separate the men from the posers. On the way up, I started to feel that these just might be a little too stiff for my taste, and my wife agreed. I have a bad back with Rods and Cages, so really like more of the 'touring' type ride over the 'sport', and I could start feeling the 'sport' when going over some of the pothole ridden Chicago roads. However, at the end of the trip, I noticed that the pain and stiffness was not as bad as I was use to. For the next 10 days or so we were there, the car was driven every day and either I got use to the new feel, or the Struts where wearing in, but I could swear the ride was getting slightly less stiff and the handling was improving. On the way home, going back through Chicago, I found the ride quality, road feel, and suspension performance very acceptable, even enjoyable. I hit some fairly rough Chicago roads with no objections and threw the car around in traffic with aplomb. On smooth, newer roads the car rode is as if on glass. On the rougher portions, the suspension sucked up the bumps while keeping the tires glued for complete control and transmitted only enough to the cabin to inspire confidence. There was no 'rough ride' complaints from anyone this time. When I got home and out of the car, my back felt about as good as could be expected, and better than it has when taking that trip in any car before, other than my '96 Aerostar Cargo (sorry guys, that thing rides nice! Not 'sporty' though).These things might be made by KYB and be on the cheap side compared to other 'non-Monroe' struts, but they just might be the ticket for those of us on a budget but still want an upgrade on the OEM ride without going full on 'sport'.
Now for the long term test drive...
Last edited by Midniteoyl; 09-16-2009 at 01:53 PM.
#9
09-17-2009, 10:13 PM
Jim,
thanks a bunch for the DIY - you're da man.
I suppose I should be ordering the set since I could swear from your pics that I'm actually seeing my own struts
I got a couple of questions:
1) "Lower the car making sure the Strut Rod is guided through the hole and install the Bump Stop just till the 'step' "
Probably I could figure it out when I see it, but what did you mean by "till the step"?
2) "Remember that ANY suspension part MUST be tightened with the car at ride height (under normal load) or binding will occur"
You already had the car on jack stands to do that rear strut. Do you just use the eye-o-meter to raise/compress that strut to "ride height"?
Thanks.
#10
09-18-2009, 02:57 AM
#1- Step, Shoulder, Chamfer... If you look again, you can see it right at the top of the bump stop.
#2- Nope. I actually pump until the car just lifts off the jack stand and is supported on the suspension. Whether the suspension is on a jack or not, when it compresses enough to lift the car it'll be at 'ride height'.
Sorry for the lack of pics, but I was in a rush when I did them as I was heading outta town. I should've done a proper write-up too, but it was more than 2 weeks after the fact