
Upholstery Glue

Thread Starter
|
3rd Gear
Joined: Dec 2008
Posts: 1,941
From: IL
Among the owners with older models, did any one have to reglue the door cards' vinyl trim?
The vinyl on all 4 doors is loose especially around the handles and I want to reglue it since I have some time on hand.
What type or brand of good glue do you recommend? Is this 3M spray on stuff something I could use with success?
Thanks in advance.
The vinyl on all 4 doors is loose especially around the handles and I want to reglue it since I have some time on hand.
What type or brand of good glue do you recommend? Is this 3M spray on stuff something I could use with success?
Thanks in advance.
We had to reglue the interior of our now gone e36, we used a spray 3m glue and it worked quite well. But on his vinyl, where it needed to be stretched, it could not hold it. We tried all sorts of glue and the 3m http://www.amazon.com/3M-08090-Yello.../dp/B0002JMPRK worked the best. I'm pretty sure that's the one we used.
Thread Starter
|
3rd Gear
Joined: Dec 2008
Posts: 1,941
From: IL
Thanks, Jeff.
I ended up calling 3M after buying a can of the 77, and noticing afterward (online) that a different number (80) is for vinyl.
A gentleman from their "Automotive Care" department recommended the very same thing your link points at. Therefore, I went and got a can from CarQuest for $ 21 and change after tax.
Will follow up on how good it did/did not work.
cheers
I ended up calling 3M
after buying a can of the 77, and noticing afterward (online) that a different number (80) is for vinyl.A gentleman from their "Automotive Care" department recommended the very same thing your link points at. Therefore, I went and got a can from CarQuest for $ 21 and change after tax.
Will follow up on how good it did/did not work.
cheers
Thread Starter
|
3rd Gear
Joined: Dec 2008
Posts: 1,941
From: IL
I started with a rear door panel, and I'll incorporate a few pics about panel removal even though probably by now everyone on the forum knows how to do it for their own model.
-
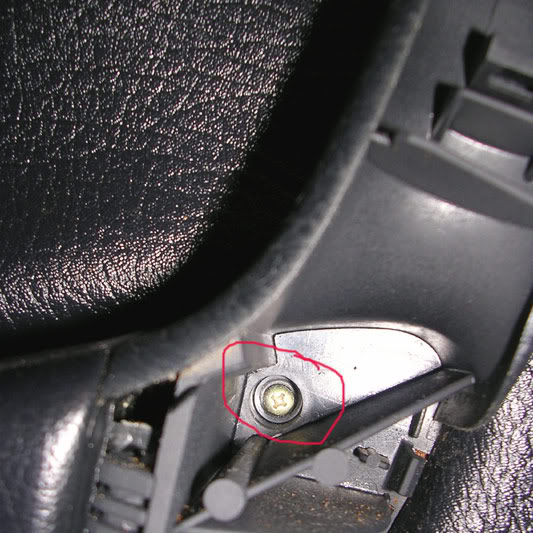
After the two side screws, there are two more inside the handle:
-


-
The panel is loosened up or partially removed by pulling from the bottom and then pushing up over the locking **** - of course:
-

-
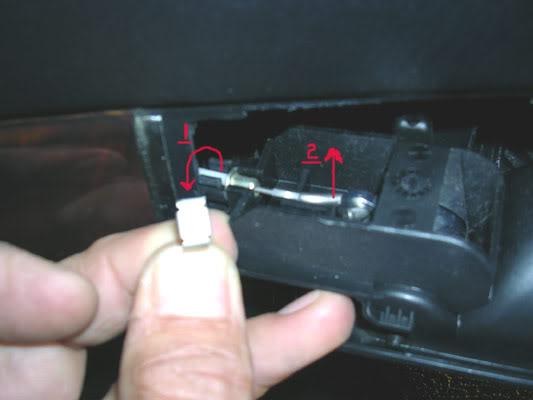
Pull the safety clip and then unhook the latch cable:
-
-
Flip the window switch/latch housing lengthwise and push it through the panel opening to free it:
-

-
After the two side screws, there are two more inside the handle:
-
-
The panel is loosened up or partially removed by pulling from the bottom and then pushing up over the locking **** - of course:
-
-
Pull the safety clip and then unhook the latch cable:
-
-
Flip the window switch/latch housing lengthwise and push it through the panel opening to free it:
-
Last edited by chefro; Nov 27, 2010 at 01:29 AM.
Thread Starter
|
3rd Gear
Joined: Dec 2008
Posts: 1,941
From: IL
At this point the panel is free.
Moving onto the the real job at hand.
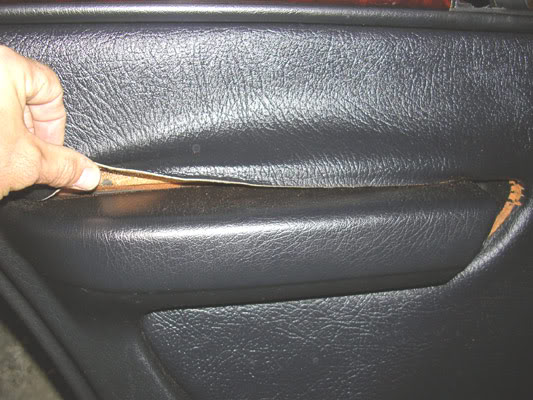
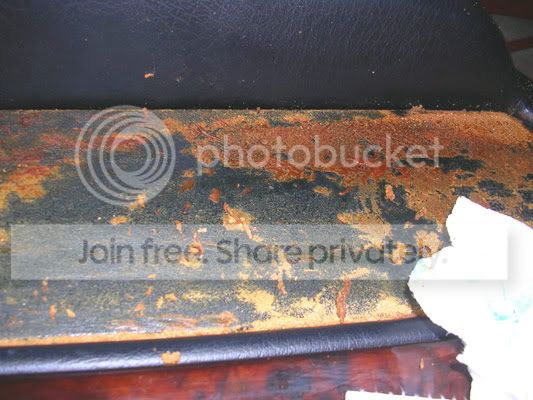
All my four panels are similar to this one, with the vinyl being loose mostly starting from around the handle and armrest:
-
-
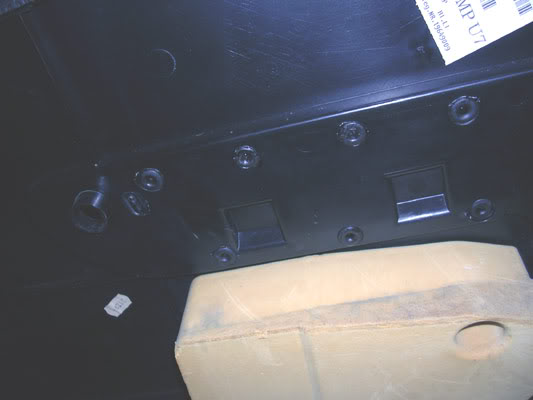
I was hoping to be able to "unscrew" the armrest (which is plastic of course), but no luck since it is molten-riveted unto the panel.
-
-
I pulled as much of the vinyl as I could without getting too far down into the pocket, as it would be nearly impossible to get it glued in there. (I suspect that in the factory they apply the vinyl first, and then they complete the panel by adding the pocket which is part of panel's outer's edge...everything is plastic...)
-

-
The vinyl has some sort of foamy backing, and actually that's what becomes dry as it ages, and not the glue itself. The glue under that dry and crumbly "foamy" film is actually still sticky! The whole thing is really a pain in the **** to clean, although it would probably come off much easier with some sort of solvent. However, I didn't want to extend the "damage" beyond a manageable area away from the pocket.
-

-
I got a portion wet and the damn thing thickens, becoming even harder to remove:
-
It took me quite some time to clean it to a decent degree, and then prepped it for spraying:
-

-
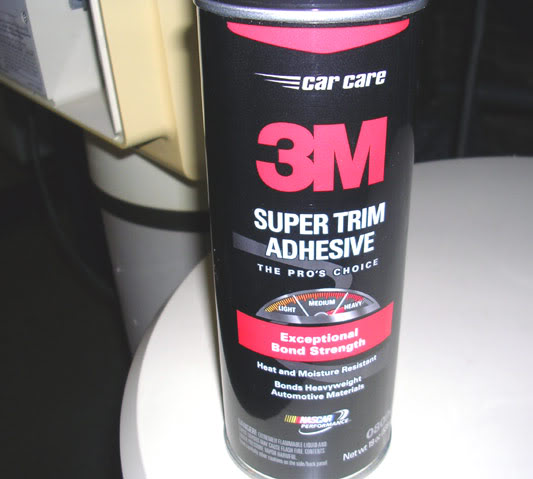
This suppose to be the "miraculous" product ($ 20):
-
-
Followed the instructions to spray 2 coats (both directions) on both surfaces. NOTE TO SELF: Need to pay attention to spraying the edge channels, otherwise the vinyl would not stay lodged good in there:
-

-
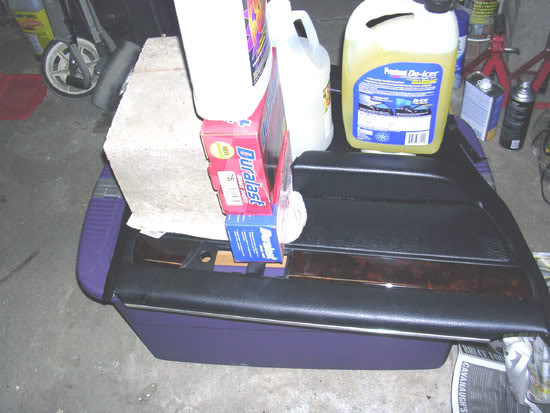
I set some weights (I know, it looks like a circus) over some areas I thought may need extra pressure to get the surfaces to stick together, and I left it alone until tomorrow, when will truly see what sort of crappy result (or decent) I had. Time will tell.
-
-
-
I will follow-up tomorrow.
chefro
Moving onto the the real job at hand.
All my four panels are similar to this one, with the vinyl being loose mostly starting from around the handle and armrest:
-
-
I was hoping to be able to "unscrew" the armrest (which is plastic of course), but no luck since it is molten-riveted unto the panel.
-
-
I pulled as much of the vinyl as I could without getting too far down into the pocket, as it would be nearly impossible to get it glued in there. (I suspect that in the factory they apply the vinyl first, and then they complete the panel by adding the pocket which is part of panel's outer's edge...everything is plastic...)
-
-
The vinyl has some sort of foamy backing, and actually that's what becomes dry as it ages, and not the glue itself. The glue under that dry and crumbly "foamy" film is actually still sticky! The whole thing is really a pain in the **** to clean, although it would probably come off much easier with some sort of solvent. However, I didn't want to extend the "damage" beyond a manageable area away from the pocket.
-
-
I got a portion wet and the damn thing thickens, becoming even harder to remove:
-
It took me quite some time to clean it to a decent degree, and then prepped it for spraying:
-
-
This suppose to be the "miraculous" product ($ 20):
-
-
Followed the instructions to spray 2 coats (both directions) on both surfaces. NOTE TO SELF: Need to pay attention to spraying the edge channels, otherwise the vinyl would not stay lodged good in there:
-
-
I set some weights (I know, it looks like a circus) over some areas I thought may need extra pressure to get the surfaces to stick together, and I left it alone until tomorrow, when will truly see what sort of crappy result (or decent) I had. Time will tell.
-
-
-
I will follow-up tomorrow.
chefro
Last edited by chefro; Nov 27, 2010 at 01:55 AM.
Thread Starter
|
3rd Gear
Joined: Dec 2008
Posts: 1,941
From: IL
And the results were pretty good, as most of the contact surface was pressed overnight. It isn't perfect, by any stretch of imagination (hard to wedge the vinyl's edges into the channels without leaving here and there smears of glue), but this 3M stuff does actually what is suppose to do. I'm confident it will hold the vinyl in place for a long time.
Personally, I would prefer a brush-on type of glue that would eliminate all the hassle and bussle invovled with masking and overspray, but overall this product works.
Today I also did the second rear door panel, and it will have more time to cure - got done with glueing around 4 pm. I was more careful not to leave large or visible smears of glue, and I'm sure it will look better than the first.
I'm just attaching the end result of the first panel.
Thread Starter
|
3rd Gear
Joined: Dec 2008
Posts: 1,941
From: IL
With the second panel I was deliberately more detail oriented, and it came out far much better and cleaner.
I also figured out a way to press the vinyl's edge against the wall in the curved area where the door handle attaches, by sticking in there a roll of masking tape, as it presses against the armrest's wall staying in place tight.
I also figured out a way to press the vinyl's edge against the wall in the curved area where the door handle attaches, by sticking in there a roll of masking tape, as it presses against the armrest's wall staying in place tight.
Thread Starter
|
3rd Gear
Joined: Dec 2008
Posts: 1,941
From: IL
After getting the second rear in, I started with the passenger side front.
Not that I'm complaining, but it is far more tedious work involved since the sculpted panel has more curvature in it than the rear one. It is very difficult to mask all that rounded profile.
In any event, I had to improvise again to keep the vinyl up deep in the pocket area, and hopefully no one laughs when looking at the pic.
Also for the front, I dismounted the speaker unit so that the panel would lay somewhat flat when pressing it (after glueing).
Long story short, tomorrow will go back in, so I'll post a few more pics with the finished "product".
Here are the pics with "before", "work", and (almost) "after"...

