
DIY: Broken Coil Pack Connector Housing

Thread Starter
|
3rd Gear
Joined: May 2008
Posts: 1,900
From: CT
DISCLAIMER:
If you are inexperienced, feel free to read on, but beware! Working with vehicle electronics can result in electrical shock, burns, and/or death. Improperly repaired electronics can cause fires, melted components, and poor performance. The author of this write-up, AudiForums, and all those associated with this particular post and/or thread take absolutely no responsibility for any personal injury or vehicle damaged cause by attempting to work on vehicle electronics as discussed below.
By reading this post, you are accepting the above DISCLAIMER!
Broken coil pack connector housings are common causes of misfires. A ham-fisted mechanic using a screw-driver to pry back the connector lock will often result in a cracked housing or broken lock. With time, they can also become brittle, breaking on the inside around the contact ends. Splicing in new connectors can cause corroded wires and a messy wiring harness. Here's how to replace a broken coil pack connector housing (Note: 2001 AWM 1.8T used as example):
Tools:
10mm wrench
small flat-blade pocket screwdriver
small right-angle pick or hook
pen or pencil
Note: Porsche and VAG have a special tool kit for electrical repairs. They are quite expensive, but will make this job easier. If you can borrow them or buy them, I recommend you do so.
^
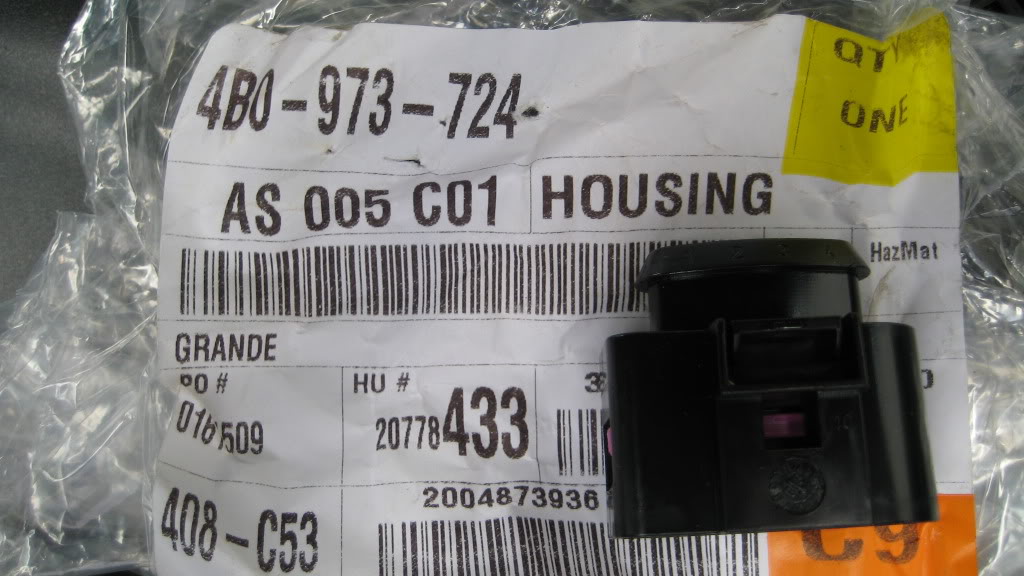
Coil Pack Connector Housing with part number from Audi (2001 A4 AWM Code 1.8T)
1. Be sure to have your radio code ready. Remove the NEGATIVE battery cable.
^
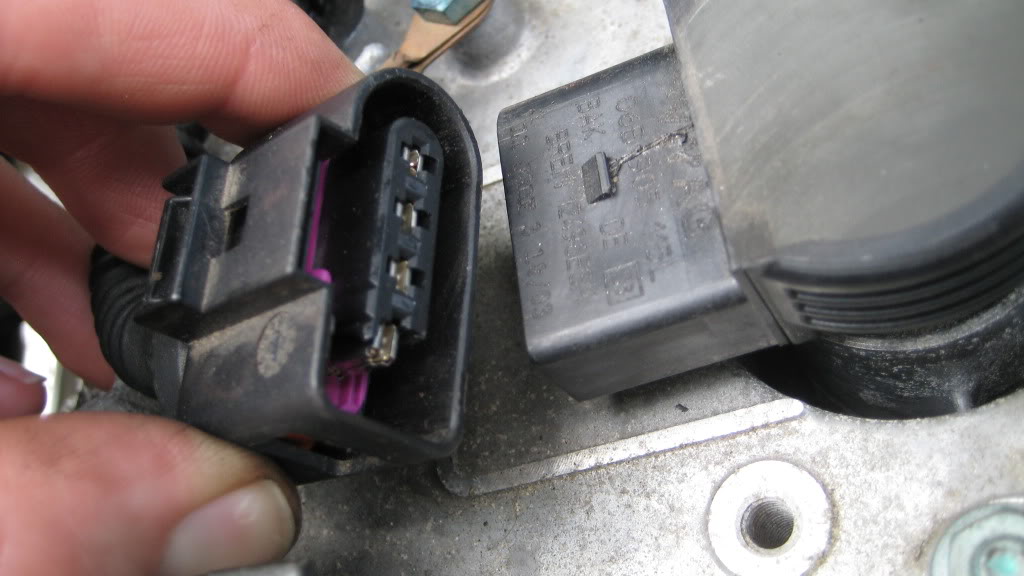
2. Inspect your coil pack connectors for cracks or damage. Clean them if dirty. Unplug them by pushing towards the coil pack and pressing the release tab. This particular one had a broken housing around the contact end. This is a potential misfire due to a bad contact.
^
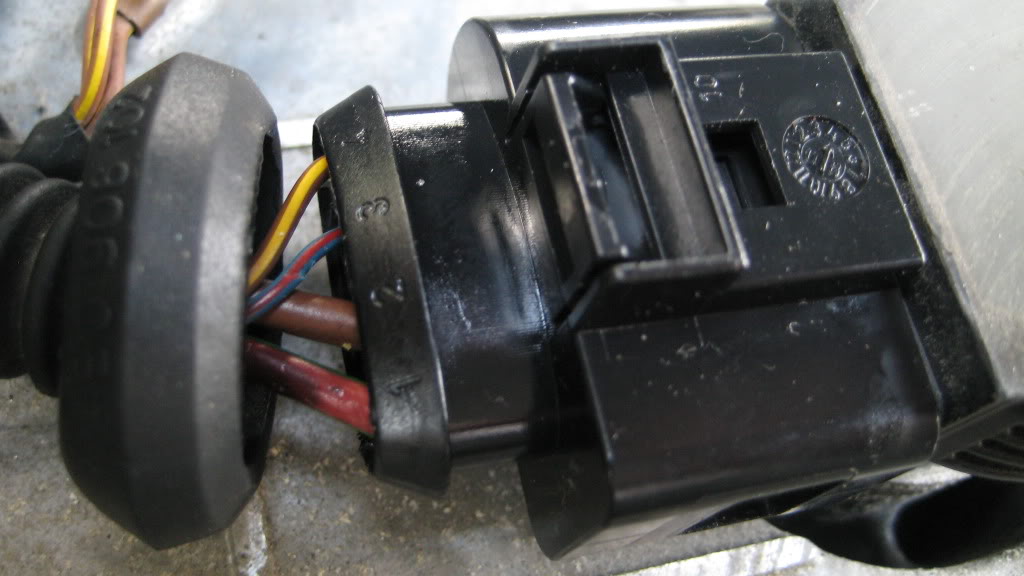
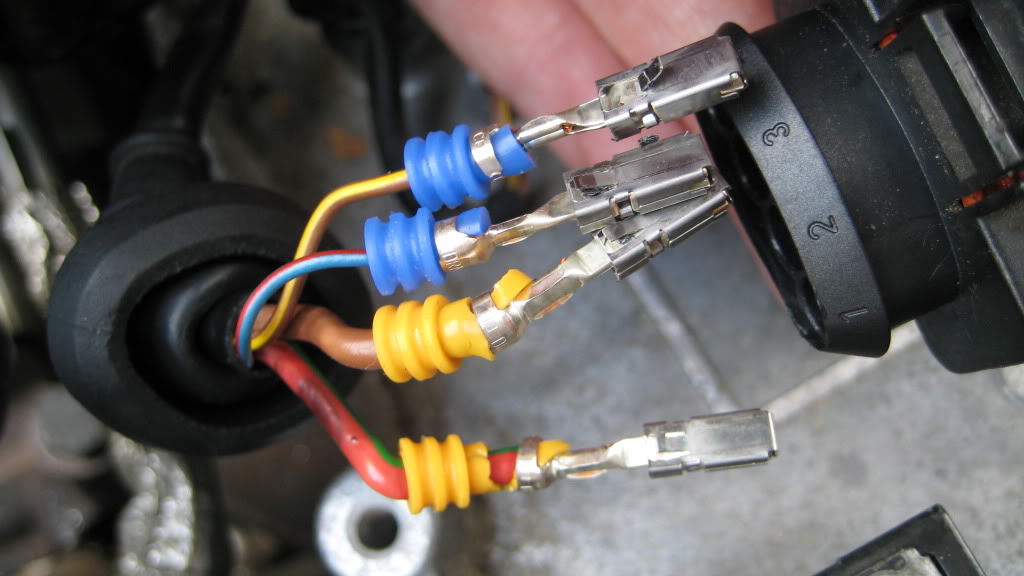
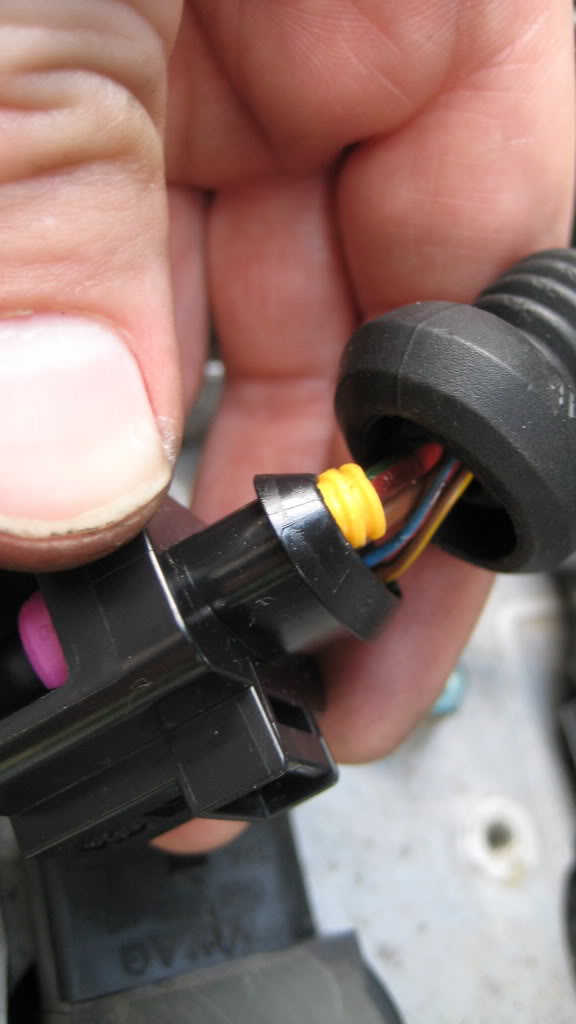
3. Pull back the weather-protective boot and note the color-coded wires and their respective positions. Write this down or use a camera.
^
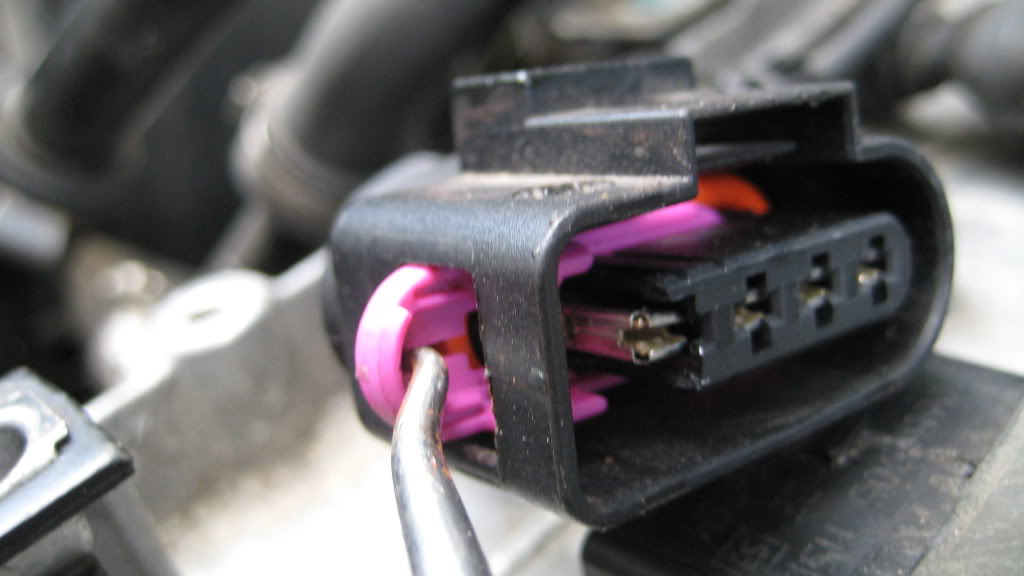
4. Remove the contact lock. Pull the purple lock out the side of the connector with a pick. Set aside as an extra if not broken.
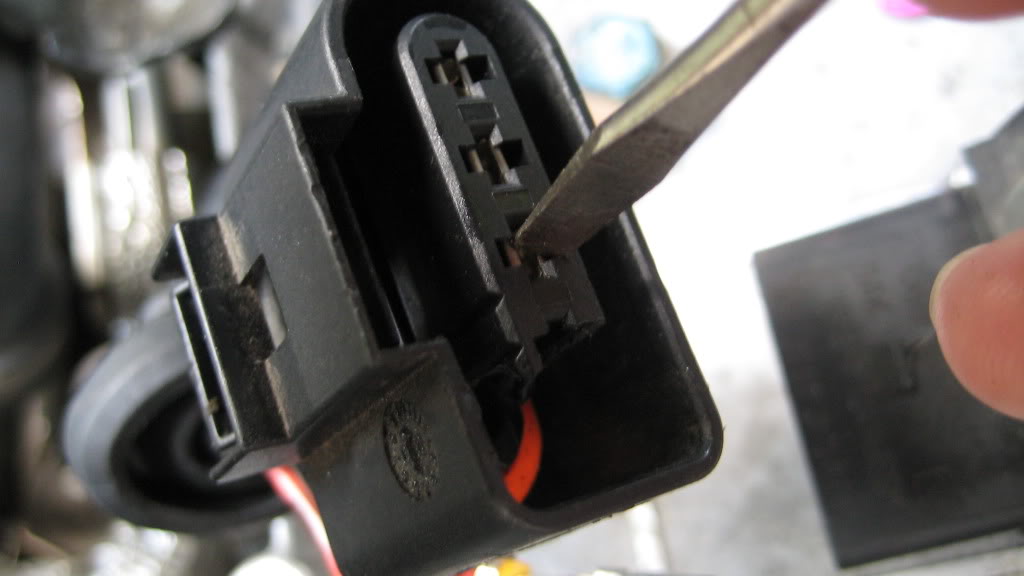
^
5. The contact ends can now be pushed out the back of the connector housing using a flat blade pocket screwdriver. Be gentle as to not destroy the contact end. The ends are held in by tangs; carefully note the orientation of the tangs when removing. Often they will bend during this process. If the tangs break, you must replace the contact ends or bad connections will result. Replace any corroded contacts.
^
Contact ends removed from the back of the connector housing. Note the ribbed, rubber ( ) boots to protect the contacts from moisture.
^
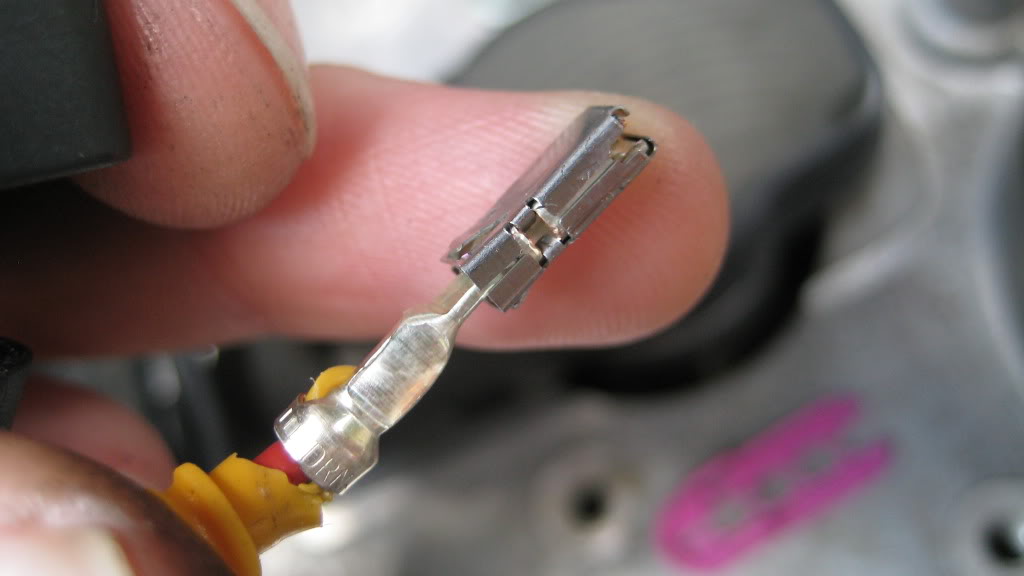
View of contact end.
^
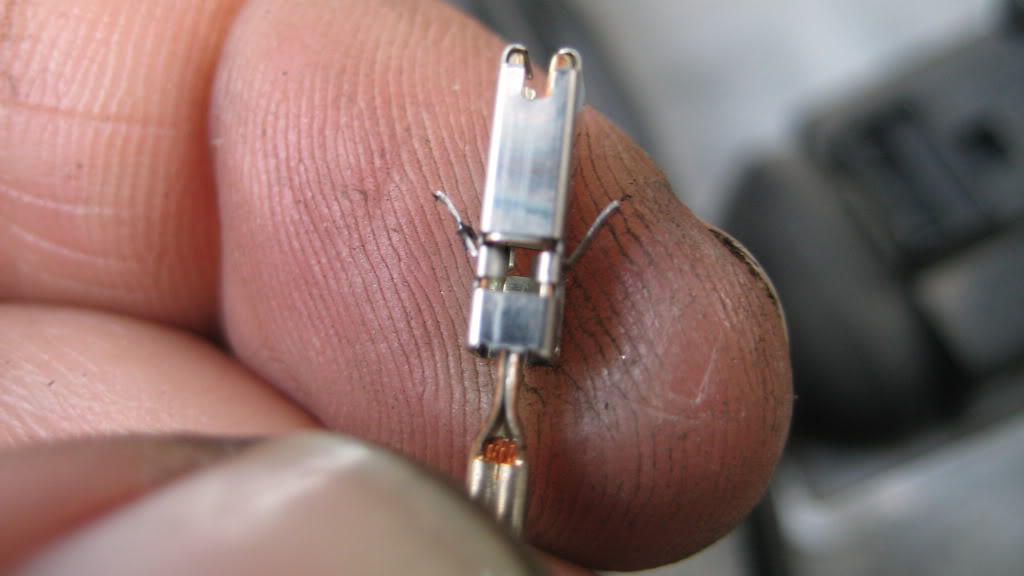
View of contact end with tangs bent in the wrong direction. Bend back at your own risk! If they break, you'll need to replace the end, which is available over the parts counter in Audi's electrical repair kit.
^
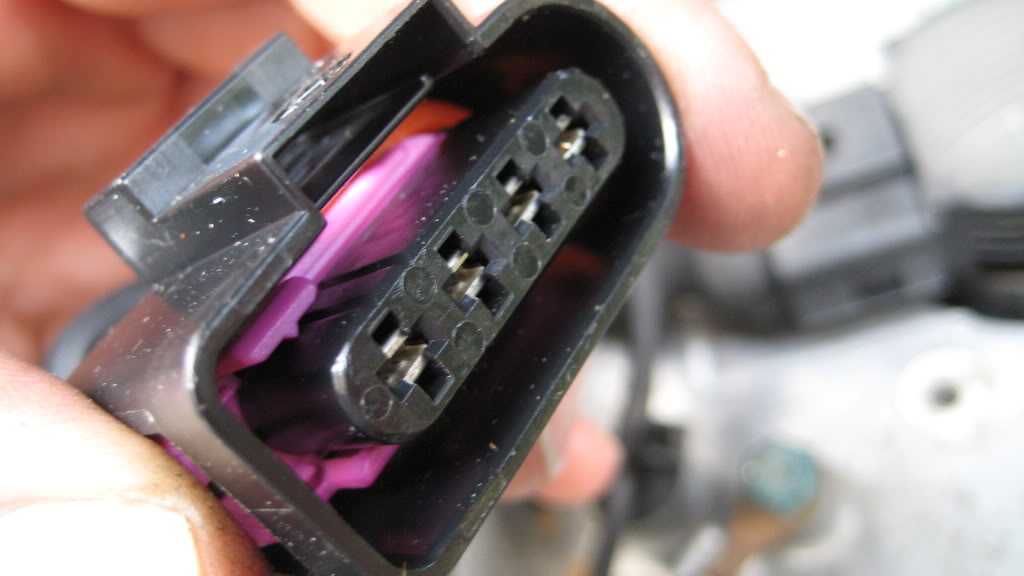
6. Remove the lock from the new connector and set aside for safe keeping. Re-install the wires through the back of the connector, the same way they came out. Tuck the boots back into the housing on each wire using a blunt object such as a dull pencil. Be careful not to stab any wires during this process.
^
7. With the contacts flush in the housing, the purple lock should slide back into place with ease and a nice "click." Be sure the orange rubber boot on the inside of the connector housing is neatly wrapped inside and all the way down. This is how the contacts should look.
^
8. Plug in the connector to the coil pack until you hear a firm "click." There should not be excess resistance. With the black weather-protective boot still pulled back, gently tug the wires from the back of the connector. If any come out, they are not locked into place. Inspect the lock, little boots, and contact ends for issues.
9. If all wires pass the test, re-install the black rubber boot, replace any zip-ties you cut in this process, and re-install the battery negative cable.
10. Enjoy misfire free operation!
Feel free to post questions or comments.
Thanks for reading.
-Chris G.
Tweaked
If you are inexperienced, feel free to read on, but beware! Working with vehicle electronics can result in electrical shock, burns, and/or death. Improperly repaired electronics can cause fires, melted components, and poor performance. The author of this write-up, AudiForums, and all those associated with this particular post and/or thread take absolutely no responsibility for any personal injury or vehicle damaged cause by attempting to work on vehicle electronics as discussed below.
By reading this post, you are accepting the above DISCLAIMER!
Broken coil pack connector housings are common causes of misfires. A ham-fisted mechanic using a screw-driver to pry back the connector lock will often result in a cracked housing or broken lock. With time, they can also become brittle, breaking on the inside around the contact ends. Splicing in new connectors can cause corroded wires and a messy wiring harness. Here's how to replace a broken coil pack connector housing (Note: 2001 AWM 1.8T used as example):
Tools:
10mm wrench
small flat-blade pocket screwdriver
small right-angle pick or hook
pen or pencil
Note: Porsche and VAG have a special tool kit for electrical repairs. They are quite expensive, but will make this job easier. If you can borrow them or buy them, I recommend you do so.
^
Coil Pack Connector Housing with part number from Audi (2001 A4 AWM Code 1.8T)
1. Be sure to have your radio code ready. Remove the NEGATIVE battery cable.
^
2. Inspect your coil pack connectors for cracks or damage. Clean them if dirty. Unplug them by pushing towards the coil pack and pressing the release tab. This particular one had a broken housing around the contact end. This is a potential misfire due to a bad contact.
^
3. Pull back the weather-protective boot and note the color-coded wires and their respective positions. Write this down or use a camera.
^
4. Remove the contact lock. Pull the purple lock out the side of the connector with a pick. Set aside as an extra if not broken.
^
5. The contact ends can now be pushed out the back of the connector housing using a flat blade pocket screwdriver. Be gentle as to not destroy the contact end. The ends are held in by tangs; carefully note the orientation of the tangs when removing. Often they will bend during this process. If the tangs break, you must replace the contact ends or bad connections will result. Replace any corroded contacts.
^
Contact ends removed from the back of the connector housing. Note the ribbed, rubber (
) boots to protect the contacts from moisture.^
View of contact end.
^
View of contact end with tangs bent in the wrong direction. Bend back at your own risk! If they break, you'll need to replace the end, which is available over the parts counter in Audi's electrical repair kit.
^
6. Remove the lock from the new connector and set aside for safe keeping. Re-install the wires through the back of the connector, the same way they came out. Tuck the boots back into the housing on each wire using a blunt object such as a dull pencil. Be careful not to stab any wires during this process.
^
7. With the contacts flush in the housing, the purple lock should slide back into place with ease and a nice "click." Be sure the orange rubber boot on the inside of the connector housing is neatly wrapped inside and all the way down. This is how the contacts should look.
^
8. Plug in the connector to the coil pack until you hear a firm "click." There should not be excess resistance. With the black weather-protective boot still pulled back, gently tug the wires from the back of the connector. If any come out, they are not locked into place. Inspect the lock, little boots, and contact ends for issues.
9. If all wires pass the test, re-install the black rubber boot, replace any zip-ties you cut in this process, and re-install the battery negative cable.
10. Enjoy misfire free operation!
Feel free to post questions or comments.
Thanks for reading.
-Chris G.
Tweaked


1st Gear
Joined: Aug 2009
Posts: 8
Instead of pushing the pins out and possibly breaking the retainer tangs--
If you plan on working on electronics on your car in the future, i.e. adding circuits to the stock fusebox/etc
Invest in a Tyco/Amp P/N 1-1579007-6 pin extractor.
Comes in really handy.
Here's the mouser catalog page for it:
http://www.mouser.com/Search/Product...bFCVPh1A%3D%3D
They're not cheap but they're worth it if you're going to do a lot of electrical repairs, reconfigs, etc.


Thread
Thread Starter
Forum
Replies
Last Post
kraylon
B5 Models
0
Jul 29, 2009 12:19 AM