
Audi UR Quattro Rally Build

Thread Starter
|
1st Gear
Joined: Apr 2011
Posts: 365
From: Birmingham, MI
Turbo Trouble & Fuse Dash Panel
We received some bad news from our turbo shop, G-Pop Shop this week. Our turbo is bad. Exhaust turbine ate something that didn’t agree with it.


We got on the blower to our engine supplier, EFI Express and they soon had another core sent out. This one turned out to be fine. The other good news is that the bad turbo was never on our engine, it was just one of many EFI Express had on the shelf so whatever did the damage almost certainly did not pass through our engine. PHEW. Can’t wait to get the refurbished turbo back now.
While that was all playing out we reassembled our belt tensioner. These are NLA and ours had a bad bearing. We sourced and new bearing but had to make our own rivets to put the pulley back together around it, followed by a lick of paint of course.

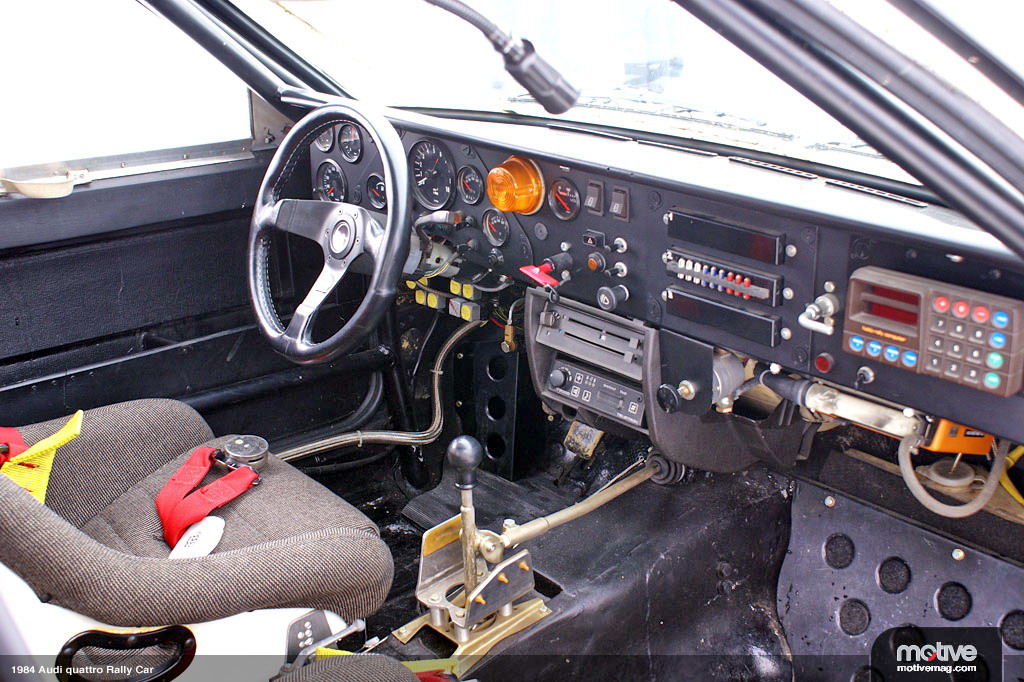
We also continued to work on our dash mounted fuse panel design. The original works cars had three fuse blocks holding ceramic fuses mounted through the center removable panel. We want to use three similarly sized panels but with more modern blade fuses. You’d think that would be quite simple but it’s proving quite difficult. We can find side entry versions but our wires have to come in from the rear.
Group B fuse blocks:
The collection of candidates we have assembled so far:
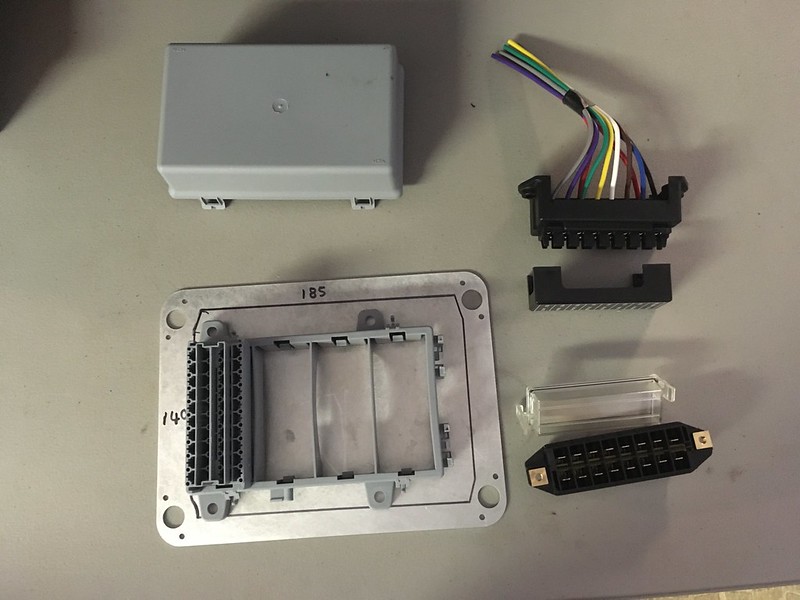
The one on the bottom right would be perfect if it held 12 fuses instead of 8. You’d think that were available wouldn’t you. Nope. We may have to compromise.
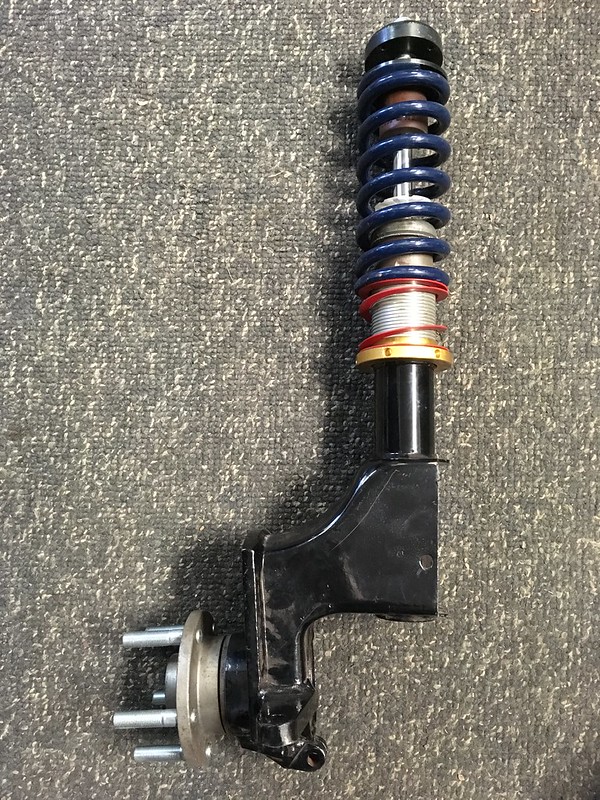
Now we have the wheels on the car the only thing stopping us putting it on the ground was the lack of springs. That and a good reason to actually do so. Undaunted we installed the springs.

We received some bad news from our turbo shop, G-Pop Shop this week. Our turbo is bad. Exhaust turbine ate something that didn’t agree with it.
We got on the blower to our engine supplier, EFI Express and they soon had another core sent out. This one turned out to be fine. The other good news is that the bad turbo was never on our engine, it was just one of many EFI Express had on the shelf so whatever did the damage almost certainly did not pass through our engine. PHEW. Can’t wait to get the refurbished turbo back now.
While that was all playing out we reassembled our belt tensioner. These are NLA and ours had a bad bearing. We sourced and new bearing but had to make our own rivets to put the pulley back together around it, followed by a lick of paint of course.
We also continued to work on our dash mounted fuse panel design. The original works cars had three fuse blocks holding ceramic fuses mounted through the center removable panel. We want to use three similarly sized panels but with more modern blade fuses. You’d think that would be quite simple but it’s proving quite difficult. We can find side entry versions but our wires have to come in from the rear.
Group B fuse blocks:
The collection of candidates we have assembled so far:
The one on the bottom right would be perfect if it held 12 fuses instead of 8. You’d think that were available wouldn’t you. Nope. We may have to compromise.
Now we have the wheels on the car the only thing stopping us putting it on the ground was the lack of springs. That and a good reason to actually do so. Undaunted we installed the springs.
Thread Starter
|
1st Gear
Joined: Apr 2011
Posts: 365
From: Birmingham, MI
Quattro Rally Build - More Engine Bay Work
More distraction this week but look at it! Wouldn't you be distracted?

Some of this is for the engine refurb but some has been holding up some ancillary stuff so we got busy. We installed the wipers (can you spot the long awaited plated parts?)


This piece of automotive jewelry holds the blower motor resistor!

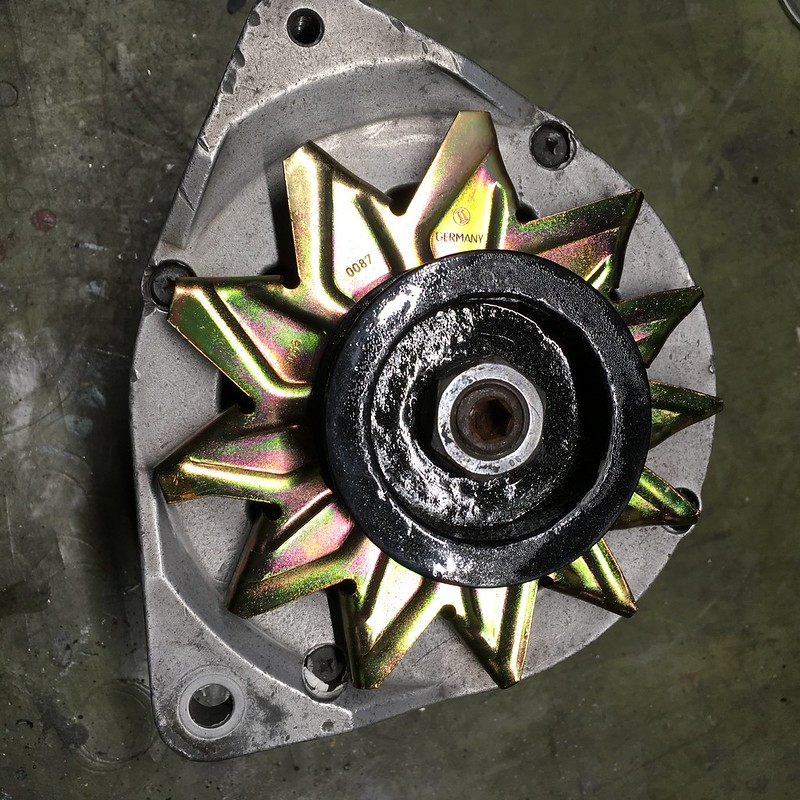
Alternator fan (that's engine related)
Power steering rack fittings.

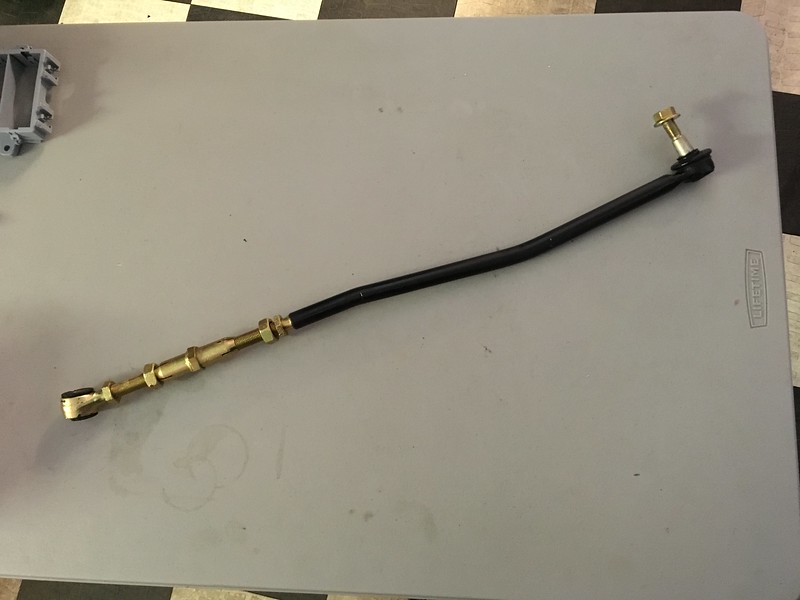
and the front left tie rod adjusters.

We even got our anti-roll bar clamps back.

So we got to cross a ton of stuff off the list; all be it, little stuff. Still, it's all progress, right? Got to keep moving forward.
More distraction this week but look at it! Wouldn't you be distracted?
Some of this is for the engine refurb but some has been holding up some ancillary stuff so we got busy. We installed the wipers (can you spot the long awaited plated parts?)
This piece of automotive jewelry holds the blower motor resistor!
Alternator fan (that's engine related)
Power steering rack fittings.
and the front left tie rod adjusters.
We even got our anti-roll bar clamps back.
So we got to cross a ton of stuff off the list; all be it, little stuff. Still, it's all progress, right? Got to keep moving forward.
Last edited by team illuminata; Jul 4, 2019 at 02:25 PM.
Thread Starter
|
1st Gear
Joined: Apr 2011
Posts: 365
From: Birmingham, MI
It's Time to Get Serious - Cold Side Engine Reassembly
This week we started on the serious reassembly of the engine. We’ll try not to get distracted. We started on the intake side as that has the most shiny bits ready to go. First up the modified alternator mount:

Then the coolant adapter. We were advised to get a straight one in metal for better fitment:

Then we installed the alternator, power steering pump and belt tensioner:


We still need to find a shorter accessory belt but that’s not what’s stopping us completing the intake side of the engine; we need an intake manifold solution. Because the radiator on the UR Quattro sits the side of the engine, the AAN throttle body would interfere with it because that is located on the center of the AAN intake plenum:

We either need to modify our stock one or source an aftermarket version with the throttle body on the front. We favor the aftermarket options from BST, Wagner or whoever else sells one. Unfortunately finding one is proving troublesome as they are basically NLA. Let’s see what we come up with.
Hey, look, we didn’t get distracted. Next week’s topic will depend on what shows up first: a refurbished turbo or a cool intake manifold.
This week we started on the serious reassembly of the engine. We’ll try not to get distracted. We started on the intake side as that has the most shiny bits ready to go. First up the modified alternator mount:
Then the coolant adapter. We were advised to get a straight one in metal for better fitment:
Then we installed the alternator, power steering pump and belt tensioner:
We still need to find a shorter accessory belt but that’s not what’s stopping us completing the intake side of the engine; we need an intake manifold solution. Because the radiator on the UR Quattro sits the side of the engine, the AAN throttle body would interfere with it because that is located on the center of the AAN intake plenum:
We either need to modify our stock one or source an aftermarket version with the throttle body on the front. We favor the aftermarket options from BST, Wagner or whoever else sells one. Unfortunately finding one is proving troublesome as they are basically NLA. Let’s see what we come up with.
Hey, look, we didn’t get distracted. Next week’s topic will depend on what shows up first: a refurbished turbo or a cool intake manifold.
Thread Starter
|
1st Gear
Joined: Apr 2011
Posts: 365
From: Birmingham, MI
Refurbished Turbo - Hot Side Engine Reassembly
The turbo won. Turns out it takes longer to find a unicorn aftermarket intake manifold than it does to refurbish a turbo. Well it does if you are a professional outfit like G-Pop Shop https://gpopshop.com/


So we’re going to assemble the exhaust side next. First we’ll need a heat shield:

Our new exhaust manifold fit well but we did have to shorten some studs to get the nuts on.

The rest was easy bolt on stuff. New gaskets of course.


And we think we’ve found an intake manifold. Subscribe if you want to find out what kind.
The turbo won. Turns out it takes longer to find a unicorn aftermarket intake manifold than it does to refurbish a turbo. Well it does if you are a professional outfit like G-Pop Shop https://gpopshop.com/
So we’re going to assemble the exhaust side next. First we’ll need a heat shield:
Our new exhaust manifold fit well but we did have to shorten some studs to get the nuts on.
The rest was easy bolt on stuff. New gaskets of course.
And we think we’ve found an intake manifold. Subscribe if you want to find out what kind.
Thread Starter
|
1st Gear
Joined: Apr 2011
Posts: 365
From: Birmingham, MI
Solving Intake Manifold Challenges
We found an intake manifold!

It’s a new old stock from Wagner Tuning. A fellow Audi nut had it in his stash and no longer had plans for it. We do! This thing should be plug and play and make moving forward very easy. We test fitted it with the 034 Motorsport phenolic spacer kit and it fit perfectly! Trouble is, nothing else would fit to it. Firstly, the throttle body and power steering pump now want to occupy the same space:


And the fuel rail won’t fit and has nothing to bolt to. At least the injectors line up with the injector holes and there are no inserts to source.


Time to get creative……….
We found an intake manifold!
It’s a new old stock from Wagner Tuning. A fellow Audi nut had it in his stash and no longer had plans for it. We do! This thing should be plug and play and make moving forward very easy. We test fitted it with the 034 Motorsport phenolic spacer kit and it fit perfectly! Trouble is, nothing else would fit to it. Firstly, the throttle body and power steering pump now want to occupy the same space:
And the fuel rail won’t fit and has nothing to bolt to. At least the injectors line up with the injector holes and there are no inserts to source.
Time to get creative……….
Thread Starter
|
1st Gear
Joined: Apr 2011
Posts: 365
From: Birmingham, MI
Solutions for our beautiful intake manifold
Last time we conversed we were reveling on the beauty of our aftermarket intake manifold and despairing at the frustration that nothing would fit around it. Now we think we have solved all these issues. Read on:
First we made a throttle body adapter to place the throttle body above the power steering pump:


Then we started to hack up the OE fuel rail. We stripped off all the brackets and fuel lines to verify that we could use it. The injector holes lined up and the rail snuggled up nicely against the intake runners.

Then we created fuel lines and incorporated an aftermarket fuel pressure regulator, a fuel pressure gauge and even a fuel sampling port!


And somehow during this process the manifold itself got painted gold to match the valve cover.
We also came up with a way to secure the now floppy dip stick tube.

We feel quite good about solving these problems. Of course there are a few minor details to work out such as the throttle cable angle of attack and mounting of ancillary items but they should be easy to figure out. At least now we feel it is time to introduce the engine to it’s new home so they can get acquainted. We do need to run brake lines and a few other bits and bobs around the engine bay before we bolt it in but it’s nice to have the engine out of the workshop.

Last time we conversed we were reveling on the beauty of our aftermarket intake manifold and despairing at the frustration that nothing would fit around it. Now we think we have solved all these issues. Read on:
First we made a throttle body adapter to place the throttle body above the power steering pump:
Then we started to hack up the OE fuel rail. We stripped off all the brackets and fuel lines to verify that we could use it. The injector holes lined up and the rail snuggled up nicely against the intake runners.
Then we created fuel lines and incorporated an aftermarket fuel pressure regulator, a fuel pressure gauge and even a fuel sampling port!
And somehow during this process the manifold itself got painted gold to match the valve cover.
We also came up with a way to secure the now floppy dip stick tube.
We feel quite good about solving these problems. Of course there are a few minor details to work out such as the throttle cable angle of attack and mounting of ancillary items but they should be easy to figure out. At least now we feel it is time to introduce the engine to it’s new home so they can get acquainted. We do need to run brake lines and a few other bits and bobs around the engine bay before we bolt it in but it’s nice to have the engine out of the workshop.
Last edited by team illuminata; Sep 26, 2019 at 09:38 AM.
Thread Starter
|
1st Gear
Joined: Apr 2011
Posts: 365
From: Birmingham, MI
We finally have a center console!
The saga of the OE center console is over! This piece took a very convoluted path to get to us from Germany but it arrived via (Friend returning from a trip to England) courier and couldn’t wait to install itself under the dash.


This is the same piece used by most if not all the works cars and comes off lower spec cars not sold in the USA. We could have chopped off the lower half of the UR’s console but we really didn’t want to ruin one and it would never have looked so tidy.
The upper bay will house the OE heater controls, if we can find them again, while the lower bay is still up for grabs. We could install the OE cubby for storage, which would be useful as we’ve lost our glove box, but it might end up being home to the brake bias **** and USB ports. As a bonus, it does come with an accessory socket so there’s that!
The saga of the OE center console is over! This piece took a very convoluted path to get to us from Germany but it arrived via (Friend returning from a trip to England) courier and couldn’t wait to install itself under the dash.
This is the same piece used by most if not all the works cars and comes off lower spec cars not sold in the USA. We could have chopped off the lower half of the UR’s console but we really didn’t want to ruin one and it would never have looked so tidy.
The upper bay will house the OE heater controls, if we can find them again, while the lower bay is still up for grabs. We could install the OE cubby for storage, which would be useful as we’ve lost our glove box, but it might end up being home to the brake bias **** and USB ports. As a bonus, it does come with an accessory socket so there’s that!
Thread Starter
|
1st Gear
Joined: Apr 2011
Posts: 365
From: Birmingham, MI
Proper Gravel Rally Wheels!
We ordered more BRAID wheels for the car. This is the third set! We sold the first set including the tires. We have a problem. We justified this set of gravel wheels by ordering them double drilled so we can also use them on our 911 rally car. That car now has five sets of wheels yet only does about 300 miles a year. Did we mention we have a problem? Anyway, we think they look really cool.
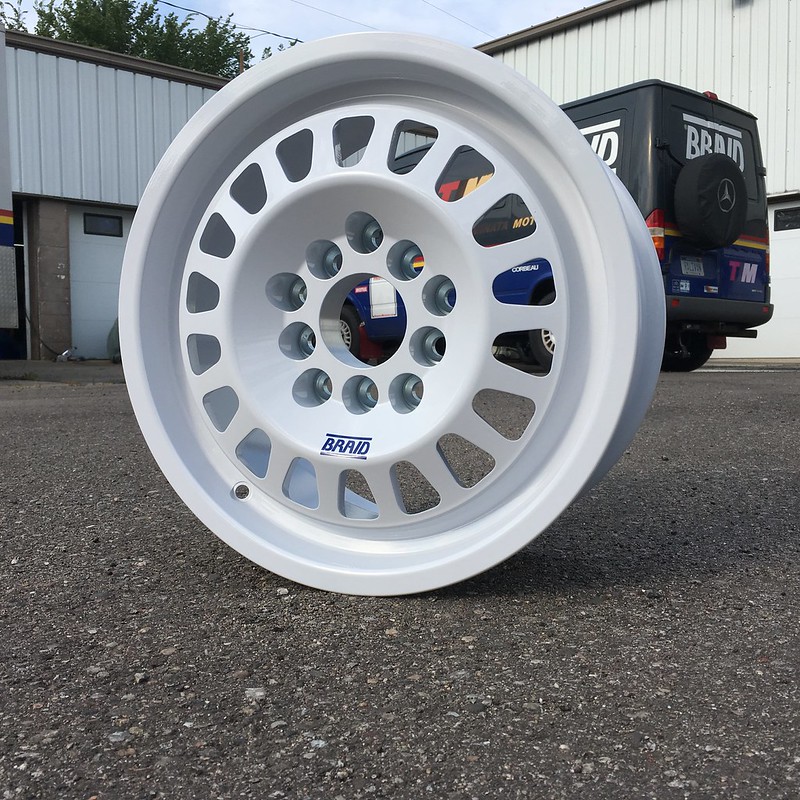
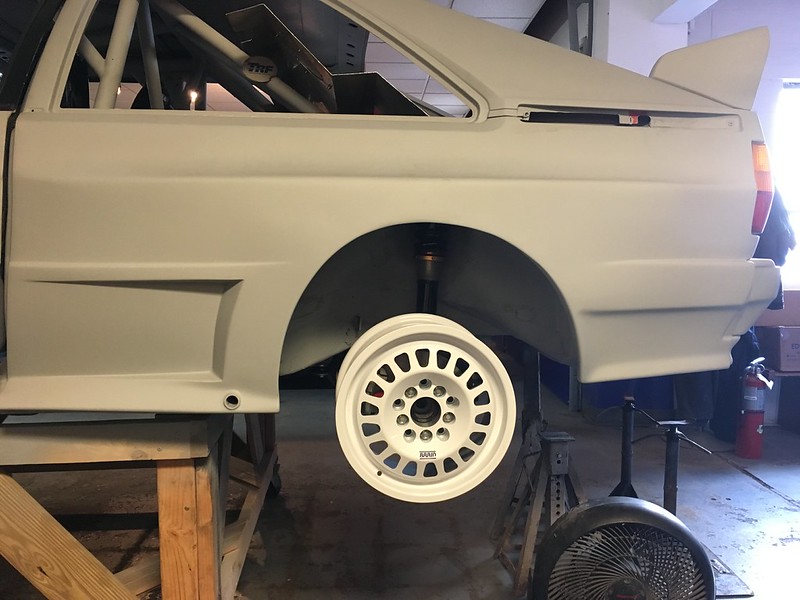

Even though they are ET20 they still sit pathetically inboard of the wide body fenders; as they should. LOL

These are a classic BRAID gravel wheel in 15x7. Let’s hope these MRF rally tires don’t age out before we finish the car!
We ordered more BRAID wheels for the car. This is the third set! We sold the first set including the tires. We have a problem. We justified this set of gravel wheels by ordering them double drilled so we can also use them on our 911 rally car. That car now has five sets of wheels yet only does about 300 miles a year. Did we mention we have a problem? Anyway, we think they look really cool.
Even though they are ET20 they still sit pathetically inboard of the wide body fenders; as they should. LOL
These are a classic BRAID gravel wheel in 15x7. Let’s hope these MRF rally tires don’t age out before we finish the car!
Thread Starter
|
1st Gear
Joined: Apr 2011
Posts: 365
From: Birmingham, MI
THE ROAD TO RADWOOD - Part 1
“The best laid schemes o' mice an' men………..” Robbie burns said that, way before Quattros were invented. Still applies today.
When we left you we had just installed our center console and were about to start working on installing brake lines before we put the engine in. Well that plan got blown up as the car got invited to Radwood Detroit, the car show for 80s and 90s stuff. So our first thought was “Nah, It’s not finished” but then someone suggested that if we got it on its wheels and put the engine in it would still be cool and people would love to see it. So that’s what we did, or tried to.
So this was our starting point, with the engine on a stand and just shoved into the engine bay and the car still on the wooden build table.
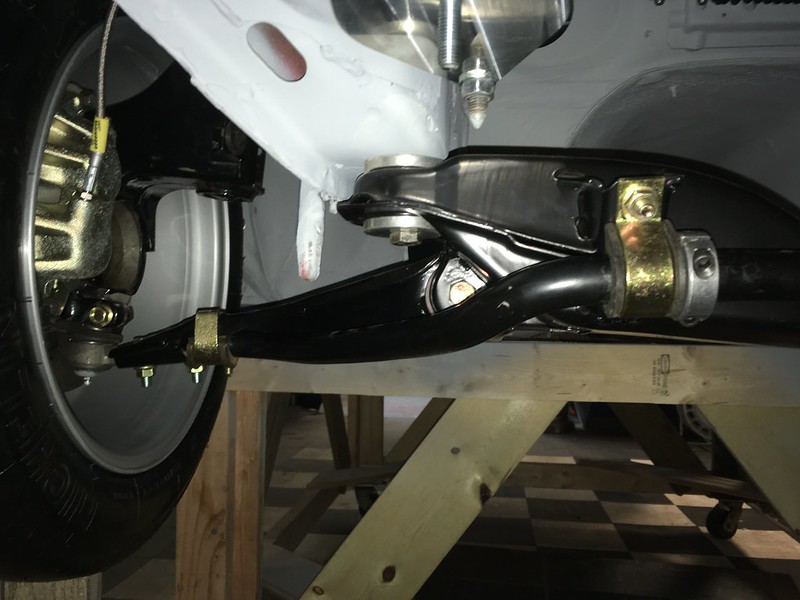
We didn’t have a plan for getting it off the table but thought it would be a dam site easier if the engine was still out of it. But first we had to prep a few things. Chiefly bolting the front tie rods onto the uprights. We hadn’t sourced nuts yet but realized some lug nuts of the correct thread would do for now:

And that we’d also need a steering wheel in order to manipulate it around.

We temporarily installed the rear firewall (again):

And rigged up the door strike pins so the doors would stay closed:

We also bolted down the Corbeau seats as best we could. Some adjustments will be necessary before final assembly:


Next time we'll mount the engine and transmission together and get it bolted to the chassis.
“The best laid schemes o' mice an' men………..” Robbie burns said that, way before Quattros were invented. Still applies today.
When we left you we had just installed our center console and were about to start working on installing brake lines before we put the engine in. Well that plan got blown up as the car got invited to Radwood Detroit, the car show for 80s and 90s stuff. So our first thought was “Nah, It’s not finished” but then someone suggested that if we got it on its wheels and put the engine in it would still be cool and people would love to see it. So that’s what we did, or tried to.
So this was our starting point, with the engine on a stand and just shoved into the engine bay and the car still on the wooden build table.
We didn’t have a plan for getting it off the table but thought it would be a dam site easier if the engine was still out of it. But first we had to prep a few things. Chiefly bolting the front tie rods onto the uprights. We hadn’t sourced nuts yet but realized some lug nuts of the correct thread would do for now:
And that we’d also need a steering wheel in order to manipulate it around.
We temporarily installed the rear firewall (again):
And rigged up the door strike pins so the doors would stay closed:
We also bolted down the Corbeau seats as best we could. Some adjustments will be necessary before final assembly:
Next time we'll mount the engine and transmission together and get it bolted to the chassis.
Thread Starter
|
1st Gear
Joined: Apr 2011
Posts: 365
From: Birmingham, MI
THE ROAD TO RADWOOD - Part 2
We thought we should mount the transmission as well as the engine only has two engine mounts. We figured the whole package would be much more stable mounted together. We don’t yet have a flywheel or a clutch but neither of those are necessary just to bolt the two lumps together.


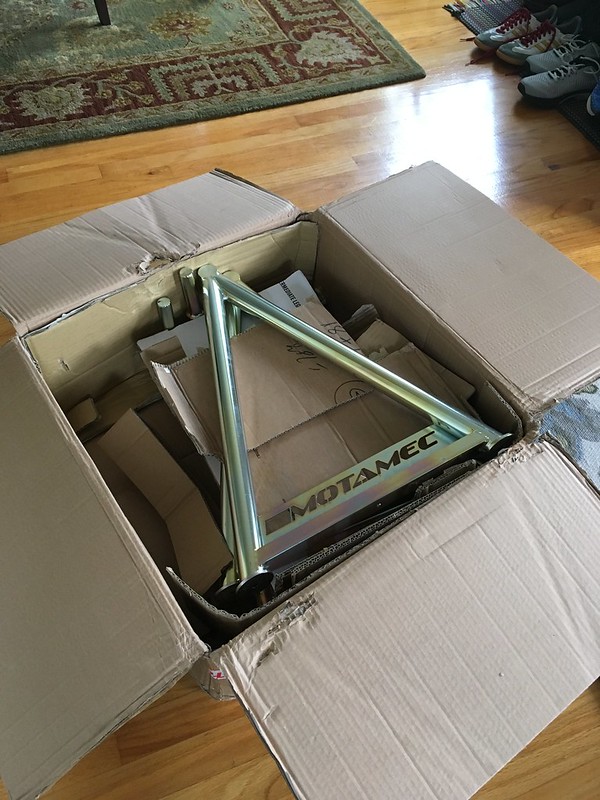
We recently sourced some pin stands from Motamec in England so our plan was to lower the car onto these initially as that would only mean dropping it a few inches. Plus, the screw jacks we planned to use at one end of the car were to long to allow the wheels to reach the ground in one go so it would have to be a two-step process anyway.

So our plan was to lift the rear using screw jacks on the subframe, as far apart as possible and the front using our engine stand. Once we could slide the table away we would incrementally lower each end of the car onto the pin stands then off those using our high lift jack. This is how it went:
That’s the first time the car has been on the ground in about fifteen years!
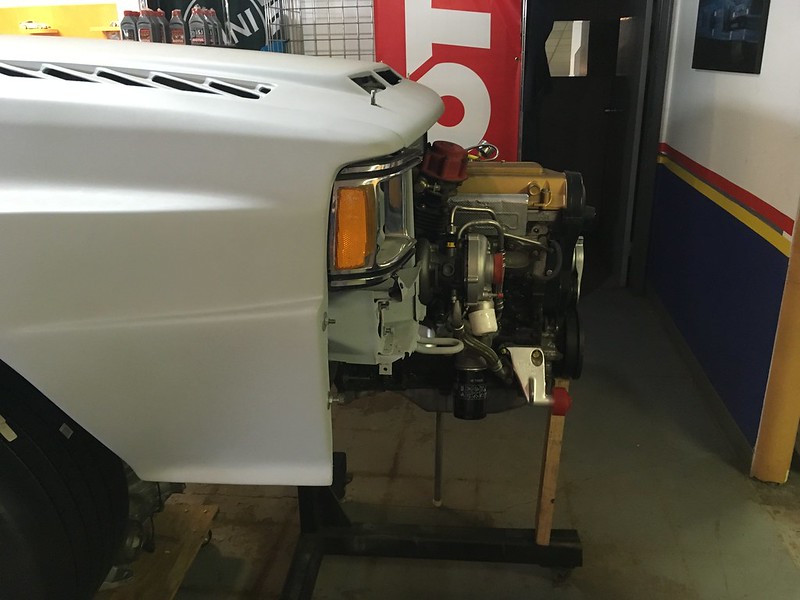
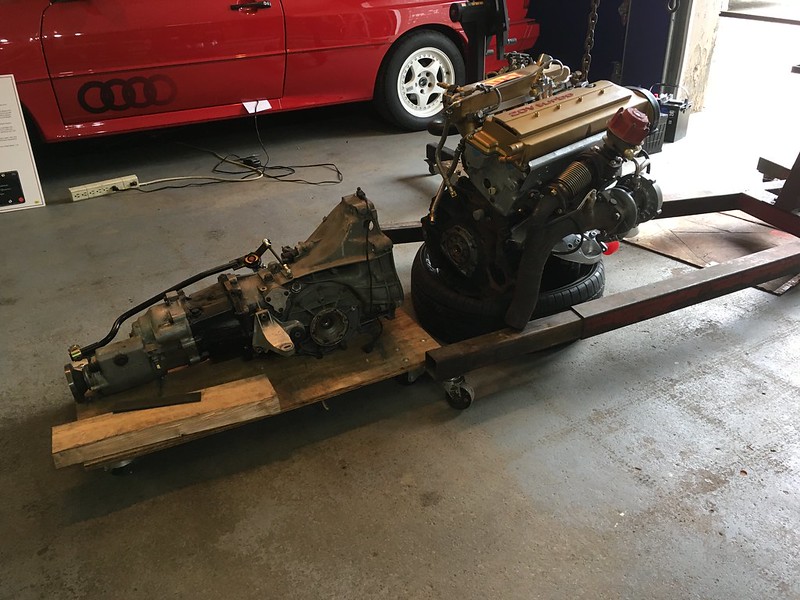
Now the easy bit, throw the engine in and put it in the trailer. How hard could that be with no front on the car:

But wait, what? Who knew the AAN engine brackets wouldn’t line up with the Quattro engine mounts? Oops.


A quick swap to the 10 valve units and we were back in business:
But what’s this? Now the hood won’t close!

Will we make it to Radwood after all? You’ll have to wait to find out.
We thought we should mount the transmission as well as the engine only has two engine mounts. We figured the whole package would be much more stable mounted together. We don’t yet have a flywheel or a clutch but neither of those are necessary just to bolt the two lumps together.
We recently sourced some pin stands from Motamec in England so our plan was to lower the car onto these initially as that would only mean dropping it a few inches. Plus, the screw jacks we planned to use at one end of the car were to long to allow the wheels to reach the ground in one go so it would have to be a two-step process anyway.
So our plan was to lift the rear using screw jacks on the subframe, as far apart as possible and the front using our engine stand. Once we could slide the table away we would incrementally lower each end of the car onto the pin stands then off those using our high lift jack. This is how it went:
That’s the first time the car has been on the ground in about fifteen years!
Now the easy bit, throw the engine in and put it in the trailer. How hard could that be with no front on the car:
But wait, what? Who knew the AAN engine brackets wouldn’t line up with the Quattro engine mounts? Oops.
A quick swap to the 10 valve units and we were back in business:
But what’s this? Now the hood won’t close!
Will we make it to Radwood after all? You’ll have to wait to find out.
Last edited by team illuminata; Nov 21, 2019 at 08:54 AM. Reason: Adjusting video link