
B5 Brake Light Mod By 1.8T

Thread Starter
|
Administrator
Joined: Aug 2004
Posts: 15,116
From: SoCal
Well i dont know how to begin explaining this. Its really simple. from a scale of 1-10 (coming form soneone who has never used a soldering gun) i can give it a 1 for being extremely easy. I tried to make this write up really really really user friendly. It doesnt take a genius to make this stuff work. Its strait forward.
When i did the mod i was using a writeup that was on AZ. It was good but i thought i can make it a bit better by adding better pics. Haha we have our own writeup. Btw, youre doing everything at your own risk. If you brake something its not my fault. [8D]
My car is a 2001.5 A4 I do not think its the same for all b5 a4's. Im guessings its the same for 00 through 01.5
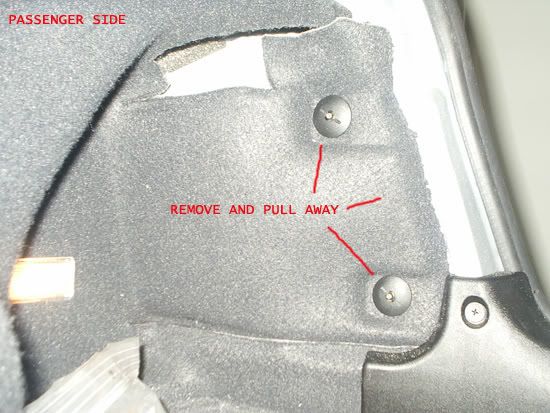
PASSENGER SIDE
(you can do pass. side first or drivers. doesnt matter)
Step 1.
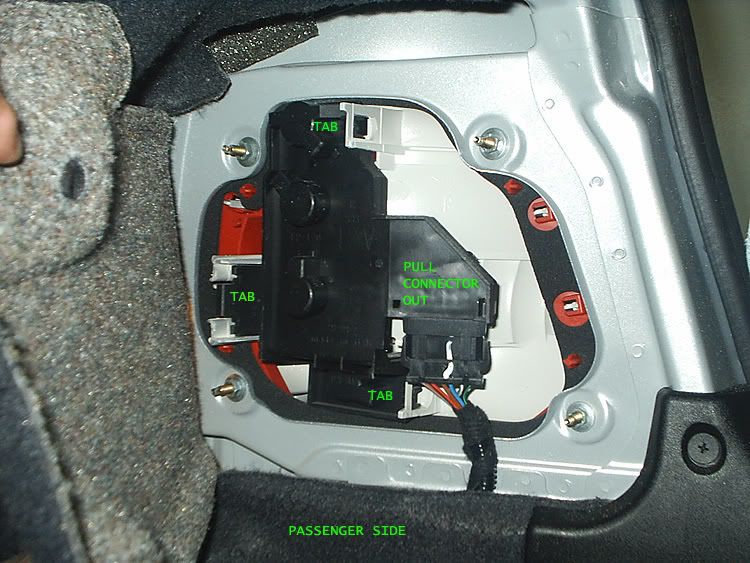
Passenger side : take out the little screw thingies. i did this by rotating them CCW till they poped out. Pull the panel back and youll see the assembly.
To remove it from the housing pop the tabs and dissconect the connector.
Step 2.
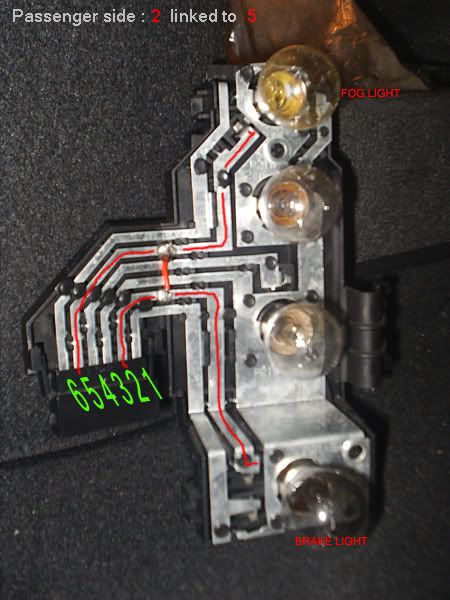
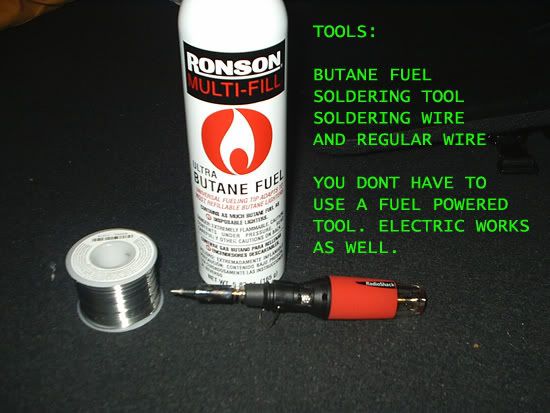
Now comes the fun part! Heat up the gun by leting it sit for a minute or two on full blast (if its fuel powered) Then get the soldering wire and solder a wire from 2 to 5. The soldering job has to be clean! Dont let it spill over to any of the other lines. If it does (and if you havent done this before it might) just heat it up and remove it.
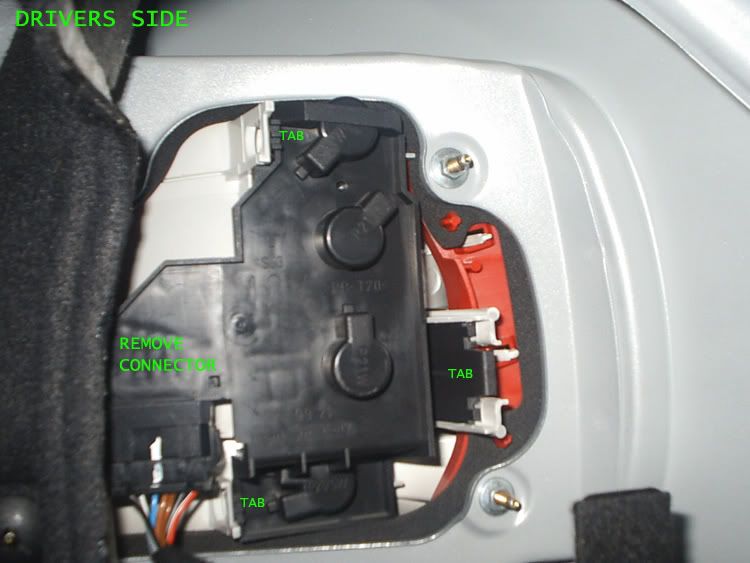
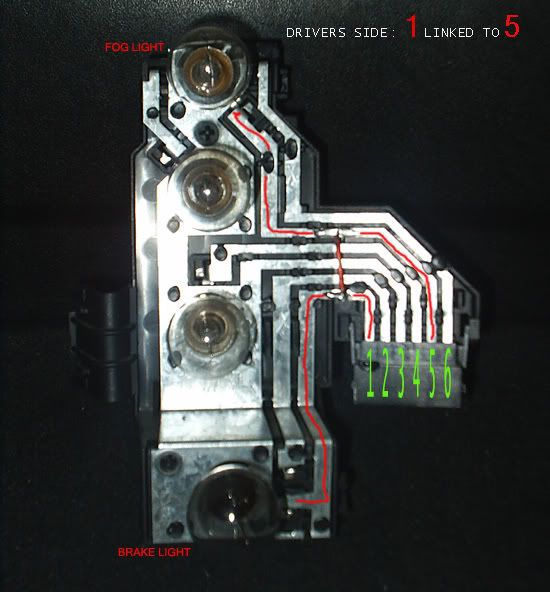
DRIVERS SIDE
Step 1.
This is the same thing as up there, except that you have to take off the panel where the tools are. just pull it out.
Then just disconect the connector and pop the tabs.
Step 2.
Ah yes now the fun part! Solder a wire from 1 to 5.
NOW THAT YOURE DONE..
Let them sit for a bit to cool off. After a few minutes just pop them carefully back in place! Put the panels back on and youre done!
THINGS TO WATCH OUT FOR
1. Use the gun with caution. At full blast it gets to 1000+ degrees.
2. I found out that if the gun hasnt heated up to proper "work" temp , the melted soldering wire will not stick.
3. Once you have done this mod you can no longer use your rear fogs. ( the best part about the mod is that if you dont like it just take of the soldered pieces and it goes back to stock). If you do happen to press the fog light button , youll have a few lights light up on the dash and a "BRAKE LIGHT" display go on. no biggie, just restart car.
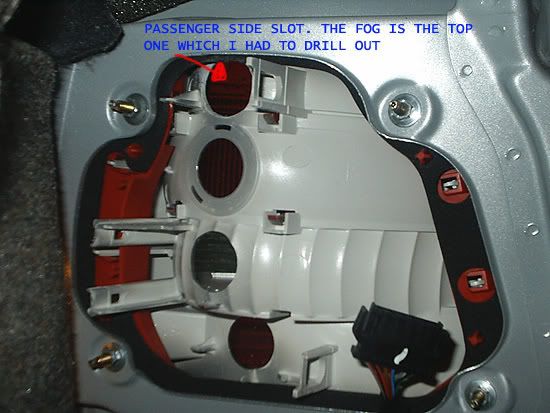
4. On some of your cars you will have a partial passenger fog light bulb slot. You will have to drill it out completely so it can fit a bulb. As shown here..
THE FINAL PRODUCT
I think it looks awesome. Some of you might not feel like this which is fine, everyone has their own taste.
In the day its not annoying, because its not bright at all. And at night it looks absolutely awesome. Please note that i took these pics in low light thats why the brake lights appear so bright.
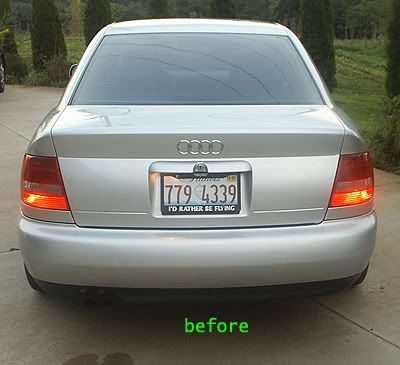
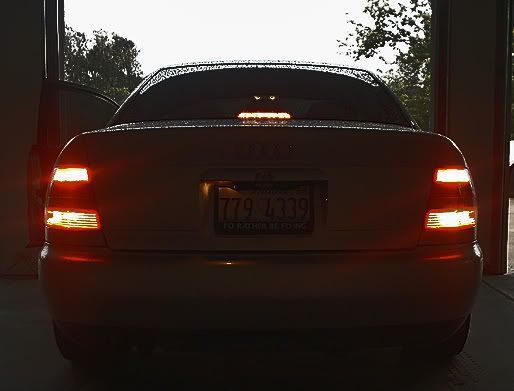
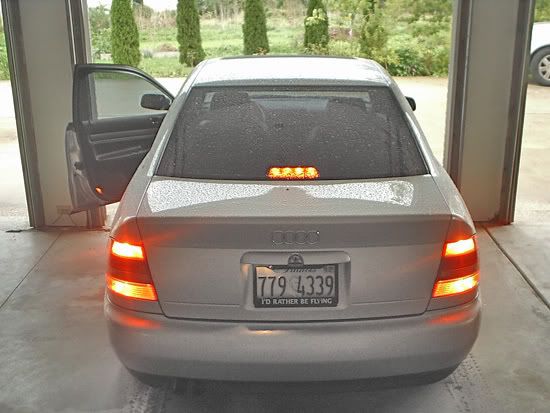
ENJOYYYY!
When i did the mod i was using a writeup that was on AZ. It was good but i thought i can make it a bit better by adding better pics. Haha we have our own writeup. Btw, youre doing everything at your own risk. If you brake something its not my fault. [8D]
My car is a 2001.5 A4 I do not think its the same for all b5 a4's. Im guessings its the same for 00 through 01.5
PASSENGER SIDE
(you can do pass. side first or drivers. doesnt matter)
Step 1.
Passenger side : take out the little screw thingies. i did this by rotating them CCW till they poped out. Pull the panel back and youll see the assembly.
To remove it from the housing pop the tabs and dissconect the connector.
Step 2.
Now comes the fun part! Heat up the gun by leting it sit for a minute or two on full blast (if its fuel powered) Then get the soldering wire and solder a wire from 2 to 5. The soldering job has to be clean! Dont let it spill over to any of the other lines. If it does (and if you havent done this before it might) just heat it up and remove it.
DRIVERS SIDE
Step 1.
This is the same thing as up there, except that you have to take off the panel where the tools are. just pull it out.
Then just disconect the connector and pop the tabs.
Step 2.
Ah yes now the fun part! Solder a wire from 1 to 5.
NOW THAT YOURE DONE..
Let them sit for a bit to cool off. After a few minutes just pop them carefully back in place! Put the panels back on and youre done!
THINGS TO WATCH OUT FOR
1. Use the gun with caution. At full blast it gets to 1000+ degrees.
2. I found out that if the gun hasnt heated up to proper "work" temp , the melted soldering wire will not stick.
3. Once you have done this mod you can no longer use your rear fogs. ( the best part about the mod is that if you dont like it just take of the soldered pieces and it goes back to stock). If you do happen to press the fog light button , youll have a few lights light up on the dash and a "BRAKE LIGHT" display go on. no biggie, just restart car.
4. On some of your cars you will have a partial passenger fog light bulb slot. You will have to drill it out completely so it can fit a bulb. As shown here..
THE FINAL PRODUCT
I think it looks awesome. Some of you might not feel like this which is fine, everyone has their own taste.
In the day its not annoying, because its not bright at all. And at night it looks absolutely awesome. Please note that i took these pics in low light thats why the brake lights appear so bright.
ENJOYYYY!


Thread
Thread Starter
Forum
Replies
Last Post
Pbcrazy
B5 Models
7
Sep 7, 2012 04:25 PM
gertron30
Audi A6
6
Feb 1, 2010 06:34 PM
Splbasshead
Suspension
8
Feb 2, 2009 08:17 PM