
DIY: B5 Control Arms and Tie Rod End Assemblies, Part 2: TRE Assembly Replacement

Thread Starter
|
2nd Gear
Joined: Nov 2010
Posts: 695
From: Rochester, MN
In part 1, we prepared your car for the replacement by jacking it up and removing the brake components. In part 2, we get to the real meat of this DIY.
Ready to begin? Good, let's do it!
Step 11. It's time to replace those old tie rod end assemblies, both the inner and outer tie rod ends. In order to do this as effortlessly as possible, you should run out to the nearest Advance Auto Parts store and rent this Inner Tie Rod End removal tool, kit #85. Rental of this kit is free. The way it works is that they charge your credit card aprox $100. When you return the tool kit, they credit your card $100.
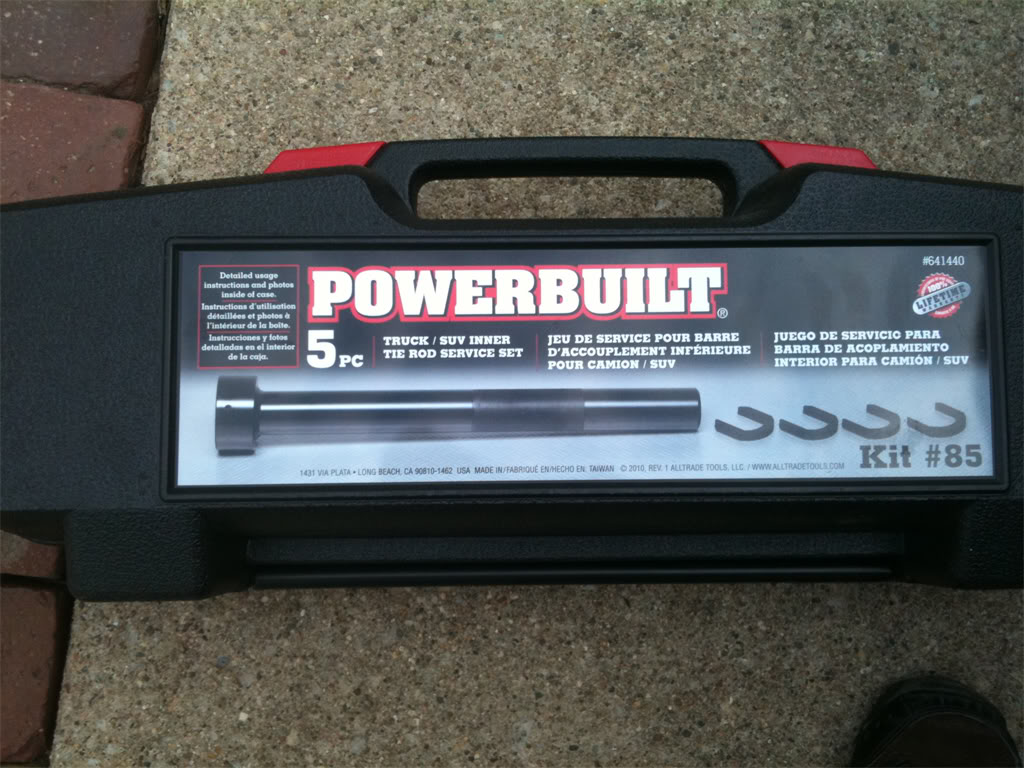
It's also possible to get away with using a short adjustable wrench to remove the inner tie rod assembly, but for me it was well worth the drive to Advance Auto Parts to rent this tool. This kit makes the removal and installation of the new inner tie rod end quick and easy.
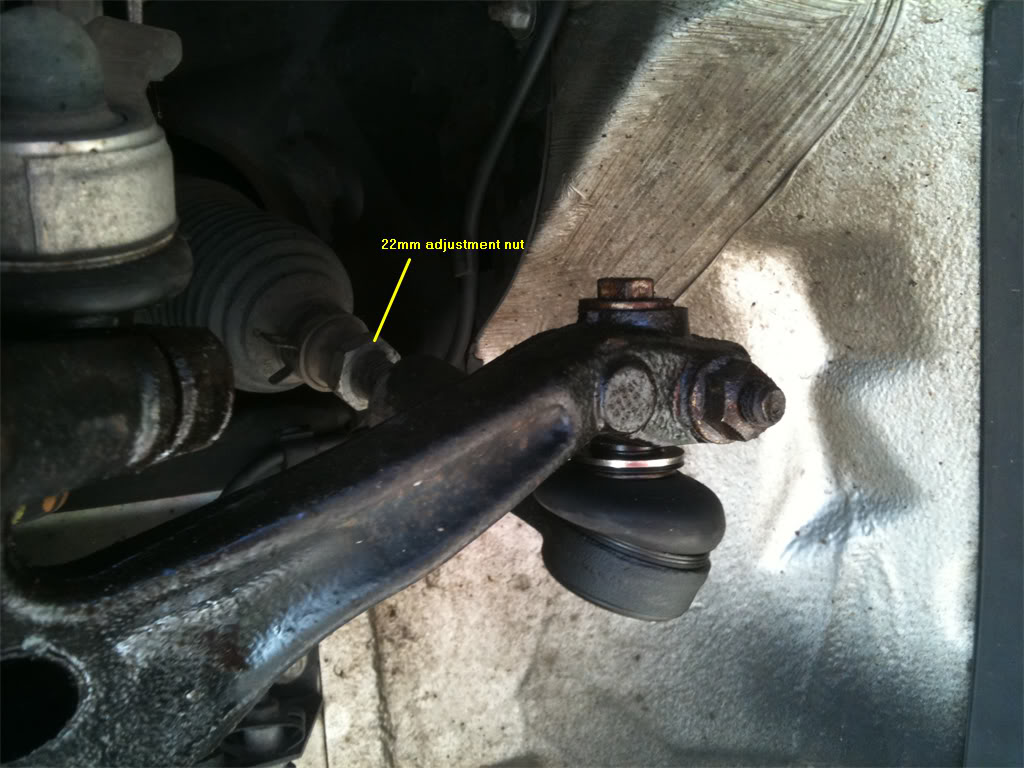
Step 12. Loosen the outer tie rod end adjustment nut using either a 22mm box end wrench or an adjustable wrench.
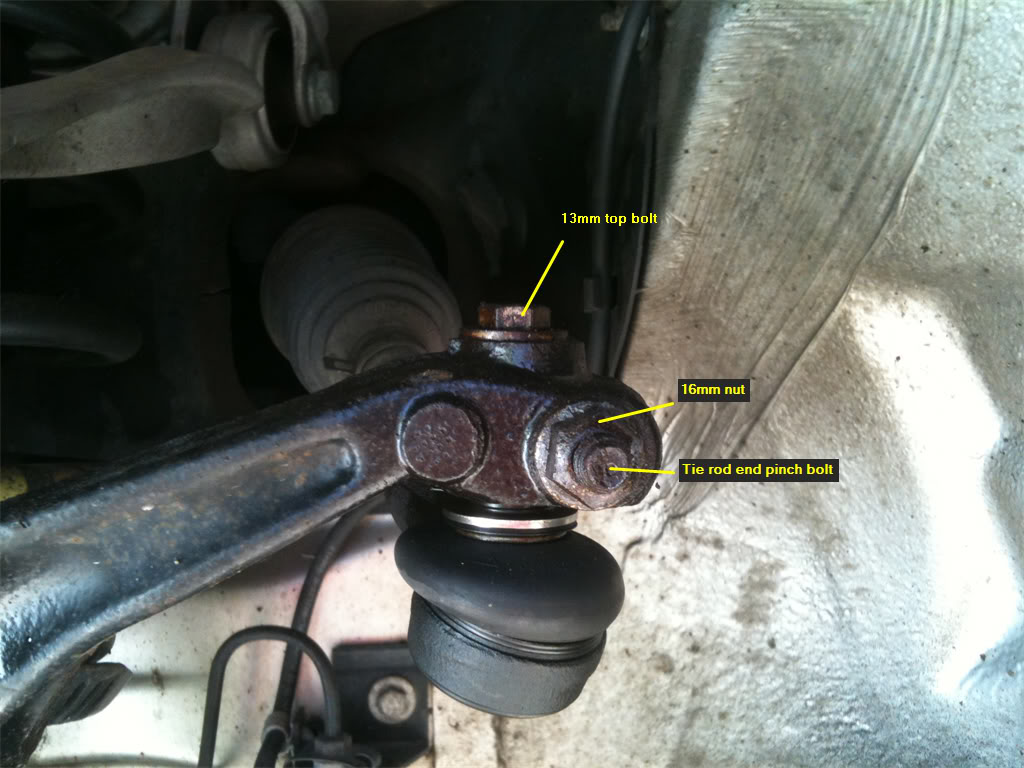
Step 13. Remove the top 13mm bolt from the spindle. This bolt came out very easily for me. Next, remove the 16mm nut that is attached to the pinch bolt. You have been spraying it with PB Blaster for the past few days, right?
Sonofabeyotch! Look what happened when I tried to remove this nut! Snapped it right off.
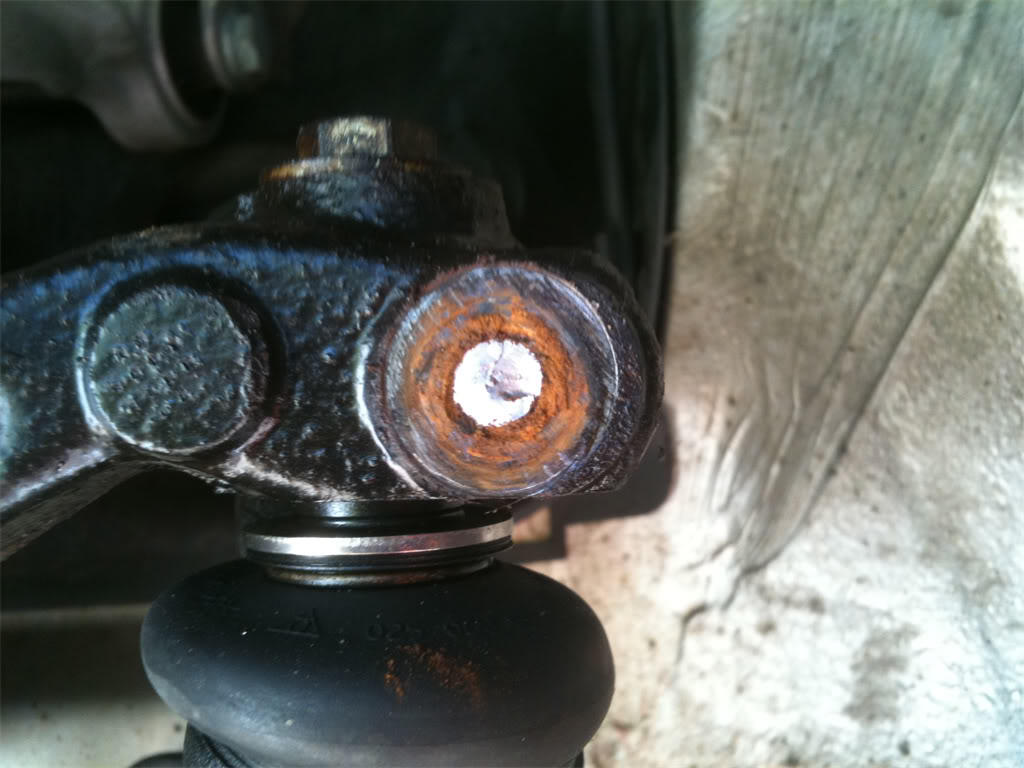
Holy cow, that thing was rusty, even with spraying PB Blaster on it for days on end before the job. Not to worry, you can overcome this! The solution to this problem was provided by one of the regular gurus on Audiforums.com, Jeremy(aka ImTheDevil).
Grab this:
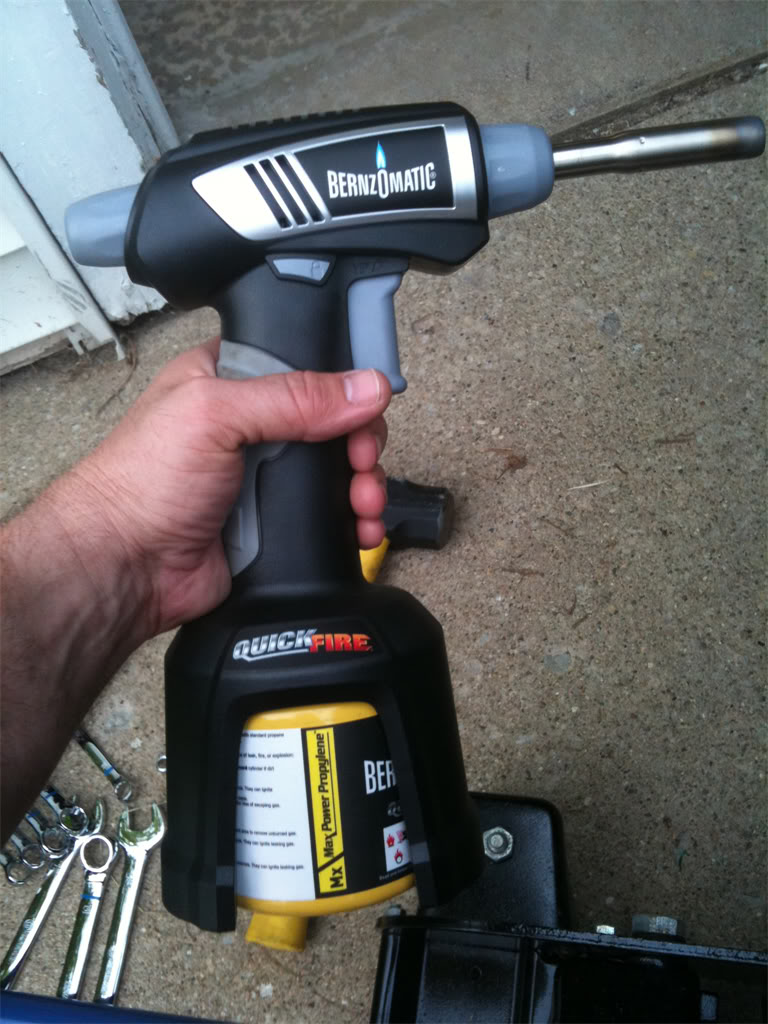
Mapp gas to the rescue! Mapp gas burns hotter than propane, so this is just what the doctor ordered. Being very careful to not burn up the tie rod end bushing, heat up the outside of the spindle where the pinch bolt lives. About a minute of heating up should do it.
Next, grab your punch of choice and that nice little 4lb sledgehammer that has been waiting to see some action. Place the punch over the pinch bolt, and start hammering for all you're worth until the pinch bolt starts to move. Since the pinch bolt is not threaded inside the spindle, you don't have to worry about any threads. Oh yeah, don't forget to wear goggles for this part. Eye patches look good on pirates, but not on Audi drivers. Safety first!
If you were able to get your pinch bolt nut removed without snapping the bolt, then you are better than poor old me. In that case, you can simply pound away on the bolt with the sledge hammer until the pinch bolt is level with the spindle. You'll have to then finish it by using the punch.
When you get the pinch bolt removed, here's what the spindle looks like:
You may have noticed that that is a pic of the passenger side spindle and tie rod end, while the previous pics were of the driver's side. Sorry, but when I broke the pinch bolt, I gave up on the driver's side and moved over to the passenger side until I could find a solution to my predicament. So please excuse the inconsistency of sides. I did the best I could. The rest of the pictures of the tie rod assembly replacement will be from the passenger side.
Step 14. Now that we have the top bolt and pinch bolts removed from the spindle, we can now remove the outer tie rod end bushing from the spindle. To do this, I used this handy tool from the OTC Front End Kit that I purchased online. I was going to rent a kit, but Advance Auto Parts were out of this kit at the time, and nobody else in town had one. From my experience on this job, the $90 I spent on this kit was well worth the money for how easy it made popping the tie rod ends and ball joints out of the spindle.
And here's what the tool looks like when ready to pop the outer tie rod end bushing out of the spindle. The bolt on the end of the tool is 24mm, so this is where the 24mm box end wrench comes in handy. Using this tool, pop the bushing out of the spindle.
For those of you who don't have access to a kit like this, I've also discovered that by using a short, flat head screwdriver and carpenter's hammer, you can gently tap the bushing out of the hole in the spindle by placing the tip of the screwdriver into the hole and rest it on the outer lip of the bushing tip. Keep tapping with the hammer until it pops out of the hole.
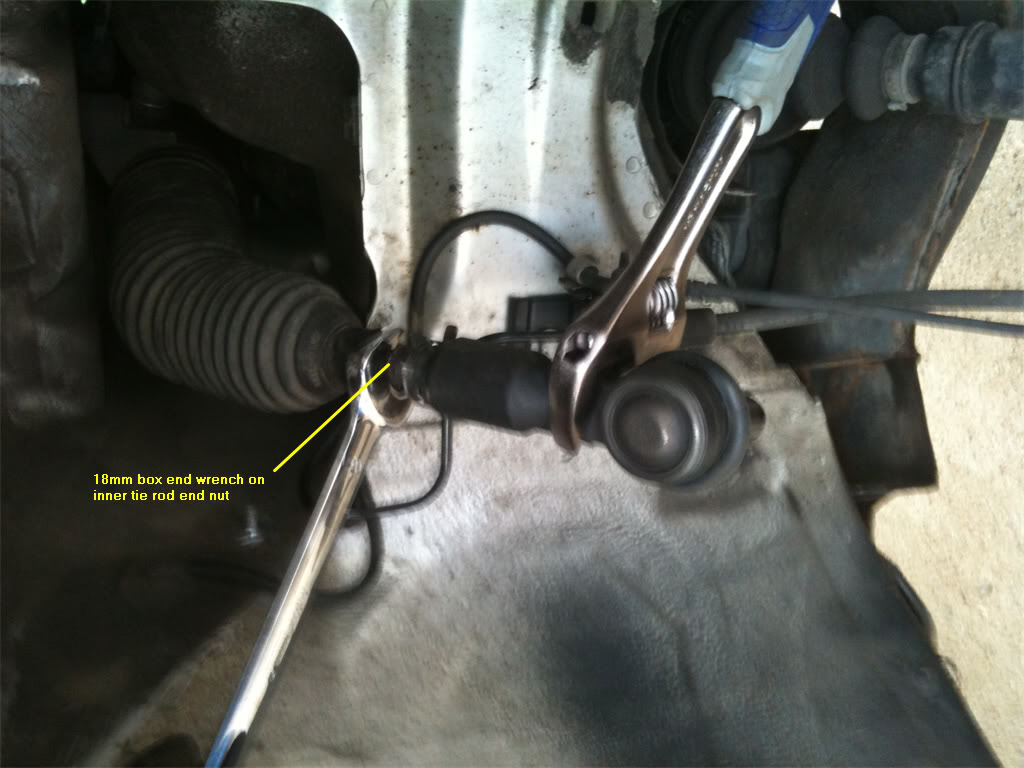
Step 15. Now that the bushing is out of the spindle, you can remove the outer tie rod end from the inner tie rod end. You need to do this so that the fancy inner tie rod end tool will fit over the inner tie rod end. If you're not using the inner tie rod end removal tool, you may skip this step and go straight to Step 17. Alright, if you're lucky, the outer tie rod end will simply unscrew from the inner tie rod end without any difficulty. The inner tie rod end nut is 18mm, so you may be able to simply slip your 18mm box end wrench on that and unscrew the outer tie rod end.
If yours was stuck on there like mine was, you'll need to apply force to this situation. Grab your adjustable wrench and place it on the outer tie rod end as shown in the pic below. In conjunction with the 18mm box end wrench placed on the inner tie rod end nut, break that sucker free!
If it still won't come free, it's time to break out the mapp gas torch and heat that connection up. Be careful to not burn the inner tie rod end boot! You'll need to reuse it later.
Step 16. Alright, since we've been successful at taking off the outer tie rod end, we see this:
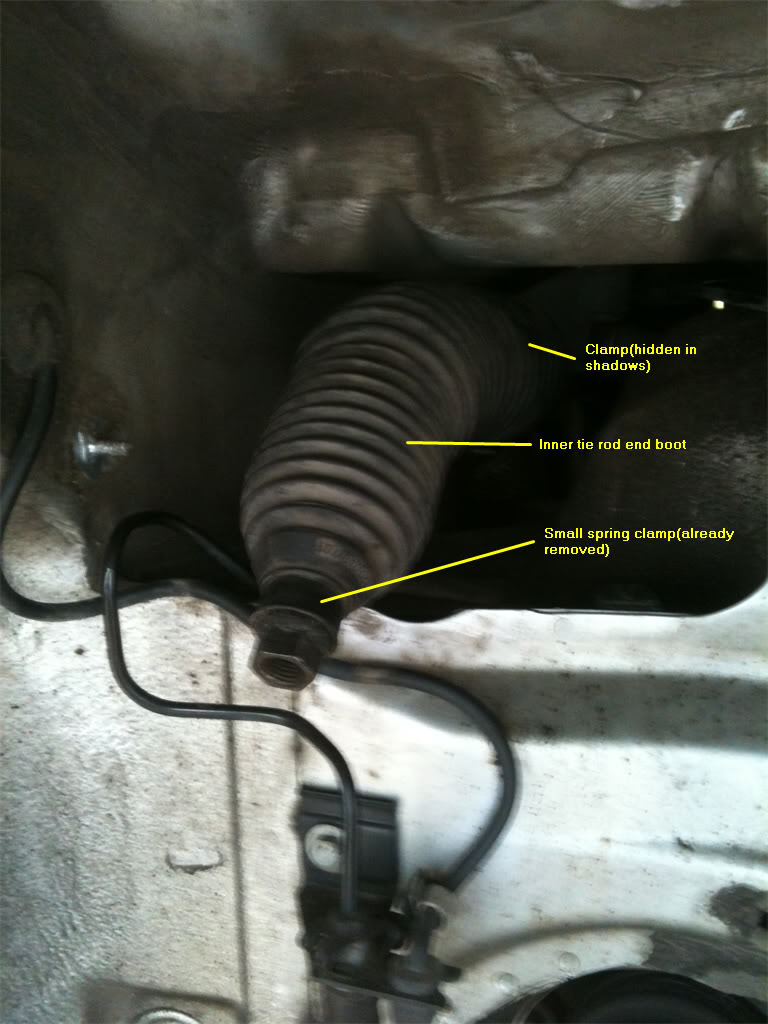
At this time, remove the black plastic covering that is in your way to getting better access to the large hose clamp on the inside of the inner tie end boot. There is a 10mm nut to remove(in the pic above you can see the bolt where this lived), as well as two plastic rivets that pop off by using a flat head screwdriver. I apologize for not having a pic of these items before removal. I was getting impatient and forgot to get a pic of them before i removed the panel.
After the access panel is removed and set aside, it's time to remove the two clamps that are holding the plastic boot to the inner tie rod end. The smaller of the two is a spring clamp, and can be easily removed by compressing both ends with a pair of pliers. The larger clamp on the inside of the boot is a little trickier to get at. If you listened to me and bought yourself an LED headlamp, this is the time to put it on and shine that light up into the area so that you can see the inside clamp. Using a flat head screwdriver, insert the tip into the rectanglularish hole on the clamp and push down on it until it pops free. This is one of the most tedious parts of the job. Keep at it until you get it. You can do it!
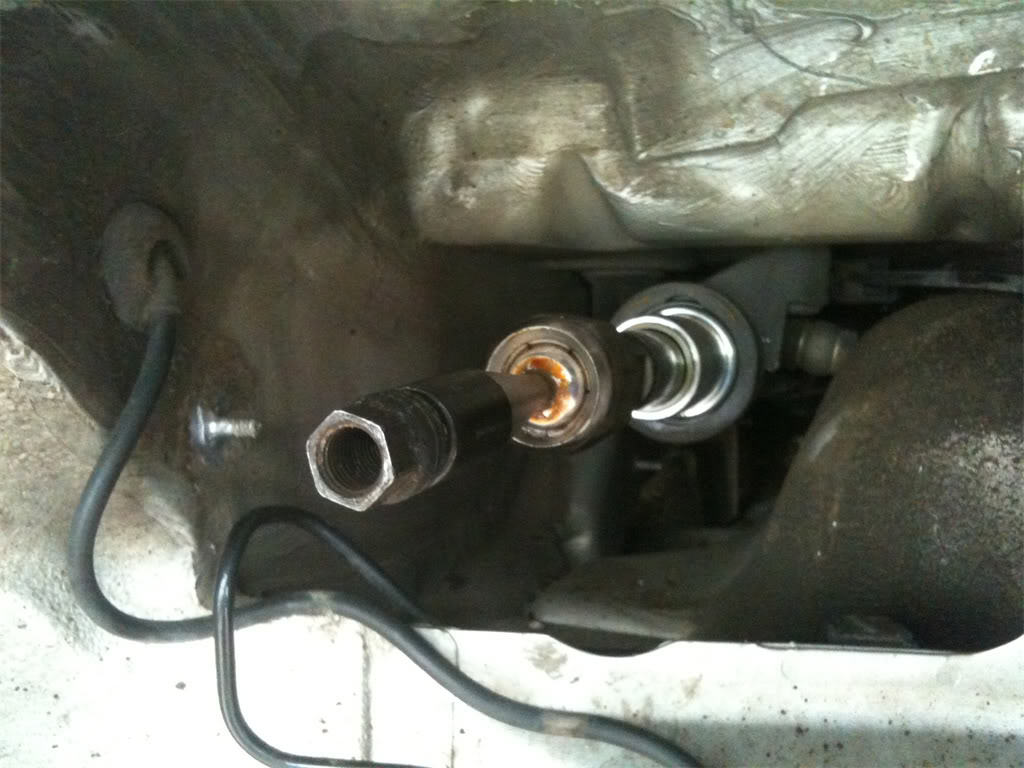
You got it? Excellent! Now, with both clamps removed, carefully pull the boot off of the inner tie rod end. You can now see the inner tie rod end for the first time. Yeah, I didn't know that's what they looked like, either.
Step 17. Place the 38.4mm adapter from the kit onto the inner tie rod nut, like this:
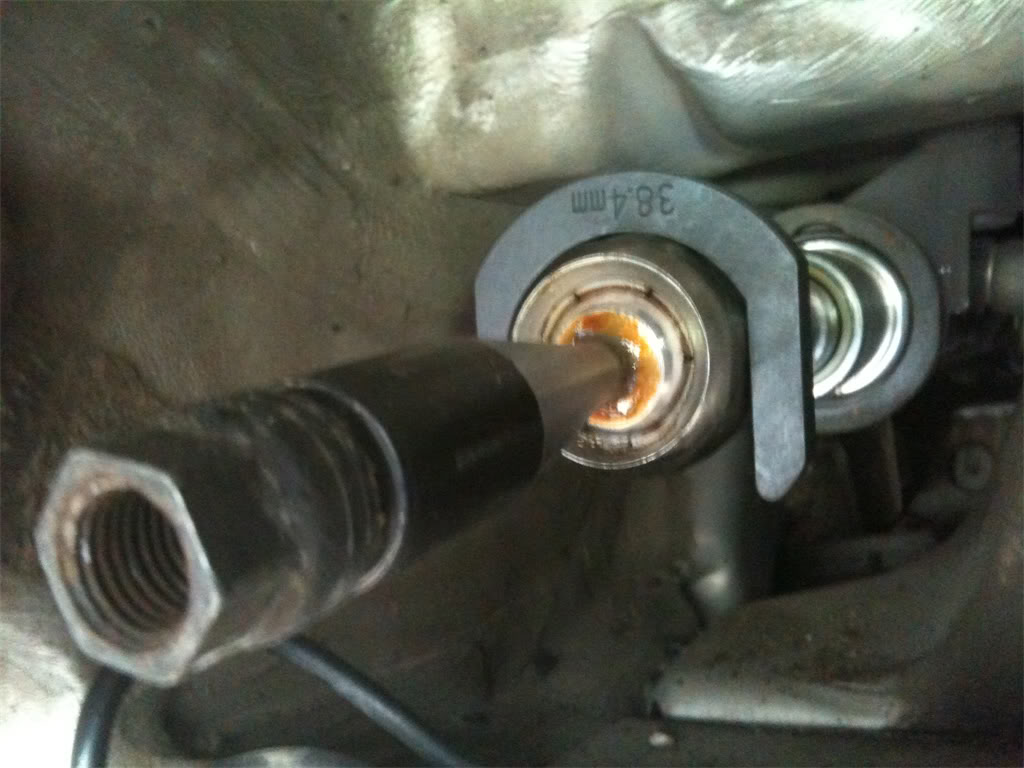
Next, slide the big long black pipe over the inner tie rod end and adapter. The end of the pipe is keyed to match the adapter, so rotate it around until you feel the adapter sink into alignment with the pipe. When that's done, attach your 1/2" ratchet to the pipe, and turn counter-clockwise to loosen the inner tie rod end. When that is accomplished, unscrew the inner tie rod end and thank it for it's service before you throw it into the trash.

Before we install the new inner tie rod end, let's talk about the boot that was covering it. On 99% of B5's, both sides have a 7.5" boot. A very small percentage, however, have a 10" boot used on the passenger side for some reason. I discovered this when I ordered a pair of new boots from blauparts.com. I was confused by this, so I actually called them and spoke to a very friendly and knowledgeable guy in their tech support. After learning this, I thought "What are the odds that my B5 could be one of the few to have the 10" boot? Not very high". So, I smugly ordered two 7.5" boots.
Alas, as you can see in the pic below, my B5 was one of the few. I wish I had gone out and eyeballed it before I ordered. Mea culpa.
You can definitely tell if you have the long boot on the passenger side, just by using the eyeball method.
I reused the old 10" boot because it was still in good condition and I was out of patience by this point in the project.
Step 18. Install the new tie rod end assembly. You already know how to do this since you just took the old one off. When you put either a new boot onto the inner tie rod end, or use the old one, getting a new large clamp onto the inside part is going to be a PITA. You can either go out and buy a real hose clamp that uses a screw to tighten, or you may do like I did and use a large zip tie instead of a clamp. If you do use a zip tie, make sure to snug it down tight! And, make sure the boot is completely seated before tightening it down. You don't want any dirt or water to get into the boot.
One piece of advice I would give at this point is to add a light coat of anti-seize compound to the outer tie rod end threads, the part that screws into the inner tie rod end nut. This will help prevent having it get seized in there like mine was. And remember to put the plastic cover back on the car before you screw the outer tie rod end into the inner tie rod end.
If you plan on removing the spindle, don't install the new tie rod end assembly back into the spindle. You'll need the spindle to swing free when you're trying to get the axle out of the spindle. If you don't plan on removing the spindle, proceed with installation.
To install the inner tie rod end back into the spindle, you must first make sure that the valley, or notch in the nipple is lined up with the end of the spindle. If they are not lined up, there won't be enough room for the new pinch bolt to go all the way through the hole in the spindle. Sorry that I don't have a pic of this, but the way to move the nipple is by inserting a 10mm hex socket into the top of the nipple and then use a ratchet to turn the nipple until it's lined up.
Once that is lined up, go ahead and use the sledge hammer to tap the nipple all the way back into the spindle. You may then install the new pinch bolt and top bolt into the spindle. Remember to use some anti-seize compound on the pinch bolt! Tighten to 7NM, or 5 ft lbs.
Congratulations, you've got the tie rod end assemblies replaced! On to part 3: Replacing the upper control arms.
Ready to begin? Good, let's do it!
Step 11. It's time to replace those old tie rod end assemblies, both the inner and outer tie rod ends. In order to do this as effortlessly as possible, you should run out to the nearest Advance Auto Parts store and rent this Inner Tie Rod End removal tool, kit #85. Rental of this kit is free. The way it works is that they charge your credit card aprox $100. When you return the tool kit, they credit your card $100.
It's also possible to get away with using a short adjustable wrench to remove the inner tie rod assembly, but for me it was well worth the drive to Advance Auto Parts to rent this tool. This kit makes the removal and installation of the new inner tie rod end quick and easy.
Step 12. Loosen the outer tie rod end adjustment nut using either a 22mm box end wrench or an adjustable wrench.
Step 13. Remove the top 13mm bolt from the spindle. This bolt came out very easily for me. Next, remove the 16mm nut that is attached to the pinch bolt. You have been spraying it with PB Blaster for the past few days, right?
Sonofabeyotch! Look what happened when I tried to remove this nut! Snapped it right off.
Holy cow, that thing was rusty, even with spraying PB Blaster on it for days on end before the job. Not to worry, you can overcome this! The solution to this problem was provided by one of the regular gurus on Audiforums.com, Jeremy(aka ImTheDevil).
Grab this:
Mapp gas to the rescue! Mapp gas burns hotter than propane, so this is just what the doctor ordered. Being very careful to not burn up the tie rod end bushing, heat up the outside of the spindle where the pinch bolt lives. About a minute of heating up should do it.
Next, grab your punch of choice and that nice little 4lb sledgehammer that has been waiting to see some action. Place the punch over the pinch bolt, and start hammering for all you're worth until the pinch bolt starts to move. Since the pinch bolt is not threaded inside the spindle, you don't have to worry about any threads. Oh yeah, don't forget to wear goggles for this part. Eye patches look good on pirates, but not on Audi drivers. Safety first!
If you were able to get your pinch bolt nut removed without snapping the bolt, then you are better than poor old me. In that case, you can simply pound away on the bolt with the sledge hammer until the pinch bolt is level with the spindle. You'll have to then finish it by using the punch.
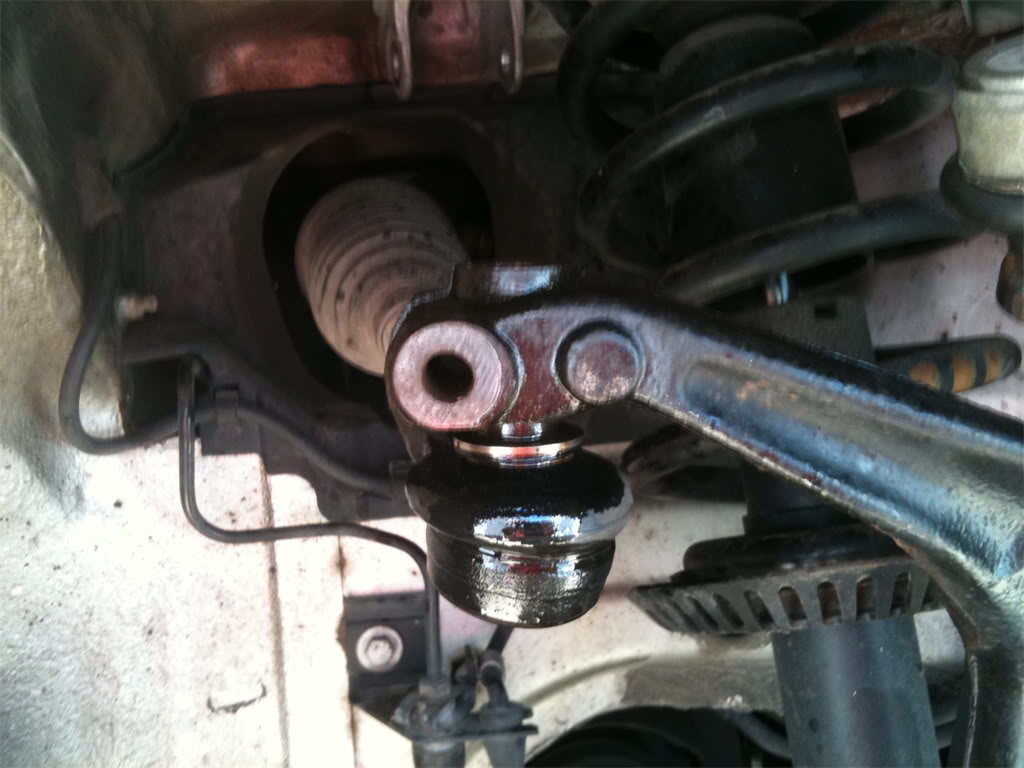
When you get the pinch bolt removed, here's what the spindle looks like:
You may have noticed that that is a pic of the passenger side spindle and tie rod end, while the previous pics were of the driver's side. Sorry, but when I broke the pinch bolt, I gave up on the driver's side and moved over to the passenger side until I could find a solution to my predicament. So please excuse the inconsistency of sides. I did the best I could. The rest of the pictures of the tie rod assembly replacement will be from the passenger side.
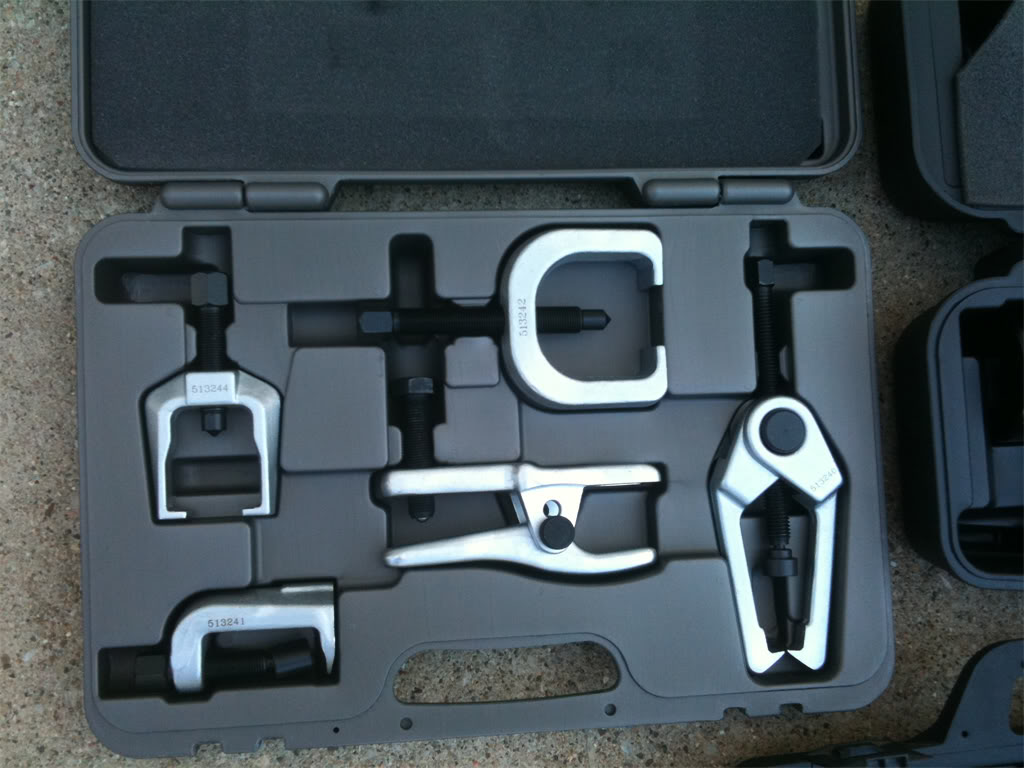
Step 14. Now that we have the top bolt and pinch bolts removed from the spindle, we can now remove the outer tie rod end bushing from the spindle. To do this, I used this handy tool from the OTC Front End Kit that I purchased online. I was going to rent a kit, but Advance Auto Parts were out of this kit at the time, and nobody else in town had one. From my experience on this job, the $90 I spent on this kit was well worth the money for how easy it made popping the tie rod ends and ball joints out of the spindle.
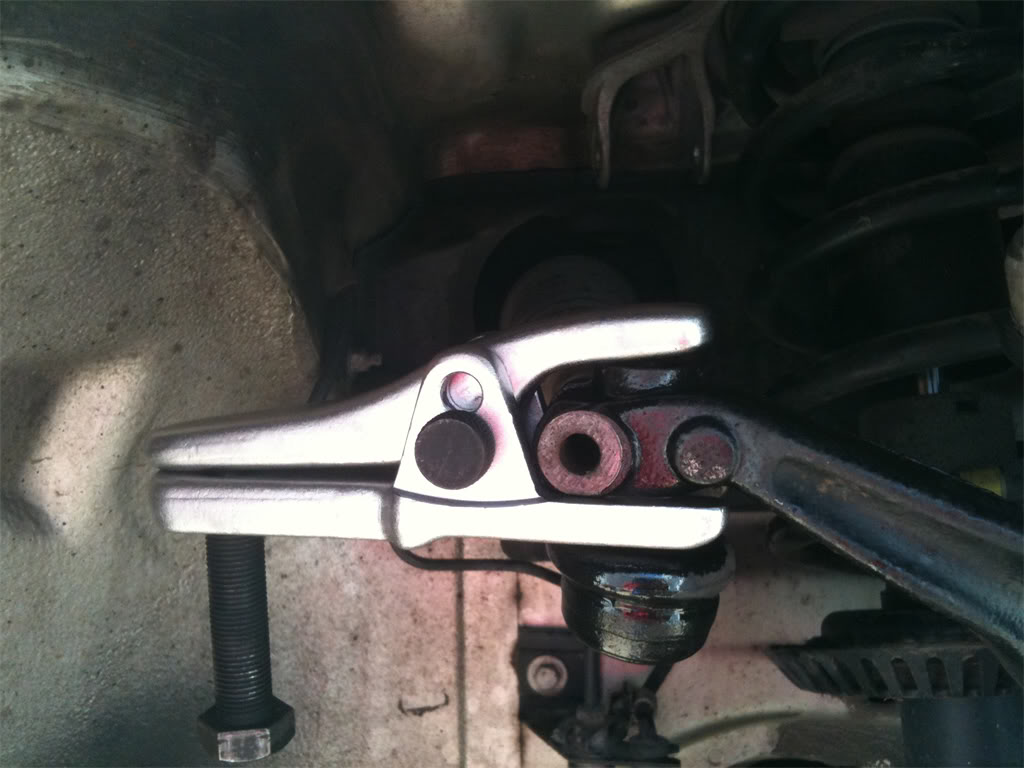
And here's what the tool looks like when ready to pop the outer tie rod end bushing out of the spindle. The bolt on the end of the tool is 24mm, so this is where the 24mm box end wrench comes in handy. Using this tool, pop the bushing out of the spindle.
For those of you who don't have access to a kit like this, I've also discovered that by using a short, flat head screwdriver and carpenter's hammer, you can gently tap the bushing out of the hole in the spindle by placing the tip of the screwdriver into the hole and rest it on the outer lip of the bushing tip. Keep tapping with the hammer until it pops out of the hole.
Step 15. Now that the bushing is out of the spindle, you can remove the outer tie rod end from the inner tie rod end. You need to do this so that the fancy inner tie rod end tool will fit over the inner tie rod end. If you're not using the inner tie rod end removal tool, you may skip this step and go straight to Step 17. Alright, if you're lucky, the outer tie rod end will simply unscrew from the inner tie rod end without any difficulty. The inner tie rod end nut is 18mm, so you may be able to simply slip your 18mm box end wrench on that and unscrew the outer tie rod end.
If yours was stuck on there like mine was, you'll need to apply force to this situation. Grab your adjustable wrench and place it on the outer tie rod end as shown in the pic below. In conjunction with the 18mm box end wrench placed on the inner tie rod end nut, break that sucker free!
If it still won't come free, it's time to break out the mapp gas torch and heat that connection up. Be careful to not burn the inner tie rod end boot! You'll need to reuse it later.
Step 16. Alright, since we've been successful at taking off the outer tie rod end, we see this:
At this time, remove the black plastic covering that is in your way to getting better access to the large hose clamp on the inside of the inner tie end boot. There is a 10mm nut to remove(in the pic above you can see the bolt where this lived), as well as two plastic rivets that pop off by using a flat head screwdriver. I apologize for not having a pic of these items before removal. I was getting impatient and forgot to get a pic of them before i removed the panel.
After the access panel is removed and set aside, it's time to remove the two clamps that are holding the plastic boot to the inner tie rod end. The smaller of the two is a spring clamp, and can be easily removed by compressing both ends with a pair of pliers. The larger clamp on the inside of the boot is a little trickier to get at. If you listened to me and bought yourself an LED headlamp, this is the time to put it on and shine that light up into the area so that you can see the inside clamp. Using a flat head screwdriver, insert the tip into the rectanglularish hole on the clamp and push down on it until it pops free. This is one of the most tedious parts of the job. Keep at it until you get it. You can do it!
You got it? Excellent! Now, with both clamps removed, carefully pull the boot off of the inner tie rod end. You can now see the inner tie rod end for the first time. Yeah, I didn't know that's what they looked like, either.
Step 17. Place the 38.4mm adapter from the kit onto the inner tie rod nut, like this:
Next, slide the big long black pipe over the inner tie rod end and adapter. The end of the pipe is keyed to match the adapter, so rotate it around until you feel the adapter sink into alignment with the pipe. When that's done, attach your 1/2" ratchet to the pipe, and turn counter-clockwise to loosen the inner tie rod end. When that is accomplished, unscrew the inner tie rod end and thank it for it's service before you throw it into the trash.
Before we install the new inner tie rod end, let's talk about the boot that was covering it. On 99% of B5's, both sides have a 7.5" boot. A very small percentage, however, have a 10" boot used on the passenger side for some reason. I discovered this when I ordered a pair of new boots from blauparts.com. I was confused by this, so I actually called them and spoke to a very friendly and knowledgeable guy in their tech support. After learning this, I thought "What are the odds that my B5 could be one of the few to have the 10" boot? Not very high". So, I smugly ordered two 7.5" boots.
Alas, as you can see in the pic below, my B5 was one of the few. I wish I had gone out and eyeballed it before I ordered. Mea culpa.
You can definitely tell if you have the long boot on the passenger side, just by using the eyeball method.
I reused the old 10" boot because it was still in good condition and I was out of patience by this point in the project.
Step 18. Install the new tie rod end assembly. You already know how to do this since you just took the old one off. When you put either a new boot onto the inner tie rod end, or use the old one, getting a new large clamp onto the inside part is going to be a PITA. You can either go out and buy a real hose clamp that uses a screw to tighten, or you may do like I did and use a large zip tie instead of a clamp. If you do use a zip tie, make sure to snug it down tight! And, make sure the boot is completely seated before tightening it down. You don't want any dirt or water to get into the boot.
One piece of advice I would give at this point is to add a light coat of anti-seize compound to the outer tie rod end threads, the part that screws into the inner tie rod end nut. This will help prevent having it get seized in there like mine was. And remember to put the plastic cover back on the car before you screw the outer tie rod end into the inner tie rod end.
If you plan on removing the spindle, don't install the new tie rod end assembly back into the spindle. You'll need the spindle to swing free when you're trying to get the axle out of the spindle. If you don't plan on removing the spindle, proceed with installation.
To install the inner tie rod end back into the spindle, you must first make sure that the valley, or notch in the nipple is lined up with the end of the spindle. If they are not lined up, there won't be enough room for the new pinch bolt to go all the way through the hole in the spindle. Sorry that I don't have a pic of this, but the way to move the nipple is by inserting a 10mm hex socket into the top of the nipple and then use a ratchet to turn the nipple until it's lined up.
Once that is lined up, go ahead and use the sledge hammer to tap the nipple all the way back into the spindle. You may then install the new pinch bolt and top bolt into the spindle. Remember to use some anti-seize compound on the pinch bolt! Tighten to 7NM, or 5 ft lbs.
Congratulations, you've got the tie rod end assemblies replaced! On to part 3: Replacing the upper control arms.
Last edited by jdahlen24; Aug 25, 2011 at 06:25 PM.

Thread
Thread Starter
Forum
Replies
Last Post
jdahlen24
DIY - Do It Yourself
7
Aug 25, 2011 09:51 PM
jdahlen24
DIY - Do It Yourself
5
Aug 25, 2011 09:50 PM
jdahlen24
DIY - Do It Yourself
0
Aug 25, 2011 03:05 PM