
1995 2.8L- Window Regulator Replacement

Thread Starter
|
3rd Gear
Joined: Dec 2008
Posts: 1,941
From: IL
As others who did write-ups before (on AudiWorld.com) because they didn't find one for their particular model, I noticed there is none for this very first A6 model. There is just one "plastic guides replacement" article under the A6 model, but that's for a C5 and doesn't apply to C4 as there's no design tangency.
Since I had to replace my front driver side regulator, I decided as in some other instances to document the repair, maybe some others might benefit from the step-by-step visuals. Probably it isn't by far the best approach or repair method (Audi-trained technicians may sigh upon reading this writeup), but the route I took provided me with additional knowledge about the car, and the same time allowed for a nice clean-up of all the door's components...
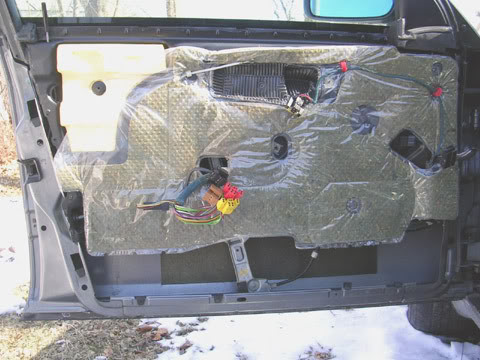
In addition, it was a perfect opportunity to glue some foam insulation inside the door for sound deadening purpose.
__________________________________________________ _______________
First off, the usual disclaimer:
Attempt the repair AT YOUR OWN RISK!
Neither myself, nor AudiForums should be hold liable if you attempt the repair and something goes bad.
With that being said, THIS WRITE-UP IS FOR THE FRONT REGULATORS ONLY. However, I would assume that the rear regulators replacement should not be much different, except for the size of the regulator (for the rear they are smaller) and the configuration of the door (e.g.: the rear door does not have a rearview mirror; the rear door does not have speakers; the rear door has ashtray; etc...)
To accomplish the replacement, I needed the following:
PARTS
Driver side front regulator - 4A0 837 397 A
New: about $180 - 200
Used: $ 42.50 - shipping included from Force5Auto.com (Thanks, Chris!)
TOOLS
Flat head screwdriver
Philips screwdriver
3/8" ratchet with optional 4" extension
T-30 Torx bit
10-metric bit or wrench
13-metric bit or wrench
SUPPLIES
WD40
Grease - to lubricate the cable guide
Rags
My battery is out of the car, so I started with the window rolled up. Some other people recommend starting with the window down. I don't really know if it makes a difference.
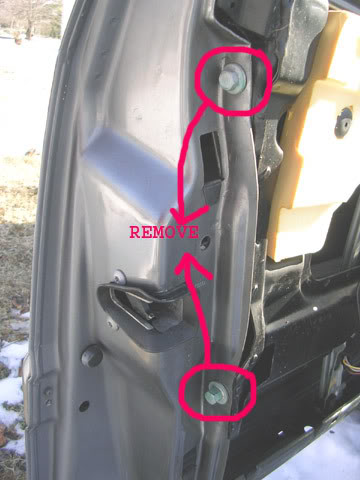
STEP 1 - Remove the door panel.
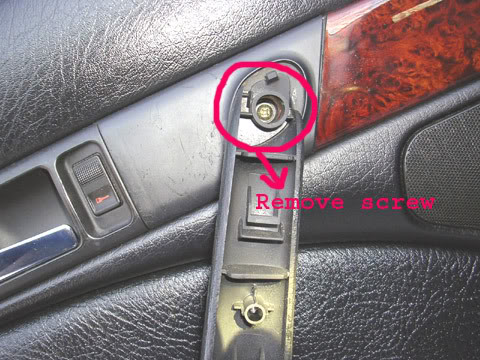
There are two Phillips screws to tackle first.
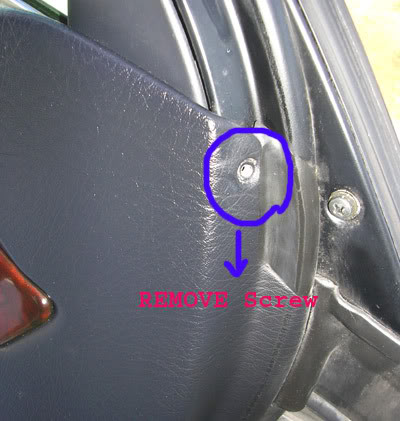
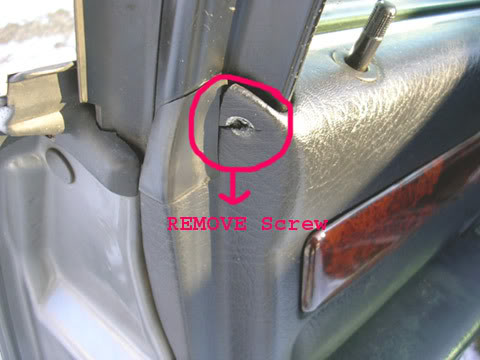
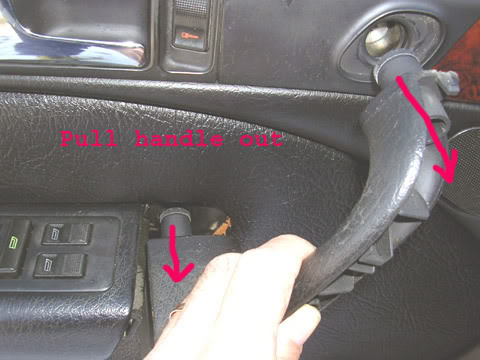
Next, the door handle should come out, as it is mounted via two screws fastened into the door frame assembly. Press the top of the handle cover and down toward you, as it will snap loose. Then just pull it out toward you.
Remove the two Pillips head screws and pull the handle out.
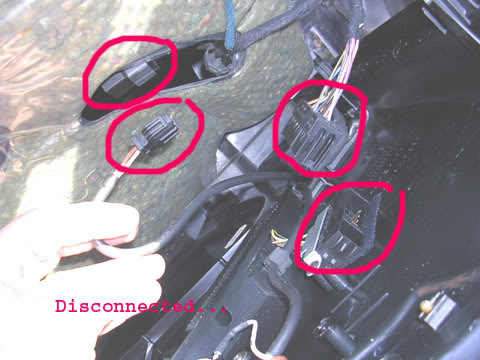
Next, the central locking switch cover comes out and its power harness gets disconnected.
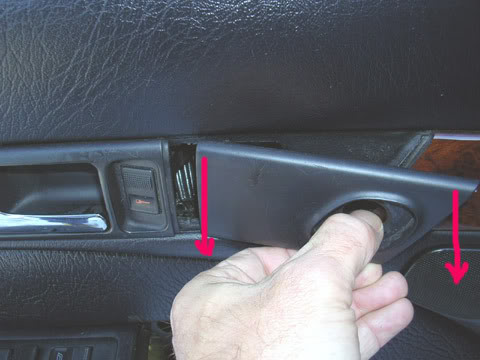
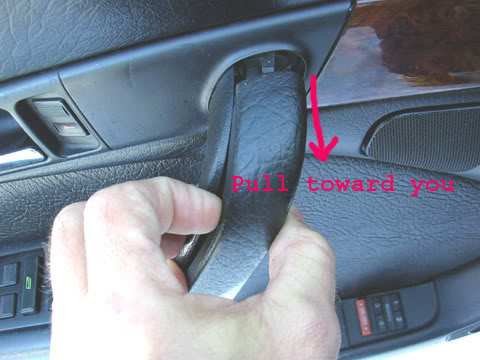
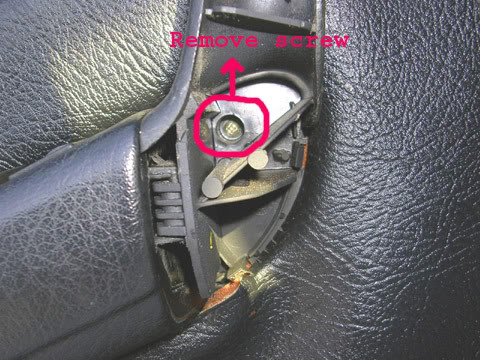
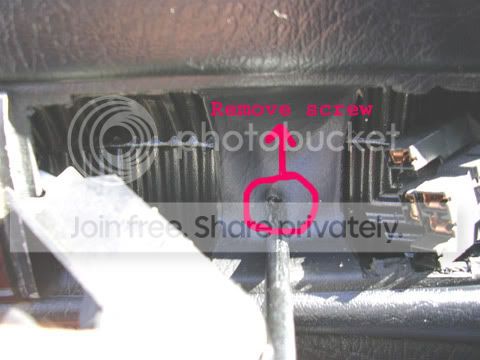
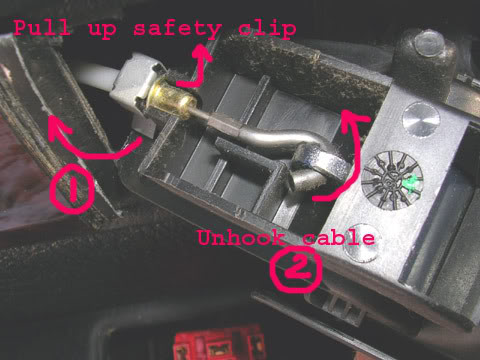
Pull out the door latch (handle) and locate the screw behind it. It is the last screw holding the panel to the door frame assembly.
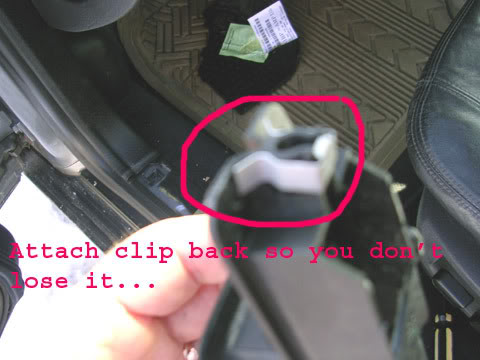
Now, turn the latch (handle) unit and unhook the cable. As seen, the cable is hold in place by an additional safety metal clip that just snaps out.
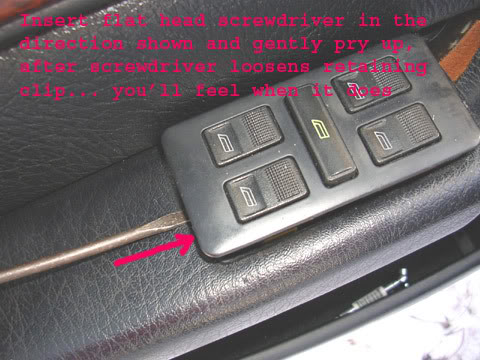
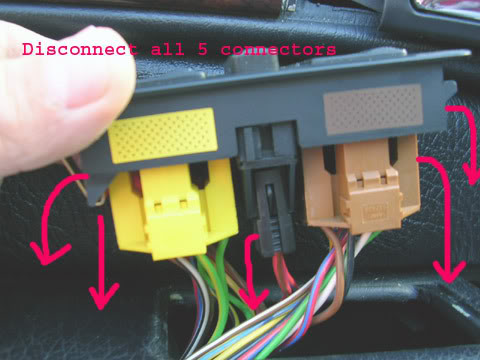
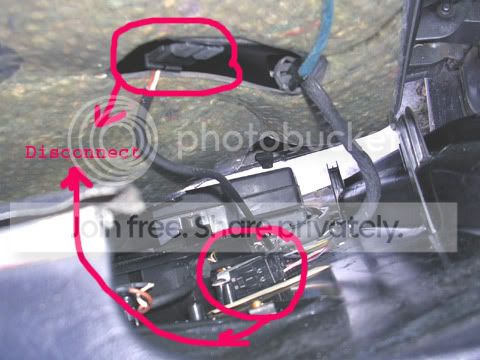
Next move is to detach the window switch unit, because the harness should be disconnected from the panel. Insert a flat head screwdriver gebtly and push toward the front of the car. You'll feel when the safety clip that holds it in place snaps loose. At the other end has two retaining tabs.
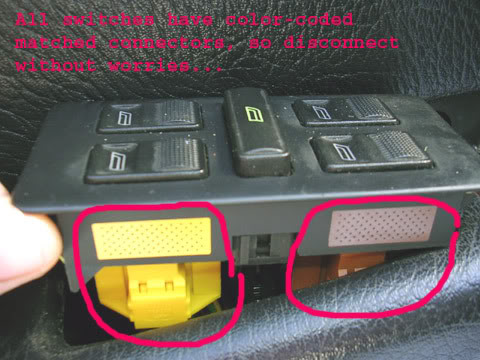
The connectors are color coded and matched on the switch unit, so no need to jot down the order for reinstalling.
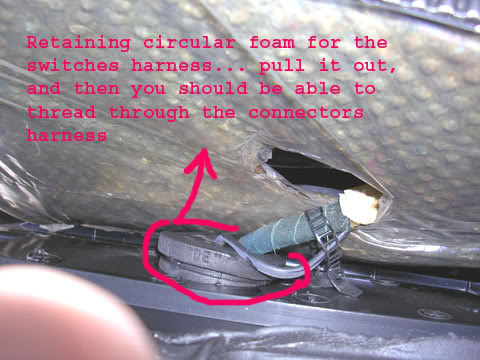
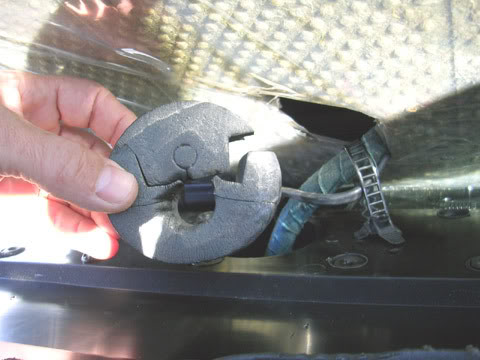
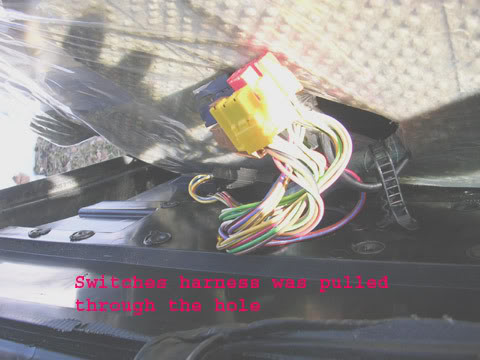
Now we need to pull the switch unit harness out of the cover panel through the opening, after taking out the retaining foam in the opening.
At this point you can pull the panel up over the safety lock pin, but you cannot detach it, since are more power connectors to get unhooked.
Now the cover panel is free. Set it aside and have a cigarette, or a glass of beer...
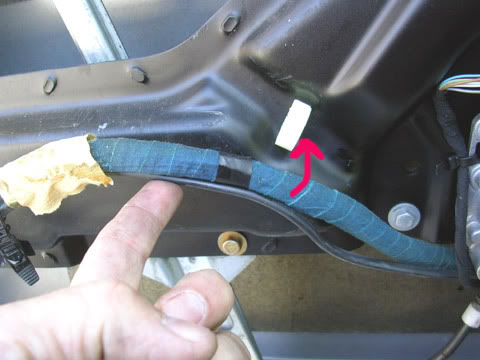
Next, the insulation has to come out. If you can work around it, please do so, but there is some wiring fastened with plastic clips that needs to come off, so you might as well take it out.
TO BE CONTINUED
(Reason - 20 photos is the limit per post)
Since I had to replace my front driver side regulator, I decided as in some other instances to document the repair, maybe some others might benefit from the step-by-step visuals. Probably it isn't by far the best approach or repair method (Audi-trained technicians may sigh upon reading this writeup), but the route I took provided me with additional knowledge about the car, and the same time allowed for a nice clean-up of all the door's components...
In addition, it was a perfect opportunity to glue some foam insulation inside the door for sound deadening purpose.
__________________________________________________ _______________
First off, the usual disclaimer:
Attempt the repair AT YOUR OWN RISK!
Neither myself, nor AudiForums should be hold liable if you attempt the repair and something goes bad.
With that being said, THIS WRITE-UP IS FOR THE FRONT REGULATORS ONLY. However, I would assume that the rear regulators replacement should not be much different, except for the size of the regulator (for the rear they are smaller) and the configuration of the door (e.g.: the rear door does not have a rearview mirror; the rear door does not have speakers; the rear door has ashtray; etc...)
To accomplish the replacement, I needed the following:
PARTS
Driver side front regulator - 4A0 837 397 A
New: about $180 - 200
Used: $ 42.50 - shipping included from Force5Auto.com (Thanks, Chris!)
TOOLS
Flat head screwdriver
Philips screwdriver
3/8" ratchet with optional 4" extension
T-30 Torx bit
10-metric bit or wrench
13-metric bit or wrench
SUPPLIES
WD40
Grease - to lubricate the cable guide
Rags
My battery is out of the car, so I started with the window rolled up. Some other people recommend starting with the window down. I don't really know if it makes a difference.
STEP 1 - Remove the door panel.
There are two Phillips screws to tackle first.
Next, the door handle should come out, as it is mounted via two screws fastened into the door frame assembly. Press the top of the handle cover and down toward you, as it will snap loose. Then just pull it out toward you.
Remove the two Pillips head screws and pull the handle out.
Next, the central locking switch cover comes out and its power harness gets disconnected.
Pull out the door latch (handle) and locate the screw behind it. It is the last screw holding the panel to the door frame assembly.
Now, turn the latch (handle) unit and unhook the cable. As seen, the cable is hold in place by an additional safety metal clip that just snaps out.
Next move is to detach the window switch unit, because the harness should be disconnected from the panel. Insert a flat head screwdriver gebtly and push toward the front of the car. You'll feel when the safety clip that holds it in place snaps loose. At the other end has two retaining tabs.
The connectors are color coded and matched on the switch unit, so no need to jot down the order for reinstalling.
Now we need to pull the switch unit harness out of the cover panel through the opening, after taking out the retaining foam in the opening.
At this point you can pull the panel up over the safety lock pin, but you cannot detach it, since are more power connectors to get unhooked.
Now the cover panel is free. Set it aside and have a cigarette, or a glass of beer...
Next, the insulation has to come out. If you can work around it, please do so, but there is some wiring fastened with plastic clips that needs to come off, so you might as well take it out.
TO BE CONTINUED
(Reason - 20 photos is the limit per post)
Thread Starter
|
3rd Gear
Joined: Dec 2008
Posts: 1,941
From: IL
CONT'D
STEP2 - Removal of the door frame assembly.
There are four 13-metric nuts that hold the door assembly frame fastened. Removing those is the first step.
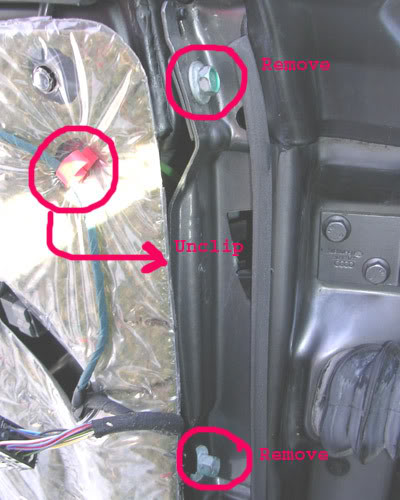
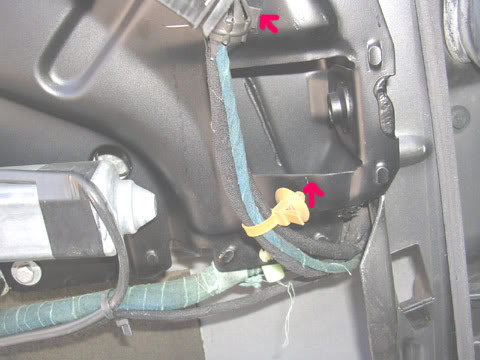
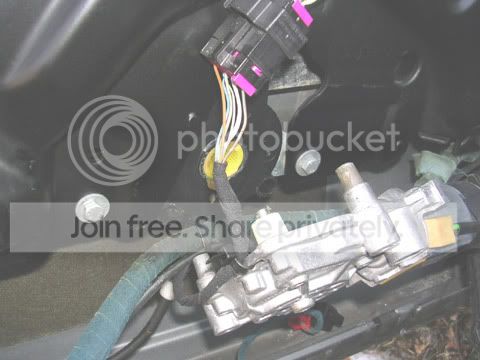
As I said before, there are several wire harnesses hold by plastic clips that need to be unclipped. This, along with the motor removal will free the assembly. I couldn't figure out a different way to do it.
Last step is to dismount the motor. It is fastened via three T-30 screws.
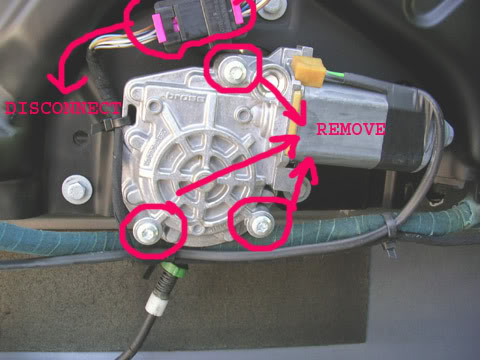
At this point, you can pull out the door assembly (housing + regulator + window + weatherstripping intact + rearview side mirror)
STEP3 - Regulator Replacement
Probably at this point you had another cigarette (another glass of beer).
Lay down the door assembly on something that protects the window and the side mirror.
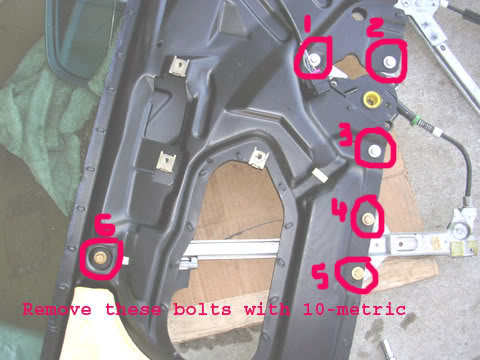
Start by removing the 6 10-metric nuts that hold the regulator connected to the assembly.
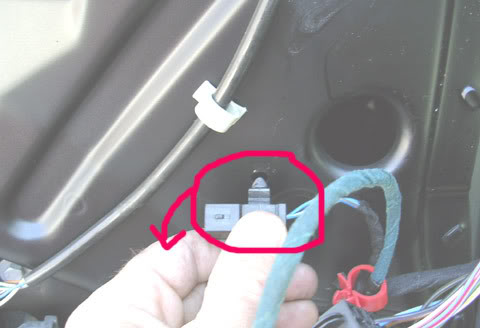
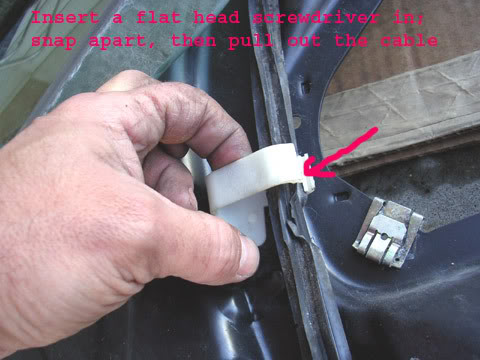
Unclip the retainer seen in the picture that holds one cable fastened to the assembly. Insert a flat head screwdriver on its edge and snap open. Pull out the cable.
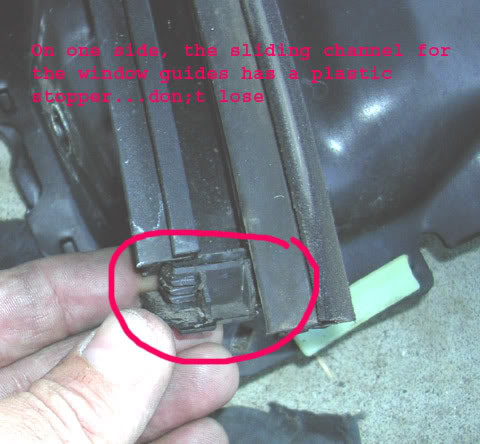
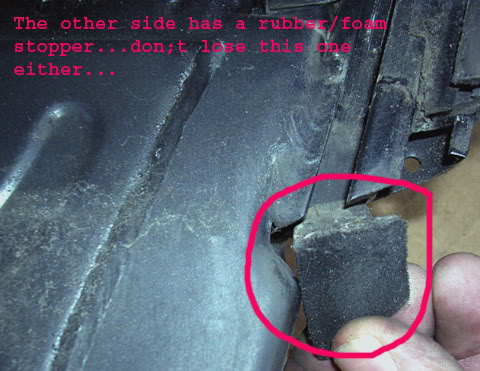
You can now slide the regulator + window assembly out of the weatherstripping channels. On the bottom, there are two stoppers, as seen in the pics. Don't lose them.
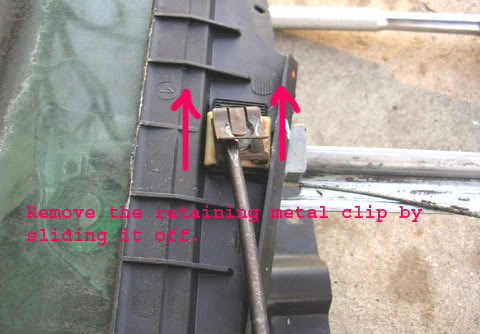
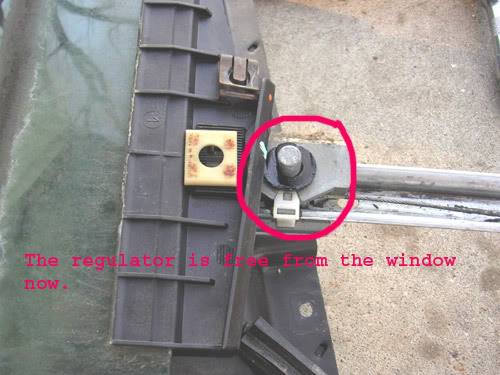
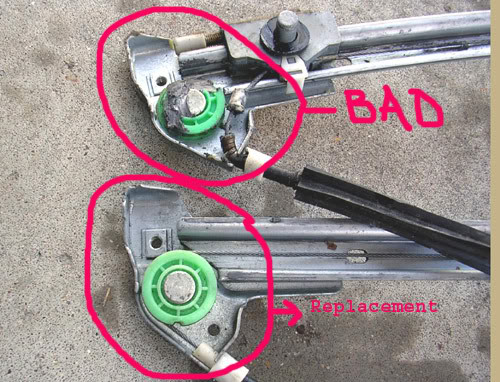
Next step is to detach the regulator from the window. The two are fastened via a safety metal clip that slides out. Use the flat head screwdriver as seen in the pic.
If you started with the window up, make sure the connecting tip seen below is at the highest point on the regulator's track/channel.
Also, it is a good time to lubricate the sliding tracks and the cable.
It is finally the time to mount the new/used replacement regulator. Also, as you reconnect the regulator to the window and you slide it back into the weatherstripping channels, don't forget to mount back the stoppers.
And the Evrika moment (well, not quite, since the door need be reassambled)...

STEP4 - Door Reassembly.
Reinstall everything in reverse order.
Good luck and open a cold brewski when you conclude the job. A dealer quoted me $ 350 to replace the darn thing...
Enjoy.
Chefro
STEP2 - Removal of the door frame assembly.
There are four 13-metric nuts that hold the door assembly frame fastened. Removing those is the first step.
As I said before, there are several wire harnesses hold by plastic clips that need to be unclipped. This, along with the motor removal will free the assembly. I couldn't figure out a different way to do it.
Last step is to dismount the motor. It is fastened via three T-30 screws.
At this point, you can pull out the door assembly (housing + regulator + window + weatherstripping intact + rearview side mirror)
STEP3 - Regulator Replacement
Probably at this point you had another cigarette (another glass of beer).
Lay down the door assembly on something that protects the window and the side mirror.
Start by removing the 6 10-metric nuts that hold the regulator connected to the assembly.
Unclip the retainer seen in the picture that holds one cable fastened to the assembly. Insert a flat head screwdriver on its edge and snap open. Pull out the cable.
You can now slide the regulator + window assembly out of the weatherstripping channels. On the bottom, there are two stoppers, as seen in the pics. Don't lose them.
Next step is to detach the regulator from the window. The two are fastened via a safety metal clip that slides out. Use the flat head screwdriver as seen in the pic.
If you started with the window up, make sure the connecting tip seen below is at the highest point on the regulator's track/channel.
Also, it is a good time to lubricate the sliding tracks and the cable.
It is finally the time to mount the new/used replacement regulator. Also, as you reconnect the regulator to the window and you slide it back into the weatherstripping channels, don't forget to mount back the stoppers.
And the Evrika moment (well, not quite, since the door need be reassambled)...
STEP4 - Door Reassembly.
Reinstall everything in reverse order.
Good luck and open a cold brewski when you conclude the job. A dealer quoted me $ 350 to replace the darn thing...
Enjoy.
Chefro

3rd Gear
Joined: Sep 2004
Posts: 2,371
From: Newfields NH
From what I see in your post we should open the cold brewski before beginning the job and keep an open one going while doing the work. I suspect it will require a case and a half to complete the job..
Don't forget to give Chris Semple at Force Ficve a half case!!
Don't forget to give Chris Semple at Force Ficve a half case!!
Thread Starter
|
3rd Gear
Joined: Dec 2008
Posts: 1,941
From: IL
I would gladly share a case of beer with Chris.
As far as the replacement, it surely may not be the "shortest" or "most rapid" method of doing it, but it worked for me great. I want to know where everything is and how it works.
The second time around I bet I can do the job in 1 1/2 hr max.
As far as the replacement, it surely may not be the "shortest" or "most rapid" method of doing it, but it worked for me great. I want to know where everything is and how it works.
The second time around I bet I can do the job in 1 1/2 hr max.

1st Gear
Joined: Jul 2006
Posts: 48
From:
I would like to say "Thank-you". I could not find the screw behind the handle until reading your post and EXCELLENT pictures, too BTW!
Anyone had luck/tried the "window regulator repair kit" that is on E-bay?
http://cgi.ebay.com/ebaymotors/Audi-...Q5fAccessories
I'm thinking about it, mainly because the piece that has busted on my regulator is a small piece of plastic. I am guessing if I buy used, the plastic pieces have already been "stressed" and could break anytime.
Thanks in advance,
Brian
Thread Starter
|
3rd Gear
Joined: Dec 2008
Posts: 1,941
From: IL
 You're very welcome. I'm glad at least one person benefited from it.
As far as that Ebay kit, you could ask yourself "Can I live without $ 28?". If the answer is yes, you can surely give it a try, especially since the guy has a 100% feedback - even though is from Turkey! It is amazing that s&h is only $6 from there...
If that doesn't work for you, try getting the plastic guides from the dealer (as other few guys who posted in the forum did for $ 5 or so) - I would assume you have a C5.
1st Gear
Joined: Jul 2006
Posts: 48
From:
You're very welcome. I'm glad at least one person benefited from it.As far as that Ebay kit, you could ask yourself "Can I live without $ 28?". If the answer is yes, you can surely give it a try, especially since the guy has a 100% feedback - even though is from Turkey! It is amazing that s&h is only $6 from there...
If that doesn't work for you, try getting the plastic guides from the dealer (as other few guys who posted in the forum did for $ 5 or so) - I would assume you have a C5.
I actually have the C4; 1997 A6 Avant w/quattro. So that plastic guide repair will not work for me. Not looking forward to replacing the whole regulator either. Mine was rivited in about a dozen places.
We shall see what happens with the $28 soon enough.

1st Gear
Joined: Feb 2005
Posts: 368
From: SW PA
Actually, the easiest way out of this is to go to the boneyard and buy an entire inner panel of the door, complete with regulator for, in my case, 45 bucks. Glass and motor not included.
Glass is a matter of taking off one clip and a couple washers. Motor is 3 bolts with 10mm head.
Main problem is that the cable frays or breaks. I had one, an 85, that the potmetal piece broke, didn't know that when I drove 700 miles to fix my kid's car while she was at Purdue, in Indiana.
New regulator, at that time, was about 174, and that DID call for drilling out and re-pop-rivetting it in place.
Replace the entire regulator, and, as I can testify, wind the window down to close the door to check the seal of the weatherstrip. I put mine all together and closed the door, all the bolts matching the wear marks from the old door, and the rear of the frame is an 1/8 inch or so low.
It a PITA to take the inner panel off, again, so I will wait for better weather to fix mine. It does not leak, does not whistle, just looks bad, to me. Inner panels come off in different ways with different models. Get a disc or whatever to learn how yours does.
Cheers,
George

2nd Gear
Joined: Dec 2006
Posts: 666
From:
BUMP!
Excellent guide. Although I did not need to replace my regulator, I just recently replaced the guide/mount/clip for my driver's window. Have a Bentley, so getting the carrier assembly out was relatively easy following those steps and diagrams.
One of my two more difficult challenges was finding/purchasing the yellow piece that attaches to the blue guide/mount/clip. I never could find it, so in the end I re-used them (minor dremel action required) with the new pink guide/mount/clip. The other difficult part (for a first timer) was making sure, once the carrier assembly was placed back in the door, that it sealed the door properly at the pillar.
Whenever I do a repair/maintenance on my car/bike I have greater appreciation for my mechanical skills which helps boost my confidence. For those of you that aren't sure whether or not you can do these types of repairs you are mistaken. Just grab a Bentley manual, a few tools, and time/repetition and you'll do just fine.
Tools required: Ratchet, Torx set, Phillips head screwdriver, Standard screwdriver (to remove the window switch), can of white lithium grease to lube the rail a tad.
Good luck to anyone else who may encounter a window issue!
Last edited by Khardysius; Apr 29, 2010 at 12:42 PM.