
C4 Differential Flange Seal Replacement (FWD, 12V, AFC engine - 1995)

Thread Starter
|
3rd Gear
Joined: Dec 2008
Posts: 1,941
From: IL
Although I did it as part of the engine "rebuild", perhaps as an independent topic may be more beneficial to some others, at least from a forum "search" perspective.
The job isn't that difficult, except for the space you have to work with. If you have a lift (fancy stuff, eh?), then God bless you as you're a lucky "sob".")
BEFORE you start though - so you don't put a lot of time and effort in for nothing - MAKE SURE YOU GOT THE RIGHT PART NUMBER replacement!!!
(I got mine from a ZF Authorized reseller, so could you)
-
I had the car already somewhat "high" from changing the transmission fluid.
Just as the book says, it is very wise (if not crucial) to drop the exhaust or that right side catalytic converter/downpipe. It makes just enough room for the cv axle to be wedged out without any twist of the steering wheel or anymore sweat than it's necessary. Although a helper could be handy in the garage I would assume, so you don't have to crawl back up from under the car (greasy and dirty), get in and turn the wheel, etc...However, the CV Axle didn't seem to be very friendly while the downpipe was still against it, so I would recommend dropping the exhaust - it's your choice.
-

-
Undo the axle bolt while the wheels are still on and resting on the ground, and undo the wheel bolts/lugs as well. The axle bolt is torqued @ 148 ftlb + 90� so you need to muster all the force you got and probably a big pipe to slide over the breaker bar - which I didn't have... I weigh only 176 pounds, and I hardly was able to break the bolt's binding with my foot.
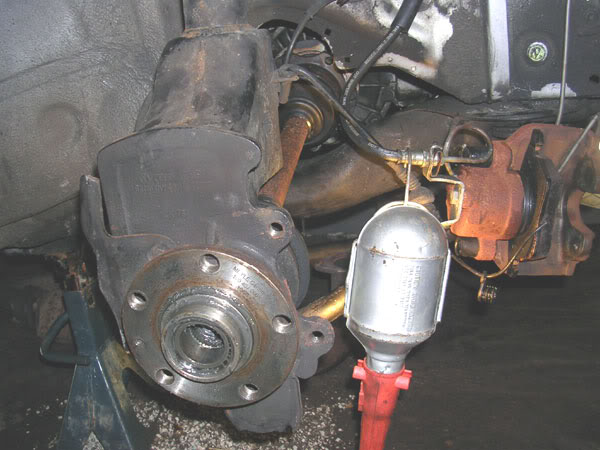
Nevertheless, undo the brake caliper bolts - two, slide the caliper off and hang it safely without disconnecting any lines. Undo the caliper bracket's bolts - two (I believe 16 M), pull off the rotor and you should be left with something looking similar to this:
-
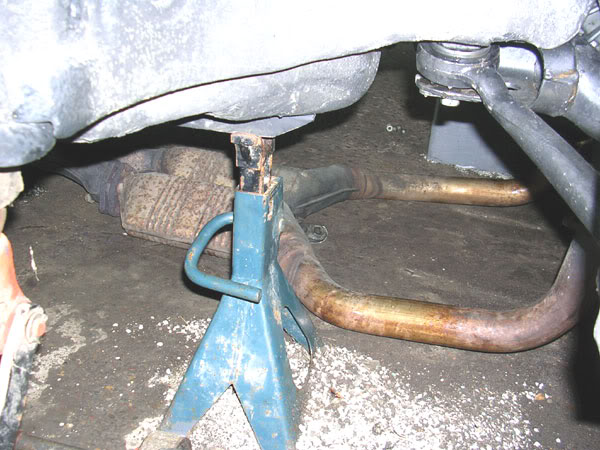
Next - I realized it would be easier just as the manual says, and dropped the exhaust (you can take it off before you start on the cv axle - your choice if you go this route):
-
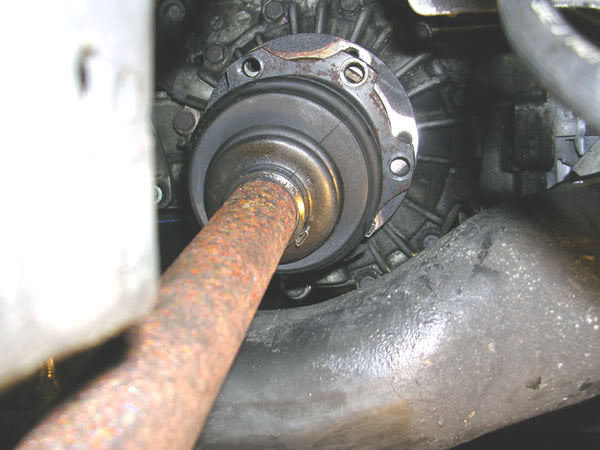
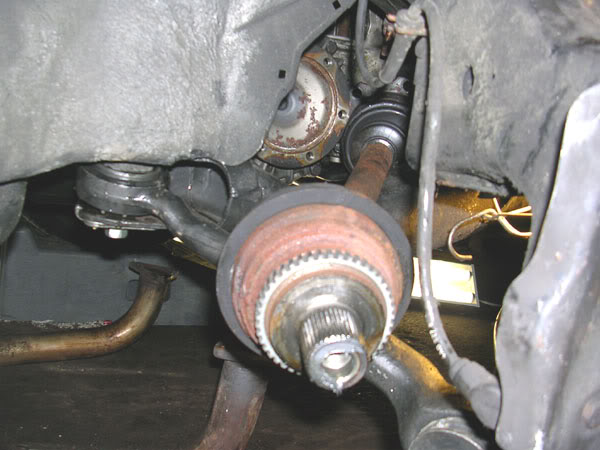
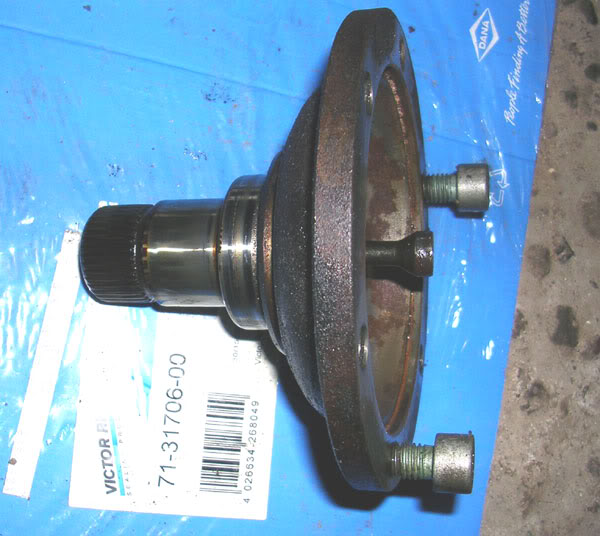
Undid the CV Axle's inner bolts that connect it to the differential's flange:
-
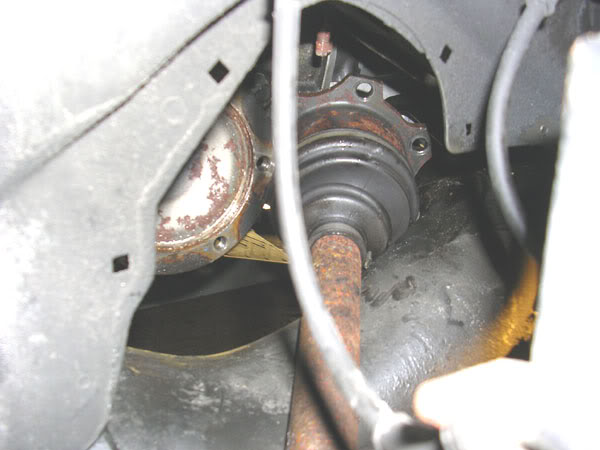
Remove the axle's main bolt now - is (or should be by now) already loosened up. With the exhaust downpipe out of the way, you can wedge the axle to the right (toward the front of the car), under one of the exhaust's studs and around the flange's edge. Then just slide out the outer end toward the differential (of course) and you should be able to free it.
-
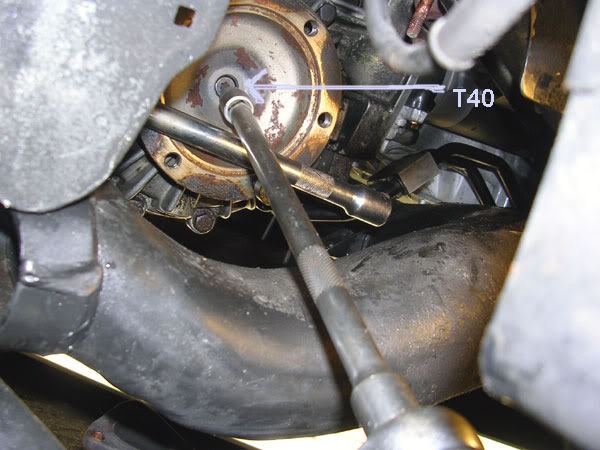
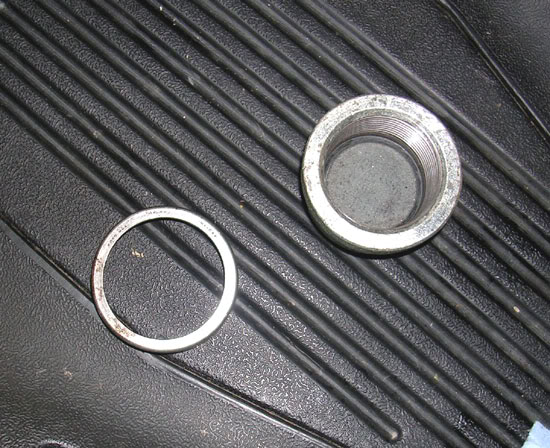
Now you can see the flange exposed - the target is the little bolt right in its center (T40 socket bit needed). To remove it, you need to thread two flange bolts back in and hold counter with a small tire iron, wrench extension, etc.
The bolt is only torqued to 18 ftlb so it shouldn't take you too long to undo it.
-
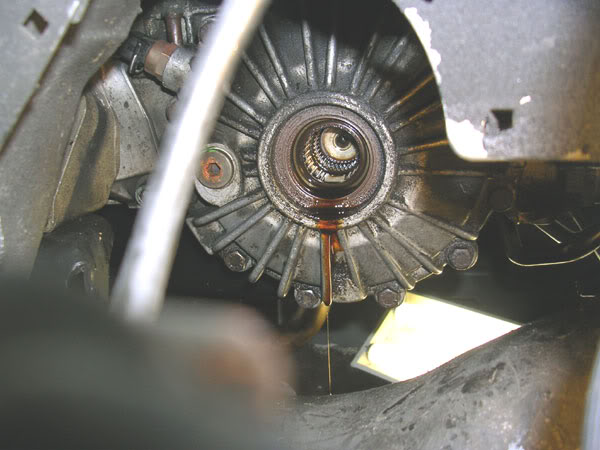
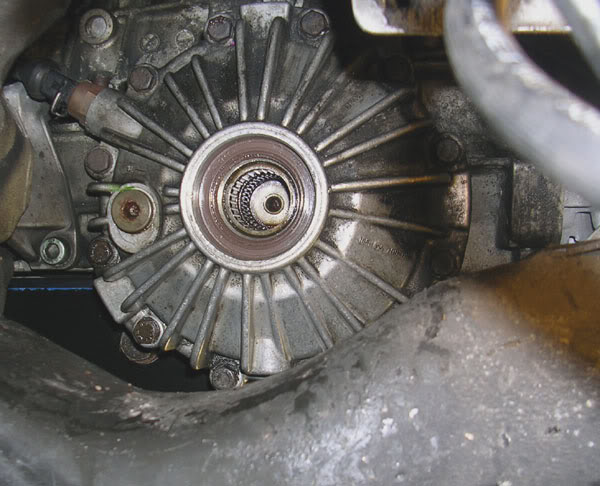
There's the differential opening staring at you. Let all that old gear oil drain (grab a cigarette or a beer meantime) and then grab a small tire iron. You'll take the old seal out. The book says to be careful not to pry on the flanges. They're right as you don't have much room to maneuver that tire iron around as you please.
Take your time and pry a smidgeon at a time; You can even use a sturdy, solid and long flat head screw driver... Just be careful not to pinch the interior flanges of differential's opening. I would have used a normal seal puller but there's no room or angle to operate it in there. (I guess that's what those expensive and fancy VW/Audi tools are exactly meant to do )
)
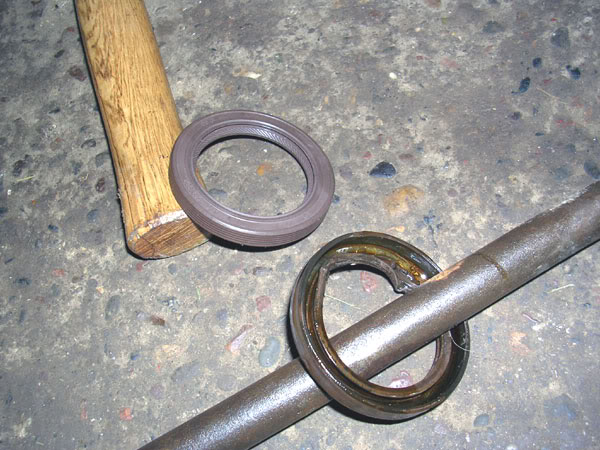
Eventually you'll get the seal out.
-
You have some time on-hand now, as that gear oil still drips... when it quit doing that you can clean those edges nicely; coat the new seal's sealing edge with some Vaseline, and start "driving" it in there.
I used a "pipe end" piece from Ace Hardware until I came against the opening's lip, and then a bearing's outer race to drive it further in...
You may be more inventive that my fried brain could come up with...
-
Eventually you'll get it in there and reflect "Wouldn't have been much easier to buy one of those seal installers that the Bentley manual lists?".
Well, you may think it but you know you wouldn't have done that in the first place because they're expensive and you're... here, looking for a DIY on how to change your flange seal.
(yeah, this is the "funny hour" sort of bs commenting I can afford at the end of the job...Bear with me...)
Doesn't it look nice in there? You'll be pleased with your work...
(Hell, it looks the same to me!)
-
(Re)Installation is in reverse order. Not much to say there, really. If you got to this point in time, then putting it back together is a breeze.
Well, then wrap it up ..."smart guy", we listened enough to your crap!
OK..
-
Good luck for who needs this "DIY" and Happy motoring!.
P.S. - The CV Axle flange bolts' torque spec is 57 ft lb
The job isn't that difficult, except for the space you have to work with. If you have a lift (fancy stuff, eh?), then God bless you as you're a lucky "sob".
BEFORE you start though - so you don't put a lot of time and effort in for nothing - MAKE SURE YOU GOT THE RIGHT PART NUMBER replacement!!!
(I got mine from a ZF Authorized reseller, so could you)
-
I had the car already somewhat "high" from changing the transmission fluid.
Just as the book says, it is very wise (if not crucial) to drop the exhaust or that right side catalytic converter/downpipe. It makes just enough room for the cv axle to be wedged out without any twist of the steering wheel or anymore sweat than it's necessary. Although a helper could be handy in the garage I would assume, so you don't have to crawl back up from under the car (greasy and dirty), get in and turn the wheel, etc...However, the CV Axle didn't seem to be very friendly while the downpipe was still against it, so I would recommend dropping the exhaust - it's your choice.
-
-
Undo the axle bolt while the wheels are still on and resting on the ground, and undo the wheel bolts/lugs as well. The axle bolt is torqued @ 148 ftlb + 90� so you need to muster all the force you got and probably a big pipe to slide over the breaker bar - which I didn't have... I weigh only 176 pounds, and I hardly was able to break the bolt's binding with my foot.
Nevertheless, undo the brake caliper bolts - two, slide the caliper off and hang it safely without disconnecting any lines. Undo the caliper bracket's bolts - two (I believe 16 M), pull off the rotor and you should be left with something looking similar to this:
-
Next - I realized it would be easier just as the manual says, and dropped the exhaust (you can take it off before you start on the cv axle - your choice if you go this route):
-
Undid the CV Axle's inner bolts that connect it to the differential's flange:
-
Remove the axle's main bolt now - is (or should be by now) already loosened up. With the exhaust downpipe out of the way, you can wedge the axle to the right (toward the front of the car), under one of the exhaust's studs and around the flange's edge. Then just slide out the outer end toward the differential (of course) and you should be able to free it.
-
Now you can see the flange exposed - the target is the little bolt right in its center (T40 socket bit needed). To remove it, you need to thread two flange bolts back in and hold counter with a small tire iron, wrench extension, etc.
The bolt is only torqued to 18 ftlb so it shouldn't take you too long to undo it.
-
There's the differential opening staring at you. Let all that old gear oil drain (grab a cigarette or a beer meantime) and then grab a small tire iron. You'll take the old seal out. The book says to be careful not to pry on the flanges. They're right as you don't have much room to maneuver that tire iron around as you please.
Take your time and pry a smidgeon at a time; You can even use a sturdy, solid and long flat head screw driver... Just be careful not to pinch the interior flanges of differential's opening. I would have used a normal seal puller but there's no room or angle to operate it in there. (I guess that's what those expensive and fancy VW/Audi tools are exactly meant to do
)Eventually you'll get the seal out.
-
You have some time on-hand now, as that gear oil still drips... when it quit doing that you can clean those edges nicely; coat the new seal's sealing edge with some Vaseline, and start "driving" it in there.
I used a "pipe end" piece from Ace Hardware
until I came against the opening's lip, and then a bearing's outer race to drive it further in... You may be more inventive that my fried brain could come up with...
-
Eventually you'll get it in there and reflect "Wouldn't have been much easier to buy one of those seal installers that the Bentley manual lists?".
Well, you may think it but you know you wouldn't have done that in the first place because they're expensive and you're... here, looking for a DIY on how to change your flange seal.
(yeah, this is the "funny hour" sort of bs commenting I can afford at the end of the job...Bear with me...)
Doesn't it look nice in there? You'll be pleased with your work...
(Hell, it looks the same to me!)
-
(Re)Installation is in reverse order. Not much to say there, really. If you got to this point in time, then putting it back together is a breeze.
Well, then wrap it up ..."smart guy", we listened enough to your crap!
OK..
-
Good luck for who needs this "DIY" and Happy motoring!.
P.S. - The CV Axle flange bolts' torque spec is 57 ft lb
Last edited by chefro; Jun 20, 2011 at 01:15 PM.
Thread Starter
|
3rd Gear
Joined: Dec 2008
Posts: 1,941
From: IL
LOL...forgot all about it...REPLENISHING THE GEAR OIL!
-
While the flange is still out, undo the fill plug - you can see it in the picture (8M Allen socket bit or regular L-shaped wrench).
You can use a hand pump or put together some gravity-feed implement. I could have used the same hand pump for the ATF fluid, but I was too lazy to clean it and didn't want to mix the different fluids.
I came up with a long neck funnel, plugged in at the end a heater hose, then another smaller diameter hose in that one, which I was able to stick in the fill plug's opening.
I placed the funnel up high and secured it with a wire by a strut tower bolt, got the hose end inside the fill hole opening and started slowly pouring the 75W-90 Mobil1 synthetic gear oil. Eventually it chases out as much old gear oil as possible - you'll notice the difference in color. When it starts running clean, reinstall the fill plug and let it drain through the differential's opening until stops running off the seal's edge - it's pretty much at the same level with the fill opening's bottom edge. That's where the proper fill level should be, according to the manual.
Wipe again the differential opening clean and the seal's inner rubber lip and reinstall the flange.
That's all there is to it.

Thread
Thread Starter
Forum
Replies
Last Post
BaseDrifter
DIY - Do It Yourself
1
Feb 28, 2015 11:52 PM
wgrand802
Archive - Vehicles for Sale
0
Jan 22, 2011 10:35 PM
xqwizit
B5 Models
11
Dec 9, 2009 09:26 AM