
turboxs hp-bc install and tune

Thread Starter
|
1st Gear
Joined: Aug 2008
Posts: 33
Anyone have any tips or how tos for this? I dont want to blow anything up installing it. Also any tips to set it to what everyone else is chipped, around 21-23 psi? Thanks very much.
I'm make believe
Joined: Dec 2006
Posts: 17,587
From: In my head
All you have to do is set it up before install like the directions say to and then just bypass the n75. This will give the mbc full control and you can then set the psi level from there. Just do a few pulls to see where you are at psi wise, pull over, adjust the mbc and do a few more pulls. Keep doing this until you have it setup the way you want it. The ball and spring will make the turbo spool up faster and hold boost longer and the bleed will smooth out the boost onset and spiking. Personally i have the b&s do most of the increase over the wastegate and the bleed increase the last 3-4psi so it doesnt spike and is smooth even with a ko3 and 2.0.
As for psi level, 23-24psi is fine on the 225.
As for psi level, 23-24psi is fine on the 225.
1st Gear
Joined: Mar 2008
Posts: 403
From: Virginia Beach, VA
I had a bad experience with this, mainly because i am impatient. I attached it all properly, but couldn't get the boost over 15psi without it failing. It took a long *** time also to get to this point, going up and down to find the right spot, make sure you have a lot of time available and a nice stretch of road!
i eventually took it off and went back to the n75, i might put it on at a later date... we will see.
Good luck!
i eventually took it off and went back to the n75, i might put it on at a later date... we will see.
Good luck!

I'm make believe
Joined: Dec 2006
Posts: 17,587
From: In my head
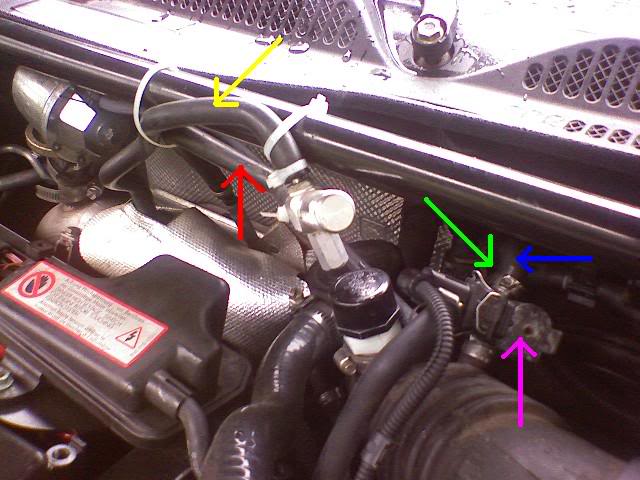
same basic layout. That pic clearly shows the line from the charge piping to the mbc and which side it goes to. I have the older blue version with both sides needing the hex wrench, takes me 5mins to get to the right psi.
To set it up, if you loosen the brass side all the way, you can hear the rattle of the ball. You just slowly turn it till it stops. Should be a good 2-3 full turns. The old style was then also 2 full rotations of the bleed from closed. This basically set me to about 9-10psi and then i went from there
To set it up, if you loosen the brass side all the way, you can hear the rattle of the ball. You just slowly turn it till it stops. Should be a good 2-3 full turns. The old style was then also 2 full rotations of the bleed from closed. This basically set me to about 9-10psi and then i went from there
I'm make believe
Joined: Dec 2006
Posts: 17,587
From: In my head
Thats about how i have it setup, 3-4psi with the bleed (fine) and the reast with the b&s (course).
The line from the charge pipe will go to the nipple opposite of the brass fitting, the line going done behind the engine to the wastegate will go from the nipple opposite of the top bleed adjustment. You can see the way it is in the pic above.
The line from the charge pipe will go to the nipple opposite of the brass fitting, the line going done behind the engine to the wastegate will go from the nipple opposite of the top bleed adjustment. You can see the way it is in the pic above.