
Photo of interior roof without headliner?

Thread Starter
|
1st Gear
Joined: Nov 2010
Posts: 390
So a branch fell on the roof and dinged up my otherwise super nice looking A4 2.8. I think I can use a hammer-on-dolly technique to flatten out the four big dings, but only if there is direct access to the sheet metal from the interior (i.e. it's not obstructed by the roof frame, airbags, etc.).
By any chance does anyone have a photo of the B5 interior roof metal, with the headliner removed? I'd like to have an idea of whether or not I can actually access the dings before I spend an afternoon pulling down the headliner.
Thanks
1998 Audi A4 2.8 30v
By any chance does anyone have a photo of the B5 interior roof metal, with the headliner removed? I'd like to have an idea of whether or not I can actually access the dings before I spend an afternoon pulling down the headliner.
Thanks
1998 Audi A4 2.8 30v
Actual WIZARD
Joined: Jan 2010
Posts: 1,047
From: Dallas, Texas
My friend sat on his tacoma roof and put a big dent in it, but after a sharp uppercut to the roof (without removing anything) popped the dent out.
I dont think theres a way to non destructively remove it though
I dont think theres a way to non destructively remove it though
1st Gear
Joined: Sep 2010
Posts: 217
From: DALLAS, TEXAS
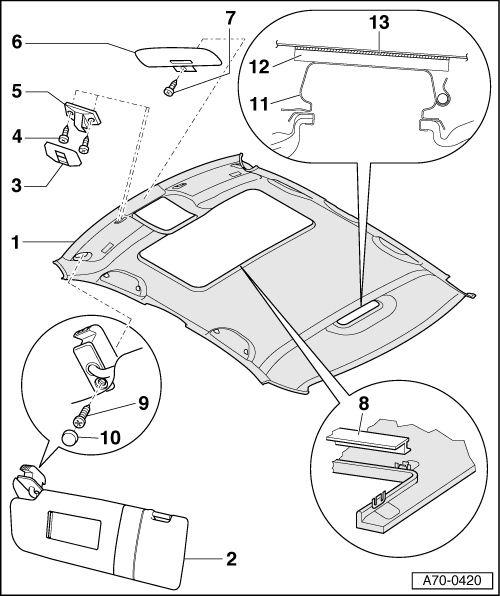
NoteRemoval and installation of molded headliner and sun visors is the same for vehicles with and without head-level airbags.
1 - Molded headliner
Removing:
– Remove upper A-pillar trim.
– Remove wiring harness to molded headliner on left side from A-pillar up to instrument panel.
– Remove upper B-pillar trim.
– Remove upper D-pillar trim.
– For automatic day/night rear-view mirror function, disconnect harness connector.
– Remove sun visors -item 2-.
– Remove brackets -item 5- for sun visors.
– Remove center sun visor -item 6-.
– For vehicles with sunroof, remove cover frame -item 8-.
– Remove cover for molded headliner cutout and map/reading lamp → Anchor.
– Remove roof grab handles → Anchor
– Remove all door seals in area of molded headliner.
– Remove rear courtesy lamp.
– Disconnect Velcro fastener -item 12-.
– Move shift lever or selector lever toward rear as far as possible.
– Move passenger side backrest as far back as possible.
– Move driver's side backrest as far back as possible.
.
– Disengage molded headliner at rear.
– To remove cable at molded headliner, exit vehicle and carefully lower molded headliner onto seats.
– Remove wiring harness from molded headliner.
– Remove molded headliner through passenger side door.
Installing:
– Carefully push molded headliner through passenger-side door.
– Attach wiring harness at molded headliner.
Note
If installation sequence is not followed, the roof trim cannot be centered.
.
– Engage molded headliner at rear.
– Secure molded headliner at Velcro� fastener -item 12-.
– Install center sun visor -item 6-.
– Clip in sunroof cover frame -item 8-.
– Remainder of installation is reverse order of removal.
2 - Sun visor
– Unclip sun visor -item 2- from bracket -item 5- remove cap -item 10- and screw -item 9-.
3 - Cap
4 - Screws
q 2.5 Nm
q 2x
5 - Sun visor Bracket
– Pry off cap -item 3-.
– Remove screws -item 4- (2x).
6 - Center Sun Visor
– Remove screw -item 7- and sun visor -item 6-.
7 - Screw
q 2.5 Nm
8 - Sunroof Cover Frame
9 - Screw
10 - Cap
11 - Clip for Interior Light
12 - Velcro Fastener at Clip
13 - Velcro Fastener at Headliner
q If Velcro pulls off roof during removal, press headliner against strip and press firmly during installation
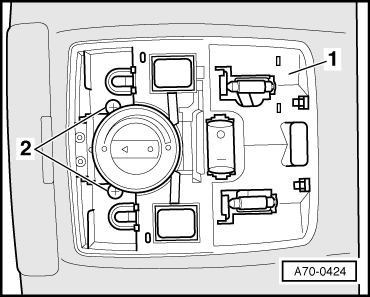
Removing and installing cover for molded headliner cutout
– Unclip covers beginning at rear.
– Remove screws -2- (2x).
– Remove carrier piece -1- at rear.
– Disconnect harness connector.
Removing roof grab handle
For vehicles without head-level airbags, an adapter must be installed. Refer to → Chapter „Roof Grab Handle Adapter“
– Open cover -4-.
– Remove bolts -5- (2x).
Tightening torque: 4 Nm
– Remove roof grab handle -1- together with pins -3- from mount -6-.
2 - Clothing hook
Clothing hooks for rear roof grab handles
Clothing hooks face forward
1 - Molded headliner
Removing:
– Remove upper A-pillar trim.
– Remove wiring harness to molded headliner on left side from A-pillar up to instrument panel.
– Remove upper B-pillar trim.
– Remove upper D-pillar trim.
– For automatic day/night rear-view mirror function, disconnect harness connector.
– Remove sun visors -item 2-.
– Remove brackets -item 5- for sun visors.
– Remove center sun visor -item 6-.
– For vehicles with sunroof, remove cover frame -item 8-.
– Remove cover for molded headliner cutout and map/reading lamp → Anchor.
– Remove roof grab handles → Anchor
– Remove all door seals in area of molded headliner.
– Remove rear courtesy lamp.
– Disconnect Velcro fastener -item 12-.
– Move shift lever or selector lever toward rear as far as possible.
– Move passenger side backrest as far back as possible.
– Move driver's side backrest as far back as possible.
.
– Disengage molded headliner at rear.
– To remove cable at molded headliner, exit vehicle and carefully lower molded headliner onto seats.
– Remove wiring harness from molded headliner.
– Remove molded headliner through passenger side door.
Installing:
– Carefully push molded headliner through passenger-side door.
– Attach wiring harness at molded headliner.
Note
If installation sequence is not followed, the roof trim cannot be centered.
.
– Engage molded headliner at rear.
– Secure molded headliner at Velcro� fastener -item 12-.
– Install center sun visor -item 6-.
– Clip in sunroof cover frame -item 8-.
– Remainder of installation is reverse order of removal.
2 - Sun visor
– Unclip sun visor -item 2- from bracket -item 5- remove cap -item 10- and screw -item 9-.
3 - Cap
4 - Screws
q 2.5 Nm
q 2x
5 - Sun visor Bracket
– Pry off cap -item 3-.
– Remove screws -item 4- (2x).
6 - Center Sun Visor
– Remove screw -item 7- and sun visor -item 6-.
7 - Screw
q 2.5 Nm
8 - Sunroof Cover Frame
9 - Screw
10 - Cap
11 - Clip for Interior Light
12 - Velcro Fastener at Clip
13 - Velcro Fastener at Headliner
q If Velcro pulls off roof during removal, press headliner against strip and press firmly during installation
Removing and installing cover for molded headliner cutout
– Unclip covers beginning at rear.
– Remove screws -2- (2x).
– Remove carrier piece -1- at rear.
– Disconnect harness connector.
Removing roof grab handle
For vehicles without head-level airbags, an adapter must be installed. Refer to → Chapter „Roof Grab Handle Adapter“
– Open cover -4-.
– Remove bolts -5- (2x).
Tightening torque: 4 Nm
– Remove roof grab handle -1- together with pins -3- from mount -6-.
2 - Clothing hook
Clothing hooks for rear roof grab handles
Clothing hooks face forward

1st Gear
Joined: Sep 2010
Posts: 217
From: DALLAS, TEXAS
no problem that should help you get threw it.
and i dont know if i said this in the other post, but i suggest you put a towel of your favorite football team or your childhood blanky over your dash to keep it from scratching it with the headliner as your taking it down.... unless you like scratches. =]
and i dont know if i said this in the other post, but i suggest you put a towel of your favorite football team or your childhood blanky over your dash to keep it from scratching it with the headliner as your taking it down.... unless you like scratches. =]

Thread
Thread Starter
Forum
Replies
Last Post