
Thermostat DIY please


1st Gear
Joined: Mar 2010
Posts: 40
From: Deerfield, NH
And just to add...
I too used a 17mm wrench/spanner (not 19mm) for relieving the serpentine tension. I've also heard talk of requiring a triple square drive for some of the bolts but didn't require one for this task.
I also disconnected the battery but didn't disconnect the +ve cable, I just laid it down on the suspension mount with a plastic bag over it to prevent it getting drowned in coolant. My intention was to pop the lowest hose first and get most of the coolant out that way but as I already said, with all the struggling, that theory went out the window.
Last edited by betyouaint; Mar 11, 2013 at 12:54 PM.

1st Gear
Joined: Apr 2010
Posts: 4
Thanks much for this DIY, I just wanted to add a note on how I successfully used the drain **** vs. removing the entire drivers side lower radiator hose.
Just keep turning the drain **** counter clockwise and it will slowly push itself out of its housing. My started to drip out of the small drain hole around 270 degrees of CCW rotation. Don't worry it won't fall out.
There's a pic below of the drain **** in the open position and you can see where the coolant will come out. If I had a piece of tubing, I would have connected it to the drain nipple beforehand.
When you're done, push in on the drain **** while rotating clockwise and it will pull itself back in to the closed position.

Just a few more pictures:
Here's how I let the serpentine belt lay:

My car has a French alternator:

Alternator Out (battery disconnected):
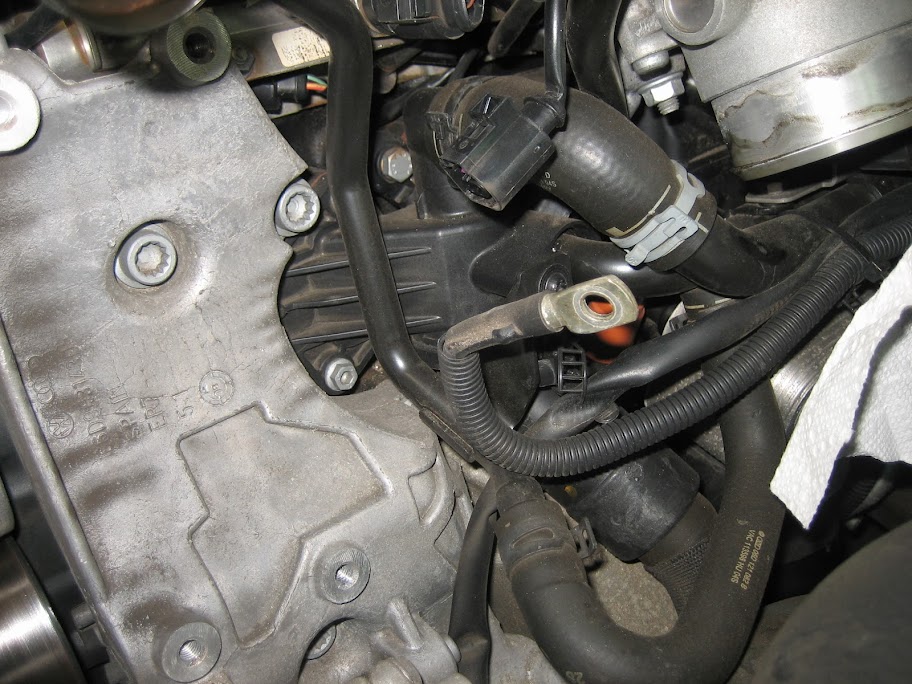
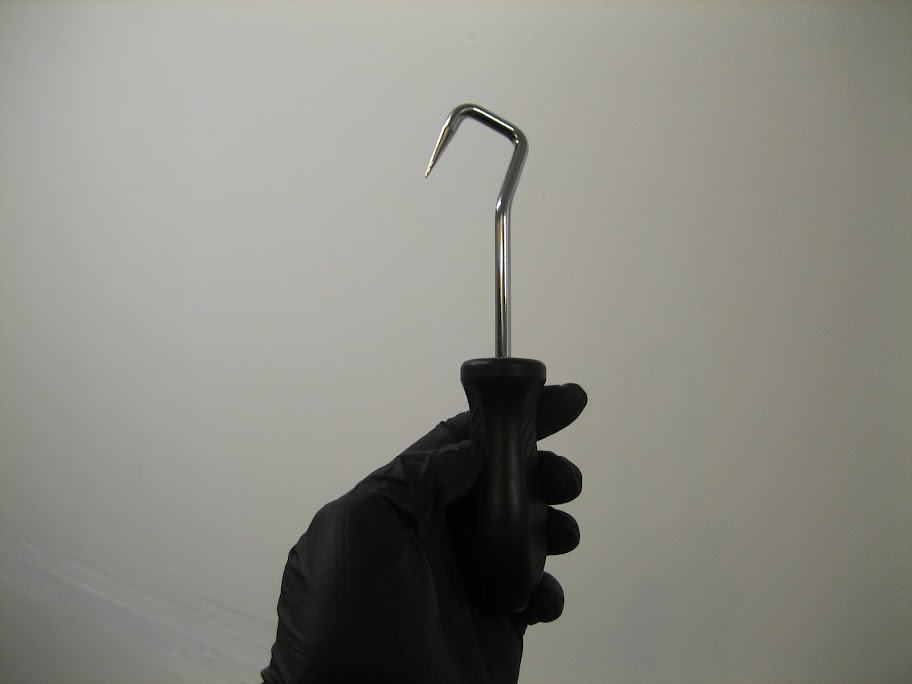
A useful and dangerous tool. It was the 1st time I'd used it and I slipped and put a hold in a hose...
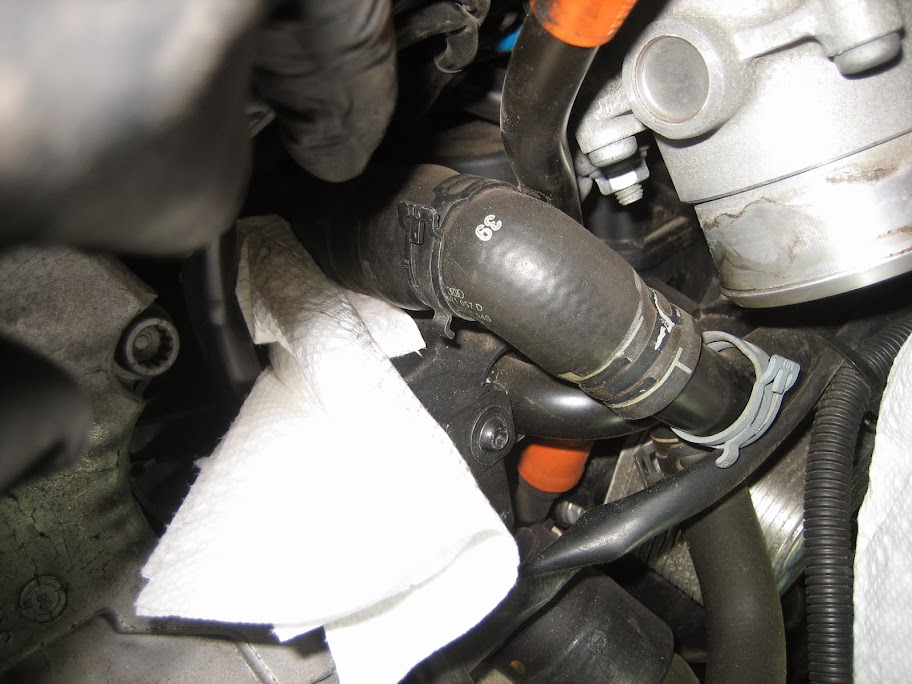
This is the evil, hard to remove hose I tore a hole through with the above. In fact, I should have just bought a new one (for $8) and made it easy on myself by cutting it out:
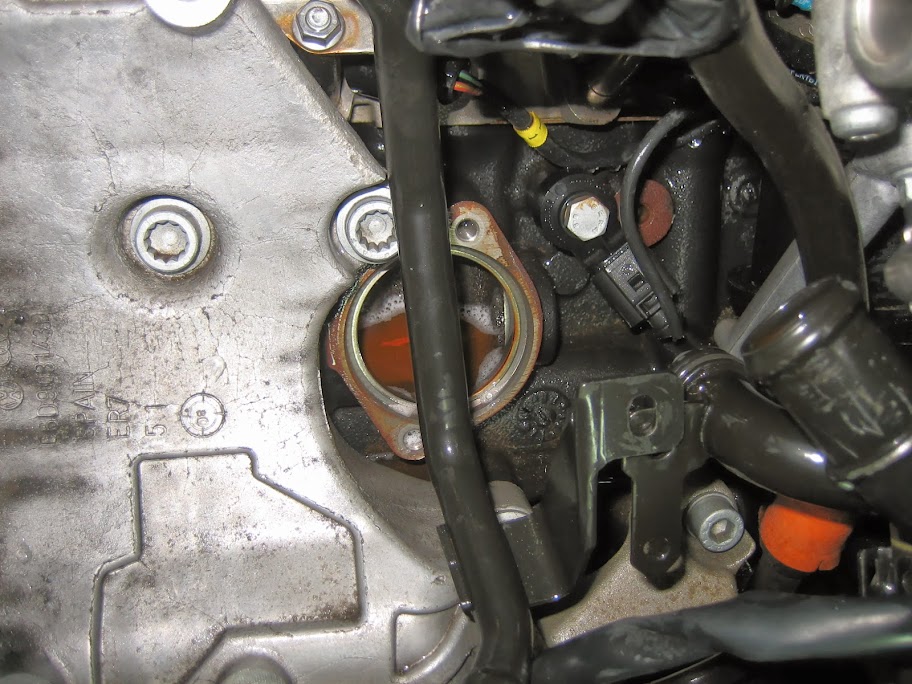
Prepare for coolant, a good half gallon came out, pretty much rendering useless efforts to drain it through the radiator:
Replace this seal (N90365302C):

Make sure the pipe with the seal goes into the thermostat housing 1st, then the support bracket for the other pipe (otherwise it won't seat into the thermostat properly):

Coming back together, note the scratches on the hard coolant pipe, these came from the hose removal tool. I ended up sanding the surface a bit to make sure it wouldn't leak.
Just keep turning the drain **** counter clockwise and it will slowly push itself out of its housing. My started to drip out of the small drain hole around 270 degrees of CCW rotation. Don't worry it won't fall out.
There's a pic below of the drain **** in the open position and you can see where the coolant will come out. If I had a piece of tubing, I would have connected it to the drain nipple beforehand.
When you're done, push in on the drain **** while rotating clockwise and it will pull itself back in to the closed position.
Just a few more pictures:
Here's how I let the serpentine belt lay:
My car has a French alternator:
Alternator Out (battery disconnected):
A useful and dangerous tool. It was the 1st time I'd used it and I slipped and put a hold in a hose...
This is the evil, hard to remove hose I tore a hole through with the above. In fact, I should have just bought a new one (for $8) and made it easy on myself by cutting it out:
Prepare for coolant, a good half gallon came out, pretty much rendering useless efforts to drain it through the radiator:
Replace this seal (N90365302C):
Make sure the pipe with the seal goes into the thermostat housing 1st, then the support bracket for the other pipe (otherwise it won't seat into the thermostat properly):
Coming back together, note the scratches on the hard coolant pipe, these came from the hose removal tool. I ended up sanding the surface a bit to make sure it wouldn't leak.
Last edited by Type_Audi; Oct 30, 2013 at 08:18 PM.

1st Gear
Joined: May 2014
Posts: 2
From: Pittsburgh, PA
Great Write-ups and tips! I am looking to tackle this job on mine in a week or so. It seems that both of you were able to get to the thermostat without having to remove the bracket which holds the alternator and AC pump, is that correct? Also, I'm assuming this cleared solved the issue of the P2181 code you were getting and it wasn't a coolant temp sensor? Thanks!
1st Gear
Joined: Apr 2010
Posts: 4
Great Write-ups and tips! I am looking to tackle this job on mine in a week or so. It seems that both of you were able to get to the thermostat without having to remove the bracket which holds the alternator and AC pump, is that correct? Also, I'm assuming this cleared solved the issue of the P2181 code you were getting and it wasn't a coolant temp sensor? Thanks!
In my case, there was no P2181 code so I think my thermostat was just stuck open vs. permanently open. It was getting to the point though when going down a hill in the winter the gauge would drop slightly but that was it.
1st Gear
Joined: May 2014
Posts: 2
From: Pittsburgh, PA
That's correct, no need to remove the bracket. I didn't touch the AC pump and only removed the alternator.
In my case, there was no P2181 code so I think my thermostat was just stuck open vs. permanently open. It was getting to the point though when going down a hill in the winter the gauge would drop slightly but that was it.
In my case, there was no P2181 code so I think my thermostat was just stuck open vs. permanently open. It was getting to the point though when going down a hill in the winter the gauge would drop slightly but that was it.
Please help. I searched everywhere for a diy for a thermostat change (2.0 fsi quattro).
Temp is not reaching midpoint in the guage and cel is throwing p2181 code.
I did find some info and pics which slightly covers diy of the thermostat but it is actually for a timing belt change and the car in that diy post was in service mode with the a4's whole face taken apart.
For those who have made the thermostat change on the a4 b7 2.0, can you do this by simply removing the serp belt, alternator, a few hoses and bolts without actually putting the car in service mode?
Thanks!

1st Gear
Joined: Jun 2014
Posts: 1
thanks for the write-up. My car threw P2181. I first replaced the temperature sensor, but that wasn't the cure, so I just did thermostat. It's one of those jobs that literally takes 2 hours to get everything apart and replaced, then just 10 minutes to put back together. I swapped the cam follower in the same day, since I had the tools out.

1st Gear
Joined: Dec 2014
Posts: 2
I'm going to be tackling this on Sunday. I will try and record everything and post the link later on to this thread. Thanks for all of the useful information you guys have posted! I changed out my temperature sensor last week and that did not fix my low temperature. I also ran the codes and was hoping that it would be the simple fix. Looks like it's time to change the thermostat now :-)

1st Gear
Joined: Jul 2014
Posts: 35
Just wanted to share a few notes after changing out the thermostat on my B7 and referring this thread.
The only bolts that you have remove to get the plumbing off the thermostat itself is this one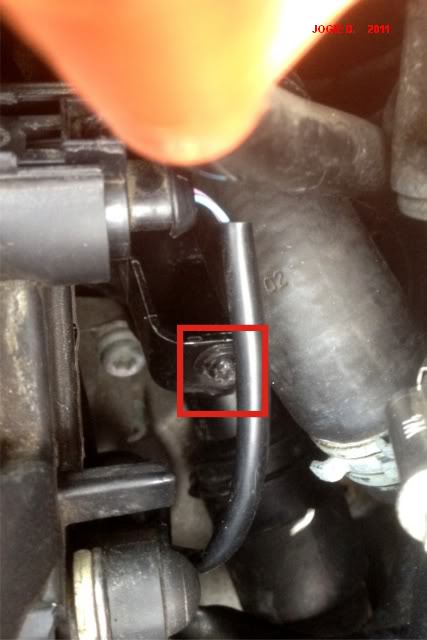
and these two(In retrospect I should've removed the small torx on the upper left side of the manifold).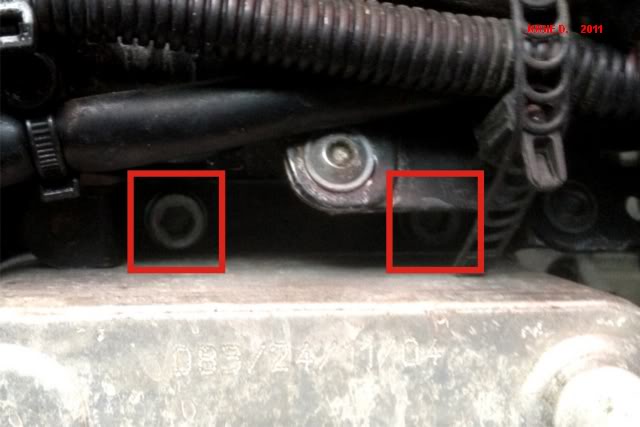
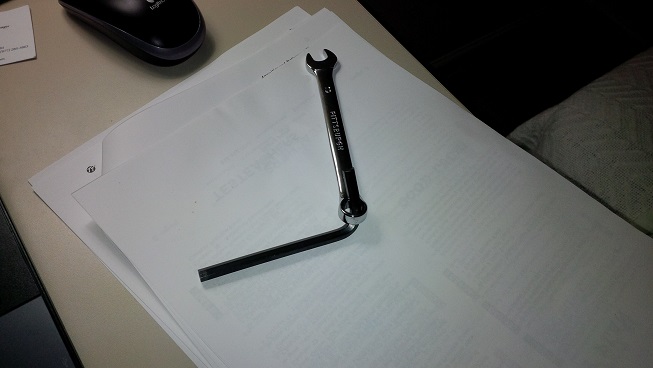
Note: The above bolts are 6mm hex bolts. The one on the right is not easily accessible unless your hex socket has an extended bit. I used an 6mm allen wrench and inserted it into the eye of a small closed ended wrench to turn it like so. Make sure you do not strip these or the hex bolts on the alternator and thermostat as well!!!!
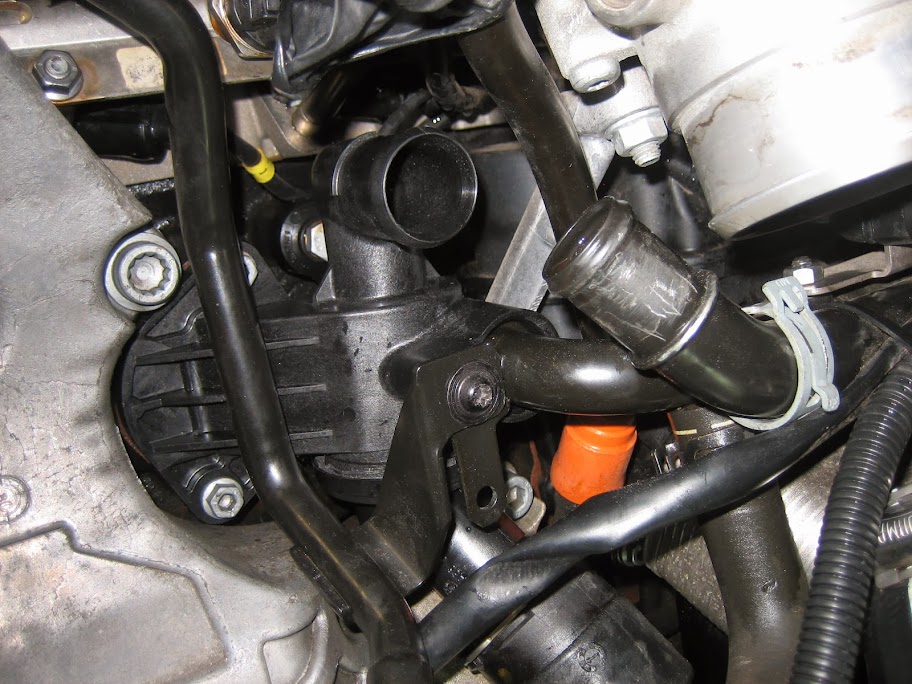
The bottom hose is the lower radiator connection and is a BITCH to get off . I tried man handling it for an hour off and on. Mine was so stuck that I had to use WD40 and it came off after a couple minutes of penetrating. I recommend you have some handy. Anyone and everyone that has done this job will tell you that this hose is the worst.
Finally that hose pic in the picture below is also a God send. Notice it's not a plain box angle radiator hose pic. It has another angle that let's it wrap around the thermostat end. Careful not to puncture the hose. This is on clearance at harbor freight for 2dollars. If you're reading this and haven't done your thermostat - buy this tool immediately, It made what should've been a real challenge pretty easy.
4407ad2f-d231-42c3-aa56-98666ad874e8_zps59d0609b.jpg?t=1420194980
Also: I wasn't able to get the throttle body hose removed cause it was fused to intercooler side and didn't want to break anything(I'm good @that). I just disconnected the throttle side and just folded it over and moved it around a bunch instead of struggling taking it off.
I didn't need to do these although I probably should've done this one torx on the manifold I mentioned earlier.


I didn't remove the hard line side of the hose(not shown), only on the thermostat end. Think the poster did cause he accidentally punctured the hose.
Have some short zipties ready because the ties that are around the metal hardlines are brittle from heat and will most likely break. Follow the proper coolant fill and bleed procedures as well. Hope this helps you guys save some time and trouble.
The only bolts that you have remove to get the plumbing off the thermostat itself is this one
and these two(In retrospect I should've removed the small torx on the upper left side of the manifold).
Note: The above bolts are 6mm hex bolts. The one on the right is not easily accessible unless your hex socket has an extended bit. I used an 6mm allen wrench and inserted it into the eye of a small closed ended wrench to turn it like so. Make sure you do not strip these or the hex bolts on the alternator and thermostat as well!!!!
The bottom hose is the lower radiator connection and is a BITCH to get off
. I tried man handling it for an hour off and on. Mine was so stuck that I had to use WD40 and it came off after a couple minutes of penetrating. I recommend you have some handy. Anyone and everyone that has done this job will tell you that this hose is the worst.Finally that hose pic in the picture below is also a God send. Notice it's not a plain box angle radiator hose pic. It has another angle that let's it wrap around the thermostat end. Careful not to puncture the hose. This is on clearance at harbor freight for 2dollars. If you're reading this and haven't done your thermostat - buy this tool immediately, It made what should've been a real challenge pretty easy.
4407ad2f-d231-42c3-aa56-98666ad874e8_zps59d0609b.jpg?t=1420194980
Also: I wasn't able to get the throttle body hose removed cause it was fused to intercooler side and didn't want to break anything(I'm good @that). I just disconnected the throttle side and just folded it over and moved it around a bunch instead of struggling taking it off.
I didn't need to do these although I probably should've done this one torx on the manifold I mentioned earlier.
I didn't remove the hard line side of the hose(not shown), only on the thermostat end. Think the poster did cause he accidentally punctured the hose.
Have some short zipties ready because the ties that are around the metal hardlines are brittle from heat and will most likely break. Follow the proper coolant fill and bleed procedures as well. Hope this helps you guys save some time and trouble.
Last edited by Closer; Jan 4, 2015 at 11:52 PM.

1st Gear
Joined: Sep 2007
Posts: 67
From: South florida
sorry to revive this, but on my B7 (11/05 mfg) I cant seem to relieve the tension on the alternator belt.
Never mind, I found another thread about the tensioner tab. That did the trick, though i could not find the pin to hold it in place. Moving on.
Never mind, I found another thread about the tensioner tab. That did the trick, though i could not find the pin to hold it in place. Moving on.
Last edited by SFL_A4; Mar 29, 2015 at 02:09 PM.