
Thermostat DIY please

Thread Starter
|
1st Gear
Joined: Jun 2011
Posts: 19
Please help. I searched everywhere for a diy for a thermostat change (2.0 fsi quattro).
Temp is not reaching midpoint in the guage and cel is throwing p2181 code.
I did find some info and pics which slightly covers diy of the thermostat but it is actually for a timing belt change and the car in that diy post was in service mode with the a4's whole face taken apart.
For those who have made the thermostat change on the a4 b7 2.0, can you do this by simply removing the serp belt, alternator, a few hoses and bolts without actually putting the car in service mode?
Thanks!

1st Gear
Joined: Jan 2008
Posts: 70
I am curious, did you find out anything regarding this? any tips to share? I just looked up the part today and need to look up and see if I have instructions in my Bentley manual but was curious if you had any info you cared to share...thanx
Thread Starter
|
1st Gear
Joined: Jun 2011
Posts: 19
Update: i got the part from ecs tuning and managed to do the swap myself. I just needed to take out the alternator, some screws and bolts, some clamps and hoses and a lot of pulling and cursing.
You will also need around a galon + of mixed g12.
You will also need around a galon + of mixed g12.
Last edited by jokie; Dec 15, 2011 at 03:09 PM.
Thread Starter
|
1st Gear
Joined: Jun 2011
Posts: 19
This is what I did: (caveat: I'm not an expert and this is my first time doing this without following any DIY)
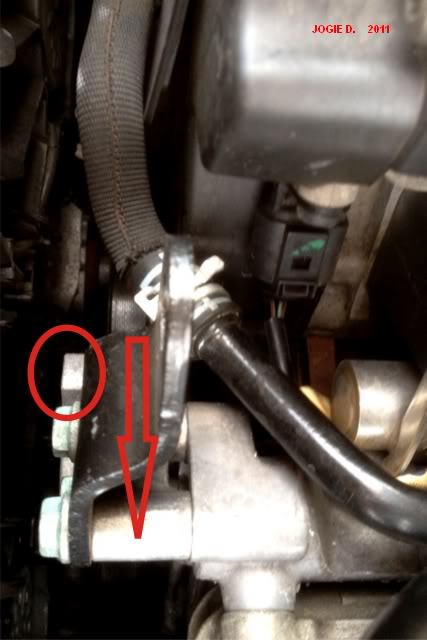
I started working when the engine was really cold. I Removed the engine cover. Released tension from the serpentine belt using an open 17mm wrench pulling in the direction of the arrow in the photo below. This allowed me to slip off the serp belt from the the alternator pulley. I found no need to remove the serp belt all the way. I just made sure it cleared the alternator.
Next, I removed the upper radiator hose connected to the top of the engine. I removed the end nearest to the engine only.
coolant came out of every hose I pulled out.
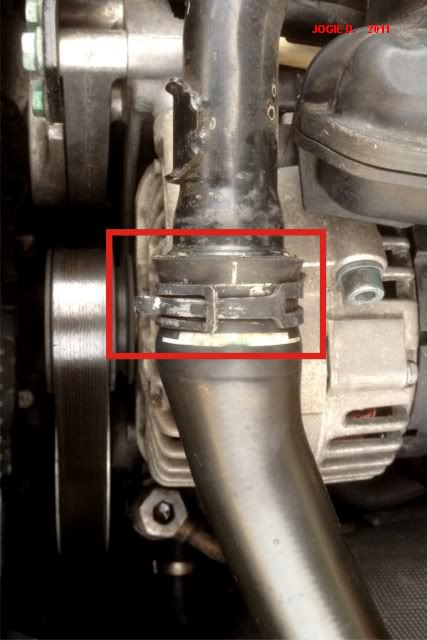
I removed this torx screw to make this metal hose/pipe moveable later (sorry I have no idea what it's called):
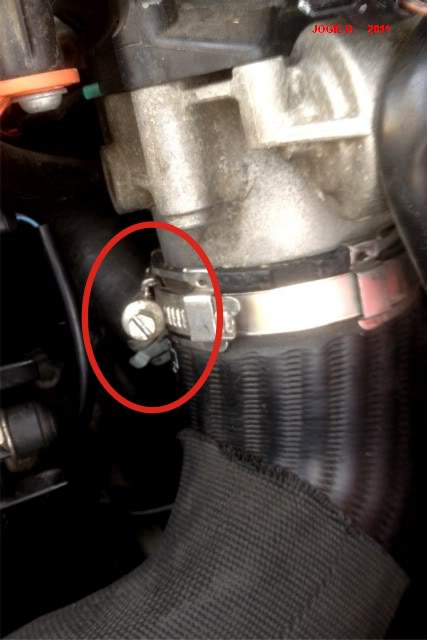
I also removed this big hose by turning on this screw head anti clockwise:
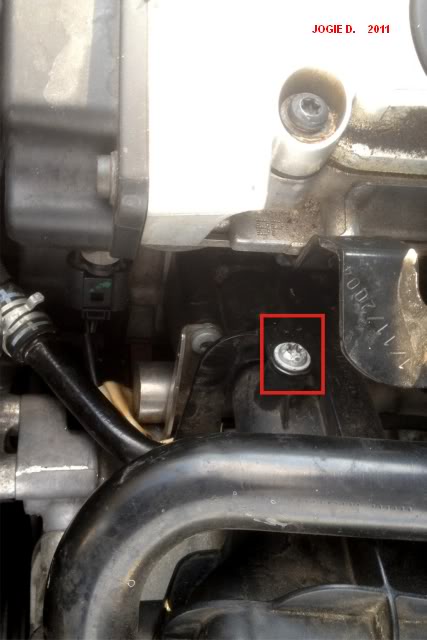
Next, I removed the alternator by removing this 4 hex bolts:
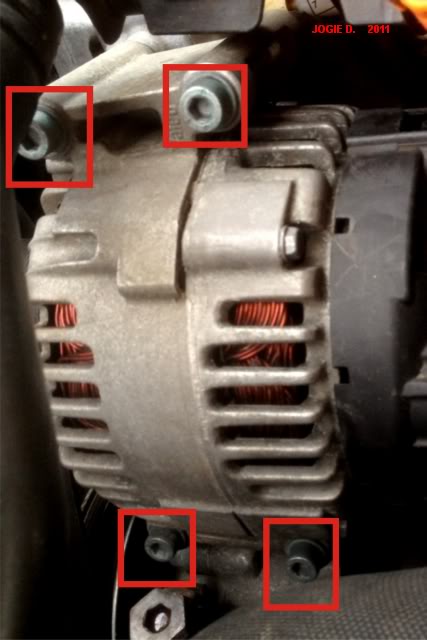
and then the 2 connectors at the back of the alternator (note no. 2 needed a socket wrench. This one is live with positive 12v current so I immediately covered the wire with electric tape after I took it off the alternator.)
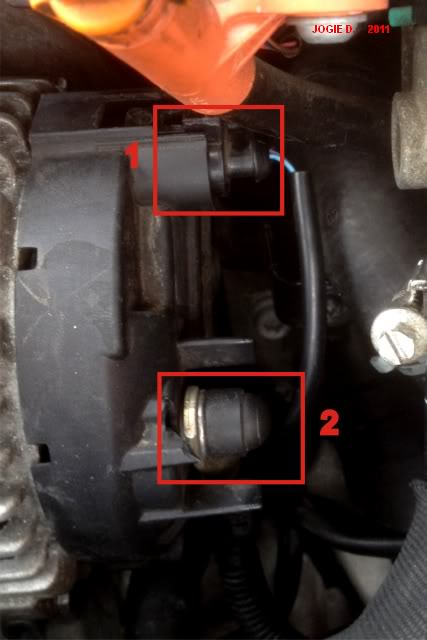
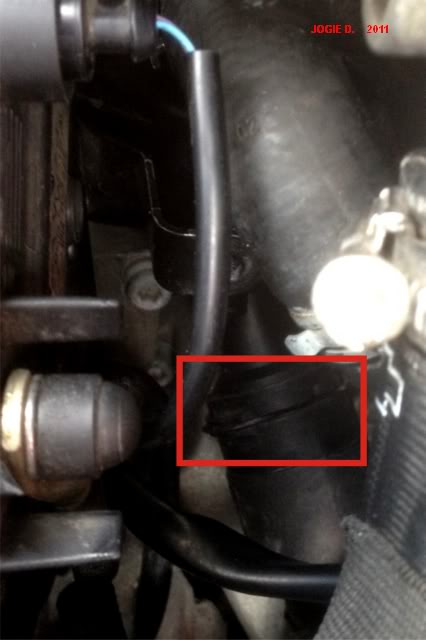
Now that I finally have a clear view and access to the thermostat, I just needed to pull out the hoses attached to it.
I started with the topmost hose which was connected by a clamp. This one was really hard to get out. I used a flat head screw driver to carefully pry it out of the thermostat.
note that the picture above was taken after everything was put back. You should be able to clearly see it once the alternator is out.
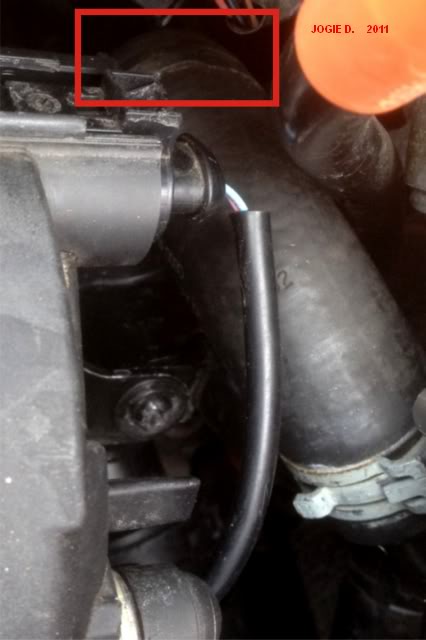
Next I did was the center hose. This one is metal and held by another torx screw. I forgot the size of the torx bit I used but I'm sure it's the same as the one I used to remove the first torx screw above.
Alternator is once again blocking clear view of this screw.
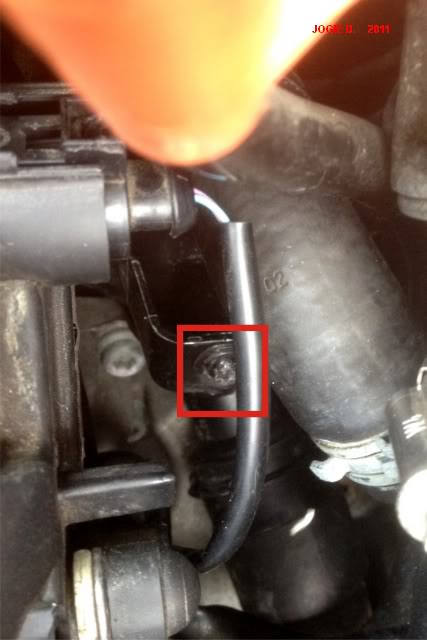
The center hose will not come out easily. It's metal and it won't flex. I had to remove 2 hidden hex bolts top of the oil cooler. These 2 are impossible to see unless you use a mirror.
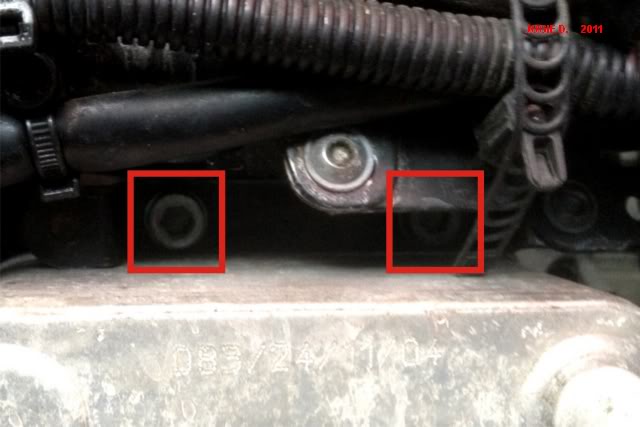
I used the same allen wrench bit I used to remove the bolts on the alternator.
I was able to remove the center hose. It's sealed by an O-ring. This O-ring needs to be replaced since it rips very easily. Part number is N90365302. I got it for around $5 at my local Audi dealer.
Finally I removed the bottom hose. It's held by a really flimsy clamp. I used long-nosed pliers to get it out.
Next, I removed the 2 hex bolts holding the thermostat. The thermostat easily came off.
I place everything back in reverse (new thermostat) and added g12. At first it took in only around 1.5 liters of mixed g12. After several cycles of running and stopping the engine and turning on and then off the heater, coolant level gradually came down and I was able to add more mixed g12. I needed around a gallon of mixed g12.
Hope this helps.
I started working when the engine was really cold. I Removed the engine cover. Released tension from the serpentine belt using an open 17mm wrench pulling in the direction of the arrow in the photo below. This allowed me to slip off the serp belt from the the alternator pulley. I found no need to remove the serp belt all the way. I just made sure it cleared the alternator.
Next, I removed the upper radiator hose connected to the top of the engine. I removed the end nearest to the engine only.
coolant came out of every hose I pulled out.
I removed this torx screw to make this metal hose/pipe moveable later (sorry I have no idea what it's called):
I also removed this big hose by turning on this screw head anti clockwise:
Next, I removed the alternator by removing this 4 hex bolts:
and then the 2 connectors at the back of the alternator (note no. 2 needed a socket wrench. This one is live with positive 12v current so I immediately covered the wire with electric tape after I took it off the alternator.)
Now that I finally have a clear view and access to the thermostat, I just needed to pull out the hoses attached to it.
I started with the topmost hose which was connected by a clamp. This one was really hard to get out. I used a flat head screw driver to carefully pry it out of the thermostat.
note that the picture above was taken after everything was put back. You should be able to clearly see it once the alternator is out.
Next I did was the center hose. This one is metal and held by another torx screw. I forgot the size of the torx bit I used but I'm sure it's the same as the one I used to remove the first torx screw above.
Alternator is once again blocking clear view of this screw.
The center hose will not come out easily. It's metal and it won't flex. I had to remove 2 hidden hex bolts top of the oil cooler. These 2 are impossible to see unless you use a mirror.
I used the same allen wrench bit I used to remove the bolts on the alternator.
I was able to remove the center hose. It's sealed by an O-ring. This O-ring needs to be replaced since it rips very easily. Part number is N90365302. I got it for around $5 at my local Audi dealer.
Finally I removed the bottom hose. It's held by a really flimsy clamp. I used long-nosed pliers to get it out.
Next, I removed the 2 hex bolts holding the thermostat. The thermostat easily came off.
I place everything back in reverse (new thermostat) and added g12. At first it took in only around 1.5 liters of mixed g12. After several cycles of running and stopping the engine and turning on and then off the heater, coolant level gradually came down and I was able to add more mixed g12. I needed around a gallon of mixed g12.
Hope this helps.
Last edited by jokie; Dec 15, 2011 at 03:22 PM.

1st Gear
Joined: Aug 2009
Posts: 5
I figured I'd bring this thread up from the depths to thank Jokie (from my old home town! I love Annapolis). I did the thermostat swap today. I'm pretty much a complete novice. I can change my oil and brakes, and that's about it. I've done thermostats on American cars and it was always super simple. Thanks to Jokie's tutorial, I did the whole thing in about 3-1/2 hours movig very slowly and carefully. I was nervous about getting it all back together, but it turns out that getting the hoses off, especially the 3 on the thermostat, was the hardest part.
I didn't drain the coolant first because I couldn't get the drain plug to pull out, and didn't want to damage it. I had the car up on ramps and put some cardboard and a bucket underneath, and it wasn't too bad. I ended up using exactly 1 gallon of mixed G12 to get it back to full.
Also, I just disconnected the battery before I started. I didn't want to worry about the live alternator wire.
And just as an FYI, other than the hex (allen) wrench and the socket wrenches, the one slightly odd tool that is needed is a t30 torx.
Thanks!!

1st Gear
Joined: Dec 2009
Posts: 7
From: Columbus, OH
Thank you for the guide - saved me a bunch of time. I just finished this job a couple minutes ago on my wife's 06 A4. Tools I needed:
- 19mm wrench (not 17mm as noted above) for the belt tensioner
- 6mm 3/8" drive allen socket (4 alternator bolts + one of the hard tube hidden bolts)
- 10mm wrench (for battery terminal)
- 6mm allen wrench (for the back hard tube bolt as the 6mm allen socket won't fit)
- 3/8" ratchet + standard extension
- 1/4" ratchet + standard extension
- T30 torx socket (1/4" drive) for the center tube bolt on the thermostat and the hard tube bolt up top.
- Vice grips for the squeeze hose clamps
- Standard size flat-head screw driver
- Small flat head screw driver (to help pry loose hoses and to get the wire clip off the alternator)
- Pliers (for the metal clip clamp on the bottom port of thermostat). Needle nose would be best but I did it with a flat tip plier in about 5 seconds.
- 10mm 3/8" drive deep well socket (or standard well + longer extension) for thermostat bolts
- 13mm 3/8" drive standard well socket (to remove power cable from alternator)
I purchased two 1.5L bottles of G12. I mixed 50/50 on both, used probably 3.5L total to fill her back up. Make sure to run the motor hard a couple times to get the air out; it took a couple times of topping off and WOT runs to get the temp to settle out and the heat to be hot again.
I also didn't need the O-ring for the center tube on the thermostat. The top and center tube hoses popped right off; the bottom one on the thermostat took some work. The rest were pretty standard affair.
Took me 2 hours total (getting over the flu so I'm not working at my best); I could probably go do it again in about an hour now that I know all the tricks.

1st Gear
Joined: Mar 2010
Posts: 40
From: Deerfield, NH
Thanks for the write up, made my life a whole lot easier. Those hoses were a real pain, even the lower one which looked like it would be easy once the clip was off. Middle one wasn't too bad but the top one was completely bonded to the metal pipe. I couldn't get it off at the thermostat end and eventually got it off of the metal pipe. Thanks for the heads-up on the 2 allen bolts above the oil cooler.
All good in the end. Cheers.
All good in the end. Cheers.