
DIY headlight LED DRL mod - A6 C5

Thread Starter
|
1st Gear
Joined: Jan 2011
Posts: 2
From: Ashtarak, Armenia
Hi,
I'm new to this great forum, and this is my first post here. English is not my native language, so please excuse me for possible mistakes.
I recently bought an US-imported '98 Audi A6 2.8 Quattro. I like to add a little touch of customization to my cars, and this is the first mod I did to that babe. I liked the looks of newer A4 and R8 and tried to do something similar. Also I didn't like the amber parking lights (hope this is the correct US term) and reflectors in the headlights (which should be white here, but this is not enforced), so I removed the reflectors and disconnected the parking light wire and connected it to the LED strip.
Disclaimer: standard disclaimer about doing at your own risk, may void your warranty, may not be street legal etc. ;)
I'm sorry for picture quality, because my DSLR was not on hand at the time of doing this, so I used my phone. Also I may not remember all details, because I'm writing this a month after the actual install.
Unfortunately I discovered that I have no "before" photo of my car.
The LED strip used:

These are the steps I did:
1. Remove all bulbs from the headlights
This is necessary because shaking the headlight may break the filaments inside the bulbs
2. Disconnect the harness connector
It is unlocked by pulling on the locking tab towards the back of the vehicle
3. Remove the headlights
This may be the hardest part in this procedure. The official version says to remove the front bumper, but I managed to avoid it. It is a little bit risky, because it is easy to damage the rubber weather striping and the chrome trim under the headlight. There are 3 Torx screws to undo, 2 on top of the headlight and 1 reachable through the hole on the fender near the front turn signal. You will need long Torx driver for this. Then comes a little bit tricky part of wiggling the headlight to take it out. I don't remember the exact steps of this procedure, but it was like pulling the headlight to the corner side to detach it from the 4th support point, which is in the lower side of the headlight towards the radiator, then rotating it so that the corner goes inside under the fender and the inner side goes out. Then it should go out easier.
Result:

4. Remove the weather stripping from the headlight.
It is held by 3 clips on the upper and inner sides of the headlight, and is fixed to the lens on the outer side.
Maybe the full removal is not necessary, and you can just unclip it from the headlight housing and keep it attached to the lens, but it will get in the way while removing the lens. My weather strips are in very bad shape and one of them went out in 3 pieces, but I put it together using RTV silicone.
5. Remove the lens
First, I removed the 5 steel clips holding the glass to the housing using the flat screwdriver. Then comes the sealant between the lens and the housing. I used a hair dryer to heat and soften it, then pried them apart using couple of flat screwdrivers. The easiest point to start prying is the inner lower corner. Care must be taken not to break the plastic lens.
Result:

6. (If needed and legal!) remove the amber reflector on the side light
It is glued to the chromed frame in the lens in 2 points - above and below. I pried it with a thin flat screwdriver to release the glue.
Result with reflector attachment points highlighted:

7. Make a bracket for the upper end of LED strip
You can see it in the picture:

I made it using a PCI slot cover off a PC case. It is made to be glued to the outer and lower sides of the low beam projector. The straight part is parallel to the outer edge of the high/low beams reflector and measures about 1.2 inch, just enough not to touch or be covered by the chrome frame attached to the lens.
8. Sand or file the lower side of the projector housing
This is needed to allow for better bond of the glue that holds the bracket, otherwise the bracket will fall off together with the chrome plating of the reflector.
This area:


I did not sand other areas of the reflector where I glued the LED stripe, because the strength of the chrome seems to be enough to hold it.
9. Glue the bracket in place
I chose a 2 part epoxy glue for my gluing needs, because it hardens very fast (about 5 min) and bonds to all materials used, including the silicone-enclosed LED stripe. Other glues in my toolbox did not bond to it.

I held the bracket all the way down to the reflector, while trying to keep the straight side parallel to the edge of the reflector.
The correct position:

10. Cut the LED stripe to the required length
For the particular stripe I used, 30 LEDs were enough.
Caution: The LED stripes are made so that the LEDs are connected in groups of 3(usually) LEDs in series, to make it work with 12 volts. So when you determine the correct size, please make sure that the number of LEDs divides by 3, otherwise 1 or 2 LEDs at the end will not light up! This number may vary for other color LEDs, but for white it's usually 3.
11. Glue the LED stripe to the bracket, then to the reflector
The lead wire should be on the bracket side, that way it will not be visible after assembling the headlight:

The same 2 part epoxy glue was used here. I found that it was difficult to attach the entire stripe at once because the glue would harden very quickly. So I mixed up a little of it, attached the stripe to bracket first, then when the stuff hardened, I mixed another portion and glued the remaining of the strip to the reflector.
Results:


With LEDs powered:

12. Wire up the LEDs
The wiring options may vary, I connected them to the parking light.
Inside the OEM Hella headlight, the parking light/turn signal wiring is the following:
Brown - ground - splice the "-" of the LEDs
Red - turn signal
Green - parking light - splice the "+" of the LEDs, cut the green wire after LED connection if you want to disable the yellow parking lamps (may not be legal in US!)

13. Attach the lens
There are many ways of doing this, some suggest using an oven or a heat gun to soften the old sealant. I didn't risk putting my headlight into the oven with LEDs inside, so I used transparent (black will work also) RTV silicone.
I applied the silicone on the edge of the lens, pressed them together and put the 5 metal clips on.
14. Attach the weather striping
This should be the reverse of removal. I don't know the best way to attach the thin parts of it to the headlight. I used transparent RTV, but it will not hold very strong. Mine loosened while I was installing the headlight.
Result:


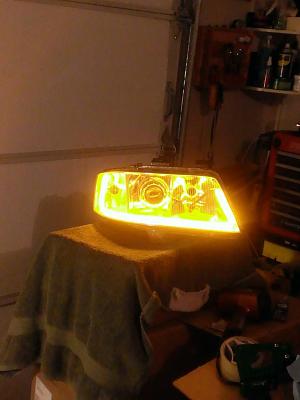
Powered up:

15. Install and align the headlight
Sorry for not having pictures.
This is the reversal of the removing.
Insert the outer (corner) side of the headlight first, then rotate it inside to get the corner out.
Pull it to the corner side, then align and insert the lower inner support pin in its hole attached to the lock carrier.
Push the headlight in place.
Put in the Torx screws, but don't tighten.
Align the headlight corner with the fender, so that the spacing is minimal and transition is smooth.
Tighten the screws while holding the headlight aligned.
Connect the wiring harness connector.
Install all bulbs.
This is the picture "after": (I'll make more)

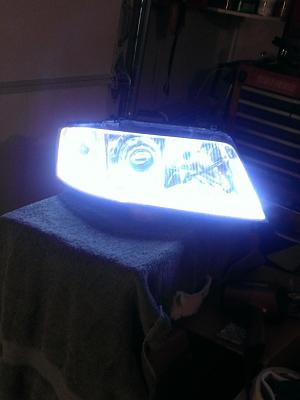
With aftermarket HID low beams that I got a couple of days later:

Hope this helps someone,
HITMAn
Edit: Also while doing this, I wiped the inside of the glass lens with a dry cloth. There was something like fine dust on it, which was making my headlights look dirty and glare.
I'm new to this great forum, and this is my first post here. English is not my native language, so please excuse me for possible mistakes.
I recently bought an US-imported '98 Audi A6 2.8 Quattro. I like to add a little touch of customization to my cars, and this is the first mod I did to that babe. I liked the looks of newer A4 and R8 and tried to do something similar. Also I didn't like the amber parking lights (hope this is the correct US term) and reflectors in the headlights (which should be white here, but this is not enforced), so I removed the reflectors and disconnected the parking light wire and connected it to the LED strip.
Disclaimer: standard disclaimer about doing at your own risk, may void your warranty, may not be street legal etc. ;)
I'm sorry for picture quality, because my DSLR was not on hand at the time of doing this, so I used my phone. Also I may not remember all details, because I'm writing this a month after the actual install.
Unfortunately I discovered that I have no "before" photo of my car.
The LED strip used:
These are the steps I did:
1. Remove all bulbs from the headlights
This is necessary because shaking the headlight may break the filaments inside the bulbs
2. Disconnect the harness connector
It is unlocked by pulling on the locking tab towards the back of the vehicle
3. Remove the headlights
This may be the hardest part in this procedure. The official version says to remove the front bumper, but I managed to avoid it. It is a little bit risky, because it is easy to damage the rubber weather striping and the chrome trim under the headlight. There are 3 Torx screws to undo, 2 on top of the headlight and 1 reachable through the hole on the fender near the front turn signal. You will need long Torx driver for this. Then comes a little bit tricky part of wiggling the headlight to take it out. I don't remember the exact steps of this procedure, but it was like pulling the headlight to the corner side to detach it from the 4th support point, which is in the lower side of the headlight towards the radiator, then rotating it so that the corner goes inside under the fender and the inner side goes out. Then it should go out easier.
Result:
4. Remove the weather stripping from the headlight.
It is held by 3 clips on the upper and inner sides of the headlight, and is fixed to the lens on the outer side.
Maybe the full removal is not necessary, and you can just unclip it from the headlight housing and keep it attached to the lens, but it will get in the way while removing the lens. My weather strips are in very bad shape and one of them went out in 3 pieces, but I put it together using RTV silicone.
5. Remove the lens
First, I removed the 5 steel clips holding the glass to the housing using the flat screwdriver. Then comes the sealant between the lens and the housing. I used a hair dryer to heat and soften it, then pried them apart using couple of flat screwdrivers. The easiest point to start prying is the inner lower corner. Care must be taken not to break the plastic lens.
Result:
6. (If needed and legal!) remove the amber reflector on the side light
It is glued to the chromed frame in the lens in 2 points - above and below. I pried it with a thin flat screwdriver to release the glue.
Result with reflector attachment points highlighted:
7. Make a bracket for the upper end of LED strip
You can see it in the picture:
I made it using a PCI slot cover off a PC case. It is made to be glued to the outer and lower sides of the low beam projector. The straight part is parallel to the outer edge of the high/low beams reflector and measures about 1.2 inch, just enough not to touch or be covered by the chrome frame attached to the lens.
8. Sand or file the lower side of the projector housing
This is needed to allow for better bond of the glue that holds the bracket, otherwise the bracket will fall off together with the chrome plating of the reflector.
This area:
I did not sand other areas of the reflector where I glued the LED stripe, because the strength of the chrome seems to be enough to hold it.
9. Glue the bracket in place
I chose a 2 part epoxy glue for my gluing needs, because it hardens very fast (about 5 min) and bonds to all materials used, including the silicone-enclosed LED stripe. Other glues in my toolbox did not bond to it.
I held the bracket all the way down to the reflector, while trying to keep the straight side parallel to the edge of the reflector.
The correct position:
10. Cut the LED stripe to the required length
For the particular stripe I used, 30 LEDs were enough.
Caution: The LED stripes are made so that the LEDs are connected in groups of 3(usually) LEDs in series, to make it work with 12 volts. So when you determine the correct size, please make sure that the number of LEDs divides by 3, otherwise 1 or 2 LEDs at the end will not light up! This number may vary for other color LEDs, but for white it's usually 3.
11. Glue the LED stripe to the bracket, then to the reflector
The lead wire should be on the bracket side, that way it will not be visible after assembling the headlight:
The same 2 part epoxy glue was used here. I found that it was difficult to attach the entire stripe at once because the glue would harden very quickly. So I mixed up a little of it, attached the stripe to bracket first, then when the stuff hardened, I mixed another portion and glued the remaining of the strip to the reflector.
Results:
With LEDs powered:
12. Wire up the LEDs
The wiring options may vary, I connected them to the parking light.
Inside the OEM Hella headlight, the parking light/turn signal wiring is the following:
Brown - ground - splice the "-" of the LEDs
Red - turn signal
Green - parking light - splice the "+" of the LEDs, cut the green wire after LED connection if you want to disable the yellow parking lamps (may not be legal in US!)
13. Attach the lens
There are many ways of doing this, some suggest using an oven or a heat gun to soften the old sealant. I didn't risk putting my headlight into the oven with LEDs inside, so I used transparent (black will work also) RTV silicone.
I applied the silicone on the edge of the lens, pressed them together and put the 5 metal clips on.
14. Attach the weather striping
This should be the reverse of removal. I don't know the best way to attach the thin parts of it to the headlight. I used transparent RTV, but it will not hold very strong. Mine loosened while I was installing the headlight.
Result:
Powered up:
15. Install and align the headlight
Sorry for not having pictures.
This is the reversal of the removing.
Insert the outer (corner) side of the headlight first, then rotate it inside to get the corner out.
Pull it to the corner side, then align and insert the lower inner support pin in its hole attached to the lock carrier.
Push the headlight in place.
Put in the Torx screws, but don't tighten.
Align the headlight corner with the fender, so that the spacing is minimal and transition is smooth.
Tighten the screws while holding the headlight aligned.
Connect the wiring harness connector.
Install all bulbs.
This is the picture "after": (I'll make more)
With aftermarket HID low beams that I got a couple of days later:
Hope this helps someone,
HITMAn
Edit: Also while doing this, I wiped the inside of the glass lens with a dry cloth. There was something like fine dust on it, which was making my headlights look dirty and glare.
Last edited by HITMAnsOFT; Feb 12, 2011 at 02:43 PM.

I know this is a rather old thread, but reading it definitely inspired me to do something similar to my car. For lighting, though, I purchased a set of switchback LED tube strip lights similar to the one's in the '13 A6 to do my retrofit.
Here's a couple of pics mid-install, while I was testing them out.
I've had them on for about 2 weeks, and have gotten a lot of compliments. I'll see if I can post some pics of them now that they are on the car.
Here's a couple of pics mid-install, while I was testing them out.


I've had them on for about 2 weeks, and have gotten a lot of compliments. I'll see if I can post some pics of them now that they are on the car.

Thread
Thread Starter
Forum
Replies
Last Post
paulywalnuts446
B6 Models
5
Feb 3, 2013 02:41 PM
blks4
Archive - Exterior/Body
3
May 20, 2007 03:04 AM
Influentialstylez
Audi A4
5
Mar 29, 2007 04:30 AM