
C4 2.8L non-quattro Engine Removal

Thread Starter
|
3rd Gear
Joined: Dec 2008
Posts: 1,941
From: IL
I finally got the new bolts.
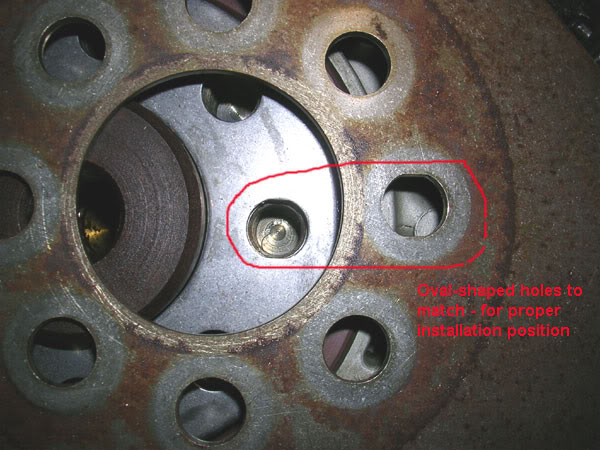
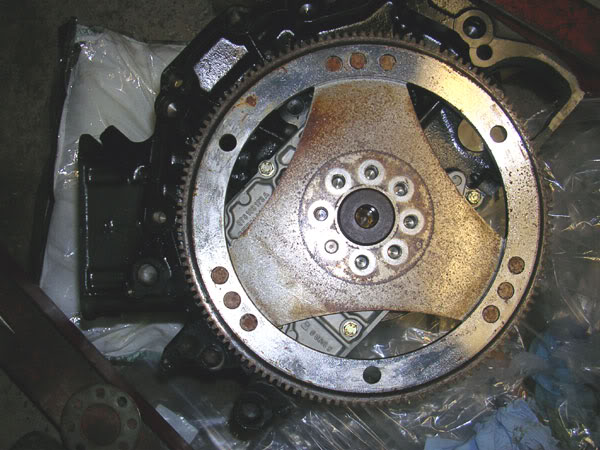
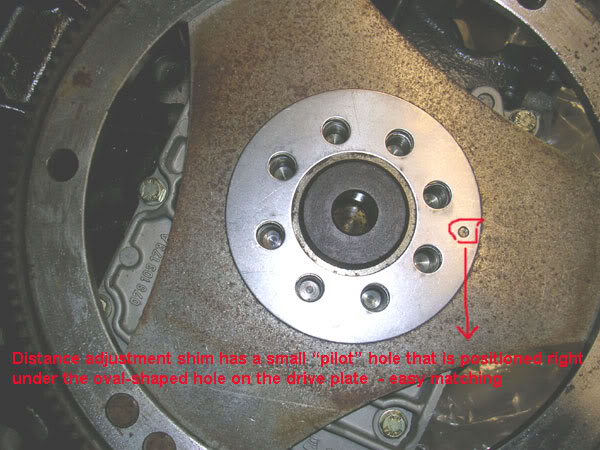
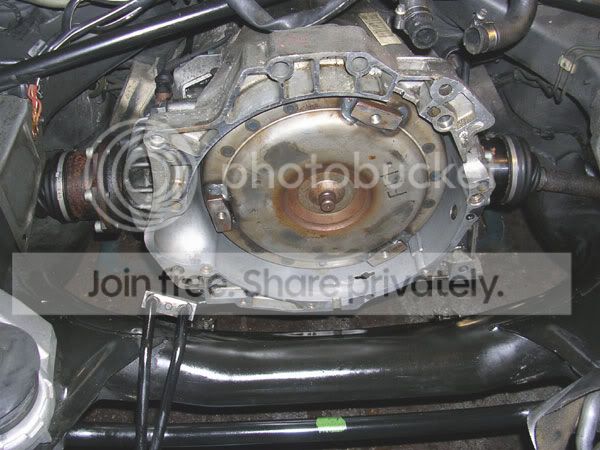
Some anecdotal observations before pictures... Bentley says to mark the drive plate's position in relationship to the block before removing it. Well, I didn't read that when pulling the engine out. So I said to myself - What if you replace the drive plate entirely with a new one? There will be no marking... It turns out that the drive plate has one of the eight holes being oval-shaped (so as the spacer). Therefore, it will be impossible to screw up the proper installation. Going further, the shim on top (in between the plate and bolts) has also a tiny hole-marking that rests exactly below the drive plate's oval-shaped hole, in proper mounting position.
In any event, I torqued the bolts to 44 ft lb - the engine block resting all this time on the ground. It would be impossible to install the drive plate with the block being mounted on the engine stand. I have no idea how this is done "properly" - in a shop I mean.
So for the "plus 1/4 turn" I propped a 2x4 against a cylinder opening, held it with my knee, while torquing the extra 90 degrees... It worked out just fine.
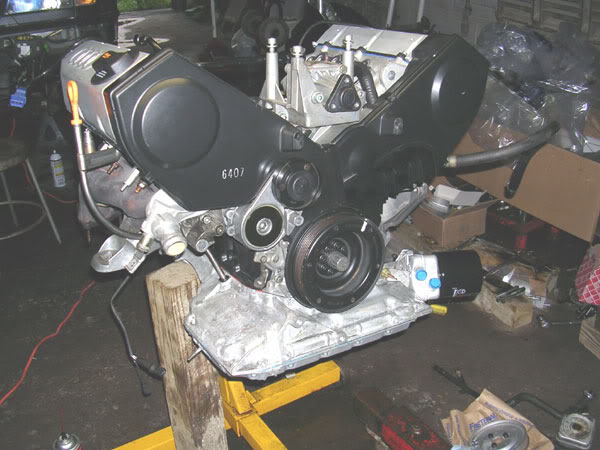
Almost forgot - Before installing the upper pan gasket and the pan I filled up the oil pump !
Then I had to wrestle the block back on the engine stand - with the shop crane, of course, but without help is so much fun...")
Well, the oil pan's section are mounted and hopefully today or tomorrow I'll tackle the heads and camshafts...
Pics:
-
-
-
-

-

-

-

-

-

-
-
To be cont'd...
Some anecdotal observations before pictures... Bentley says to mark the drive plate's position in relationship to the block before removing it. Well, I didn't read that when pulling the engine out. So I said to myself - What if you replace the drive plate entirely with a new one? There will be no marking... It turns out that the drive plate has one of the eight holes being oval-shaped (so as the spacer). Therefore, it will be impossible to screw up the proper installation. Going further, the shim on top (in between the plate and bolts) has also a tiny hole-marking that rests exactly below the drive plate's oval-shaped hole, in proper mounting position.
In any event, I torqued the bolts to 44 ft lb - the engine block resting all this time on the ground. It would be impossible to install the drive plate with the block being mounted on the engine stand. I have no idea how this is done "properly" - in a shop I mean.
So for the "plus 1/4 turn" I propped a 2x4 against a cylinder opening, held it with my knee, while torquing the extra 90 degrees... It worked out just fine.
Almost forgot - Before installing the upper pan gasket and the pan I filled up the oil pump !
Then I had to wrestle the block back on the engine stand - with the shop crane, of course, but without help is so much fun...
Well, the oil pan's section are mounted and hopefully today or tomorrow I'll tackle the heads and camshafts...
Pics:
-
-
-
-
-
-
-
-
-
-
-
To be cont'd...
Last edited by chefro; May 21, 2011 at 10:55 AM.
Thread Starter
|
3rd Gear
Joined: Dec 2008
Posts: 1,941
From: IL
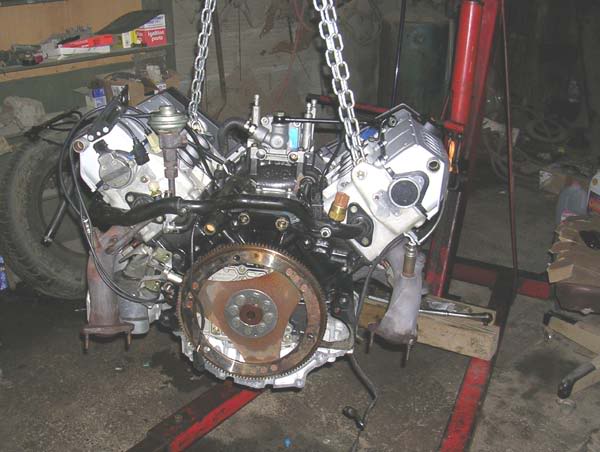
Heads are back on:
-
-
New cyl head oil pressure limiting valves:
-

-
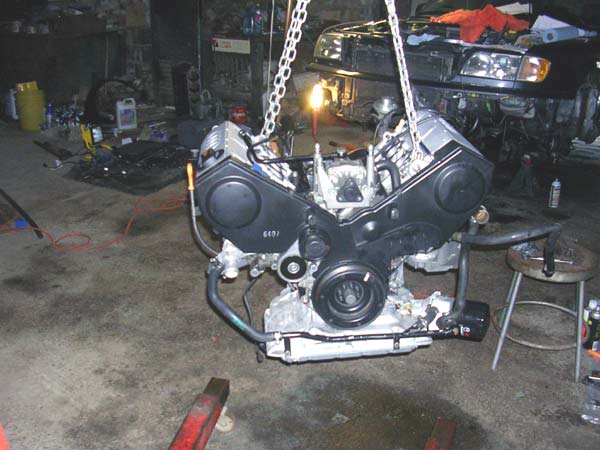
Camshafts are back on:
-


-
Installed also the tensioner + idler roller, Thermostat housing and PS Pump
-

-
-
That's where I'm at right now. Of course, ALL the OIL SEALS and GASKETS are brand new.
I'll have to wait again for a little bit - need to order a new Polydrive socket. The head bolts require 44 ft lb + 180�. I did the second step for the bank 2, but the socket bit just broke to pieces when started on the second head.
I could install meantime the valve cover on the torqued one at least, but first I want to make sure the engine turns properly and the cams are indeed matching the TDC.
-
More to come...
-
-
New cyl head oil pressure limiting valves:
-
-
Camshafts are back on:
-
-
Installed also the tensioner + idler roller, Thermostat housing and PS Pump
-
-
-
That's where I'm at right now. Of course, ALL the OIL SEALS and GASKETS are brand new.
I'll have to wait again for a little bit - need to order a new Polydrive socket. The head bolts require 44 ft lb + 180�. I did the second step for the bank 2, but the socket bit just broke to pieces when started on the second head.
I could install meantime the valve cover on the torqued one at least, but first I want to make sure the engine turns properly and the cams are indeed matching the TDC.
-
More to come...
Last edited by chefro; May 22, 2011 at 02:22 PM.
Thread Starter
|
3rd Gear
Joined: Dec 2008
Posts: 1,941
From: IL
Slight intermezzo:
for who wants to know and is interested, Snap-On has a Polydrive bit only - $ 10 + sale tax; free shipping - that can replace the broken one. I'll try to do so tomorrow and confirm or infirm the theory.
Ordered it yesterday around noon and within 24 hrs was delivered. WOW...
Part number: SPDL10E2
-
I did order though a Schwaben-made socket from Sears - $ 27 shipped.
Last edited by chefro; May 25, 2011 at 02:51 AM.
Thread Starter
|
3rd Gear
Joined: Dec 2008
Posts: 1,941
From: IL
After another little wait (for the last broken timing cover), I was able to get the second cam sprocket on.
Slapped the timing belt on and cranked the engine by hand...it's perfect. With the new piston rings and valve seals the darn thing has a nice "swoosh" sound.
Gotta wait for the weekend to get the valve covers on and hopefully slap the engine back in the bay (fingers crossed I remember to hook everything up the way it was....LOL)
-
Thread Starter
|
3rd Gear
Joined: Dec 2008
Posts: 1,941
From: IL
LOL
As soon as I get done with it.
Today I had time to get the valve covers and exhaust heads on. Tomorrow if all goes well, I may have time to lift that baby back where it belongs.... If not, there's always "another weekend".
-

As soon as I get done with it.
Today I had time to get the valve covers and exhaust heads on. Tomorrow if all goes well, I may have time to lift that baby back where it belongs.... If not, there's always "another weekend".
-
Thread Starter
|
3rd Gear
Joined: Dec 2008
Posts: 1,941
From: IL
I'm just "there" in regard to lifting the engine back in, but I had to clean some more crap, install the torque converter and decided to wait for a drier day - too damn humid yesterday (right after rain). It was so much condensation in that old and vent-less garage that I gave up on speeding things up. The whole bottom of the car was full of water droplets.
-
I installed the tq according to the manual. It says when it's properly installed, the distance between the surface of transmission's mounting flange and the surface of the mounting eyes on the converter is at least 19 mm. I got at least 21 mm so I'm good to go, but boy was I nervous (took me a little time to find the right angle of "thrust" when slowly spinning the tq and pushing it in):
-

-

-
-
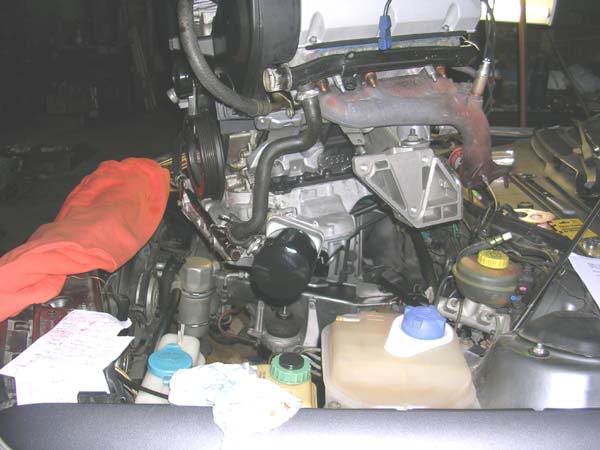
The engine is nearly ready to go in; still have to mount the rear main coolant pipe in. The manifold will get installed after the engine goes in.
-
new plugs

-
the following pic taken before reinstalling the lower coolant pipe from T-stat to oil cooler
-
Driver side engine mount ready to be fastened to the chassis, too:

-
I filled it with oil and before getting it in I'll crank it by hand several times so the oil pump gets "primed". Still have to torque the crank bolt the extra 90� since I couldn't do it while the block is on the mount stand.
-
I installed the tq according to the manual. It says when it's properly installed, the distance between the surface of transmission's mounting flange and the surface of the mounting eyes on the converter is at least 19 mm. I got at least 21 mm so I'm good to go, but boy was I nervous (took me a little time to find the right angle of "thrust" when slowly spinning the tq and pushing it in):
-
-
-
-
The engine is nearly ready to go in; still have to mount the rear main coolant pipe in. The manifold will get installed after the engine goes in.
-
new plugs
-
the following pic taken before reinstalling the lower coolant pipe from T-stat to oil cooler
-
Driver side engine mount ready to be fastened to the chassis, too:
-
I filled it with oil and before getting it in I'll crank it by hand several times so the oil pump gets "primed". Still have to torque the crank bolt the extra 90� since I couldn't do it while the block is on the mount stand.
Thread Starter
|
3rd Gear
Joined: Dec 2008
Posts: 1,941
From: IL
Some observations:
- Since all the "instructions" for installing are condensed into a single sentence "Engine is installed in reverse order of removal", sometimes is not a bad idea to re-read the removal instructions for re-tracing the steps.
I pre-installed the oil cooler and the filter, but they had to come off as the AC Compressor cannot be wiggled to its position with those two installed... After struggling to wedge it in there somehow, I gave in and remove both the filter and the cooler. So much wasted time results from not "reading" or not having a sound layout plan...
- It isn't a single man job to get the engine block back in... I struggled for about 4 hours and I called it quits for the night, although I'm nearly close.
Probably at the dealership it makes a huge difference using all those "proper" tools: engine support bridge 10-222A, the 3147 hook - so the transmission remains at the same level until you're ready to reinstall, the engine sling - 2024A - so probably it really keeps the block leveled while suspended, etc, etc...
I had a jack under the transmission from the very beginning, but it leaked... The owner had no idea. Needless to say that I need now to guess the perfect level where they mate easily. Or I may just ask him to help me.
It isn't easy to hold the block steady with one hand (heavy sob) while trying to lower the crane with the other hand, while only guessing how further you need to lower or/and push in at the same time since the eyes are far from the mounting flange... Oh well... I'm just bitching right now
-
-
-
-

-

- Since all the "instructions" for installing are condensed into a single sentence "Engine is installed in reverse order of removal", sometimes is not a bad idea to re-read the removal instructions for re-tracing the steps.
I pre-installed the oil cooler and the filter, but they had to come off as the AC Compressor cannot be wiggled to its position with those two installed... After struggling to wedge it in there somehow, I gave in and remove both the filter and the cooler. So much wasted time results from not "reading" or not having a sound layout plan...
- It isn't a single man job to get the engine block back in... I struggled for about 4 hours and I called it quits for the night, although I'm nearly close.
Probably at the dealership it makes a huge difference using all those "proper" tools: engine support bridge 10-222A, the 3147 hook - so the transmission remains at the same level until you're ready to reinstall, the engine sling - 2024A - so probably it really keeps the block leveled while suspended, etc, etc...
I had a jack under the transmission from the very beginning, but it leaked... The owner had no idea. Needless to say that I need now to guess the perfect level where they mate easily. Or I may just ask him to help me.
It isn't easy to hold the block steady with one hand (heavy sob) while trying to lower the crane with the other hand, while only guessing how further you need to lower or/and push in at the same time since the eyes are far from the mounting flange... Oh well... I'm just bitching right now
-
-
-
-
-
Thread Starter
|
3rd Gear
Joined: Dec 2008
Posts: 1,941
From: IL
Oh yeah, baby:

-
Torquing the drive plate bolts - yewwwwwwww; had to come up with a combination of extensions to use the torque wrench in a spot where I can swing it:


-
AC Compressor back in:

-
A New Starter replaced the nearly-dead, old one:


-
Put an end to a fruitful day after installing the alternator, as well:

-
Now is about tackling the little stuff.
Cheers
-
Torquing the drive plate bolts - yewwwwwwww; had to come up with a combination of extensions to use the torque wrench in a spot where I can swing it:
-
AC Compressor back in:
-
A New Starter replaced the nearly-dead, old one:
-
Put an end to a fruitful day after installing the alternator, as well:
-
Now is about tackling the little stuff.
Cheers