
Valley Pan Gasket; Head Gaskets

Thread Starter
|
3rd Gear
Joined: Dec 2008
Posts: 1,941
From: IL
Apr 18 - Saturday
Cloudy skies early. A few showers developing later in the day. High 72F. Winds SSE at 10 to 15 mph. Chance of rain 30%.
Apr 18 Saturday night
Showers and thundershowers likely. Low 53F. Winds SSE at 5 to 10 mph. Chance of rain 60%.
Apr 19 Sunday
Cloudy with showers and thunderstorms.. Highs in the low 60s and lows in the low 40s.
Apr 20 Monday
Showers. Highs in the upper 50s and lows in the upper 30s.
Gotta go to work... talk to you later - this afternoon

Thread Starter
|
3rd Gear
Joined: Dec 2008
Posts: 1,941
From: IL
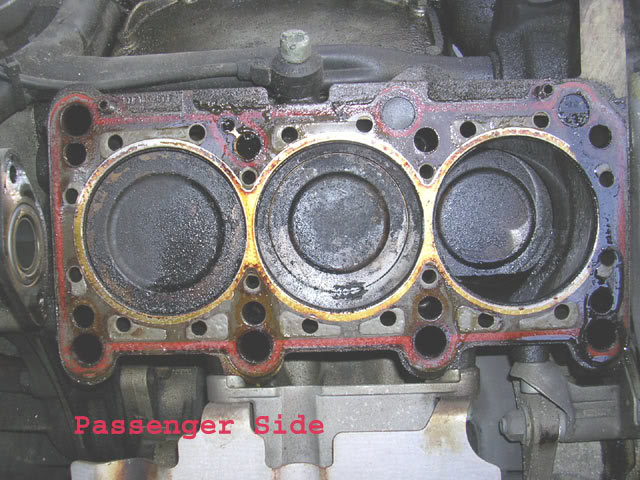
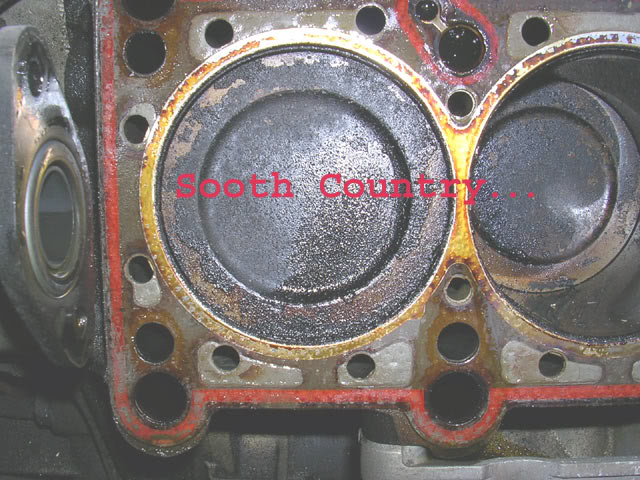
Here we go, Jim.
Put your mechanic gear on to protect yourself from sooth and carbon buildup..
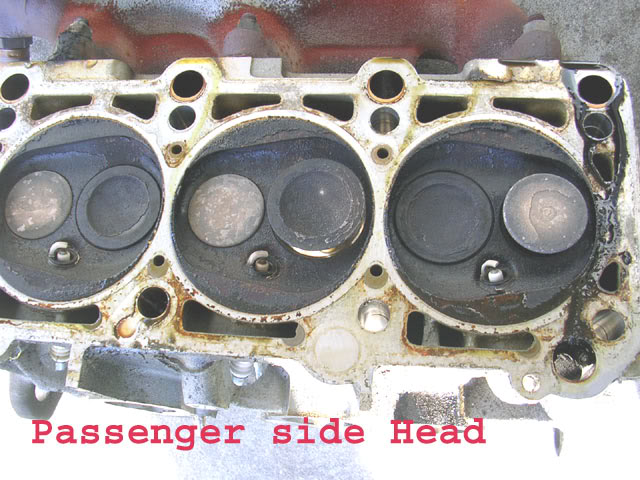
A) Passenger Side
-
-
Intermission - Go grab a beer for the second half
-
B) Driver Side
-
-
C) BONUS Round
-
Mine were not loose - they require a 8mm Allen Bit...
__________________________________________________ __________
That's it for right now.
Any ideas, concerns, rants, raves?
Next step it will be to clean up somehow everything laying on the porch.
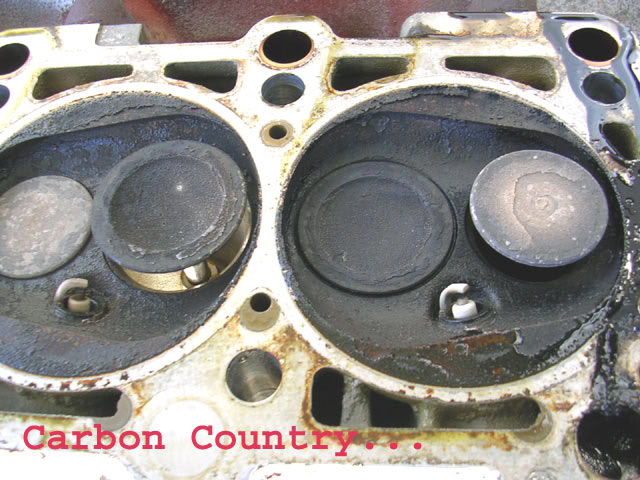
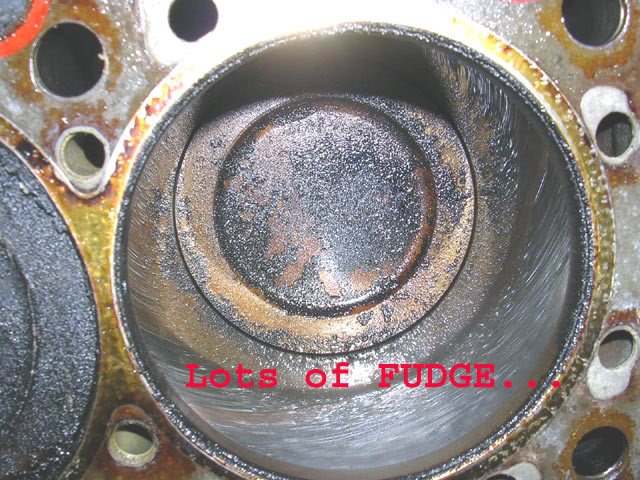
The pistons are looking pretty "carbonized" themselves...how do I clean that stuff up?
As far as the heads.....could the valves be cleaned? I would buy new ones but I'm starting to slip over the budget... The Intake ones run about $ 15 a piece; for the exhaust ones I noticed that are cheaper brands (Osvat vs TRW) for around $ 11-12. Total around $ 170...I don't know; I'm affraid the wife will throw my pillow on the porch.
About a shop that can mill... I have no idea, but I'll start asking tomorrow around.
What exactly it suppose to be done or involve: re-smoothening the mating surfaces, or hone something else?
That's all for now.
chefro.
Put your mechanic gear on to protect yourself from sooth and carbon buildup..
A) Passenger Side
-
-
Intermission - Go grab a beer for the second half
-
B) Driver Side
-
-
C) BONUS Round
-
Mine were not loose - they require a 8mm Allen Bit...
__________________________________________________ __________
That's it for right now.
Any ideas, concerns, rants, raves?
Next step it will be to clean up somehow everything laying on the porch.
The pistons are looking pretty "carbonized" themselves...how do I clean that stuff up?
As far as the heads.....could the valves be cleaned? I would buy new ones but I'm starting to slip over the budget... The Intake ones run about $ 15 a piece; for the exhaust ones I noticed that are cheaper brands (Osvat vs TRW) for around $ 11-12. Total around $ 170...I don't know; I'm affraid the wife will throw my pillow on the porch.
About a shop that can mill... I have no idea, but I'll start asking tomorrow around.
What exactly it suppose to be done or involve: re-smoothening the mating surfaces, or hone something else?
That's all for now.
chefro.
Last edited by chefro; Apr 17, 2009 at 10:21 PM.
Thread Starter
|
3rd Gear
Joined: Dec 2008
Posts: 1,941
From: IL
Ok,
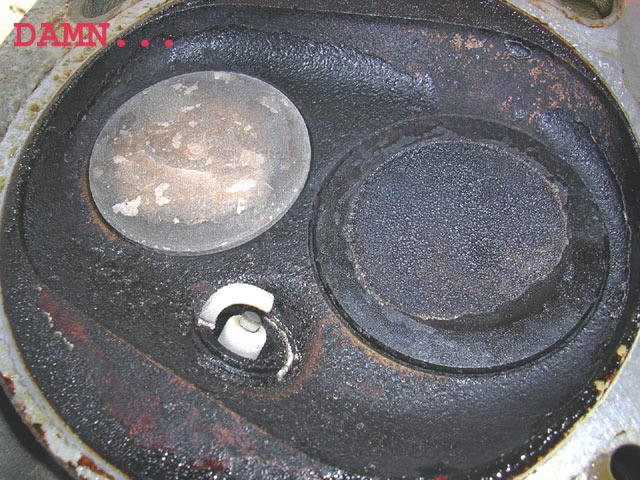
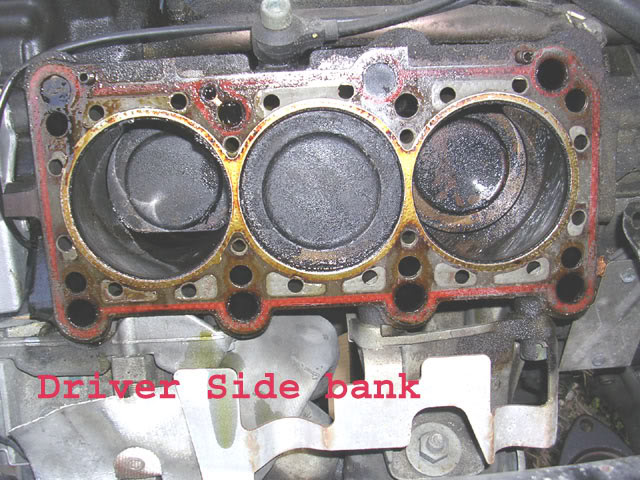
My good friend (old gentleman) mechanic stopped by to check on my progress. After having a good look around he concluded that the cylinders are in a shockingly "excellent" shape for a 153,000 miles engine. The walls are as smooth as in a new engine, so there's no milling needed.
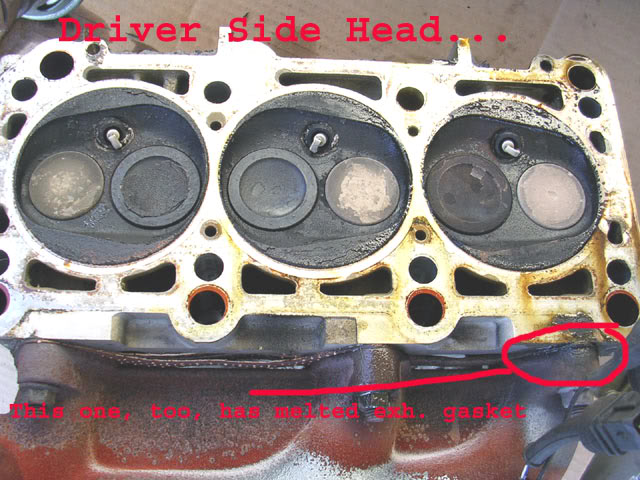
The valve heads (well, the exposed surfaces) can be clean with a wire brush or disc attached to a drill/sander, etc. The same goes for the mating surfaces.
Apparently, the head gaskets were in a pretty good shape. It is my first pulled-apart engine, so I trust his vast experience with the assesment.
I will start slowly cleaning everything up to the best of my ability, and order the necessary parts that may need replacing, or that got broken (some brittle things due to weathering) and really need replacing.
Thoughts and needs on replacement parts:
- Some injector harness connectors (about 2 of them just came apart, and dialectric grease will not do)
- 6 new injector rings (they are still attached to the fuel line, so I won't mess with that side)
- I don't know about the O2 sensors, but I would really love to get new ones.
- The "tar" isolating the inside of the female O2 connectors (so the halves on the chassis) were brittle as well and broke, no matter how gingerly I tried to unhook'em.
- I found no "triangle" gasket in between the head exhaust and downpipes.
Should I still buy them, although the car didn't have'em? Will that affect the fitting and leave a gap, or it doesn't matter?
- New head bolts... I understand perfectly that the rule is to change them. However, all mine came out with the threads perfect...not even one of them is stripped. Should I still buy new ones?
- Vacuum hoses - definitely I will try to replace ALL of them. I hope the Audi Gods help me remember the right routing for all of them; even though I have the "routing" illustration on the hood, I still have an uneasiness about getting everything back to where it belongs.
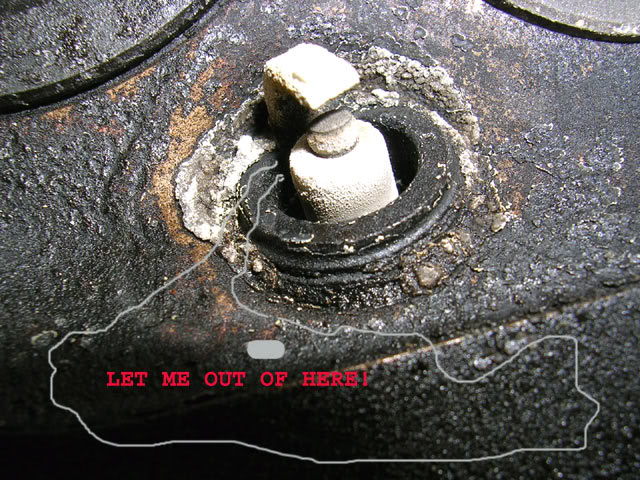
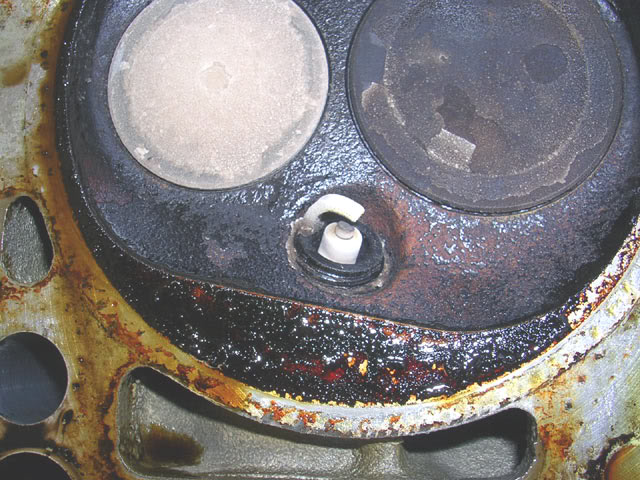
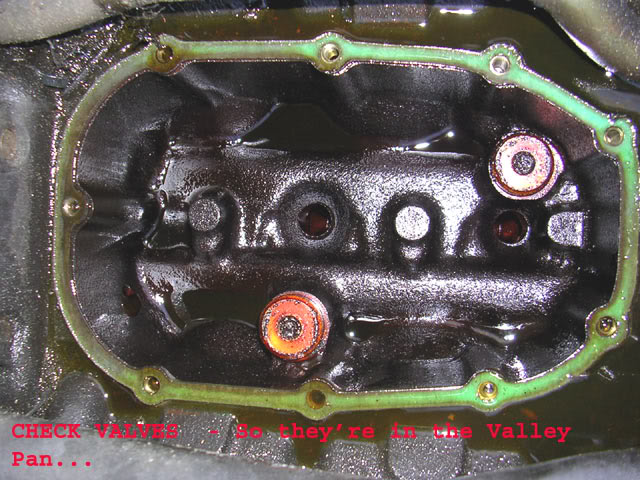
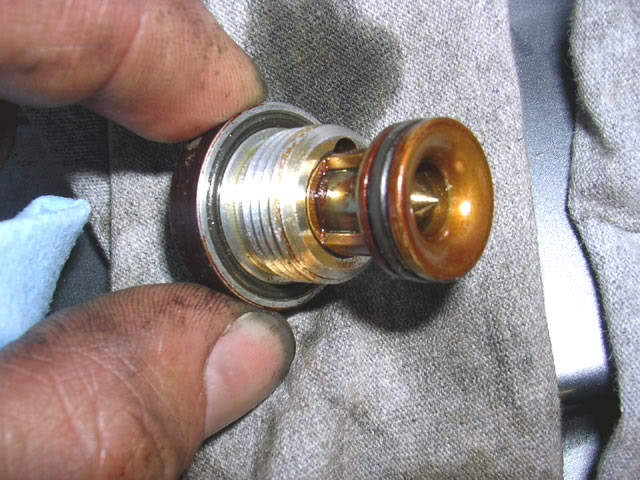
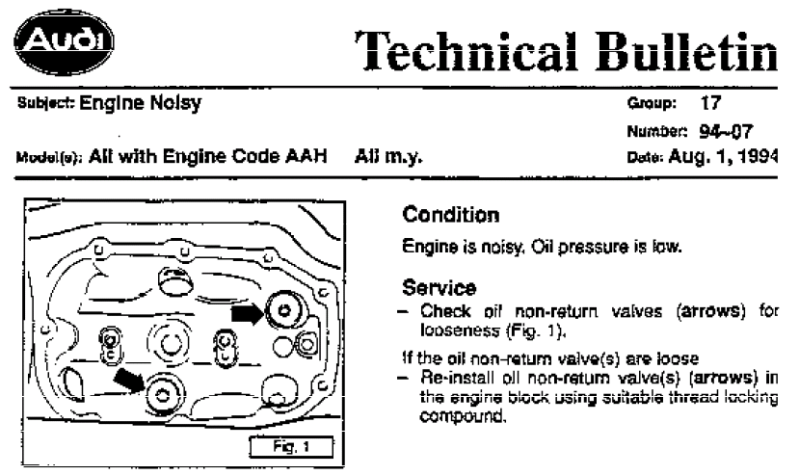
- Check (non-retention) Valves - I have no idea if I need to replace them or not. I'm yet to come across any online, so probably I'll call a dealer and at least get a part number....see how much they run.
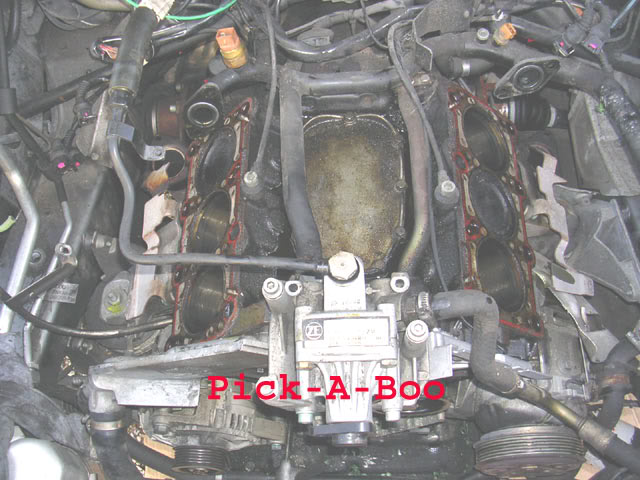
- The coolant line has a section that runs underneath the manifold and hooks into the back of the thermostat housing.
I wonder if anyone has a part number for the o-ring gasket needed there? Maybe that's where the coolant sipped through and trickled on top of the valley pan cover area. Afterall, maybe the head gaskets were indeed ok.
To the ones that still read this thread - I would appreciate if you have by any chance knowledge of the part numbers for some of the aformentioned parts - the bolded ones.
If not, then it isn't a big deal. I come so far up to this point with minimal help (thanks a bunch, Jim), I guess I can find my way out of the maze in the same fashion.
Regards.
chefro
My good friend (old gentleman) mechanic stopped by to check on my progress. After having a good look around he concluded that the cylinders are in a shockingly "excellent" shape for a 153,000 miles engine. The walls are as smooth as in a new engine, so there's no milling needed.
The valve heads (well, the exposed surfaces) can be clean with a wire brush or disc attached to a drill/sander, etc. The same goes for the mating surfaces.
Apparently, the head gaskets were in a pretty good shape. It is my first pulled-apart engine, so I trust his vast experience with the assesment.
I will start slowly cleaning everything up to the best of my ability, and order the necessary parts that may need replacing, or that got broken (some brittle things due to weathering) and really need replacing.
Thoughts and needs on replacement parts:
- Some injector harness connectors (about 2 of them just came apart, and dialectric grease will not do)
- 6 new injector rings (they are still attached to the fuel line, so I won't mess with that side)
- I don't know about the O2 sensors, but I would really love to get new ones.
- The "tar" isolating the inside of the female O2 connectors (so the halves on the chassis) were brittle as well and broke, no matter how gingerly I tried to unhook'em.
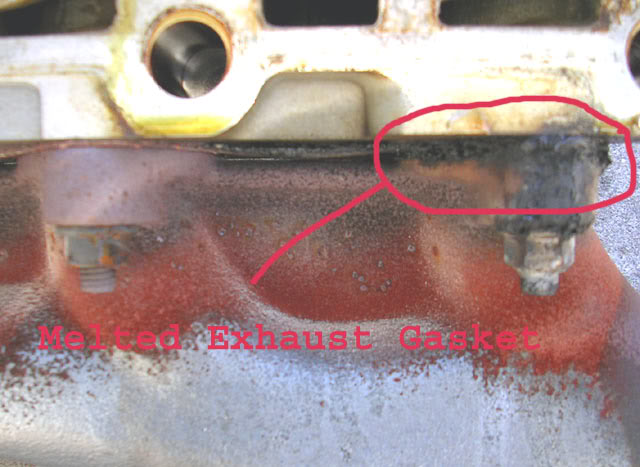
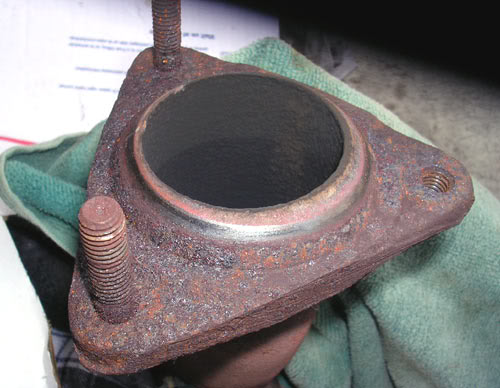
- I found no "triangle" gasket in between the head exhaust and downpipes.
Should I still buy them, although the car didn't have'em? Will that affect the fitting and leave a gap, or it doesn't matter?
- New head bolts... I understand perfectly that the rule is to change them. However, all mine came out with the threads perfect...not even one of them is stripped. Should I still buy new ones?
- Vacuum hoses - definitely I will try to replace ALL of them. I hope the Audi Gods help me remember the right routing for all of them; even though I have the "routing" illustration on the hood, I still have an uneasiness about getting everything back to where it belongs.
- Check (non-retention) Valves - I have no idea if I need to replace them or not. I'm yet to come across any online, so probably I'll call a dealer and at least get a part number....see how much they run.
- The coolant line has a section that runs underneath the manifold and hooks into the back of the thermostat housing.
I wonder if anyone has a part number for the o-ring gasket needed there? Maybe that's where the coolant sipped through and trickled on top of the valley pan cover area. Afterall, maybe the head gaskets were indeed ok.
To the ones that still read this thread - I would appreciate if you have by any chance knowledge of the part numbers for some of the aformentioned parts - the bolded ones.
If not, then it isn't a big deal. I come so far up to this point with minimal help (thanks a bunch, Jim), I guess I can find my way out of the maze in the same fashion.
Regards.
chefro
Last edited by chefro; Apr 18, 2009 at 01:34 PM.
4th Gear
Joined: Mar 2009
Posts: 3,042
From: Indiana
Sorry Chefro, internet was down..
I agree with your friend, the heads and cylinders look pretty good. I also dont see any problems with the head gaskets; no oil or water leaks and no 'burn through' of the fire ring around the cylinders. Hate to say it, but they were good.
For the clean up - yes, you could just scrape and clean everything. This is done all the time. However, you should disassemble the head to do it. If you get carbon/junk into the valve guides because the valve was open, they will be ruined quickly when ran later. Then, if you scrape and end up gouging the head, you'll leak.
If your not going to disassemble, the best thing you should do is turn the cam to close all the valves and use an aluminum safe solvent, such as liquid carb dip (not the spray stuff). You'd lay it on its back and fill the chambers with the solvent and let it soak for a day or two, then clean it up with a greenie meanie (scour pad) and brake cleaner. Then flip it over and put some dip down the intake and exhaust so it sits on the valve and soak (this takes less time) then open each valve and wipe the back face with a scour pad and brake cleaner. Of course, you'll need to do this with something under neath to catch drips and it wont clean the seats, but it should get you real close. Be careful as most solvents will eat rubber and plastic.
For your valves: the part # is 078103175D available at World Impex http://www.worldimpex.com/parts/genu...lve_74840.html - Not cheap, however. I would try to replace just the o-rings. Also, I dont know if you have them or not, but there is suppose to be one in each head, part # 078103363p. These are half the price. Dont know where to get them though. (http://forums.audiworld.com/showthread.php?t=2137076).
For your coolant o-ring, hit a parts store and match it up while getting the oil valve ones.
Dont worry about the exhaust gaskets. I didnt look, but do you have a steel 'donut'? This creates the seal. If not, any gasket that matches will work.
YES you need to get the head bolts. They are 'torque to yield' and CANNOT be re-used.
I agree with your friend, the heads and cylinders look pretty good. I also dont see any problems with the head gaskets; no oil or water leaks and no 'burn through' of the fire ring around the cylinders. Hate to say it, but they were good.
For the clean up - yes, you could just scrape and clean everything. This is done all the time. However, you should disassemble the head to do it. If you get carbon/junk into the valve guides because the valve was open, they will be ruined quickly when ran later. Then, if you scrape and end up gouging the head, you'll leak.
If your not going to disassemble, the best thing you should do is turn the cam to close all the valves and use an aluminum safe solvent, such as liquid carb dip (not the spray stuff). You'd lay it on its back and fill the chambers with the solvent and let it soak for a day or two, then clean it up with a greenie meanie (scour pad) and brake cleaner. Then flip it over and put some dip down the intake and exhaust so it sits on the valve and soak (this takes less time) then open each valve and wipe the back face with a scour pad and brake cleaner. Of course, you'll need to do this with something under neath to catch drips and it wont clean the seats, but it should get you real close. Be careful as most solvents will eat rubber and plastic.
For your valves: the part # is 078103175D available at World Impex http://www.worldimpex.com/parts/genu...lve_74840.html - Not cheap, however. I would try to replace just the o-rings. Also, I dont know if you have them or not, but there is suppose to be one in each head, part # 078103363p. These are half the price. Dont know where to get them though. (http://forums.audiworld.com/showthread.php?t=2137076).
For your coolant o-ring, hit a parts store and match it up while getting the oil valve ones
.Dont worry about the exhaust gaskets. I didnt look, but do you have a steel 'donut'? This creates the seal. If not, any gasket that matches will work.
YES you need to get the head bolts. They are 'torque to yield' and CANNOT be re-used.
Thread Starter
|
3rd Gear
Joined: Dec 2008
Posts: 1,941
From: IL
Hey, Jim.
I hope you had a better weekend than mine. Here it rained the past 2 days, so your post has a great timing as I didn't move a finger ever since Friday.
Ok, let me have it since I keep asking stuff ...
If I go the disassembling route, would I have to remove the camshafts off the heads and valve lifters? If yes, would it be any risk involved to not reassemble them back in the right position?
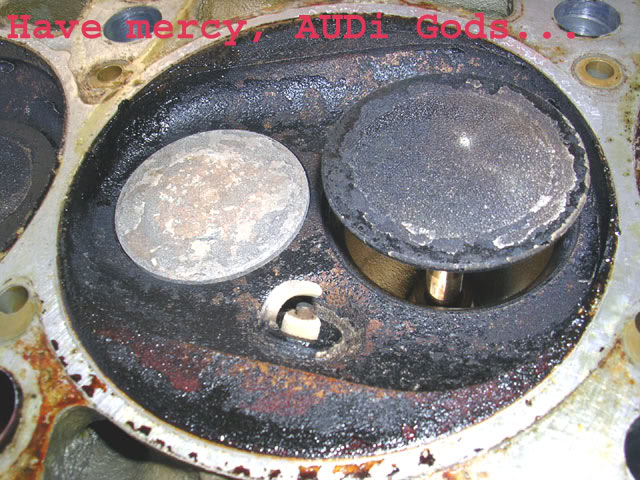
As you can see and already know, only two valves are open (one intake, one exhaust), so I was wondering if I can get by with cleaning gingerly those two open ones while stuffing some rags in the openings so nothing falls inside?
Anyway, I will try using only a kitchen scouring pad (a greenie, as you call it), and maybe some plastic brushes. That indeed will require some solvent and lots of elbow grease. Maybe I can find some sort of an abbrasive (yet gentle) disc contramption I could mount on a drill and try to make the job easier.
- The "check" valves... I called an Audi dealer and was quoted $ 160 for one. I asked for the part number: 06C 103 245. However, that's not how my check valves are looking like, not by a long shot. I'll have to keep looking, or just live with the noise, if indeed they're bad and noisy. As far as for the two ones in the heads, I'll try to locate them, but at this point I have no idea what to look for. I'll see tomorrow what's going on in there, as I'll have to take the exhaust heads off anyway.
- The coolant o-ring... I found actualy three different o-rings, one for the oil cooler pipe, the one on the main rear pipe to the cyl heads, and also the one I need from coolant pipe to t-stat housing. That's not a problem anymore.
- The exhaust "triangle" gasket... I'll take a pic and post it; However, one of the pipes (I think the down pipe) has the head chamfered (sort of round) toward the interior, so I guess it makes for a tight fit and that's why I found no gaskets.
- OK, I'll get the head bolts.") So far Arizona Autohaus has the cheapest price, but I'll have to get the socket bit tool from elsewhere.
So far Arizona Autohaus has the cheapest price, but I'll have to get the socket bit tool from elsewhere.
I'll keep you posted with the progress.
You're an invaluable source of experience and knowledge. Thank you kindly.
I hope you had a better weekend than mine. Here it rained the past 2 days, so your post has a great timing as I didn't move a finger ever since Friday.
Ok, let me have it since I keep asking stuff ...
If I go the disassembling route, would I have to remove the camshafts off the heads and valve lifters? If yes, would it be any risk involved to not reassemble them back in the right position?
As you can see and already know, only two valves are open (one intake, one exhaust), so I was wondering if I can get by with cleaning gingerly those two open ones while stuffing some rags in the openings so nothing falls inside?
Anyway, I will try using only a kitchen scouring pad (a greenie, as you call it), and maybe some plastic brushes. That indeed will require some solvent and lots of elbow grease. Maybe I can find some sort of an abbrasive (yet gentle) disc contramption I could mount on a drill and try to make the job easier.
- The "check" valves... I called an Audi dealer and was quoted $ 160 for one. I asked for the part number: 06C 103 245. However, that's not how my check valves are looking like, not by a long shot. I'll have to keep looking, or just live with the noise, if indeed they're bad and noisy. As far as for the two ones in the heads, I'll try to locate them, but at this point I have no idea what to look for. I'll see tomorrow what's going on in there, as I'll have to take the exhaust heads off anyway.
- The coolant o-ring... I found actualy three different o-rings, one for the oil cooler pipe, the one on the main rear pipe to the cyl heads, and also the one I need from coolant pipe to t-stat housing. That's not a problem anymore.
- The exhaust "triangle" gasket... I'll take a pic and post it; However, one of the pipes (I think the down pipe) has the head chamfered (sort of round) toward the interior, so I guess it makes for a tight fit and that's why I found no gaskets.
- OK, I'll get the head bolts.
So far Arizona Autohaus has the cheapest price, but I'll have to get the socket bit tool from elsewhere. I'll keep you posted with the progress.
You're an invaluable source of experience and knowledge. Thank you kindly.
Last edited by chefro; Apr 20, 2009 at 01:53 AM.
4th Gear
Joined: Mar 2009
Posts: 3,042
From: Indiana
If I go the disassembling route, would I have to remove the camshafts off the heads and valve lifters? If yes, would it be any risk involved to not reassemble them back in the right position?
The "check" valves... I called an Audi dealer and was quoted $ 160 for one.
However, one of the pipes (I think the down pipe) has the head chamfered (sort of round) toward the interior, so I guess it makes for a tight fit and that's why I found no gaskets.

OK, I'll get the head bolts.
Last edited by Midniteoyl; Apr 20, 2009 at 03:11 AM.

2nd Gear
Joined: Jul 2007
Posts: 1,430
From: Goodrich, Michigan
Looking good, so far! Your next step should be to take the heads to a shop for a 3-angle valve job. You can remove the cams yourself, but DO take the heads to a professional shop for the valve job.
Bob
Bob
Thread Starter
|
3rd Gear
Joined: Dec 2008
Posts: 1,941
From: IL
Jim,
That number they gave me (06C 103 245) corresponds with a "crankcase vent valve",

which doesn't resemble in any shape or form those 2 non-returning/non-retention/check valves I have in this car.
Probably the guy at the Audi dealership had no freaking clue what I'm inquiring about, even though I gave him all the necessary details. I don't seem to find them, so I'll just give up on replacing them.
I found a shop (they also run a parts store - or the other way around; it doesn't matter) that can clean the heads and valves by dipping them in some "caustic" solution... but they said I should bring them in so they can better assess how much cleaning is required before giving me a quote.
I'll start cleaning them by myself. If I'm not successful, I may take them in.
BOB,
thanks much for chiming in.
I would immensely appreciate if you can give me more details on what that "3-angle valve job" suppose to accomplish.
Do you think my valves are bad?
regards.
That number they gave me (06C 103 245) corresponds with a "crankcase vent valve",
which doesn't resemble in any shape or form those 2 non-returning/non-retention/check valves I have in this car.
Probably the guy at the Audi dealership had no freaking clue what I'm inquiring about, even though I gave him all the necessary details. I don't seem to find them, so I'll just give up on replacing them.
I found a shop (they also run a parts store - or the other way around; it doesn't matter) that can clean the heads and valves by dipping them in some "caustic" solution... but they said I should bring them in so they can better assess how much cleaning is required before giving me a quote.
I'll start cleaning them by myself. If I'm not successful, I may take them in.
BOB,
thanks much for chiming in.
I would immensely appreciate if you can give me more details on what that "3-angle valve job" suppose to accomplish.
Do you think my valves are bad?
regards.

4th Gear
Joined: Mar 2009
Posts: 3,042
From: Indiana
Ya, thats definitely the wrong valve
Watch out for soaking rubber/plastic parts as anything 'caustic' will eat them.
One trick I used before that I didnt mention because it takes longer than using solvent and requires tons more work is to simply use Dawn with water. Find a pan that will hold the heads and be deep enough to come to about half-way up the heads when filled with water. Fill the pan with soap and water as hot as you can get it, place the heads in the water mating surface down, burp the air out, fill the intake/exhaust ports and let soak. 4-5 days should do it. Clean and scrub till your elbows lock up and you should be good. You then could follow up with a light use of the solvent. You have to realize, however, that most home cleaning jobs will not be perfect.
A '3 angle valve job' consists of removing the valve and cutting the seat and valve at '3 angles' to better improve airflow around the valve. Its not something I would recommend unless you're willing to spend money. It'll prolly take new valves and seats at this point. No, your valves look to be good as they are.
Heres a few examples:
Standard Cut: Notice the straight angle on the valve seating surface (back)

3-angle: The back side cut is smoother.

There is also a 5-angle, but its overkill on the street.
Watch out for soaking rubber/plastic parts as anything 'caustic' will eat them.
One trick I used before that I didnt mention because it takes longer than using solvent and requires tons more work is to simply use Dawn with water. Find a pan that will hold the heads and be deep enough to come to about half-way up the heads when filled with water. Fill the pan with soap and water as hot as you can get it, place the heads in the water mating surface down, burp the air out, fill the intake/exhaust ports and let soak. 4-5 days should do it. Clean and scrub till your elbows lock up and you should be good. You then could follow up with a light use of the solvent. You have to realize, however, that most home cleaning jobs will not be perfect.
A '3 angle valve job' consists of removing the valve and cutting the seat and valve at '3 angles' to better improve airflow around the valve. Its not something I would recommend unless you're willing to spend money. It'll prolly take new valves and seats at this point. No, your valves look to be good as they are.
Heres a few examples:
Standard Cut: Notice the straight angle on the valve seating surface (back)
3-angle: The back side cut is smoother.
There is also a 5-angle, but its overkill on the street.