
Paint Frustrations!


Member
Joined: Sep 2009
Posts: 82
You know that flex promoter is not to make the paint stick better. When the paint dries fully the promoter evaporates out of it. Its to make the paint flexible for a period of time. So when you put on a freshly painted bumper the paint doesn't crack as the bumper needs to flex to get it on. Thats why its named flex promoter. Lets make sure every one understands paint is plastic. Just a different form of it. When you buff a car you want as much heat as possible with out burning it. It (in a way) melts the clear coat smooth. Every one should own a non orbital buffer, some fine cut compound, and polish. As you see no wax. You put wax on by hand. If you want a true show quality paint job, wet sand with 2000 then buff with 2000 extra fine compound, and then buff with the polish. Then you wax by hand to protect the polish. If you do this and do this right you WILL have the best possible paint job. The only thing better is better paint.
Sorry i didn't mean to write all that. I just have a problem with cars lol.
Sorry i didn't mean to write all that. I just have a problem with cars lol.
3rd Gear
Joined: Oct 2008
Posts: 1,636
From: Morristown, NJ
I enjoyed reading your insights into how to get a good looking paint job but how the hell does that apply to painting rings? I want the paint to come out looking good but first and foremost is to help reduce the paint from chipping. I'm not about to wet sand, compound and buff my rings.
Good info, just waaaaaaaay outta context.
Good info, just waaaaaaaay outta context.
Member
Joined: Sep 2009
Posts: 82
I wrote how in the beginning of the thread (2nd page). Now I wrote how to make it look like black glass.
In a way if you do wet sand, I think (not sure) it would make it even stronger. When wet sanding your taking out the orange peal and making it straighter. There would be less fratchers. So when a rock hits it, the rock would slide off instead of digging in and taking paint. Now the more coats of wax the better (to a point). You can put layers of wax on. It will protect it more but the more wax you put on the duller the paint gets and has a yellow haze to it. So its up to you what you do .
.
In a way if you do wet sand, I think (not sure) it would make it even stronger. When wet sanding your taking out the orange peal and making it straighter. There would be less fratchers. So when a rock hits it, the rock would slide off instead of digging in and taking paint. Now the more coats of wax the better (to a point). You can put layers of wax on. It will protect it more but the more wax you put on the duller the paint gets and has a yellow haze to it. So its up to you what you do
.
Last edited by fastenhard; Sep 8, 2009 at 10:26 PM.
3rd Gear
Joined: Oct 2008
Posts: 1,636
From: Morristown, NJ
Don't get me wrong, I get what you are saying. I believe he was putting a matte clear on his rings as will I. I don't want anything glossy especially the rings or I would just leave them alone.
No doubt you have great knowledge on paint, I'll be looking you up if and when I need to repaint the car.
No doubt you have great knowledge on paint, I'll be looking you up if and when I need to repaint the car.
Thread Starter
|
2nd Gear
Joined: Feb 2009
Posts: 1,301
From: Oregon
Yeah, I agree with drunk. While this knowledge is very useful when repainting larger sections of body, I don't think much applies besides the prep in my situation. Thank you though, I'm always welcoming to more knowledge. Stored in my memory banks. =D But as far as your wetsand = stronger idea, the paint may not have things for the rock to drag on, but the rock does. and just like sandpaper, that rock will nail, probably dent and (what I'm trying to avoid) scratch the ring. So I'm putting adhesive promoter on as a plastic primer. This and the clear coat will hopefully provide enough layers and strength for the paint to withstand a rock's blow and simply dent, not break.
Anyway, got the front rings/grill painted. Dont know if staying up so late was a good idea on the night before school begins. (Senior year finally!) But whatever, at least the car will roll in with a grill. If it dries right...
and just like sandpaper, that rock will nail, probably dent and (what I'm trying to avoid) scratch the ring. So I'm putting adhesive promoter on as a plastic primer. This and the clear coat will hopefully provide enough layers and strength for the paint to withstand a rock's blow and simply dent, not break.Anyway, got the front rings/grill painted. Dont know if staying up so late was a good idea on the night before school begins. (Senior year finally!) But whatever, at least the car will roll in with a grill. If it dries right...
Thread Starter
|
2nd Gear
Joined: Feb 2009
Posts: 1,301
From: Oregon
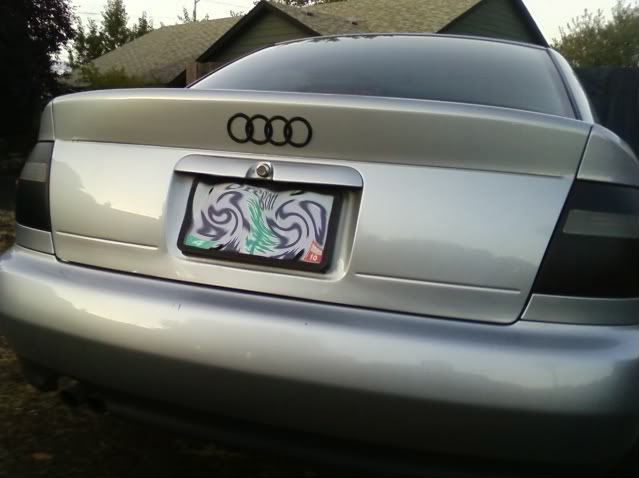
The rears turned out damn good. Only problem was that in my haste to get them on the car, I didn't let the clear cure for the full 24 hours. As I pressed the rings onto the car for 5 minutes letting the adhesive bond, the towel I cleverly used to keep any fingerprints from being embedded into the paint left its own stich embedded. So it has an overlapping square look up close, like fabric. After realizing it couldn't be buffed out I simply tried to add it uniformly over the whole rings. Looks neat. (Obviously this can only be seen up close.)

And the fronts are still curing. Up very close (yes, I am a perfectionist, haha. I know the rings will be seen by most from a lane of traffic away.) you can see the clear has bubbled a bit, I think I laid a coat on too soon. Its decreasing though, so hopefully it will disappear. There are just parts that look a little foggy.

Closeup:

And the fronts are still curing. Up very close (yes, I am a perfectionist, haha. I know the rings will be seen by most from a lane of traffic away.) you can see the clear has bubbled a bit, I think I laid a coat on too soon. Its decreasing though, so hopefully it will disappear. There are just parts that look a little foggy.
Closeup:
Thread Starter
|
2nd Gear
Joined: Feb 2009
Posts: 1,301
From: Oregon
Be **** about the painting process! At first I just sanded and sprayed paint. When I threw them on I scratched the crap out of them trying to remove the excess glue. They were so weak I simply peeled the paint off with a thumbnail to repaint.
Adhesive Promoter. Lots of paint. Plenty of clear.
Follow the directions on the back. I did 3-5 min between adhesive promoter coats, 7-10 minutes between paint coats and 10-12 minutes between clear coats. Like Fastenhard said, you want (non gloss) to see that dull look, make sure its there though, because you don't want to waste all that prep and have your paint go on too thick/early and aligator. When you sand, make sure the entire surface is dull. Move it around in the light and sand semi-glossy high spots. I started at 150, then did 220 and did a quick over with a scotch style pad. Then on with the gloves and I gave it a wipe down with mineral spirits to take off my finger oils. Then paint.
1st Gear
Joined: Jul 2007
Posts: 239
From:
The rears turned out damn good. Only problem was that in my haste to get them on the car, I didn't let the clear cure for the full 24 hours. As I pressed the rings onto the car for 5 minutes letting the adhesive bond, the towel I cleverly used to keep any fingerprints from being embedded into the paint left its own stich embedded. So it has an overlapping square look up close, like fabric. After realizing it couldn't be buffed out I simply tried to add it uniformly over the whole rings. Looks neat. (Obviously this can only be seen up close.)
And the fronts are still curing. Up very close (yes, I am a perfectionist, haha. I know the rings will be seen by most from a lane of traffic away.) you can see the clear has bubbled a bit, I think I laid a coat on too soon. Its decreasing though, so hopefully it will disappear. There are just parts that look a little foggy.

Closeup:

And the fronts are still curing. Up very close (yes, I am a perfectionist, haha. I know the rings will be seen by most from a lane of traffic away.) you can see the clear has bubbled a bit, I think I laid a coat on too soon. Its decreasing though, so hopefully it will disappear. There are just parts that look a little foggy.
Closeup:
Look at you, repping the black rings on white like I did. It looks great. Did you black out the tails, or was it just dark in the pics? I like how they are dark except for the reverse lights, but wouldn't have done it that way myself. What did you use for the adhesive for the rear rings?