
DIY: How to Recode an ECU to use in your car


Thread Starter
|
3rd Gear
Joined: Jan 2010
Posts: 1,973
From: Costa Mesa, SoCal
There can be a variety of reasons why you might desire to install a foreign ECU into your car. Traditionally you would try to find one that came out of the same car as yours, IE if your car is Quattro and manual then the ECU donor vehicle also would be.
But this doesn't have to be the case! Realistically the only compatibility required is ECU part numbers, and even in some cases you could install an ECU with a different part number (but we won't get into that here).
So, let's say your car is Quattro manual and you found an ECU with matching part number from a car that is automatic/FWD for a really good price. No need to panic! After installing the foreign ECU, just grab your VAG-COM cable, plug it into your car and computer/laptop, open up VAG-COM, and follow these simple steps:
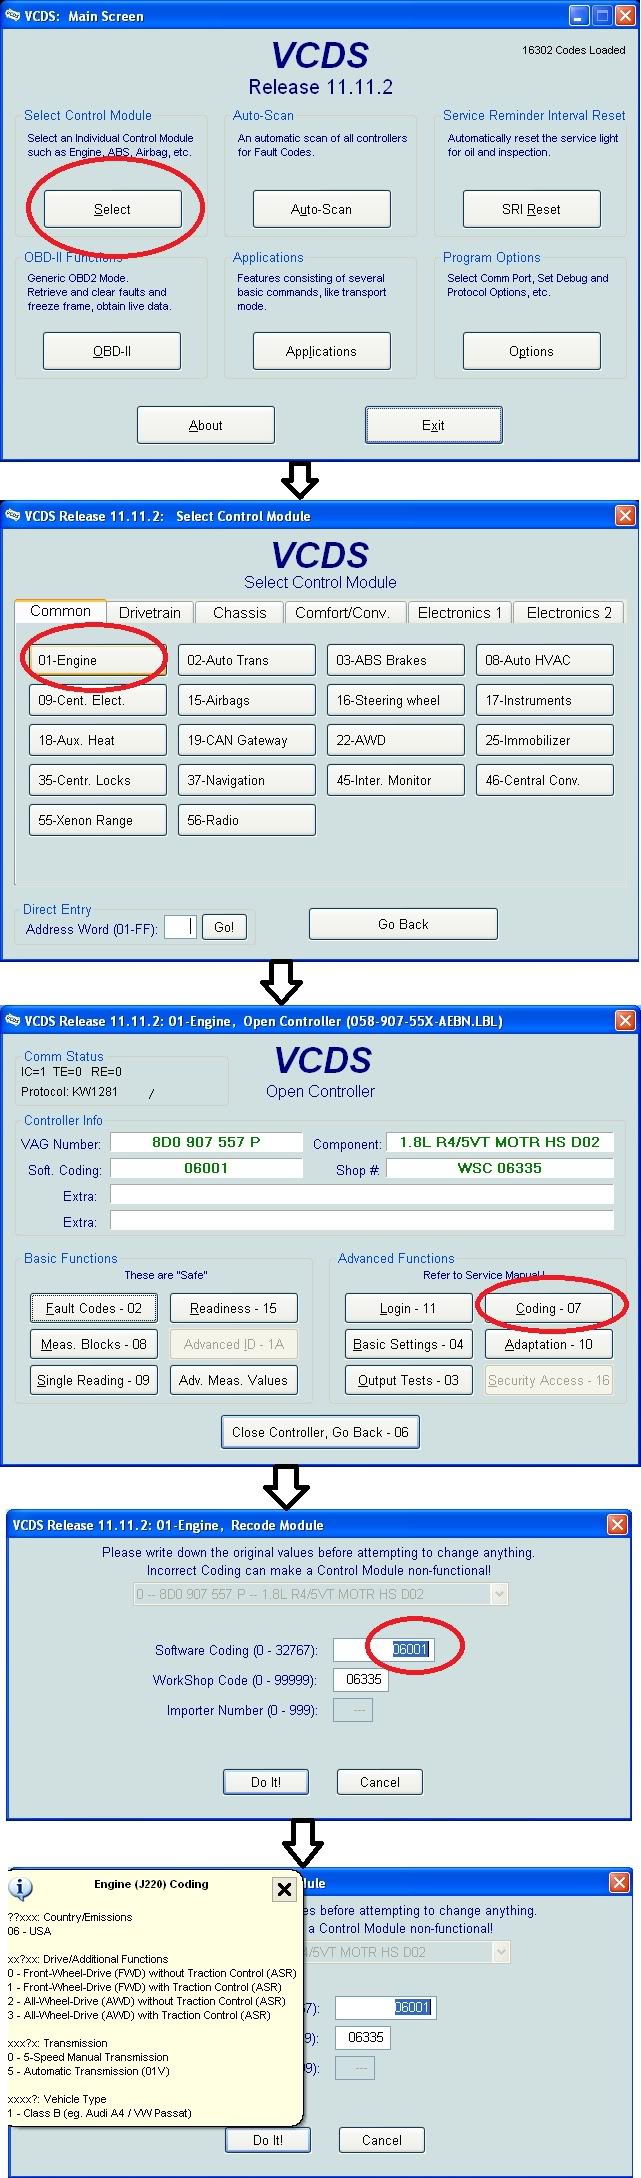
In case the picture doesn't show up for you, here's what to do:
-Click on "Select" to get a listing of control modules to choose from
-Click on "Engine" since that is what we're dealing with
-Click on "Coding"
-Move your mouse over the box titled "Software Coding". If a pop-up note with coding information (specific for your car) doesn't show, click in the Software Coding box. If for some reason it still doesn't show up, you can find ECU coding information for your specific car here:
Ross-Tech: VCDS: Diagnostic Procedures
-When you've entered the appropriate coding click on "Do It!". That's all there is to it!
The particular ECU shown in the pictures is a B5 A4 1.8T so the listing of coding options for your car may vary.
Generally speaking, that pop-up note will tell you which numbers to select based on your car's features, just make sure to choose wisely.
And also it is worth pointing out: this guide in its simple form is only useful for cars without immobilizers. It is my understanding that if your car has an immobilizer this process becomes far more complicated, and without the right tools/equipment may not be possible.
But this doesn't have to be the case! Realistically the only compatibility required is ECU part numbers, and even in some cases you could install an ECU with a different part number (but we won't get into that here).
So, let's say your car is Quattro manual and you found an ECU with matching part number from a car that is automatic/FWD for a really good price. No need to panic! After installing the foreign ECU, just grab your VAG-COM cable, plug it into your car and computer/laptop, open up VAG-COM, and follow these simple steps:
In case the picture doesn't show up for you, here's what to do:
-Click on "Select" to get a listing of control modules to choose from
-Click on "Engine" since that is what we're dealing with
-Click on "Coding"
-Move your mouse over the box titled "Software Coding". If a pop-up note with coding information (specific for your car) doesn't show, click in the Software Coding box. If for some reason it still doesn't show up, you can find ECU coding information for your specific car here:
Ross-Tech: VCDS: Diagnostic Procedures
-When you've entered the appropriate coding click on "Do It!". That's all there is to it!
The particular ECU shown in the pictures is a B5 A4 1.8T so the listing of coding options for your car may vary.
Generally speaking, that pop-up note will tell you which numbers to select based on your car's features, just make sure to choose wisely.
And also it is worth pointing out: this guide in its simple form is only useful for cars without immobilizers. It is my understanding that if your car has an immobilizer this process becomes far more complicated, and without the right tools/equipment may not be possible.
Last edited by MetalMan; Mar 25, 2012 at 10:37 AM.
Administrator
Joined: Jul 2006
Posts: 11,670
From: Binghamton, NY
Lol I asked MetalMan to rewrite his post in Brad's thread in a DIY format exactly for this reason. Moving this to the DIY section now. Thanks man, great info that'll pay off for many guys in the future.
Last edited by ImTheDevil; Mar 25, 2012 at 02:02 PM.
Administrator
Joined: Jul 2006
Posts: 11,670
From: Binghamton, NY
Just used the procedure and a couple comments. One, I had to code it twice because it didn't save the first time. No biggie, just wanted to mention it so others know that after they do it, they should go back in to verify that the new code saved. Second one - the first two digits were "16" rather than "06." not sure what country code that is but that was not the original ECU for the car so it may be a moot point.
Cliff notes - the procedure really is as easy as MetalMan spelled out, and just double check that the recode saves after you do it.
Cliff notes - the procedure really is as easy as MetalMan spelled out, and just double check that the recode saves after you do it.
Administrator
Joined: Jul 2006
Posts: 11,670
From: Binghamton, NY
Been working with Doc DePalma today regarding a coding issue with his 97 12v. Apparently this code structure is for 1.8T and 30v engines. His stock coding in the replacement ECU he's using is 01242. I'm assuming this is a 12v code structure. He tried recoding using the values shown above and it went wacky with SAP and TCU-related codes, which make no sense in his manual car. The fourth digit, 4, is what came in this ECU, which is from a 12v auto non-tip. The assumption is that the 4 is the code digit for a non-tip automatic, and we assumed that a manual would still use a code 0, so we made the switch to 01202, and every CEL code related to the transmission went away. So future info for you 12v guys, your auto car should have 01242 as an ECU code, and 01202 for a manual.
Just a tip to put out there for anyone doing an ECU replacement on a 12v - don't take the values in the tutorial above as being what you want - your car will go into retard mode. Those are for later cars.
Just a tip to put out there for anyone doing an ECU replacement on a 12v - don't take the values in the tutorial above as being what you want - your car will go into retard mode. Those are for later cars.

Thread
Thread Starter
Forum
Replies
Last Post