
DIY Combi Switch Removal, Overhaul, And Replacement

Thread Starter
|
Administrator
Joined: Jul 2006
Posts: 11,670
From: Binghamton, NY
OK, since the combination switches on the B5 are a source of a lot of inopportune failures on these cars, leaving owners stranded or having to drive their cars while holding the signal lever toggled back and aggravating everyone with their high beams, I thought I'd link an existing DIY here, and add my own pics of the switch internals, to show a way to take the switch apart and potentially resurrect it rather than shelling out $158 for a new one.
First off, here's the existing DIY for switch removal:
http://www.audiworld.com/tech/elec114.shtml
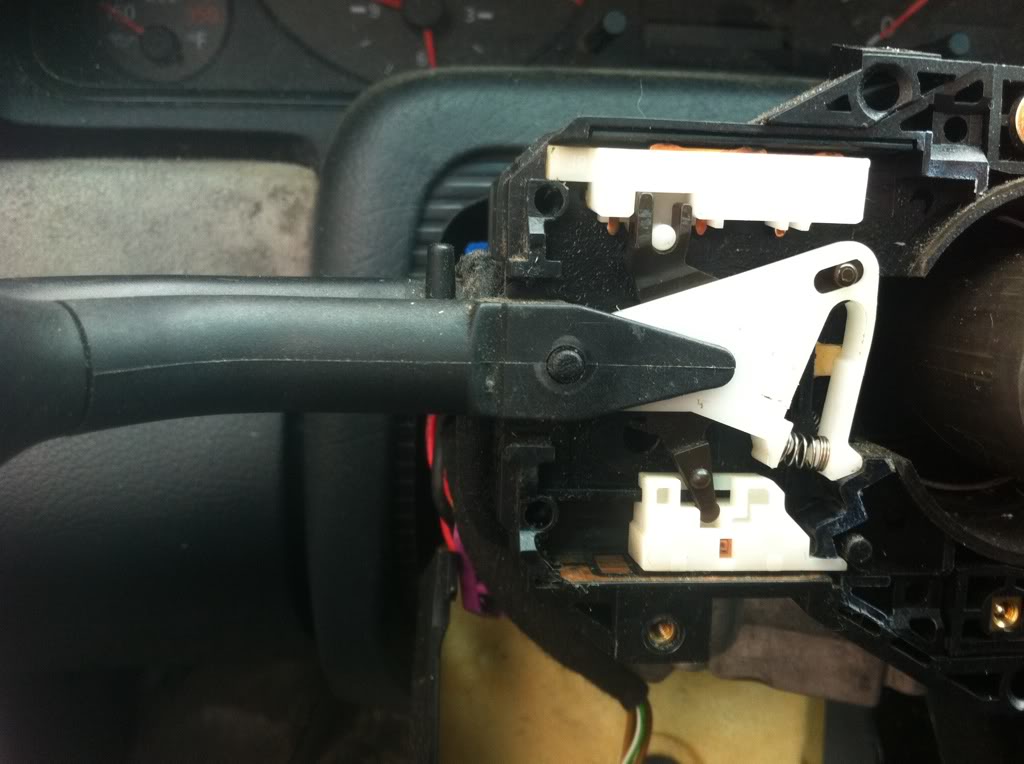
Once the switch is out, you'll need the T10 Torx bit to remove the four tiny screws that hold the metal cover on the housing, to gain access to the switch internals. If you don't pay attention, you may fumble around trying to put the pieces back correctly, so here's some shots I took last time I took one apart.
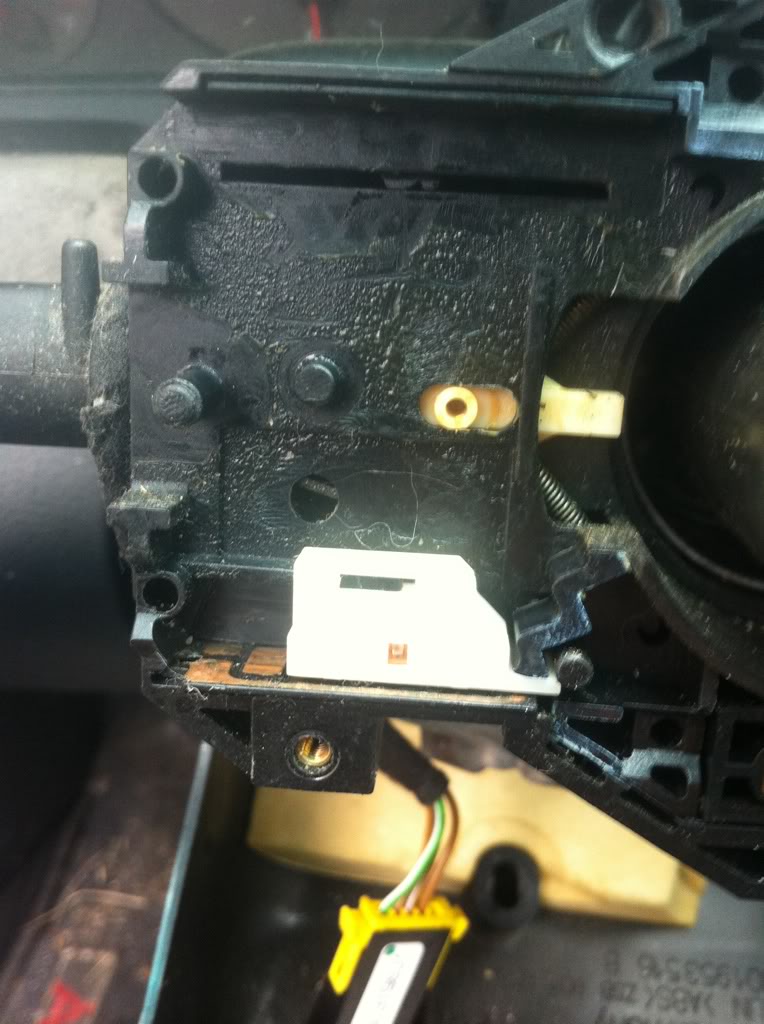
Once the cover is off, you'll see this:
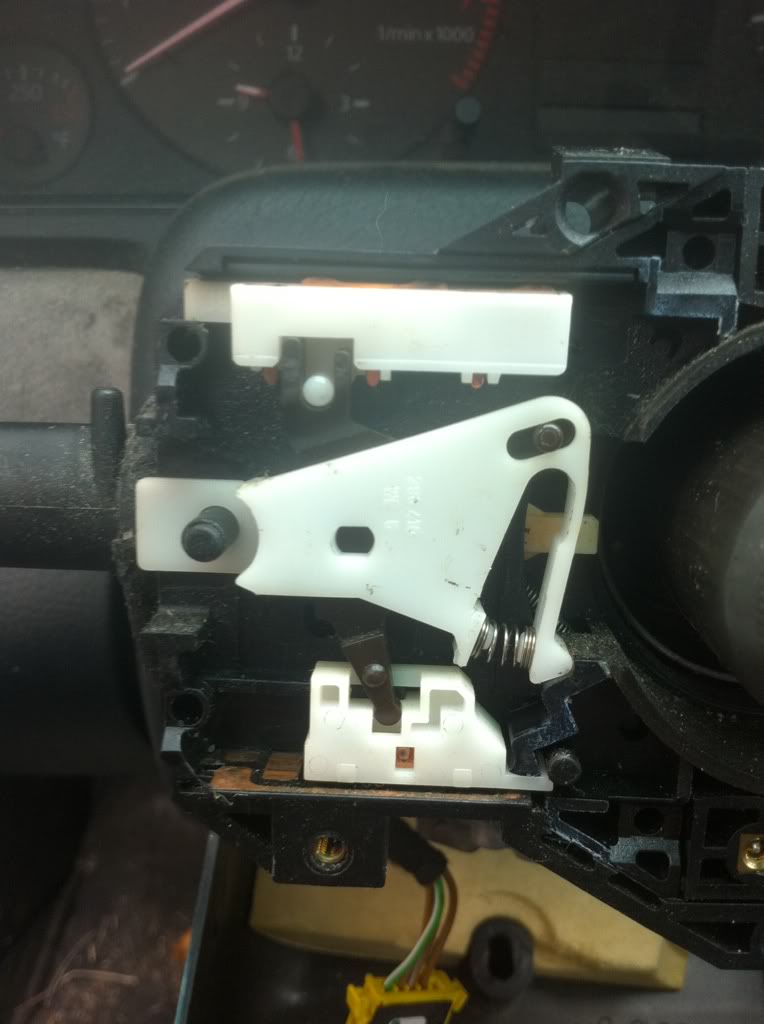
Before taking anything else apart, hold down on the center white actuator and move the switch lever through its range of positions so you can see how it works and use that as a reference when you put it all back together. For my own peace of mind, I disassemble and reassemble the switch with everything in the OFF position. That puts the lower slider positioned all the way to the right, and the upper one toward the left of the housing.
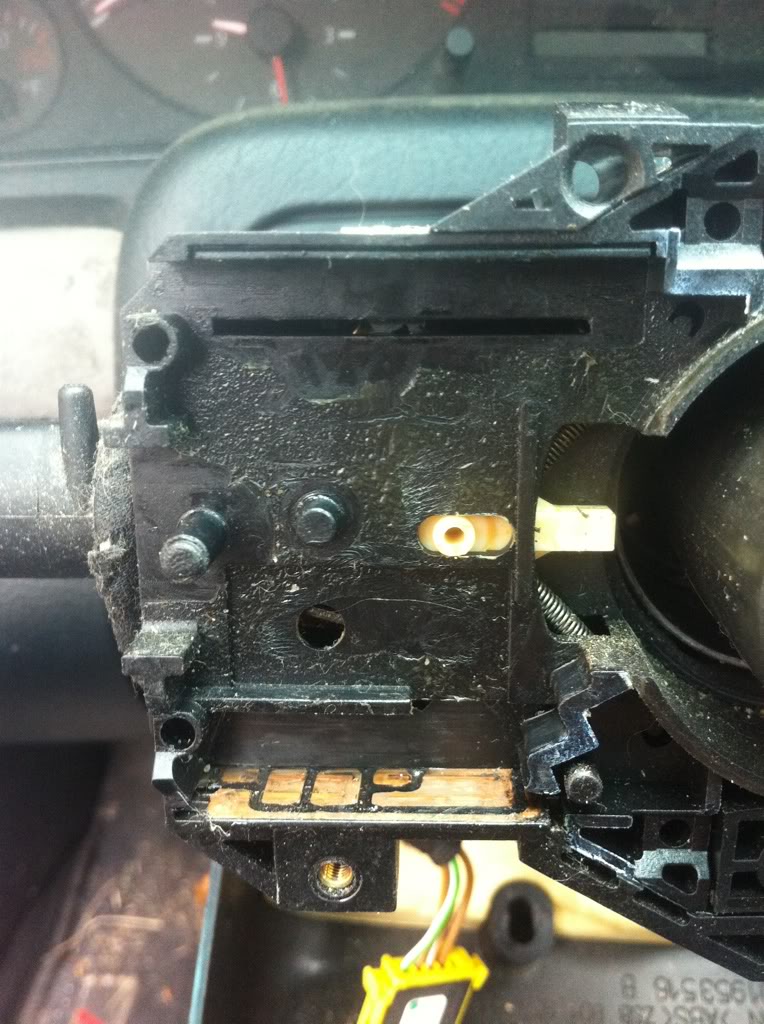
Remove the light switch lever, to get this:
Pop off the main white piece on top (the actuator lever). Don't lose that little spring in there - keep an eye on it when you take things apart and make sure that if it does come out (which is fairly likely) you put it back in the same position.
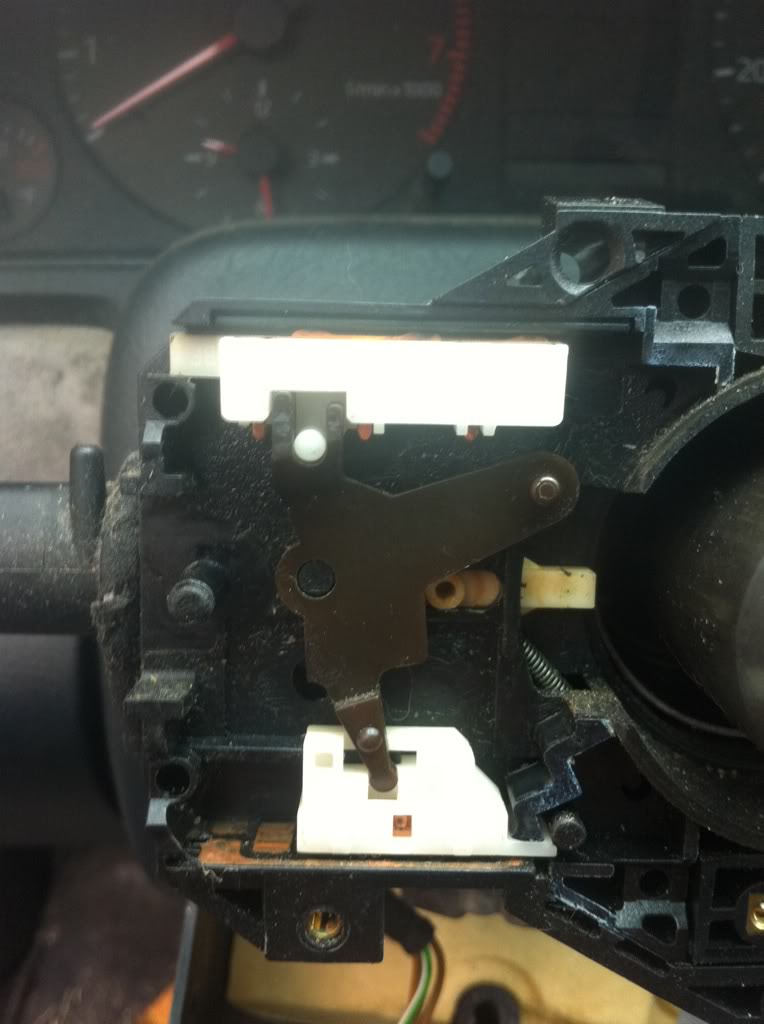
Remove the brown motion translater and you're left with the two white sliding contact pieces. In this one, I'm holding the upper one in place where it sits with the translator in place:
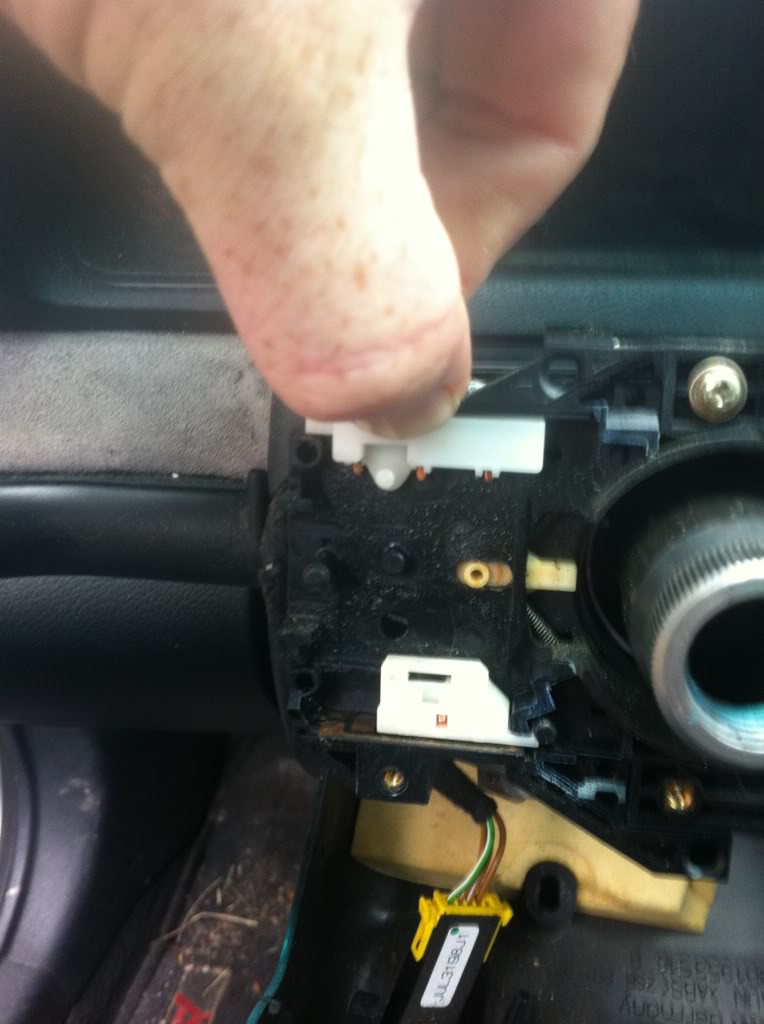
Removing the upper slider, you're left only with the headlight contact slider in the bottom. This is the one that takes the brunt of the 23A of current that goes through the lighting system when lows, fogs, and rear fog are on. Seems in retrospect like a stupid design, using a plastic piece with a copper contact to handle all that current, rather than using headlight relays to handle the heavy current and keep the plastic from melting and distorting, pulling the copper contact bar off the pads in the housing and killing the lighting system.
Looking at the above picture, there are two copper contacts visible in the bottom of the switch housing just to the left of the white contact slider. The one closest to the slider is "grabbed" when the switch is put into parking light position, activating the parking lights. Moving the switch to the headlight position moves the slider all the way to the left, where it contacts the pad at the end of its travel to turn on the lights. When the plastic slider heats up, it distorts and lifts the contact bars upward, where they can't contact these pads and turn the lights on.
This last pic is the switch housing with everything removed, and you can see the various contact pads. While you recondition your switch, use some electrical contact cleaner, a scouring pad or fine sandpaper, and some Q-tips, to clean these pads and the contact bars in the slider until they gleam. Be sure to clean any pads/rails on the upper part of the housing as well, where the upper slider moves. That'll help them conduct cleanly and keep the impedance low so that excess heat won't build up as readily.
When you need to put the switch guts back together, just follow the pics above in reverse order. Happy trails.
First off, here's the existing DIY for switch removal:
http://www.audiworld.com/tech/elec114.shtml
Once the switch is out, you'll need the T10 Torx bit to remove the four tiny screws that hold the metal cover on the housing, to gain access to the switch internals. If you don't pay attention, you may fumble around trying to put the pieces back correctly, so here's some shots I took last time I took one apart.
Once the cover is off, you'll see this:
Before taking anything else apart, hold down on the center white actuator and move the switch lever through its range of positions so you can see how it works and use that as a reference when you put it all back together. For my own peace of mind, I disassemble and reassemble the switch with everything in the OFF position. That puts the lower slider positioned all the way to the right, and the upper one toward the left of the housing.
Remove the light switch lever, to get this:
Pop off the main white piece on top (the actuator lever). Don't lose that little spring in there - keep an eye on it when you take things apart and make sure that if it does come out (which is fairly likely) you put it back in the same position.
Remove the brown motion translater and you're left with the two white sliding contact pieces. In this one, I'm holding the upper one in place where it sits with the translator in place:
Removing the upper slider, you're left only with the headlight contact slider in the bottom. This is the one that takes the brunt of the 23A of current that goes through the lighting system when lows, fogs, and rear fog are on. Seems in retrospect like a stupid design, using a plastic piece with a copper contact to handle all that current, rather than using headlight relays to handle the heavy current and keep the plastic from melting and distorting, pulling the copper contact bar off the pads in the housing and killing the lighting system.
Looking at the above picture, there are two copper contacts visible in the bottom of the switch housing just to the left of the white contact slider. The one closest to the slider is "grabbed" when the switch is put into parking light position, activating the parking lights. Moving the switch to the headlight position moves the slider all the way to the left, where it contacts the pad at the end of its travel to turn on the lights. When the plastic slider heats up, it distorts and lifts the contact bars upward, where they can't contact these pads and turn the lights on.
This last pic is the switch housing with everything removed, and you can see the various contact pads. While you recondition your switch, use some electrical contact cleaner, a scouring pad or fine sandpaper, and some Q-tips, to clean these pads and the contact bars in the slider until they gleam. Be sure to clean any pads/rails on the upper part of the housing as well, where the upper slider moves. That'll help them conduct cleanly and keep the impedance low so that excess heat won't build up as readily.
When you need to put the switch guts back together, just follow the pics above in reverse order. Happy trails.
Last edited by ImTheDevil; Jan 31, 2012 at 04:54 PM.

Thread
Thread Starter
Forum
Replies
Last Post
ImTheDevil
Audi A4
10
Dec 30, 2012 11:26 PM