
MetalMan's 1.8T FrankenTurbo (F4H-L, F21) Build Thread


Thread Starter
|
3rd Gear
Joined: Jan 2010
Posts: 1,973
From: Costa Mesa, SoCal
This morning I talked with my wife about the clutch situation. I decided to buy the Valeo single mass flywheel conversion clutch kit, because I was able to get it off Amazon for $373 including tax. Also ordered a new primary O2 sensor (another $79 including tax). And I have Prime so they should both be here Saturday.
This car (like any Audi project) is awful when it comes to nickel-and-dime-ing.
I have an ambitious plan for replacement of parts moving forward. It's been on my mind for a while, and will serve as my master list.
It goes in order of something like this: (red indicates completed, green indicates in-progess/upcoming)
1) remove throttle body / intake manifold, including coolant crossover pipe and fuel rail. Degrease/mask/sandblast/paint intake manifold.
2) remove PCV parts and replace check valves, and finish removal of N249 and N112 valves
3) remove suction jet pump
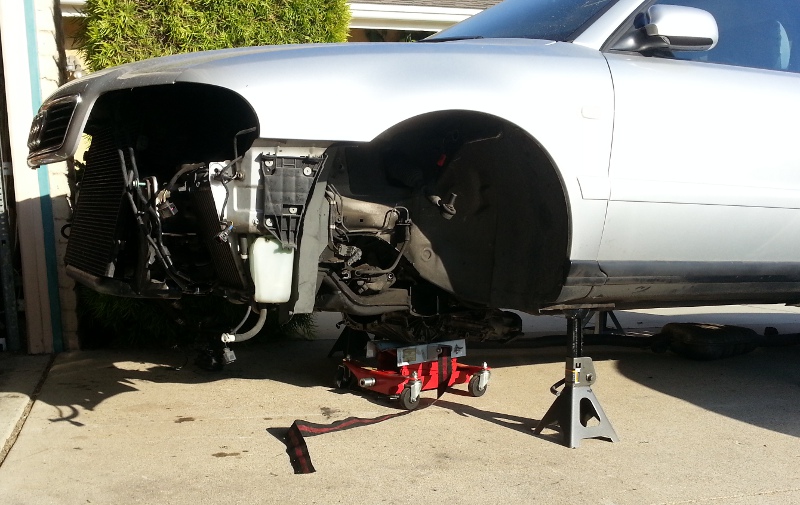
4) lift car up high with jack stands on all 4 corners. Remove all wheels.
5) remove all front control arms/spindles/hubs/axles/coilovers/sway bar/brakes, but don't remove axle bolts
6) remove downpipe and exhaust
7) remove cat and O2 sensors, and fully remove primary O2 sensor
8) drop AC compressor, remove turbo, exhaust manifold, and oil/coolant lines
9) remove transmission mounts, disconnect rear driveshaft, and remove tranny from car
10) replace entire tie rods (have all-metal upgraded tie rods). It's easy to access inner boot clamps from below with transmission removed.
11) remove snub mount and loosen snub cage
12) mark engine mount mounting bolt locations. Remove engine mounts and lift up engine by the oil pan. Use Harbor Freight engine support bar to hold engine up (instead of dropping the subframe).
13) pull oil pan and replace oil pickup tube (maintenance, might as well). It's easy to access 2 of the oil pan bolts with the transmission and clutch removed.
14) reinstall oil pan with new sealant. Install new engine mounts and lower engine back onto subframe. Install Stern snub mount.
15) replace pilot bearing, throwout bearing, and replace clutch (flywheel/clutch disk/pressure plate) with Valeo single-mass clutch kit
16) reinstall transmission, center driveshaft, with new transmission mounts
17) install AWE Drivetrain Stabilizer, with two mount bolts loose
18) loosely set in Milltek downpipe/034 high-flow cat (loosely bolted together) with new primary O2 sensor and rear O2 sensor with spacer installed
19) route braided stainless turbo oil feed line
20) install new 034 Motorsport silicone PCV parts and make sure all PCV system parts are in place except PRV and hard line that goes to the PRV
21) install FrankenTurbo exhaust manifold with new studs and gasket. Insert turbo mounting bolt closest to head with 034 K03/K04 locking tab. Loosely install FrankenTurbo. See about fabricating a bracket to support the turbo to the block. Torque turbo mounting bolts.
22) attach cat to turbo. Tighten cat-to-downpipe nuts.
23) Install oil and coolant lines. Fill oil and check for leaks.
24) Reattach AC compressor
25) install N75 valve, FrankenTurbo TIP, and DV, along with new vacuum lines
26) install boost gauge
27) install PRV and PRV hard line
28) install air box with a cap over the hole used for SAI fresh air inlet. Air box has AFE high-flow dry air filter.
29) replace alternator brushes (might as well, I already had them)
30) finalize the suction jet pump bypass. Route brake booster hose directly to intake manifold.
31) install intake manifold with its support bracket. Clean and install throttle body. Clean coolant crossover pipe, and install it with a new O-ring on the end that fits into coolant flange.
32) plug battery back in and perform a throttle body alignment
33) reattach turbo/intercooler hoses to front lower engine support bar. Install new AC and accessory belt tensioners, and install AC belt and shorter accessory belt (fan clutch delete).
34) install new coolant reservoir
35) install electric fan onto radiator support
36) wire up thermostatic relay for electric fan
37) install radiator support
38) install radiator and attach all cooling system parts, and install condenser
39) flush cooling system: fill cooling system with distilled water, let car idle until warm (cap removed from reservoir, AC blowing max heat), turn off engine, and drain water.
40) wait for car to cool down, and repeat above step a couple times to fully flush cooling system
41) fill car with 50/50 G12 coolant and distilled water (cap removed from reservoir, AC blowing max heat)
42) while engine is idling, coolant reservoir cap removed, and AC blowing max heat (to purge air from coolant system):
...a) tighten snub cage
...b) fully install/tighten AWE DTS
...c) re-torque turbo mounting bolts to spec (while engine is still hot). Bend tabs of 034 Motorsport K03/K04 locking tab to secure turbo bolts in place.
43) restore headlight lenses and reinstall headlights
44) install new front control arms, and reinstall front coilovers. Load front suspension and torque lower inner control arm bolts.
45) put '98 A4's front end up on jack stands, and remove A8/TT front brakes (including Tyrolsport bushings and SS brake lines), Neuspeed 29mm sway bar/spherical sway bar endlinks, and Bilstein/Tein shocks/springs
46) install OEM front shocks/springs to '98 A4, along with new front OEM rotors, and finish putting that car's front end back together
jack up rear of '98 A4, remove Neuspeed 28mm sway bar (to sell)and Bilstein/Tein rear shocks/springs. Install OEM rear shocks/springs on '98 A4. Put rear end back together.
48) install TT/A8 front brakes onto 2001 A4, with new Hawk HPS pads
49) install Neuspeed 29mm front sway bar onto 2001 A4?? or stock front sway bar?? with spherical joint endlinks onto 2001 A4.
50) install stock front sway bar with new OEM endlinks to '98 A4
51) swap 17" wheels from '98 A4 to 2001 A4, and 15" wheels from 2001 to '98
52) remove original (puny) sway bar, and install 034 rear sway bar with subframe brackets, and new metal Meyle HD endlinks
53) FINALLY car will be driveable
54) take car to local exhaust shop, and have exhaust fabbed up
55) take car to alignment shop next to my work, and have car aligned
56) enjoy car for a bit
57) find rear S4 brake calipers and finish rebuilding caliper brackets
58) remove rear brakes from 2001 A4
59) install S4 brakes, including new (vented ) rotors and Hawk HPS pads
60) slowly swap in upgraded audio components: front speakers, rear door speakers, 4chan. speaker amplifier, subwoofer amplifier, and install Nexus 7 as a head unit. Also install backup camera connected through Nexus 7.
61) build subwoofer box in place of old CD changer
62) figure out intercooler situation
63) install Hayden external power steering cooler
64) sell everything possible that isn't already sold
65) buy Motoza Hybrid K04 tune and Bosch 550cc injectors
66) flash Motoza tune to ECU and install Bosch 550cc injectors
67) take logs of engine performance to fine-tune Motoza tune
68) Retrofit Morimoto Mini H1 bi-xenon projectors into stock Valeo xenon headlights
69) re-do all interior trim fabric: A/D pillars, door card inserts, rear deck, headliner, sunroof shade
70) Drain transmission fluid, remove center differential and install 4:1 diff mod washers, reinstall center diff, and re-fill transmission fluid.
71) Drain rear differential fluid, and re-fill.
72) keep car for a LOOOONNGGG time so all of this work/money remains worthwhile
This car (like any Audi project) is awful when it comes to nickel-and-dime-ing.
I have an ambitious plan for replacement of parts moving forward. It's been on my mind for a while, and will serve as my master list.
It goes in order of something like this: (red indicates completed, green indicates in-progess/upcoming)
1) remove throttle body / intake manifold, including coolant crossover pipe and fuel rail. Degrease/mask/sandblast/paint intake manifold.
2) remove PCV parts and replace check valves, and finish removal of N249 and N112 valves
3) remove suction jet pump
4) lift car up high with jack stands on all 4 corners. Remove all wheels.
5) remove all front control arms/spindles/hubs/axles/coilovers/sway bar/brakes, but don't remove axle bolts
6) remove downpipe and exhaust
7) remove cat and O2 sensors, and fully remove primary O2 sensor
8) drop AC compressor, remove turbo, exhaust manifold, and oil/coolant lines
9) remove transmission mounts, disconnect rear driveshaft, and remove tranny from car
10) replace entire tie rods (have all-metal upgraded tie rods). It's easy to access inner boot clamps from below with transmission removed.
11) remove snub mount and loosen snub cage
12) mark engine mount mounting bolt locations. Remove engine mounts and lift up engine by the oil pan. Use Harbor Freight engine support bar to hold engine up (instead of dropping the subframe).
13) pull oil pan and replace oil pickup tube (maintenance, might as well). It's easy to access 2 of the oil pan bolts with the transmission and clutch removed.
14) reinstall oil pan with new sealant. Install new engine mounts and lower engine back onto subframe. Install Stern snub mount.
15) replace pilot bearing, throwout bearing, and replace clutch (flywheel/clutch disk/pressure plate) with Valeo single-mass clutch kit
16) reinstall transmission, center driveshaft, with new transmission mounts
17) install AWE Drivetrain Stabilizer, with two mount bolts loose
18) loosely set in Milltek downpipe/034 high-flow cat (loosely bolted together) with new primary O2 sensor and rear O2 sensor with spacer installed
19) route braided stainless turbo oil feed line
20) install new 034 Motorsport silicone PCV parts and make sure all PCV system parts are in place except PRV and hard line that goes to the PRV
21) install FrankenTurbo exhaust manifold with new studs and gasket. Insert turbo mounting bolt closest to head with 034 K03/K04 locking tab. Loosely install FrankenTurbo. See about fabricating a bracket to support the turbo to the block. Torque turbo mounting bolts.
22) attach cat to turbo. Tighten cat-to-downpipe nuts.
23) Install oil and coolant lines. Fill oil and check for leaks.
24) Reattach AC compressor
25) install N75 valve, FrankenTurbo TIP, and DV, along with new vacuum lines
26) install boost gauge
27) install PRV and PRV hard line
28) install air box with a cap over the hole used for SAI fresh air inlet. Air box has AFE high-flow dry air filter.
29) replace alternator brushes (might as well, I already had them)
30) finalize the suction jet pump bypass. Route brake booster hose directly to intake manifold.
31) install intake manifold with its support bracket. Clean and install throttle body. Clean coolant crossover pipe, and install it with a new O-ring on the end that fits into coolant flange.
32) plug battery back in and perform a throttle body alignment
33) reattach turbo/intercooler hoses to front lower engine support bar. Install new AC and accessory belt tensioners, and install AC belt and shorter accessory belt (fan clutch delete).
34) install new coolant reservoir
35) install electric fan onto radiator support
36) wire up thermostatic relay for electric fan
37) install radiator support
38) install radiator and attach all cooling system parts, and install condenser
39) flush cooling system: fill cooling system with distilled water, let car idle until warm (cap removed from reservoir, AC blowing max heat), turn off engine, and drain water.
40) wait for car to cool down, and repeat above step a couple times to fully flush cooling system
41) fill car with 50/50 G12 coolant and distilled water (cap removed from reservoir, AC blowing max heat)
42) while engine is idling, coolant reservoir cap removed, and AC blowing max heat (to purge air from coolant system):
...a) tighten snub cage
...b) fully install/tighten AWE DTS
...c) re-torque turbo mounting bolts to spec (while engine is still hot). Bend tabs of 034 Motorsport K03/K04 locking tab to secure turbo bolts in place.
43) restore headlight lenses and reinstall headlights
44) install new front control arms, and reinstall front coilovers. Load front suspension and torque lower inner control arm bolts.
45) put '98 A4's front end up on jack stands, and remove A8/TT front brakes (including Tyrolsport bushings and SS brake lines), Neuspeed 29mm sway bar/spherical sway bar endlinks, and Bilstein/Tein shocks/springs
46) install OEM front shocks/springs to '98 A4, along with new front OEM rotors, and finish putting that car's front end back together
jack up rear of '98 A4, remove Neuspeed 28mm sway bar (to sell)and Bilstein/Tein rear shocks/springs. Install OEM rear shocks/springs on '98 A4. Put rear end back together.
48) install TT/A8 front brakes onto 2001 A4, with new Hawk HPS pads
49) install Neuspeed 29mm front sway bar onto 2001 A4?? or stock front sway bar?? with spherical joint endlinks onto 2001 A4.
50) install stock front sway bar with new OEM endlinks to '98 A4
51) swap 17" wheels from '98 A4 to 2001 A4, and 15" wheels from 2001 to '98
52) remove original (puny) sway bar, and install 034 rear sway bar with subframe brackets, and new metal Meyle HD endlinks
53) FINALLY car will be driveable
54) take car to local exhaust shop, and have exhaust fabbed up
55) take car to alignment shop next to my work, and have car aligned
56) enjoy car for a bit
57) find rear S4 brake calipers and finish rebuilding caliper brackets
58) remove rear brakes from 2001 A4
59) install S4 brakes, including new (vented
) rotors and Hawk HPS pads60) slowly swap in upgraded audio components: front speakers, rear door speakers, 4chan. speaker amplifier, subwoofer amplifier, and install Nexus 7 as a head unit. Also install backup camera connected through Nexus 7.
61) build subwoofer box in place of old CD changer
62) figure out intercooler situation
63) install Hayden external power steering cooler
64) sell everything possible that isn't already sold
65) buy Motoza Hybrid K04 tune and Bosch 550cc injectors
66) flash Motoza tune to ECU and install Bosch 550cc injectors
67) take logs of engine performance to fine-tune Motoza tune
68) Retrofit Morimoto Mini H1 bi-xenon projectors into stock Valeo xenon headlights
69) re-do all interior trim fabric: A/D pillars, door card inserts, rear deck, headliner, sunroof shade
70) Drain transmission fluid, remove center differential and install 4:1 diff mod washers, reinstall center diff, and re-fill transmission fluid.
71) Drain rear differential fluid, and re-fill.
72) keep car for a LOOOONNGGG time so all of this work/money remains worthwhile
Last edited by MetalMan; Jan 16, 2015 at 02:26 PM.
Thread Starter
|
3rd Gear
Joined: Jan 2010
Posts: 1,973
From: Costa Mesa, SoCal
So this is how I ended today:

My main goal today was to get the transmission out of the car, after first removing all of the exhaust, turbo/manifold/oil/coolant lines, etc.
Yesterday I rented a Harbor Freight transmission jack from a local guy (found on Craigslist!) and it worked out quite well
Still have to remove the old clutch, but at least the Valeo clutch kit came in. Although I was only able to find 5 pressure plate bolts in the box... have 2 sets of pressure plate bolts of my own that I can dig into.
Will also replace the pilot bearing while the dual-mass flywheel is off the car, before installing the single-mass flywheel.
Last edited by MetalMan; Oct 20, 2013 at 03:40 AM.
Thread Starter
|
3rd Gear
Joined: Jan 2010
Posts: 1,973
From: Costa Mesa, SoCal
Today I researched how to go about pulling the oil pan to replace the oil pickup tube. Saw several different ways to do it... one way requires the transmission to be installed, so that the whole engine/tranny can be lifted by either the AC bracket and/or by prying the subframe down, while pivoting off of the tranny mounts.
Another way requires supporting the engine while the subframe is dropped from underneath it. Either an engine hoist or something like the Harbor Freight engine support bar would normally be used.
My situation is unique: my transmission AND front lock carrier are removed so I have ultimate access to everything. This includes perfect access to the 2 oil pan bolts that are normal hidden by the transmission/flywheel, and require a very long 5mm hex driver to access.
So I got to thinking about how I could remove the oil pan while keeping the transmission separated. Right now the only things holding the engine up are the 2 engine mounts, and the snub mount (partially) keeps the engine from rocking forward/backward. The engine mounts cannot be used to support the engine while the pan is off (because the engine and subframe need to be disconnected from each other).
What it came down to is that I bought the Harbor Freight engine support bar for $79.99 - 25% with a coupon (save $20!!), $7 shipping, and a few $$ for tax. Total came out to almost $72.
I'm thinking about lifting the engine by placing a jack and a block of wood under the oil pan, and undoing the engine mounts. Then I would use the engine support bar to maintain the raised engine position, while I work at removing the oil pan. Seems simple enough, so hopefully I won't need to drop the subframe! (which would potentially mess with its alignment)
Also, it turns out the inner clamps that hold on the steering tie rod boots are very easily accessible from below the car while the transmission is out! So I'm working on that as well. Just ordered a 1.5" 1/2" drive crow's foot wrench to remove the inner tie rods. Hopefully that will work!
Last edited by MetalMan; Oct 23, 2013 at 03:16 PM.
Thread Starter
|
3rd Gear
Joined: Jan 2010
Posts: 1,973
From: Costa Mesa, SoCal
Got the Harbor Freight engine support mounted up last night, pulled the oil pan, swapped the oil pickup tube, cleaned off all the old sealant, applied new sealant to the pan, realized I needed to drop one side of the subframe, cleaned off the new sealant, reapplied more sealant, and bolted the pan back on.
WHAT A PITA it is to drop the pan! Somehow I managed to wiggle the pan out, with the engine elevated a bit on the engine support, but I couldn't finagle it back in. Was trying to avoid dropping the subframe (alignment...) but ended up dropping the driver's side of the subframe. The sealant starts to cure in 5-15mins, so you have to work fast, and I spent too much time the first time around after applying sealant that I needed to remove it and start fresh.
But it's done at least! The old pickup tube definitely had lots of debris on it screen so I'm glad I replaced it. And I'm happy that there wasn't much in the way of sludge (just a really thin layer in a couple spots on the pan). Though it looked like there were pieces of broken dipstick tube at the bottom of the pan so I took care of that.
Also have new engine mounts installed, as well as a Stern snub mount old (stock) snub mount was torn to bits, and one of the engine mounts you could hear the fluid inside.
WHAT A PITA it is to drop the pan! Somehow I managed to wiggle the pan out, with the engine elevated a bit on the engine support, but I couldn't finagle it back in. Was trying to avoid dropping the subframe (alignment...) but ended up dropping the driver's side of the subframe. The sealant starts to cure in 5-15mins, so you have to work fast, and I spent too much time the first time around after applying sealant that I needed to remove it and start fresh.
But it's done at least! The old pickup tube definitely had lots of debris on it screen so I'm glad I replaced it. And I'm happy that there wasn't much in the way of sludge (just a really thin layer in a couple spots on the pan). Though it looked like there were pieces of broken dipstick tube at the bottom of the pan so I took care of that.
Also have new engine mounts installed, as well as a Stern snub mount
old (stock) snub mount was torn to bits, and one of the engine mounts you could hear the fluid inside.
Thread Starter
|
3rd Gear
Joined: Jan 2010
Posts: 1,973
From: Costa Mesa, SoCal
Last night I had a few hours to get stuff done...
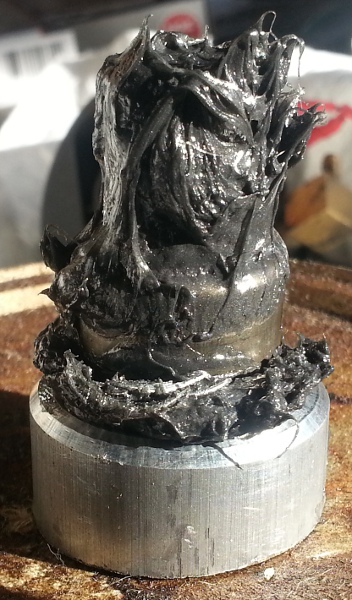
1) used a custom-made tool to use hydraulic pressure from thick axle grease to push out the old pilot bearing in the crank shaft. Installed a new pilot bearing. This was a pretty fun/cool process!
2) installed the new flywheel, clutch disk, and pressure plate. One of the flywheel bolts had slightly messed up threads, so I re-threaded it with a M10 x 1.0 die, and wasted maybe half an hour on that one bolt. Torqued the flywheel bolts to 44 ft-lb and turned them an additional 90 degrees.
Pressure plate bolts went in (with clutch alignment tool) at 18 ft-lbs plus 90 degrees.
3) finished removing and replacing the whole tie rods. I tried to match the length of the new tie rod assemblies to the old ones, hoping the alignment won't be far off (it was just aligned by Eibach a month ago). Gotta say, the 1.5" crows foot wrench (and having no control arms) made removing/installing the inner tie rods a piece of cake!
4) the hard part - refitting the transmission. Seems like they never want to align properly. After much strength-induced finagling, and rotating of the crank, it finally popped into place. Only a few bolts are in, and some are in the wrong places. Really just wanted to get it mated to the engine... also installed the slave cylinder before lifting the tranny into place; this made it so much easier to install!
Thread Starter
|
3rd Gear
Joined: Jan 2010
Posts: 1,973
From: Costa Mesa, SoCal
Man, that FrankenTurbo exhaust manifold never fails to be a bitch. This time around I used 034 Motorsport's M8 lock nuts which use a 10mm wrench to install. I switched between a Crow's Foot wrench on a swivel extension, and a 10mm combination wrench to get the exhaust manifold nuts tight. Even was able to torque most of them properly! Used 9 of these 034 nuts, in the harder to reach areas, and standard 12mm-wrench nuts on the other 4 studs.
Pulling out the old exhaust manifold studs from the head yesterday was beyond not-fun. They ALL required excessive force with vice grip pliers to come out, and every hole in the head required chasing. Even then, all the new studs required persuasion to thread in, and one stud still didn't really thread in properly (ended up cutting it down so it wouldn't interfere with the FT exhaust mani).
So glad to have the exhaust manifold on, because that's ALWAYS one of my least favorite tasks. And of course I remembered to install it with the bolt closest to the head ALREADY in the manifold, with the 034 Motorsport K03/K04 locking tab in place.
Moving right along! Today I sandblasted and painted the intake manifold black, after degreasing and masking it yesterday. Letting it dry overnight so we'll see what it looks like tomorrow
Last thing I finished tonight was the block-side install of my Psi Concepts braided stainless steel turbo oil feed line. It's installed with a M12x1.0 to AN-4 fitting, and a 90-degree AN-4 fitting, then the line. Will finish routing it tomorrow with the new AN-4 cushion clamps.
Also tomorrow I plan to get lots done... including helping a buddy learn how to change the oil in his 2006 Honda CRV. Gonna get the turbo/cat/downpipe and everything associated with those installed, planning to fill the oil and check for leaks, then get the intake mani and throttle body reinstalled, and we'll see how much more time there is to get the rest of the front end back together
Thread Starter
|
3rd Gear
Joined: Jan 2010
Posts: 1,973
From: Costa Mesa, SoCal
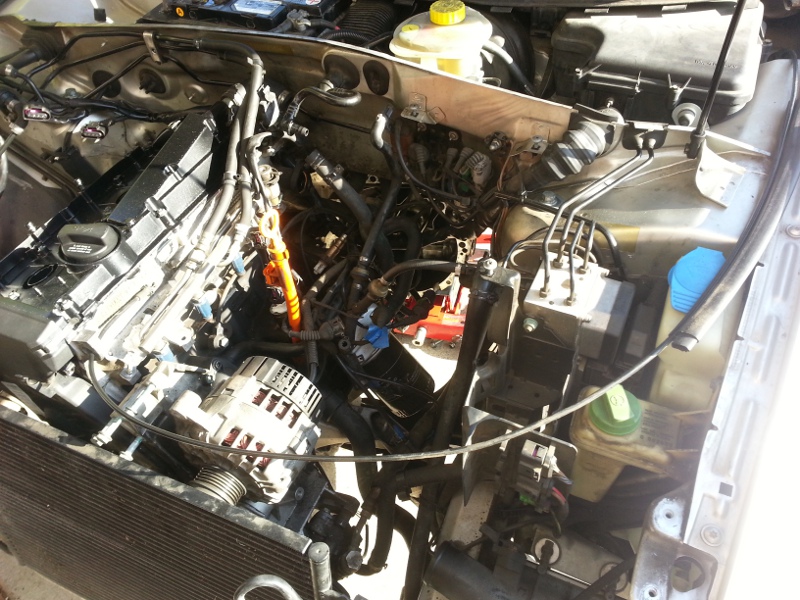
Well, she's alive! Took yesterday (Monday) off work and spent the day from 7:30am - 6:30pm and got lots done.
First and foremost: finished putting the engine bay back together. This meant installing the intake manifold with new gasket, fuel rail/injectors, throttle body (after cleaning it thoroughly) with new gakset, putting in a new coolant reservoir and cap, hooking up all intercooler hoses, installing the FrankenTurbo TIP and getting all of the PCV/DV/N75/MBC lines routed, installing the airbox, etc.
Finalized the removal of the suction jet pump: 1) Put in a hose that connected the brake booster line directly to the intake manifold. 2) Modified the leftover AEB "L" hose and the 034 Motorsport silicone "S" hose to connect the PCV valve directly to the intake manifold.
Then I installed my electric fan onto the radiator support, which only took drilling 4 holes and bolting it down (already had it set up from old A4). Still have to wire up the thermostatic relay though. And got the radiator in.
Replaced the cabin air filter while the cowl covers were off.
Before final installation of the oil feed line and subsequent filling of engine oil, I poured some oil into the turbo oil feed port to make sure the turbo wouldn't be dry on first start.
Speaking of first start: with the fuel injector connectors removed, and fuel pump fuse removed, I cranked the engine twice for 15sec. each with a minute between. The battery wasn't so happy afterwards lol. Had to hook up the charger for a few minutes, which gave me time to plug in the injector connectors and fuel pump fuse.
Then I primed the fuel a couple times (key to ON position), cranked for about 5 seconds, and it fired!!
Let it idle to warm with the distilled water in the cooling system, while I checked for leaks. Then shut it down, and waited a few minutes before draining the cooling system.
Filled up with distilled water, and repeated this process two more times.
The fluid coming out still isn't super clear, but after 3 flushes it's "good enough" and today after work I'll fill up with coolant and water to make ~50/50.
Yesterday I also got all the passenger-side control arms and suspension in, with the driveshaft bolted in. Still need brakes, which will come from the '98.5 A4.
First and foremost: finished putting the engine bay back together. This meant installing the intake manifold with new gasket, fuel rail/injectors, throttle body (after cleaning it thoroughly) with new gakset, putting in a new coolant reservoir and cap, hooking up all intercooler hoses, installing the FrankenTurbo TIP and getting all of the PCV/DV/N75/MBC lines routed, installing the airbox, etc.
Finalized the removal of the suction jet pump: 1) Put in a hose that connected the brake booster line directly to the intake manifold. 2) Modified the leftover AEB "L" hose and the 034 Motorsport silicone "S" hose to connect the PCV valve directly to the intake manifold.
Then I installed my electric fan onto the radiator support, which only took drilling 4 holes and bolting it down
(already had it set up from old A4). Still have to wire up the thermostatic relay though. And got the radiator in.Replaced the cabin air filter while the cowl covers were off.
Before final installation of the oil feed line and subsequent filling of engine oil, I poured some oil into the turbo oil feed port to make sure the turbo wouldn't be dry on first start.
Speaking of first start: with the fuel injector connectors removed, and fuel pump fuse removed, I cranked the engine twice for 15sec. each with a minute between. The battery wasn't so happy afterwards lol. Had to hook up the charger for a few minutes, which gave me time to plug in the injector connectors and fuel pump fuse.
Then I primed the fuel a couple times (key to ON position), cranked for about 5 seconds, and it fired!!
Let it idle to warm with the distilled water in the cooling system, while I checked for leaks. Then shut it down, and waited a few minutes before draining the cooling system.
Filled up with distilled water, and repeated this process two more times.
The fluid coming out still isn't super clear, but after 3 flushes it's "good enough" and today after work I'll fill up with coolant and water to make ~50/50.
Yesterday I also got all the passenger-side control arms and suspension in, with the driveshaft bolted in. Still need brakes, which will come from the '98.5 A4.
Thread Starter
|
3rd Gear
Joined: Jan 2010
Posts: 1,973
From: Costa Mesa, SoCal
On Wednesday I spent a few hours getting the passenger-side front control arms/suspension/driveshaft in, so now all suspension is done except for installation of the front sway bar and installing the 034 Motorsport rear sway bar/subframe brakcets.
Also I took some time to figure out how to route a wire from the fuel pump relay into the engine bay area. This took some careful thought, because I wanted it to be clean, unlike how it ended up in the '98 A4 (wires strewn everywhere). My pertinent reason for this is to provide an engine-on signal to a Hayden thermostatic relay controller, which is used to power the electric fan that I'm using in place of the clutch fan.
What I ended up doing was drilling a small hole through the ECU box next to the brake booster, big enough to fit a #10 screw. A screw goes the hole, with a terminal lug on the inside of the ECU box, and a wire runs from that terminal lug to the post attached to the fuel pump relay.
Outside the ECU box, terminal lugs can attach to this screw. I'm routing wires into the false firewall area through the grommet which is used for the throttle cable on DBC cars.
Thought I'd post up some older pics.
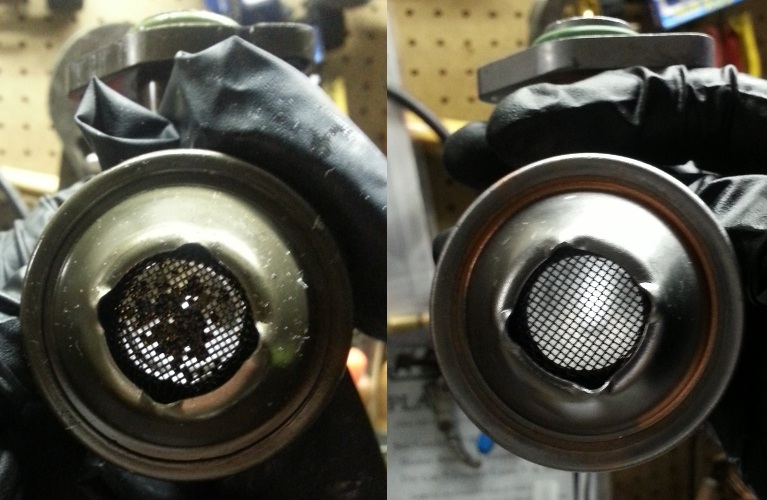
First up, old vs. new oil pickup tubes. Note that the engine seemed to run just fine with the pickup tube clogged like that.
Next is the tool I made to remove the old pilot bearing in the crankshaft (while changing the clutch/flywheel). The old pilot bearing is still on the tool in these pictures, as is the grease I used to get the old pilot bearing out. More on this later.
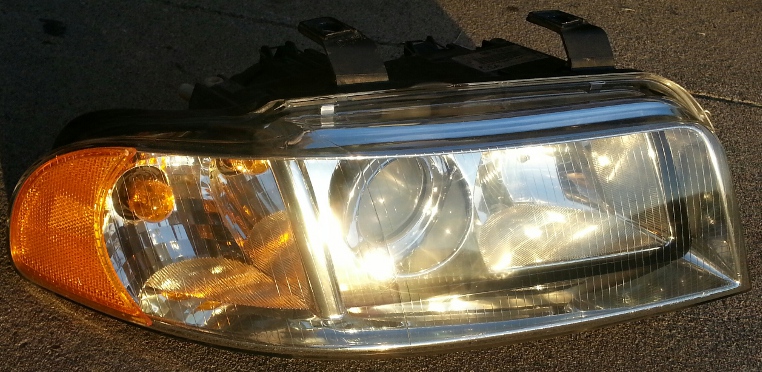
And lastly, on Tuesday I restored the 2001.5 A4's headlight lenses (they're stock Valeo Xenon, with automatic level adjustment) using the Sylvania Headlight Restoration Kit. In some of my older pics of the car you can somewhat see the haze/yellow of the headlight lenses before. Here's the after pic :
Also I took some time to figure out how to route a wire from the fuel pump relay into the engine bay area. This took some careful thought, because I wanted it to be clean, unlike how it ended up in the '98 A4 (wires strewn everywhere). My pertinent reason for this is to provide an engine-on signal to a Hayden thermostatic relay controller, which is used to power the electric fan that I'm using in place of the clutch fan.
What I ended up doing was drilling a small hole through the ECU box next to the brake booster, big enough to fit a #10 screw. A screw goes the hole, with a terminal lug on the inside of the ECU box, and a wire runs from that terminal lug to the post attached to the fuel pump relay.
Outside the ECU box, terminal lugs can attach to this screw. I'm routing wires into the false firewall area through the grommet which is used for the throttle cable on DBC cars.
Thought I'd post up some older pics.
First up, old vs. new oil pickup tubes. Note that the engine seemed to run just fine with the pickup tube clogged like that.
Next is the tool I made to remove the old pilot bearing in the crankshaft (while changing the clutch/flywheel). The old pilot bearing is still on the tool in these pictures, as is the grease I used to get the old pilot bearing out. More on this later.
And lastly, on Tuesday I restored the 2001.5 A4's headlight lenses (they're stock Valeo Xenon, with automatic level adjustment) using the Sylvania Headlight Restoration Kit. In some of my older pics of the car you can somewhat see the haze/yellow of the headlight lenses before. Here's the after pic
:
Thread Starter
|
3rd Gear
Joined: Jan 2010
Posts: 1,973
From: Costa Mesa, SoCal
Over the weekend I got the 2001 A4 all back together, including swapping the better A8/TT front brakes with Tyrolsport bushings and stainless steel brake lines from the '98, and also installed the Neuspeed front sway bar to the 2001.
The car was open downpipe at this point, so pretty loud, and lots of rattling from the downpipe bouncing off the AWE Drivetrain Stabilizer.
Took it in for a custom downpipe-back exhaust the same as the '98 A4 has (2.5", with 2.5" 22" long Magnaflow resonator, and 3" in/out Magnaflow muffler with 3" oval tip), for the amazing price of $592
At least it has exhaust that fits well, though.
And today I took the car in for an alignment, even though Eibach just aligned the car a month ago - since then (coilover install) I put on new control arms AND inner/outer tie rods. The guy said the front alignment was pretty off but it's good now (another $120, though  )
)
Handling... this car is a beast on-power. It feels as though it wants MORE throttle while in a turn, like the car is confident in its abilities. The driver will need to build some confidence to tame this beast.
One weird thing: going up driveways, even angled, I get 2 clunks from the right rear of the car: one for each of the back wheels coming up the driveway. This may be due to the car 3-wheeling from the stiffer sway bars, but I haven't actually watched it happen so I'll need to look into that further. Perhaps the car is just too stiff with the gigantic 034 rear sway bar (even on the softer setting) and the Neuspeed 29mm front sway bar. Or perhaps a bolt or two loosened up after parts shifted around.
Also found a brand new set (in packaging) of Bosch Racing 550cc injectors with adapters, for $175 shipped! They were in ECS Tuning packaging, and for reference the cheapest I found these injectors/adapters online was $210. So I was indeed happy to save $35
The car was open downpipe at this point, so pretty loud, and lots of rattling from the downpipe bouncing off the AWE Drivetrain Stabilizer.
Took it in for a custom downpipe-back exhaust the same as the '98 A4 has (2.5", with 2.5" 22" long Magnaflow resonator, and 3" in/out Magnaflow muffler with 3" oval tip), for the amazing price of $592
At least it has exhaust that fits well, though.
And today I took the car in for an alignment, even though Eibach just aligned the car a month ago - since then (coilover install) I put on new control arms AND inner/outer tie rods. The guy said the front alignment was pretty off but it's good now
(another $120, though )Handling... this car is a beast on-power. It feels as though it wants MORE throttle while in a turn, like the car is confident in its abilities. The driver will need to build some confidence to tame this beast.
One weird thing: going up driveways, even angled, I get 2 clunks from the right rear of the car: one for each of the back wheels coming up the driveway. This may be due to the car 3-wheeling from the stiffer sway bars, but I haven't actually watched it happen so I'll need to look into that further. Perhaps the car is just too stiff with the gigantic 034 rear sway bar (even on the softer setting) and the Neuspeed 29mm front sway bar. Or perhaps a bolt or two loosened up after parts shifted around.
Also found a brand new set (in packaging) of Bosch Racing 550cc injectors with adapters, for $175 shipped! They were in ECS Tuning packaging, and for reference the cheapest I found these injectors/adapters online was $210. So I was indeed happy to save $35
Last edited by MetalMan; Nov 14, 2013 at 11:11 AM.
Thread Starter
|
3rd Gear
Joined: Jan 2010
Posts: 1,973
From: Costa Mesa, SoCal
Been spending lots of free time lately getting the Nexus 7 mounted up to the center console of the 2001 A4. Here's a progress pic from last week:
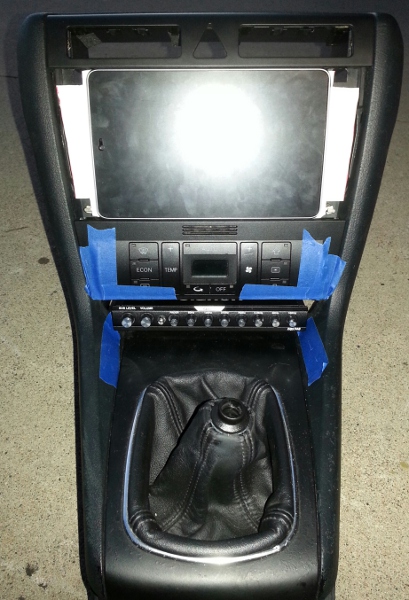
It's much further than that now; the tablet and custom double-din box are now secured, and the faceplate is completed along with being wrapped in 3M Di-Noc carbon fiber vinyl. The HVAC faceplate and hazard surround trim are also wrapped.
Last night I cut out a slot in the ash tray trim piece for the Clarion EQS746 (seen at the bottom of that pic) to fit the EQS746 in the space where the ash tray normally resides. It's a moderately tight fit, but that makes securing the EQS746 easier
Still have some USB wiring to do, and I'll take more detailed pictures later. This Nexus 7 mount is pretty sweet!
Oh, and this time around I'm actually gonna do the backup camera.