
Valley Pan Gasket; Head Gaskets

Thread Starter
|
3rd Gear
Joined: Dec 2008
Posts: 1,941
From: IL
Jim,
but we did establish that, didn't we? I'm glad that another source confirms that # 3 cylinder is at TDC and not # 1. Thanks for the reassurance.
Anyway, I got another question for you.
I don't get the deal with torque wrenches. They suppose to "click" when reaching the set torque, don't they? At least that's my understanding (never used one before)
After cleaning good those two check valves in the valley pan, I put in a new gasket and it appeared to be a good occasion to try the torque wrench... The valley pan bolts should be torqued at 7 ft/lbs.
I set the torque to that value. I tightened all the bolts a bit weary and with caution, but I still managed to strip one bolt out of 9 waiting and waiting for the stupid thing to click.
How in the world these things suppose to really work? Did I buy a worthless one ($ 27 at O'reilley; the biggest and most expensive one they got)?
I guess I'll be ready tomorrow to put back in the camshaft on that passenger side head. Just need to buy some assembly grease.
Then waiting for the UPS... probably I get the parts by Wednesday or Thursday.
4th Gear
Joined: Mar 2009
Posts: 3,042
From: Indiana
My guess is that the one you have doesnt actually go that low... It takes a pretty small wrench.
You could just tighten it with a rachet holding it by the head, not the handle. This will give you about 10lbs max depending on how strong your fingers are.
You could just tighten it with a rachet holding it by the head, not the handle. This will give you about 10lbs max depending on how strong your fingers are.
Thread Starter
|
3rd Gear
Joined: Dec 2008
Posts: 1,941
From: IL
Oh yeah... let the fun begin! ")
-
-
-
-
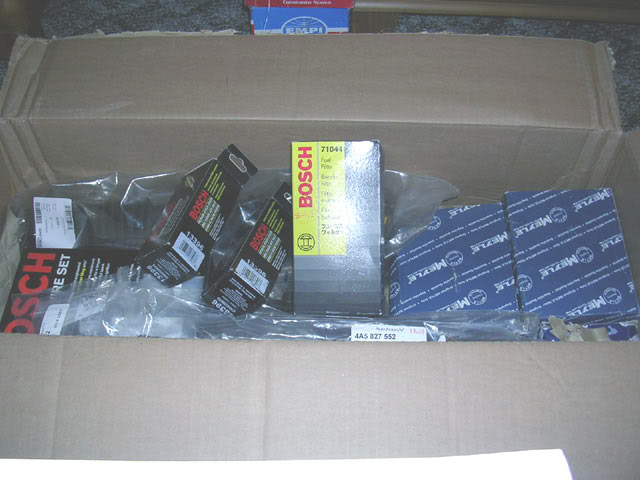
000000-000648 10mm Drain Plug; 10x1x8mm $1.86 1 $1.86
007603-014106 14mm Copper Seal Washer; 14x20x1.5mm $0.13 8 $1.04
3010 Moly Assembly Lube, 50 gram tube $7.95 1 $7.95
034919369C Coolant Temperature Switch; Brown 3 Pin Injector Connector; 14x1.5mm $40.99 1 $40.99
N90316802 Coolant Temperature Switch; Outlet O-Ring Seal 19.6x3.6mm $0.20 2 $0.40
025121142 Coolant Temperature Switch; Retainer C-Clip for Sensor or Plug in Water Outlet Flange $0.50 2 $1.00
078103385J Cylinder Head Bolt; 137.5mm Length; 6 Point Head $2.91 16 $46.56
026131547 EGR Valve Gasket $1.48 1 $1.48
71044 Fuel Filter; 172x89mm; 12mm Inlet x 14mm Outlet $7.83 1 $7.83
1287013003 Fuel Injector Repair Kit; Terminal Repair Kit For 2 Prong Bosch Injector Type Plug $7.83 2 $15.66
13641286708 Fuel Injector Seal; 7.8x3.6mm $0.83 12 $9.96
191953227A Hazard Warning Relay; Flasher/Turn Signal with 3 Prong Connector $5.95 1 $5.95
4A0905849B Ignition Switch $8.78 1 $8.78
N90660601 Oil Drain Plug; 14x18x1.5mm; Without Seal Washer $1.64 1 $1.64
06A103483D Oil Filler Cap; Oil Filler Cap Gasket; 38.5x59x2.5mm $0.88 1 $0.88
078103609G Oil Pan Gasket; Lower Section $12.20 1 $12.20
13396 Oxygen Sensor; OE Version; Three Wire; Heated $83.17 2 $166.34
431419831 Rack & Pinion Boot $18.67 1 $18.67
4A5827552 Shock/Strut, Trunk; Left/Right; Aftermarket Replacement $16.27 2 $32.54
09356 Spark Plug Wire Set; OE Type $80.76 1 $80.76
11611437560 Vacuum Hose/Line; Vacuum Cap, 3.5mm ID $0.73 1 $0.73
11611437694 Vacuum Hose/Line; Vacuum Cap, 5.0mm $3.39 1 $3.39
027109675 Valve Stem Seal; 7mm ID; Intake/Exhaust $0.98 12 $11.76
N90380002 Water Outlet Gasket; O-Ring 24x3mm; Pipe to Thermostat Housing $0.88 3 $2.64
N90560701 Water Outlet Gasket; O-Ring 30x5mm; Coolant Pipe to Rear of Cylinder Head $1.16 2 $2.32
026906161 Water Temperature Sensor; White with 2 Prong Connector; 10x1.0mm $9.79 1 $9.79
4A0498625 Wheel Bearing Kit; Front Left/Right; 82mm OD $43.71 2 $87.42
311405625B Wheel Bearing; Rear Inner Left/Right $6.39 2 $12.78
211405645D Wheel Bearing; Rear Outer; Left/Right $7.22 2 $14.44
4A0407615G Wheel Hub; Front Left/Right; 82mm Diameter $44.73 2 $89.46
8A0501641A Wheel Oil Seal; Rear Left/Right $2.41 2 $4.82
Parts Total: $702.04

Thread Starter
|
3rd Gear
Joined: Dec 2008
Posts: 1,941
From: IL


Yepp....and the Poly-drive socket bit I bought it from GermanAutoParts.com - $ 18, along with the throttle body gasket - $ 2.58 - $ 30 total including S & h.
Last edited by chefro; May 3, 2009 at 01:05 AM.
Thread Starter
|
3rd Gear
Joined: Dec 2008
Posts: 1,941
From: IL
I finally got around ordering the crank bolt along with some other stuff
- exhaust studs + nuts (replacing all of'em - on the heads and the exhaust - 18 total)
- the caliper retracting tool ($ 9.95 at ECSTuning)
- some silicone hoses - got some different color segments to still identify/troubleshoot them easier in the future.
- new oil drain plug (the magnetic one)
- 2 GKN outer CV boot kits (to freshen up the old joints when I'll replace'm - both will make for good spares rather than throwing them)
- 1 gal of VW blue antifreeze
- some other minute stuff
Now I need to get going with the reassembly of the camshaft and get the heads back on.
I dredge trying to get those old exhaust studs out, but I gotta do it. They are so rusted and half of'em came completely out...
Will report back again in a few days.
Last edited by chefro; May 10, 2009 at 01:04 PM.
Thread Starter
|
3rd Gear
Joined: Dec 2008
Posts: 1,941
From: IL
I finally got today some work done.
- Changed the trunk struts ($ 17/piece from AAz - Meistersatz brand); the trunk lid doesn't drop anymore, it also lifts as it should; took me a while to decompress the new ones about half of an inch to get'em in, but it was all worth it.
- Replaced two injector terminals that got broken ($ 7/piece)
- Replaced two coolant hoses; the section at the bottom of expansion tank, and the next section connected to the pipe running toward the T-stat housing.
- Unplugged the heater hoses and flushed the heater core. It still was some leftover crappy coolant on the lines.
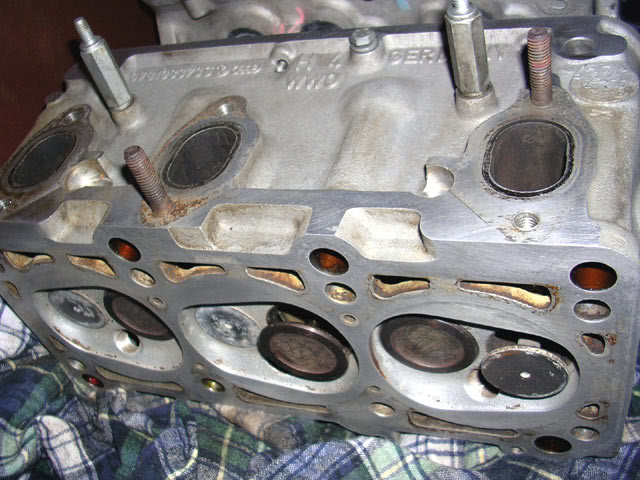
- Got the camshaft back on bank 1 and turned it back to where it was at "TDC" - Cylinder 1 intake and Cylinder 2 exhaust valves open.
Also replaced the camshaft seals on both banks and the cam plug on bank 1
Next in line is to put the heads back on, but I'll have to wait for the exhaust studs; also to finish replacing the vacuum hoses with the new silicone ones.
-
-
Assembly Grease on all the "moving" parts

-
Both heads are ready to go

-
Valves on cyl 1 and 2 are open again
-
-
-
Jim,
sorry for the "nagging".
How do you suppose to install those "shoulder" studs?
Do I have to tighten the nut in the "upper" (exposed) portion, put some threadlock on the bottom portion that goes into the head, and then thread it in using the already tighten nut?
Tks a lot, as usual.
- Changed the trunk struts ($ 17/piece from AAz - Meistersatz brand); the trunk lid doesn't drop anymore, it also lifts as it should; took me a while to decompress the new ones about half of an inch to get'em in, but it was all worth it.
- Replaced two injector terminals that got broken ($ 7/piece)
- Replaced two coolant hoses; the section at the bottom of expansion tank, and the next section connected to the pipe running toward the T-stat housing.
- Unplugged the heater hoses and flushed the heater core. It still was some leftover crappy coolant on the lines.
- Got the camshaft back on bank 1 and turned it back to where it was at "TDC" - Cylinder 1 intake and Cylinder 2 exhaust valves open.
Also replaced the camshaft seals on both banks and the cam plug on bank 1
Next in line is to put the heads back on, but I'll have to wait for the exhaust studs; also to finish replacing the vacuum hoses with the new silicone ones.
-
-
Assembly Grease on all the "moving" parts
-
Both heads are ready to go
-
Valves on cyl 1 and 2 are open again
-
-
-
Jim,
sorry for the "nagging".
How do you suppose to install those "shoulder" studs?
Do I have to tighten the nut in the "upper" (exposed) portion, put some threadlock on the bottom portion that goes into the head, and then thread it in using the already tighten nut?
Tks a lot, as usual.
4th Gear
Joined: Mar 2009
Posts: 3,042
From: Indiana
Usually you use a 'jam nut' - two nuts tightened against each other -for studs.
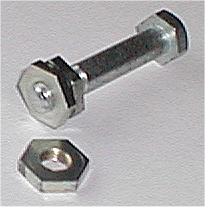
However, I wouldn't tighten the exhaust studs too tight. Usually using loc-tite finger tight (shoulder seated) plus 1/2 turn is good. Let the Lock-tite cure, then install the manifolds.
My backup on this
http://www.bmw2002faq.com/content/view/19/33/
However, I wouldn't tighten the exhaust studs too tight. Usually using loc-tite finger tight (shoulder seated) plus 1/2 turn is good. Let the Lock-tite cure, then install the manifolds.
My backup on this
Installing Exhaust Manifold or Header Studs
By John Aho
Studs are designed to be fitted only "finger-tight" into their threaded hole in a casting. However, a locking type of nut (PTN, or prevailing torque nut) is often specified to go on the stud. These two facts present an inherent dilemma. The grip of the PTN on the stud can easily turn the stud when you don't want it to (how often have you removed an exhaust manifold nut and had the stud come out at the same time?)
With this in mind, the installer may be tempted to over tighten the stud into the hole, to make certain it stays put. This mistake happens a couple of ways: Either the stud gets torqued after it bottoms in the hole, or the stud's shoulder (unthreaded section in between the threaded ends) jams into the surface at the edge of the hole. Some studs have no shoulder (all thread), and some holes have no bottom (through hole). This allows for another problem: with nothing to stop it, the stud can insert too deep.
So, why is it wrong to tighten the stud into the hole? Unfortunately, I have even seen it done by supposed "professionals". The way a stud can outperform a bolt in clamping efficiency has to do with the even distribution of stress across the engaged threads. If you torque a stud into a blind hole, you lose that benefit, and concentrate stresses at the first thread in the hole. If you torque the shoulder of a stud against the edge of a threaded hole, you lose the benefit & usually distort the mating surface. It's not as if there is a suitable bearing surface to take the load. Just don't do it.
Last edited by Midniteoyl; May 11, 2009 at 10:47 PM.

